background image


70  bright blue Installation Manual  


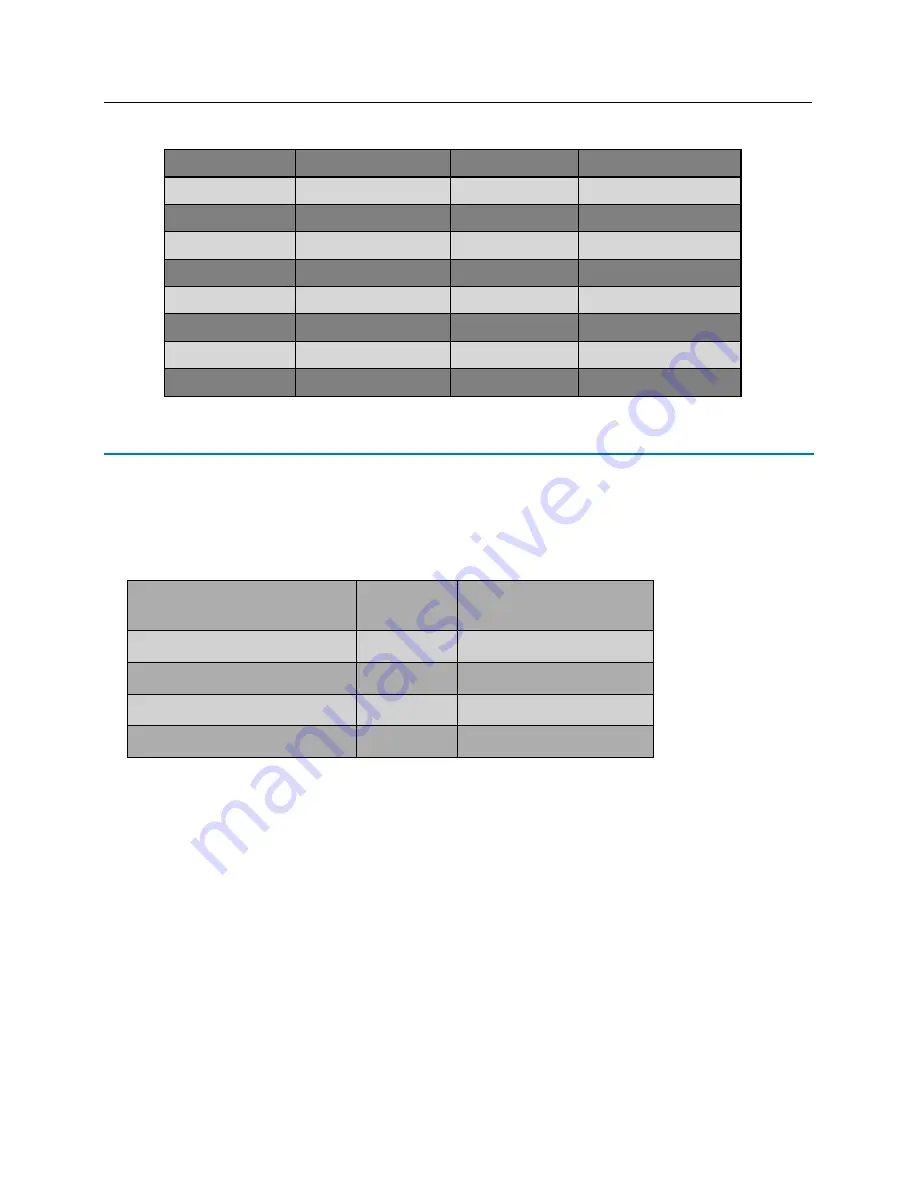
SBB-RI Address Chart 

SBB-RI Address


Jumper Locations


SBB-RI Address


Jumper Locations 

1 2 4 8 

1 2 4 

2 4 8 

10 

2 4  

1 4 8 

11 

1 4  

4 8 

12 

4  

1 2 8 

13 

1 2  

2 8 

14 

2  

1 8 

15 

1  

16 

None 

Connecting to Read Head 

The SBB-RI reader  interface  can communicate to many different read heads. Provided here are the pin outs for 
the most commonly used read-heads. The connection is different for each reader type.  See the Recommended 
Wire Chart below for the proper wire type and lengths. 

Recommended Wire Chart:  SBB-RI to Reader Head 

 
Connection


Maximum 

Distance (ft)


Cable Recommendation


SBB-RI to Magstripe Reader Head  

200 

22 AWG/5 Cond, Strd, Shld 

SBB-RI to Proximity Reader Head  

500 

22 AWG/5 Cond, Strd, Shld 

SBB-RI to Door Contact  

2000 

22 AWG/2 Cond, Strd, Shld 

SBB-RI to Exit Button 

2000 

22 AWG/2 Cond, Strd, Shld 

Abbreviations:


Cond. = Conductor 


Strd. = Stranded  


Shld. = Shielded  


Summary of Contents for bright blue

Page 1: ...VANDERBILT INDUSTRIES bright blue Manual...

Page 2: ...on contained in this manual is subject to change without notice and does not represent any commitment on the part of Vanderbilt Industries Vanderbilt Industries assumes no responsibility or liability...

Page 3: ...n Testing 14 Maintenance 14 Declaration of Conformity 15 Preface 16 Who should use this book 16 How this book is organized 16 Symbols and conventions 17 U S International Technical Support 17 Hours of...

Page 4: ...Layout 26 bright blue Pin Functions 26 Functions On AP02 Controller 29 bright blue LED Indicators 30 bright blue IP Configuration 30 Static IP Configuration Recommended 30 DHCP Configuration 37 brigh...

Page 5: ...netic Stripe Reader 56 Installing Diode for Lock Wiring Relay 56 VBB OBRI 57 Overview 57 Highlights 58 Features 58 Specifications 58 PIN Layout 59 PIN Functions 59 Reader and I O Assignment 61 Connect...

Page 6: ...es 74 Specifications 74 VBB NRI Enclosure 74 Features 74 Environmental conditions 75 Mounting 75 VBB NRI IP Configuration 75 Static IP Configuration Recommended 75 DHCP Configuration 80 Configuration...

Page 7: ...105 Factory Reset and Power down 107 Reboot 107 Power Down 107 Reboot and Reset to Default IP Address 107 Power Down and Reset to Default IP Address 107 Connecting to bright blue 108 Connecting to Rea...

Page 8: ...essing 119 Connecting to Read Head 120 Recommended Wire Chart VRI 1 to Reader Head 120 TB4 Reader Head Connections 121 XCEED ID XF 1050 Proximity Reader 121 Magnetic Stripe Reader 121 Installing Diode...

Page 9: ...ghlights 133 Features 134 Specifications 134 Enclosure 134 Features 134 Environmental conditions 135 Mounting the enclosure 135 PIN Layout 135 Configuration 136 PIN Functions 136 TB7 Power source 136...

Page 10: ...150 AD 400 Series Wireless Locks 151 WRI400 153 Wiring Instructions 154 Wiring between bright blue and PIM400 154 PIM400 Configuration 155 Log In to SUS 155 Pair to PDA 155 Set PIM400 Address 156 AD...

Page 11: ...GWE ENGAGE 193 LE Series Wireless Locks 194 GWE ENGAGE Gateway Wiring Instructions 196 GWE ENGAGE Gateway LE Lock and SMS Addressing 196 Configuring GWE ENGAGE Gateway and LE Locks 196 Allegion ENGAGE...

Page 12: ...guration 222 Viewing bright blue Transaction Alarms 228 Searching for bright blue Transaction Alarms 231 Troubleshooting 234 Overview 234 Device Communication 234 Device Addressing Issues 234 Wiring P...

Page 13: ...ID Corporate 1000 35 bit HID Corporate 1000 48 bit HID ProxIF 37 bit XceedID 40 bit XceedID 35 bit Note All interconnected devices panic hardware REX alarm devices door contacts computers wiring etc m...

Page 14: ...rsion VRI 2 Firmware vri2_appl_X_XX_XX aax X_XX_XX X XX XX firmware feature version UL Evaluated Firmware UL is evaluating firmware v5 0 0 Build 28 in the VBB UL has evaluated firmware g1_0 05 in the...

Page 15: ...blue and system components are installed log into the system and set up a cardholder with a credential and access Present that credential at read head to test A green LED indicates system is working M...

Page 16: ...8 EC Conforming Apparatus VBB Vanderbilt bright blue Reader Controller VBB NRI Vanderbilt bright blue Network Reader Interface VBB RI Vanderbilt bright blue Reader Interface Serial Numbers Serial Numb...

Page 17: ...I to peripheral devices Chapter 4 SBB RI Legacy Reader Interface Describes how to connect the Legacy SBB RI to bright blue and peripheral devices Chapter 5 VBB NRI Networked Reader Interface Describes...

Page 18: ...and events If not considered by the user it may cause damage to hardware or system data Bold Text in bold letters are used for window names button names etc Disclaimer Disclaimers provide information...

Page 19: ...uce more noise into the system Before installing the system verify that the correct UL Listed Power limited Power supplies capable of 4 hours standby power are available Remember to turn off all power...

Page 20: ...mmunications Fire Alarm Circuits UL 497B with a standard marked rating of 50 V Connection Max Distance Power ft Max Distance Communication ft Cable Requirement bright blue to VBB RI 4000 4000 18 AWG 2...

Page 21: ...ht blue has been tested on Apple Safari v13 1 running on the MacOS Catalina v10 15 4 operating system Any Apple Mac system with the recommended amount of memory for MacOS Catalina v10 15 4 will meet t...

Page 22: ...AD 300 Hardwired Lock AD 300 300mA 12 to 24VDC AD 400 Wireless PIM PIM400 485 VBB 300mA 12 to 24VDC AD 400 Wireless Lock AD 400 External Power Supply 300mA 12 to 24VDC ENGAGE Gateway GWE ENGAGE Gatew...

Page 23: ...Magstripe input It is a Linux application utilizing an atmel ARM926EJ S 32 bit processor with 400MHz CPU clock it also has 256 KB SRAM 256MB NAND Flash and 128MB SDRAM User access is via a network co...

Page 24: ...s received on Data Channel 1 left Power In Devices 1 8 Devices 1 9 to 1 16 send out same voltage as received on Data Channel 1 left Power In Devices 9 16 Devices 2 1 to 2 8 send out same voltage as re...

Page 25: ...er and communication to 8 devices Each row will be labeled for devices 1 8 and 9 16 respectively Each row of the RS 485 data channels provides either 12VDC or 24VDC to the connected devices depending...

Page 26: ...es Enclosure Installation bright blue Enclosure An enclosure with a hinged door and a lock is included with each bright blue system The flying leads of the tamper switch should be attached to a UL Lis...

Page 27: ...on Manual bright blue Pin Layout bright blue Pin Functions MAIN POWER IN VBB Power input for bright blue 12VDC or 24VDC Pin 1 is Pin 2 is POWER IN DEVICES 1 8 Power input for Channel 1 Devices 1 1 1 8...

Page 28: ...6 12VDC or 24VDC Pin 1 is Pin 2 is DEVICE 1 1 to Device 1 8 Communication and power for Channel 1 Devices 1 1 1 8 Receives power from POWER IN DEVICES 1 8 24VDC and 12VDC devices may be connected depe...

Page 29: ...y of Device 1 1 to 2 16 connections has been reversed from the Rev B controller If changing from the bright blue Rev B controller to newer bright blue controllers the positive and negative wires need...

Page 30: ...default Off 18 PASS 12V Reader Power Select 12 V Available to Reader Ports min 20 V in Input Power Passed Through to Reader Ports Verify Manufacturer Specifications for Reader Head Voltage Maximum 25...

Page 31: ...n instructions bright blue IP Configuration The IP address of bright blue has to be configured so that it can communicate with a web browser Configuration should occur after the controller is fully in...

Page 32: ...VBBIM09 33 20 v5 0 3 Chapter 1 bright blue 31 b Click on Control Panel The Control Panel window will open c Click on Network Connections The Network Connections window will open...

Page 33: ...and select Internet Protocol TCP IP f Click the Properties button The Internet Protocol TCP IP Properties window will open g Make a note of the existing settings These will need to be restored at the...

Page 34: ...network settings are now compatible with bright blue 3 Open a web browser 4 Go to http 192 168 168 250 a If dip switch 1 of S1 on the bright blue controller is in the ON position then this window will...

Page 35: ...34 bright blue Installation Manual 5 Log in a Enter User ID Default User ID is usr b Enter Password The default password is password c Click on the Log In button The bright blue main window will open...

Page 36: ...VBBIM09 33 20 v5 0 3 Chapter 1 bright blue 35 6 Click on the Utilities button on the left side of the screen The System Utilities window will open...

Page 37: ...way field Consult with network technicians to get an address that is compatible with the existing network 9 Click on the Manually configure DNS server addresses button a Enter a primary DNS server add...

Page 38: ...cessfully configured DHCP Configuration Configuring the bright blue controller to DHCP requires the Discovery and Configuration program This program is located on the CD that is included with bright b...

Page 39: ...Discovery and Configuration tool 3 Click on the On button to search for bright blue controllers 4 Edit the default values a Select which controller to configure b Click on the Device Configuration but...

Page 40: ...the new IP address and any bookmarks for bright blue will be invalidated Static IP is recommended for bright blue bright blue Date and Time Setup The date and time for bright blue has to be set up for...

Page 41: ...h 1 of S1 on the bright blue controller is in the ON position then this window will open s b This message is not an error and should be bypassed Click on Continue to this website not recommended c The...

Page 42: ...VBBIM09 33 20 v5 0 3 Chapter 1 bright blue 41 c Click on the Log In button The bright blue main window will open...

Page 43: ...Manual 5 Click on the Utilities button on the left of the main screen The System Utilities window will open 6 Click on the Set system date time and time zone button The Utilities System Date Time and...

Page 44: ...he time and date manually the Sync time with local PC button can be used Select the time zone from the Regional Time Zone list and click Save Changes Then click on the Sync time with local PC button a...

Page 45: ...be connected directly to the network card of the PC Network Connection Using a regular network cable the controller can be connected to a hub or switch that is on the same network as the PC 2 Run the...

Page 46: ...t the bright blue controller and click on the Device Configuration button The Device Configuration window will open 5 Click on the Clock tab 6 Click on the Set the Clock To button 7 Click on the Synch...

Page 47: ...lock 9 Close the Discovery and Configuration Tool Battery Replacement The bright blue controller uses a UL Listed CR2032 or equivalent 3V Lithium Coin Cell battery The battery should be replaced every...

Page 48: ...ace between bright blue and card readers The VBB RI offers a cost effective modular approach to access control system design Reader Interfaces can connect to a variety of different read head technolog...

Page 49: ...Limited Power Supply capable of 4 hours standby power Features Supports one read head credential Connects directly to the communication channels on the bright blue controller via RS 485 protocol Incl...

Page 50: ...ure An enclosure with a hinged door is included for each VBB RI The flying leads of the tamper switch should be attached to a UL Listed burglar alarm system or Listed local siren annunicator Features...

Page 51: ...sure Field Wiring It is recommended that you drill holes or punch the knockouts in the metal enclosure for field wiring before mounting the enclosure to the wall A non metallic sleeve is recommended t...

Page 52: ...te Serious damage may occur to the read head if this jumper is set incorrectly Please check the read head voltage requirements W10 VBB RI Reader Interface Addressing The address of the VBB RI is depen...

Page 53: ...er on pins 1 2 Pins Not Used W9 BKDG No jumper required for normal operation Connecting to bright blue Communication between the bright blue controller and a VBB RI reader interface is via RS 485 prot...

Page 54: ...BB RI Power Supply Pin 1 A Data A Pin 3 RXDA Data A Pin 2 B Data B Pin 2 TXDB Data B Pin 4 PWR Power Power Pin 1 GND Ground Ground Addressing the VBB RI W10 on the VBB RI consists of four jumpers that...

Page 55: ...pin outs for the most commonly used read heads The connection is different for each reader type See the Recommended Wire Chart below for the proper wire type and lengths Recommended Wire Chart VBB RI...

Page 56: ...ns XCEED ID XF 1050 Proximity Reader Proximity Read Head Pin Connections VBB RI Proximity Reader PIN 1 CLK DATA 0 GREEN Pin 2 DAT DATA 1 WHITE Pin 3 GND GROUND BLACK Pin 4 PWR POWER RED Pin 5 GRN LED...

Page 57: ...5 GRN LED ORANGE Pin 6 RED NOT USED Pin 7 BUZ NOT USED Pin 8 IBT NOT USED Installing Diode for Lock Wiring Relay A diode is supplied with the VBB RI which should be fitted across 12V and COM to prote...

Page 58: ...ew The VBB OBRI is an onboard Reader Interface between bright blue and card readers These 2 included Reader Interfaces can connect to a variety of different read head technologies supported by bright...

Page 59: ...interface Mounted directly on the bright blue Vanderbilt AP02 Controller Includes Two 2 amp form C single pole double throw mechanically latching relays total Connection for one multi color LED for ac...

Page 60: ...erface Connections Reader 1 OUT1 IN1 IN2 or alternately OUT1 OUT2 IN1 IN2 IN3 IN4 Reader 2 OUT2 IN3 IN4 or alternately not used PIN Functions 1 Power VIN is Power is Ground S is Chassis Ground 4 Relay...

Page 61: ...imum wire length of 2 000 feet 6 Contact Inputs 1 2 1 N O 2 N C C is Ground 5 Contact Inputs 3 4 3 N O 4 N C C is Ground 9 10 Read Head 1 Connection 1 is LED 2 is Not Used C is Not Used A is CLK Data...

Page 62: ...r and I O Assignment The VBB OBRI Supports 2 Door Configurations Single Door Control 2 Relays and 4 Contacts per door Dual Independent Door Control 1 Relay and 2 Contacts per door VBB OBRI Reader Inpu...

Page 63: ...read heads Provided here are the pin outs for the most commonly used read heads The connection is different for each reader type See the Recommended Wire Chart below for the proper wire type and lengt...

Page 64: ...0 PIN 1 LED LED ORANGE 10 PIN 2 NA NOT USED 10 PIN C NA NOT USED Magnetic Stripe Reader Magnetic Stripe Read Head Pin Connections VSRC A Magnetic Stripe Reader 9 PIN A CLK DATA 0 WHITE 9 PIN B DAT DAT...

Page 65: ...der Interface between bright blue and card readers The SBB RI offers a cost effective modular approach to access control system design Reader Interfaces can connect to a variety of different read head...

Page 66: ...channels on the bright blue controller via RS 485 protocol Includes Two 2 amp form C single pole double throw mechanically latching relay Connection for one multi color LED for access granted or acce...

Page 67: ...ing It is necessary to punch the knockouts in the metal enclosure for field wiring It is recommended that this is done before mounting the enclosure to the wall A non metallic sleeve is recommended to...

Page 68: ...Switch DOD Normally Closed Pin 3 is Push Button Override Normally Open Pin 4 is Auxiliary Input Normally Closed Pin 5 is Not Used Pin 5 is Not Used Pin 6 is Not Used Pin 7 is Not Used Pin 8 is Ground...

Page 69: ...ing to bright blue Communication between the bright blue controller and a SBB RI reader interface is via RS 485 protocol Any one of the Device connectors Device 1 1 through 2 16 on the bright blue con...

Page 70: ...ue SBB RI Power Supply Pin 1 A Data A Pin 2 RXDA Data A Pin 2 B Data B Pin 3 TXDB Data B Pin 1 PWR Power Power Pin 4 GND Ground Ground Addressing the SBB RI W2 on the SBB RI consists of four jumpers t...

Page 71: ...pin outs for the most commonly used read heads The connection is different for each reader type See the Recommended Wire Chart below for the proper wire type and lengths Recommended Wire Chart SBB RI...

Page 72: ...P3 SBB RI pin connections XCEED ID XF 1050 Proximity Reader Proximity Read Head Pin Connections SBB RI Proximity Reader PIN 1 CLK DATA 0 GREEN Pin 2 DAT DATA 1 WHITE Pin 3 GND GROUND BLACK Pin 4 PWR P...

Page 73: ...in 7 BUZ NOT USED Magnetic Stripe Reader Magnetic Stripe Read Head Pin Connections SBB RI Magnetic Stripe Reader PIN 1 CLK DATA 0 WHITE Pin 2 DAT DATA 1 GREEN Pin 3 GND GROUND BLACK Pin 4 PWR POWER RE...

Page 74: ...rked Reader Interface that communicates with bright blue via a network connection The VBB NRI offers a cost effective modular approach to access control system design Networked Reader Interfaces can c...

Page 75: ...bright blue See Cable Requirement Chart for details Standard Features Supports one read head credential Communicates with bright blue via network protocol at 10 100 Base T Connection for one multi co...

Page 76: ...ed mounting hardware Four 1 4 x 1 lag bolts To secure the VBB NRI enclosure use two screws through the openings provided on the cover Alternately a lock can be added using the provided punch out secti...

Page 77: ...al 2 Configure the PC s network settings to communicate with the VBB NRI a Click on the Start button b Click on Control Panel The Control Panel window will open c Click on Network Connections The Netw...

Page 78: ...window will open e Scroll down and select Internet Protocol TCP IP f Click the Properties button The Internet Protocol TCP IP Properties window will open g Make a note of the existing settings These...

Page 79: ...i Enter 192 168 168 200 into the IP address field j Enter 255 255 255 0 into the Subnet mask field k Click on the OK button The PC s network settings are now compatible with the default VBB NRI 3 Open...

Page 80: ...o the Default gateway field Consult with network technicians to get an address that is compatible with the existing network 7 Click on the Manually configure DNS server addresses button a Enter a prim...

Page 81: ...RI to DHCP requires the Discovery and Configuration program located on the CD that is included with bright blue To configure the VBB NRI with the Discovery and Configuration tool 1 Connect the PC runn...

Page 82: ...B NRI to configure If multiple VBB NRIs are discovered use the Serial Number to determine which to configure b Click on the Device Configuration button to open the Device Configuration window c Click...

Page 83: ...ollow the directions above for Static IP but select the DHCP configuration option and then use the Discovery and Configuration tool to find the IP address Configuration GUI Graphic User Interface Host...

Page 84: ...you enter the Primary DNS address Secondary DNS When Automatically obtained displays the Secondary DNS chosen by the DHCP server When Manually entered this is where you enter the Secondary DNS addres...

Page 85: ...ommunication are returned bright blue will need to reload the VBB NRI During this time the Power On option determines what state Relay 1 will be in Once the VBB NRI has been fully restored it will res...

Page 86: ...mally Open Pin 4 is Auxiliary Input Normally Closed Pin 5 is Ground P5 P6 Relay outputs The VBB NRI comes with two relay output Pin 1 Normally Open Pin 2 Normally Closed Pin 3 Common W4 Read head volt...

Page 87: ...the GUI Telnet Ping or the Discovery and Configuration Tool Pins 3 4 Not used at this time Pins 5 6 Not used at this time Pins 7 8 Not used at this time Warning After installation it is recommended th...

Page 88: ...section for details for them to communicate In addition a data surge protector needs to be installed between bright blue and the hub or switch Install the supplied data surge protector DITEK DTK MRJ45...

Page 89: ...ded Wire Chart below for the proper wire type and lengths Recommended Wire Chart VBB NRI to Reader Head Connection Maximum Distance ft Cable Recommendation VBB NRI to Magstripe Reader Head 200 22 AWG...

Page 90: ...A 1 WHITE Pin 3 GND GROUND BLACK Pin 4 PWR POWER RED Pin 5 GRN LED ORANGE Pin 6 RED NOT USED Pin 7 IBT NOT USED Magnetic Stripe Reader Magnetic Stripe Read Head Pin Connections VBB NRI Magnetic Stripe...

Page 91: ...s then required to complete the circuit This will be wired to NO or NC depending on lock type Fail Open Fail Closed diagram above shows Fail Open Upgrading Firmware With v10 and higher of the VBB NRI...

Page 92: ...s for the board to update to the latest firmware after the message is received Verifying Upgrade Checking Version Number Once the file has been successfully uploaded the user can verify the upgrade by...

Page 93: ...he G4 V00 10 section states that this is an VBB NRI v10 Additional Information The following information will vary depending on the version of the firmware that has been uploaded to the SRI For our ex...

Page 94: ...rface that communicates with bright blue via a network connection exactly like the previous generation VBB NRI The VBB NRI G2 offers a cost effective modular approach to access control system design N...

Page 95: ...from bright blue see Cable Requirement Chart for details Standard Features Supports one read head credential Communicates with bright blue via network protocol at 10 100 Base T Connection for one mult...

Page 96: ...ur 1 4 x 1 lag bolts To secure the VBB NRI G2 enclosure use two screws through the openings provided on the cover Alternately a lock can be added using the provided punch out section on the cover VBB...

Page 97: ...2 Configure the PC s network settings to communicate with the VBB NRI G2 g Click on the Start button h Click on Control Panel The Control Panel window will open i Click on Network Connections The Net...

Page 98: ...window will open k Scroll down and select Internet Protocol TCP IP l Click the Properties button The Internet Protocol TCP IP Properties window will open m Make a note of the existing settings These...

Page 99: ...ield q Click on the OK button The PC s network settings are now compatible with the default VBB NRI G2 3 Open a web browser 4 Go to https 192 168 168 249 to load the Configuration Application PW SECAd...

Page 100: ...lick on the Update button Make a note of the IP address as it will be used in the bright blue Door Setup section 9 Restore the network settings on the PC follow step 2 above to access the network sett...

Page 101: ...search for VBB NRI G2 4 Edit the default values a Select which VBB NRI G2 to configure If multiple VBB NRI G2s are discovered use the Serial Number to determine which to configure b Click on the Devi...

Page 102: ...ote of the IP Address it will be used in bright blue to configure the VBB NRI G2 5 Exit the Discovery and Configuration program The DHCP address of the VBB NRI G2 has been set Note The DHCP address ca...

Page 103: ...is used to access and setup the VBB NRI G2 using Dynamic DNS in conjunction with DHCP Consult with network technicians for details on setting up your network in this manner DHCP This setting sets up...

Page 104: ...il Secure will ultimately determine what effect the state of Relay 1 will have on the lock The examples below are assuming a Fail Secure installation Communication Failure Choose one of the options to...

Page 105: ...ration access PING and Auto discovery will also be disabled i e the Discovery and Configuration Tool will not be able to locate the VBB NRI G2 The VBB NRI G2 can still be accessed via SSH WinSCP or Pu...

Page 106: ...Reset Button activations Releasing the Tamper Switch will generate a two 2 second beep Access and log into the Configuration Application within ten 10 minutes select Options and reset Dipswitch 1 ON a...

Page 107: ...s Not Used A is CLK Data 0 B is DAT Data 1 is Ground is Power 8 10 Not Used 11 Not Used 19 Not Used 20 Not Used 21 Not Used 22 Not Used 23 Read Head Voltage Selector The VBB NRI G2 read head voltage s...

Page 108: ...ds The configured Network Settings IP Address etc will be retained on reboot Reboot and Reset to Default IP Address Press and Hold the VBB NRI G2 Reset Button 24 AND Tamper Switch 17 for five 5 to nin...

Page 109: ...section for details for them to communicate In addition a data surge protector needs to be installed between bright blue and the hub or switch Install the supplied data surge protector DITEK DTK MRJ4...

Page 110: ...d Wire Chart below for the proper wire type and lengths Recommended Wire Chart VBB NRI G2 to Reader Head Connection Maximum Distance ft Cable Recommendation VBB NRI G2 to Magstripe Reader Head 200 22...

Page 111: ...TE 9 PIN GND GROUND BLACK 9 PIN GND POWER RED 7 PIN 1 LED LED ORANGE 7 PIN 2 NA NOT USED 7 PIN C NA NOT USED Magnetic Stripe Reader Magnetic Stripe Read Head Pin Connections VBB NRI G2 Magnetic Stripe...

Page 112: ...is then required to complete the circuit This will be wired to NO or NC depending on lock type Fail Open Fail Closed diagram above shows Fail Open Upgrading Firmware The VBB NRI G2 firmware can only...

Page 113: ...the upgrade To check the version number 1 Launch the web configuration for the VBB NRI G2 https IPAddress and select Diagnostics after login 2 Select the About tab 3 Review the smsc and vnri lines wh...

Page 114: ...but utilizes the SMS M protocol Reader Interfaces can connect to a variety of different read head technologies supported by bright blue These include both Magnetic Stripe not evaluated by UL and Prox...

Page 115: ...o support a wide range of end of line resistor values Connection for one multi color LED for access granted or access denied indication Connector for one buzzer annunciator Specifications Board Dimens...

Page 116: ...wiring before mounting the enclosure to the wall A non metallic sleeve is recommended to protect the wiring where it enters the cabinet Mount the enclosure to the wall using the provided mounting hol...

Page 117: ...p downstream devices will not communicate with bright blue PIN Functions TB2 Power source and contact inputs Provides power to the VRI 1 from the bright blue 12 24 VDC 10 filtered power required Two s...

Page 118: ...RS485 communications activity Connecting to bright blue Communication between the bright blue controller and a VRI 1 reader interface is via RS 485 protocol Any one of the Device connectors Device 1 1...

Page 119: ...r and the VRI 1 remains via RS 485 protocol Any one of the Device connectors Device 1 1 through 2 16 on the bright blue controller can be used to communicate with TB1 on a VRI 1 Power will be supplied...

Page 120: ...rs that can be combined to set the address for the device RS 485 communications baud rate and enable encryption Record the jumper configured address of the VRI 1 and which channel it is connected to o...

Page 121: ...e See the Recommended Wire Chart below for the proper wire type and lengths Recommended Wire Chart VRI 1 to Reader Head Connection Maximum Distance ft Cable Recommendation VRI 1 to Magstripe Reader He...

Page 122: ...in Connections VRI 1 Proximity Reader PIN 1 GND GROUND BLACK PIN 2 BZR NOT USED PIN 3 LED LED ORANGE PIN 4 CLK D1 DATA 1 WHITE PIN 5 DAT D0 DATA 0 GREEN PIN 6 V0 POWER RED Magnetic Stripe Reader Magne...

Page 123: ...is supplied with the VRI 1 which should be fitted across 12V 24V and COM to protect the relay contacts A diode is used to eliminate the voltage spike seen across an inductive load when supply voltage...

Page 124: ...ng the SMS M protocol Reader Interfaces can connect to a variety of different read head technologies supported by bright blue These include both Magnetic Stripe not evaluated by UL and Proximity reade...

Page 125: ...ts with the ability to support a wide range of end of line resistor values Connection for one multi color LED for access granted or access denied indication Connector for one buzzer annunciator Specif...

Page 126: ...wiring before mounting the enclosure to the wall A non metallic sleeve is recommended to protect the wiring where it enters the cabinet Mount the enclosure to the wall using the provided mounting hole...

Page 127: ...oop downstream devices will not communicate with bright blue PIN Functions TB2 Power source and contact inputs Provides power to the VRI 1S3 from the bright blue 12 24 VDC 10 filtered power required T...

Page 128: ...5 communications activity Connecting to bright blue Communication between the bright blue controller and a VRI 1S3 reader interface is via RS 485 protocol Any one of the Device connectors Device 1 1 t...

Page 129: ...he VRI 1S3 remains via RS 485 protocol Any one of the Device connectors Device 1 1 through 2 16 on the bright blue controller can be used to communicate with TB1 on a VRI 1S3 Power will be supplied in...

Page 130: ...the address for the device RS 485 communications baud rate and enable encryption Record the switch configured address of the VRI 1S3 and which channel it is connected to on the bright blue controller...

Page 131: ...r wire type and lengths Recommended Wire Chart VRI 1S3 to Reader Head Connection Maximum Distance ft Cable Recommendation VRI 1 to Magstripe Reader Head 200 22 AWG 5 Cond Strd Shld VRI 1 to Proximity...

Page 132: ...UND BLACK PIN 2 BZR NOT USED PIN 3 LED LED ORANGE PIN 4 CLK D1 DATA 1 WHITE PIN 5 DAT D0 DATA 0 GREEN PIN 6 V0 POWER RED Magnetic Stripe Reader Magnetic Stripe Read Head Pin Connections VRI 1 Magnetic...

Page 133: ...is supplied with the VRI 1S3 which should be fitted across 12V 24V and COM to protect the relay contacts A diode is used to eliminate the voltage spike seen across an inductive load when supply voltag...

Page 134: ...he VRI 2 works similarly to the VRINX but utilizes the SMS M protocol and supports 2 card reader connections Reader Interfaces can connect to a variety of different read head technologies supported by...

Page 135: ...e double throw mechanically latching relays Eight supervised or unsupervised contact inputs with the ability to support a wide range of end of line resistor values when supervision is being used Conne...

Page 136: ...i e sheetrock Mount the cabinet in a secure but generally accessible location Mounting the enclosure Field Wiring It is recommended that you drill holes or punch the knockouts in the metal enclosure f...

Page 137: ...reader interfaces 16 VRI 2 boards if using both reader interfaces can be connected in this manner 8 VRI 2 per bright blue data channel Note Only identical protocol devices can be connected on the sam...

Page 138: ...PIN 1 is Data A TR PIN 2 is Data B TR TB1 TB5 Contact inputs The VRI 2 has eight supervised or unsupervised contact points plus cabinet Tamper and UPS Fault Monitoring contact inputs TB5 Device Type...

Page 139: ...VRI 2 has six relay outputs J15 Read head voltage selector 12 VDC is available on Reader Ports VIN 20 VDC VIN Passed Through to Reader Ports Serious damage may occur to the read head if this jumper is...

Page 140: ...OFF ON ON OFF ON OFF OFF OFF 10 OFF ON ON OFF ON OFF OFF ON 11 OFF ON ON OFF ON OFF ON OFF 12 OFF ON ON OFF ON OFF ON ON 13 OFF ON ON OFF ON ON OFF OFF 14 OFF ON ON OFF ON ON OFF ON 15 OFF ON ON OFF...

Page 141: ...on Override LED 8 IN8 Status Auxiliary Input Report Status of Lockdown Toggle LED TMP Cabinet Tamper LED PFL Power Fault LED R1 Reader 1 Activity LED R2 Reader 2 Activity LED K1 Relay 1 Energized LED...

Page 142: ...protocol is RS 485 to any of the communication channels on the bright blue controller Features Connects directly to the bright blue controller via RS 485 protocol to one of the communication channels...

Page 143: ...ntial Reader Technologies HID Proximity Credential Magnetic Stripe Credential J3 J4 RS 485 termination This jumper must be in place to enable communication between the AD300 lock and bright blue J1 Po...

Page 144: ...the AD 300 lock is connected to minus one number The Channel number is not affected by this Example The AD 300 lock is connected to the bright blue controller at Device 1 2 Channel 1 Address 2 then th...

Page 145: ...ternal Push Button on the AD 300 lock 11 While holding down the Internal Push Button click the Tamper Switch SW1 three times on the AD 300 lock The red LEDs in the Schlage button will flash 12 On the...

Page 146: ...85 to any of the communication channels on the bright blue controller Features Connects directly to the bright blue controller via RS 485 protocol to one of the communication channels Available with m...

Page 147: ...ies HID Proximity Credential Magnetic Stripe Credential JP1 RS 485 termination This jumper must be removed to enable communication between VIP and bright blue J3 Power source and communication Used to...

Page 148: ...communicate with J3 on a VIP lock The example below shows using Device 1 1 on the bright blue board and J3 on the VIP lock Data Communication and Power between bright blue and VIP bright blue VIP Pin...

Page 149: ...he VIP is connected to Device 2 10 Channel 2 Address 10 then the dip switches should equal 10 After the VIP has been connected to the bright blue controller make a note of the address This information...

Page 150: ...reless devices can be seamlessly integrated to your bright blue system The PIM400 485 VBB communicates directly to the bright blue controller via RS 485 protocol and can support up to 16 Schlage AD 40...

Page 151: ...g sections Panel Interface Module PIM400 485 VBB The PIM400 485 VBB can be integrated with the bright blue system it works in conjunction with the AD 400 Locks The PIM400 485 VBB module is hard wired...

Page 152: ...ight blue controller Supports 16 Wireless Devices No SRINX is required bright blue can support multiple PIM400 485 VBB AD 400 Series Wireless Locks Schlage AD 400 Series locks contain all of the eleme...

Page 153: ...t Temperature 35 C to 66 C Humidity 20 RH to 95 RH non condensing Power source The Schlage AD 400 lock uses 4 or 8 AA alkaline battery packs Optionally can be powered by 12VDC or 24VDC Operating volta...

Page 154: ...er Switch Door Status Monitoring Door Strike Relay Aux Relay and 2 Reader Head operation Inputs Request to Enter Request to Exit Door Position Switch Reader Tamper 1 Reader Tamper 2 Addressing Card fo...

Page 155: ...protocol Wiring between bright blue and PIM400 The PIM400 can receive power and data from channels 1 1 through 2 16 of bright blue as long as the channel it is connected to is receiving 12 to 24VDC Th...

Page 156: ...be ignored Initial set up of the PIM400 requires the following Login to SUS Pair to PDA Set PIM400 Address Log In to SUS You must log in to the Schlage Utility Software SUS located on the included PDA...

Page 157: ...lowest number available from 0 to 15 A maximum of sixteen 16 AD 400 Locks can communicate with a PIM400 module on the same channel with all reader types The address used by the PIM400 and AD 400 lock...

Page 158: ...l be set to 8 the next available number and the Low value will be set to 8 and the high value will be set to 13 In bright blue this PIM400 will be addressed at 8 and the AD 400 locks communicating wit...

Page 159: ...ine the PIM400 s address by clicking on the RS485 field this is where the PIM400 s address is set A numerical keypad will open at the bottom of the screen 7 Using the keypad set the address of the PIM...

Page 160: ...400 Locks to it and address them Once the lock has been addressed the user can test the connection using the Diagnostics section Linking Addressing Follow the steps bellow to link address an AD 400 lo...

Page 161: ...ding down the lever present a credential c The Schlage button will blink as will the Internal Push Button The lock is now in Linking Mode d Release Exit Request Lever 13 Once the Stop option is enable...

Page 162: ...3 Chapter 12 Schlage Adaptable AD 400 Series 161 3 Click on the Device Options button 4 Click on the Diagnostics option The Demo Mode window will open 5 Using the Select Door drop down select the doo...

Page 163: ...I400 2 Loosen the 4 screws and remove the WRI400 cover The Power LED should blink when the cover is off Note The WRI400 will send a tamper signal while the cover is off 3 Log in to the SUS software re...

Page 164: ...assword field Default password is 123456 5 Click the Login button The SUS program will open The bottom of the screen will say No Device Connected 6 Connect the HHD to the WRI400 using the supplied USB...

Page 165: ...blinks or green with very few red blinks Good link Solid red or fast red blinks Poor or no link Note The WRI400 will fail to link if it is not in RF range of the PIM400 Additional Configuration Once...

Page 166: ...the Heartbeat section of the Edit Tab 5 Change the default setting 10 Minutes to 1 second to allow for a Door Forced or Door Held Open transaction to be read by bright blue and activate the auxiliary...

Page 167: ...should look like the following image Correct Configuration 6 Click Save Configure Door Position Switch 1 Click on Device Options once the connection steps above have been followed and WRI400 is displa...

Page 168: ...167 Default Configuration 5 Change the default setting of the Door Position Switch option to Active open 6 Change the Delay option to 300 7 Change the Retry option to 7 When done the screen should lo...

Page 169: ...ver RS 485 via RSI protocol and can support up to 10 Schlage NDE or LE Series or wireless locks Specifications and guidelines for configuring the wireless devices are in the pages that follow Note For...

Page 170: ...d by the location of the NDE series locks maximum distance between Gateway and NDE series locks is 100 feet with which it will communicate wirelessly via Bluetooth Schlage NDE Series Wireless Modules...

Page 171: ...ard reader and a RF transceiver for communicating with a GWE ENGAGE Gateway or smart phone for configuration only The GWE ENGAGE Gateway interfaces to the bright blue reader controller via wired RS 48...

Page 172: ...cations UL 294 UL10C FCC Part 15 ADA RoHS Industry Canada IC ESD Protection 12KV Card formats Above specified card formats up to 255 bit Request to exit built in switch will be triggered from the acti...

Page 173: ...locks should start at that number Example A second Gateway is added to the system on the same channel as the example above There will be 5 NDE Locks communicating with the 2nd Gateway Addresses of the...

Page 174: ...onfusion Please refer to the latest Allegion ENGAGE documentation for sample screens Commission Configure GWE ENGAGE Gateway Open the ENGAGE app on the mobile device Login to the unique site using the...

Page 175: ...igh Door address see addressing section above Set the Gateway Low Door and High Door Addresses Click Save Commissioning is completed Click Disconnect The Gateway will now be displayed in the Connect t...

Page 176: ...als provided by Vanderbilt Open the Connect Devices Site Name screen Select the sign to initiate lock commissioning The Commission Device screen should display as indicated below Turn and release the...

Page 177: ...now appear in the Connect to Devices Site screen Configure Communications Delay and Retry Timing Select Connect and Configure Device Select Advanced Select Advanced RSI Acknowledge the Warning by Clic...

Page 178: ...fine Gateway 1 Open the Door Setup section by clicking on the Door Setup navigation button on the left side of the main screen 2 Click the Add doors and hardware button in the Installation and Configu...

Page 179: ...the Channel Number corresponding to the channel on the bright blue to which the Gateway is wired f Set the Gateway Address to match the address that is specified by the Allegion ENGAGE Mobile App Plea...

Page 180: ...ew Door Setup Edit Door Security System window will open The new lock will have all the same settings as the previous lock Rename the lock and complete any Notes if desired define the Channel and Addr...

Page 181: ...180 bright blue Installation Manual Locate the bright blue Controller to which the GWE ENGAGE Gateway is wired and double click to open the Device Configuration dialog...

Page 182: ...be retrieved from the Gateway and displayed The Discovery Tool will display all Addressing as required by bright blue ENGAGE Device Addressing is 0 based while Diagnostics Addressing is 1 based See GW...

Page 183: ...a timeout period of 15 seconds which is user configurable up to 30 seconds The Link button will become a counter for the Timeout period Once the timeout period expires the Link button will become Abo...

Page 184: ...teway and the Lock will exit Linking Mode Linking indicator gray Click Close once the COMM indicator displays green Clicking the Link button on a Lock that is already Linked and communicating with an...

Page 185: ...ion Manual The Lock will display communicating in the Available Locks dialog Repeat the above process to link additional NDE Locks to the selected Gateway Close the dialog once all desired NDE Locks a...

Page 186: ...Discovery Tool Define NDE Lock Note If using a Schlage NDE Wireless lock a GWE ENGAGE Gateway RS 485 must be programmed before continuing Please see the GWE ENGAGE Gateway RS 485 section above for mor...

Page 187: ...less from the drop down menus at the top 4 Click on the radio button to the left of the type of NDE Series Wireless Lock with ENGAGE lock to be set up 5 Click on the Continue button The Installation p...

Page 188: ...will open 7 Complete the Door Name and Notes fields 8 Select the Device Configuration tab in the bottom half of the screen 9 Define the following Reader Type options Standard Readers for any location...

Page 189: ...k re engages k Using the Door Held Open Detect Time drop down box define the amount of time a door can be held open after being unlocked by someone with Special Access before the system is alerted 13...

Page 190: ...oll over the information button with the mouse An information window will open showing the schedule of the selected time zone s Check the Apply 1st Person In Rule box to enable the 1st Person In Rule...

Page 191: ...ce box to enable email alerts for this door x Check the Use global alert notification default settings for this device box to use the global alert settings for this door see Utilities View of modify a...

Page 192: ...lick OK The pop up will close and a new Door Setup Edit Door Security System window will open This lock will have all the same settings as the previous lock Re name the lock and complete any Notes if...

Page 193: ...lue controller over RS 485 via RSI protocol and can support up to 10 Schlage NDE or LE Series wireless locks Specifications and guidelines for configuring the wireless devices are in the pages that fo...

Page 194: ...ance between Gateway and NDE series locks is 100 feet with which it will communicate wirelessly via Bluetooth Schlage LE Series Wireless Modules Gateway GWE ENGAGE The GWE ENGAGE works in conjunction...

Page 195: ...smart phone for configuration only The GWE ENGAGE Gateway interfaces to the bright blue reader controller via wired RS 485 Performance Credential verification time 1 second including lock actuation ti...

Page 196: ...e EV1 ST Microelectronics Texas Instruments Tag It Phillips I Code Wiegand output Certifications UL 294 UL10C FCC Part 15 ADA RoHS Industry Canada IC ESD Protection 12KV Card formats Above specified c...

Page 197: ...available address and its Low High range for the LE locks should start at that number Example A second Gateway is added to the system on the same channel as the example above There will be 5 LE Locks...

Page 198: ...ks Connect to bright blue and login with USR or another administrator account Define Gateway See Chapter 13 NDE Locks Link LE Locks to GWE ENGAGE Gateway See Chapter 13 NDE Locks the process is the sa...

Page 199: ...and Wireless from the drop down menus at the top 4 Click on the radio button to the left of the type of LE Series Wireless Lock to be set up 5 Click on the Continue button The Installation pop up win...

Page 200: ...pen 7 Complete the Door Name and Notes fields 8 Select the Device Configuration tab in the bottom half of the screen 9 Define the following Reader Type options Standard Readers for any location not us...

Page 201: ...e lock re engages b Using the Door Held Open Detect Time drop down box define the amount of time a door can be held open after being unlocked by someone with Special Access before the system is alerte...

Page 202: ...er the information button with the mouse An information window will open showing the schedule of the selected time zone b Check the Apply 1st Person In Rule box to enable the 1st Person In Rule If a d...

Page 203: ...ce box to enable email alerts for this door e Check the Use global alert notification default settings for this device box to use the global alert settings for this door see Utilities View of modify a...

Page 204: ...The pop up will close and a new Door Setup Edit Door Security System window will open This lock will have all the same settings as the previous lock Re name the lock and complete any Notes if desired...

Page 205: ...reless reader Overview Schlage wireless devices can be seamlessly integrated with the bright blue system The PIM SBB Legacy communicates directly to bright blue via RS 485 protocol and can support up...

Page 206: ...ntegrate with bright blue The Schlage wireless system contains two different types of modules One wireless panel interface module PIM Up to 16 wireless access point modules WAPM Wireless system block...

Page 207: ...Relock time Card format type Extended unlock Polarity of status signals Latch type Query intervals and quantity for unlock requests Cache mode Lock state in case of RF communication loss Relock action...

Page 208: ...ition switch sensor a card reader and an RF transceiver for communicating with another RF transceiver in a Panel Interface Module PIM which interfaces with bright blue Performance Verification Time Ty...

Page 209: ...or Thickness For doors 1 3 4 to 2 3 4 Latchbolt Available with either a latchbolt or 1 autobolt Door Position A door position monitoring circuit is available It monitors a integral reed type of switch...

Page 210: ...modules are powered locally with 12 VDC power supply The modules will transfer a bit stream up to 255 bits from one card reader with any Wiegand ABA or custom formatted outputs The WRI IN OUT 12VDC a...

Page 211: ...rect sequencing spread spectrum Frequency 902 928 MHz Data Rate 62 5 kbps half duplex Modulo 256 error detection Selectable channels 1 of 15 standard 5 groups of 3 increased interference immunity conf...

Page 212: ...a from channels 1 1 through 2 16 of bright blue as long as the channel it is connected to is receiving 12VDC The PIM receives power at J1 and data at J7 J7 has two pins for Data A and two pins for Dat...

Page 213: ...0 require any non wireless devices to start their addressing at 12 Device capacities PIM SBB Legacy modules Contact 1 PIM module Tamper state NC WAPM modules Relay 1 for the lock Relay 1 state will be...

Page 214: ...tration Tool 4 Download and save CDT executable Run wireless software 1 A folder will be created called WirelessDemo 2 Select WirelessDemo HTML and double click to open If the screen looks like the on...

Page 215: ...al Machine 8 Re boot the computer Internet Options You may now have to setup Java properly in Internet options for the CDT 1 Open WirelessDemo HTML 2 Select Tools Internet Options 3 Go to the Advanced...

Page 216: ...tab set the address of the PIM a If one PIM is being used per channel set the PIM Addr to 0 b If more than one PIM is being used per channel set the PIM Addr of each PIM to the lowest number in the a...

Page 217: ...e If multiple PIMs are being used on the same channel it is recommended that room be left in the addressing range for later expansion Example Channel 1 of bright blue will have two PIMs At time of ins...

Page 218: ...ransactions will display on the CDT software screen This indicates that the WRI reader has been addressed 8 Click on the Configuration tab This tab is used to set the Heartbeat First Delay Retry FC Mo...

Page 219: ...place When the Link process is completed the LED will stop and then blink Green slowly and a tone will be heard for a number of repetitions 6 Generate a transaction by presenting any card to the reade...

Page 220: ...Wireless Readers 219 10 Configuration of the lock is complete To set up another WA series lock follow steps 1 through 9 above Disconnecting WA Series Locks from the link mode 1 To disconnect lock from...

Page 221: ...or smaller VEVMS systems such as a system with only one VEVMS VBB DVR NVR installed it is recommended to use the Central Security Remote application to manage VEVMS Remote Client users Central Securit...

Page 222: ...VBBIM09 33 20 v5 0 3 Chapter 16 VEVMS VBB Video Server Integration 221 Cameras The following cameras are compatible with the VEVMS VBB Video Server...

Page 223: ...lation Manual Configuration To configure bright blue to work with an VEVMS DVR NVR follow these steps 1 On the VEVMS DVR NVR go to System Tools Advanced Settings Click the VBB Service tab and then cli...

Page 224: ...s window will open 3 Click on the bright blue Authentication button The bright blue Authentication window will open a Enter vanderbilt into the User Name field b Enter vanderbilt into the Password fie...

Page 225: ...res Before Event and No of Pictures After Event fields as well as the Number of Events in Select List if Shift Right Click in Video Control is desired Cameras configured to record based on bright blue...

Page 226: ...d show a red border around the camera when a bright blue transaction occurs This also enables the Shift Right Click feature in Video Control which will display a list of the last few bright blue trans...

Page 227: ...the camera list will appear on the right hand side 7 After making the initial connection the Time Zone and Date Time settings must be synchronized between bright blue and the VEVMS DVR NVR Go to Util...

Page 228: ...tinue to be synchronized regularly between bright blue and the VEVMS DVR NVR 8 The doors in bright blue must be linked with cameras on the VEVMS DVR NVR Go to Door Setup View or Modify Door Configurat...

Page 229: ...splay see the VEVMS Manual View Video from the Current Alarm When an alarm comes in the camera title bar will turn red and an Alarm Silence Acknowledge button will also appear in the upper right hand...

Page 230: ...utton is clicked holding down Shift and right clicking on a bright blue linked camera will display a drop down list of recent alarms The number of alarms shown in this list is defined in Video Server...

Page 231: ...Play5 window will appear The video associated with the transaction will play automatically VVTRPlay5 includes standard controls to Pause Fast Forward and Rewind the video transaction Any Meta Data ass...

Page 232: ...e Transaction Alarms Video can also be searched through based on bright blue transactions This is done through the standard Find utility in the Playback application by following these steps 1 Select t...

Page 233: ...nt Types and click OK 3 View the associated video in Playback It will appear like any other video event type VMD Contact Input etc except extra fields will appear listing any Meta Data associated with...

Page 234: ...VBBIM09 33 20 v5 0 3 Chapter 16 VEVMS VBB Video Server Integration 233...

Page 235: ...ressing Issues Wiring problems Device Addressing Issues If multiple RS 495 devices are given the same address on installation all or some of the devices will not work or will only work intermittently...

Page 236: ...en the system is rebooted as in the case of a power outage it takes a little time for the personnel database to reload During the reloading process the doors of the system will function normally howev...

Page 237: ...correct then the Lithium battery on the bright blue board needs to be replaced See the Battery Replacement section for details Slowly Losing Gaining Time If the time is either gaining or losing minute...

Page 238: ...GWE ENGAGE Gateway 173 197 Commission LE Series Locks 197 Compatible UL evaluated equipment 12 Configuration 115 125 136 222 Configuration GUI Graphic User Interface 82 102 Configuration Guidelines 24...

Page 239: ...ssing 172 196 H Hardware Not UL Evaluated 12 Highlights 23 48 58 65 74 94 113 123 133 Hours of Technical Support 17 How this book is organized 16 I Installation and Configuration Steps 24 Installing D...

Page 240: ...Layout 66 Schlage AD 400 Components 150 Schlage AD 400 Series Wireless modules 150 Schlage Adaptable AD 300 Series Locks 141 Schlage Adaptable AD 400 Series 149 Schlage LE Series Components 193 Schla...

Page 241: ...osure 49 VBB RI Pin Functions 51 VBB RI Pin Layout 50 Verifying Upgrade Checking Version Number 91 112 VEVMS VBB Video Server Integration 220 Viewing bright blue Transaction Alarms 228 VRI 1 113 VRI 1...

Page 242: ...Vanderbilt Industries 2 Cranberry Road Parsippany NJ 07054 vanderbiltindustries com VanderbiltInd 973 316 3900 Vanderbilt Industries 01014 1219...

Reviews: