


ZoomSHOT 30 Fixed Camera with QUSB, QMini, QDVI System or for AV Bridge MATRIX PRO
Page 26 of 73
C
ONTROLLING THE
Z
OOM
SHOT
30
C
AMERA
•
IR Remote:
The IR SHOT Commander Remote is the best way to control the camera in real time. The IR
remote controller can control the camera’s basic functions and enter the OSD (on-screen display) for more
advanced controls. The IR remote is a great way to control the camera in real-time.
The camera’s OSD menu
structure is listed below.
•
Web Interface (QUSB)
: The Quick-Connect USB
’s web interface auto-loads the control protocols of the
Vaddio camera attached (pretty cool huh?). Full camera controls including CCU (color correction unit) image
controls are available from any approved web browser on any computer. The IP address is always displayed
on the front panel display of the QUSB so access to the internal web pages is super easy.
•
Web Interface (QMini)
: The USB Mini
’s web interface auto-loads the control protocols of the Vaddio camera
attached. Camera set-up and controls are available to the administrator of the system from any approved
browser on any computer. The system has two modes; Video Streaming Mode and Web Control Mode. While
using the Web Control mode, the camera image is not available for preview. For this reason, the IR SHOT
Commander controlling the camera image through the OSD is the best way to control the camera in real time.
•
Web Interface (AV Bridge MATRIX PRO)
: A connected AV Bridge MATRIX PRO’s web interface auto-loads
the control protocols of the Vaddio cameras attached (which is pretty nifty). Full camera controls including CCU
(color correction unit) image controls are available from any approved web browser on any computer. The IP
address is always displayed under the Network Settings on the front panel display of the AV Bridge MATRIX
PRO so access to the internal web pages is a breeze.
•
Telnet Control (QUSB)
: The camera can be controlled through the Quick-Connect USB via Telnet session.
These exciting commands are listed at the back of the manual.
•
Telnet Control (AV Bridge MATRIX PRO)
: The camera can be controlled through the AV Bridge MATRIX
PRO via Telnet session. Those enticing commands are listed at the back of the AV Bridge MATRIX PRO
manual.
•
RS-232 Control (QUSB and QDVI):
An API is provided for control of the camera over RS-232 (commands in
the back of manual).
•
RS-232 Control (QMini):
Connecting the camera’s RS-232 port to the QMini allows user to control the camera
using operator input from the QMini web interface. If control of the camera with an external control device (like
a joystick) is desired instead,
the camera’s RS-232 port must be connected to the other device. A user cannot
have simultaneous serial control of the camera from both an external device and the QMini.
•
RS-232 Control (AV Bridge MATRIX PRO):
An API for Serial control of an AV Bridge MATRIX PRO and its
connected cameras is provided just for you at the back of the AV Bridge MATRIX PRO manual.
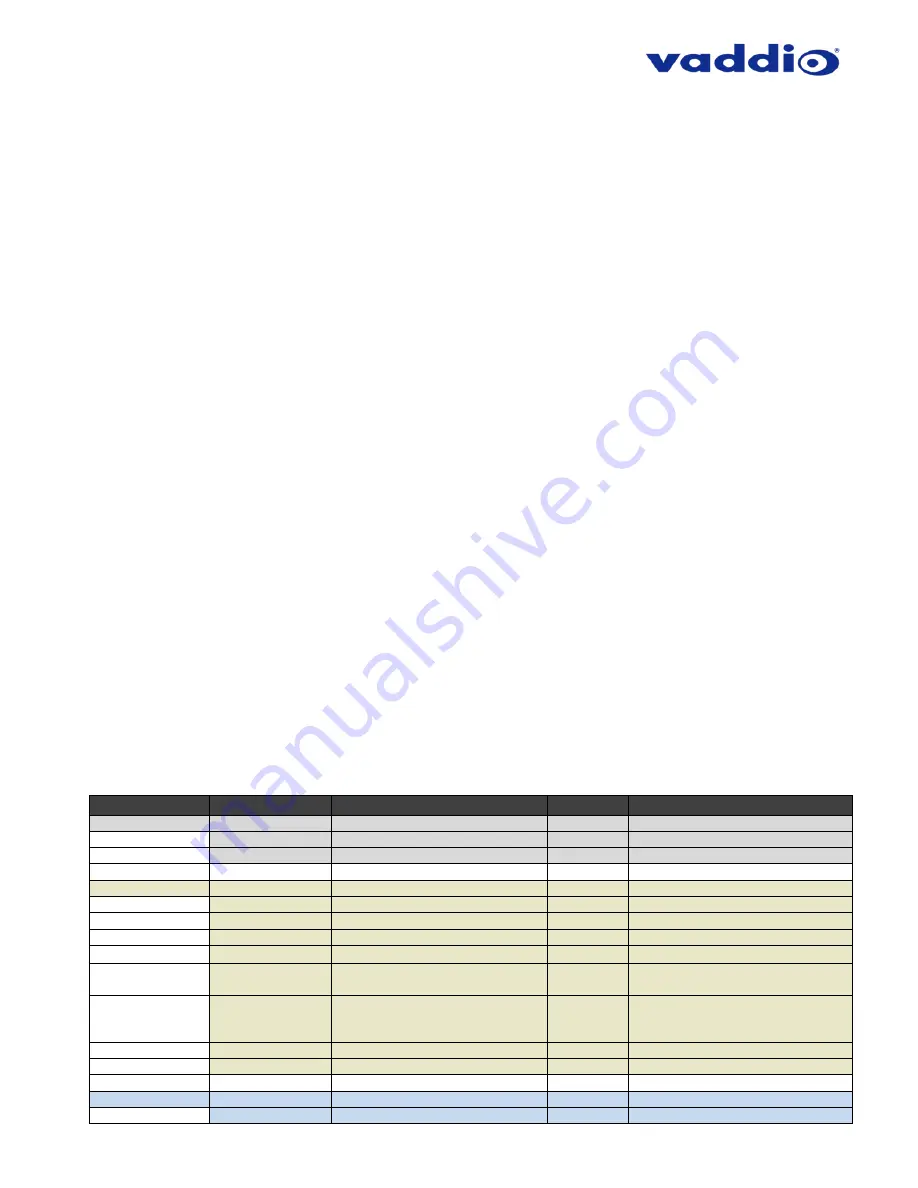
Table: ZoomSHOT 30 OSD Menu Structure
Use this OSD menu with the IR SHOT Commander Remote to make video adjustments (Picture, Color, Exposure,
etc…) on the ZoomSHOT 30 camera. Using the IR SHOT Commander Remote is an easy way to set the camera’s
color and overall picture attributes.
Menu
Controls
Range/Modes
Default
Notes
SSDR
OFF
OFF
Dynamic Range Adjustment
ON>
1 - 15
8*
*When Dynamic Range is ON
RETURN<
Return to Main Menu
WHITE BAL
ATW
ON
Auto White Balance - ON
MANUAL>
RED 0
– 1000
560
Adjust Red Level
BLUE 0
– 1000
480
Adjust Blue Level
RETURN<
Return to Main Menu
AWC
→
SET
One Push White Balance
OUTDOOR
Set to Outdoor when room has
direct sunlight and blue walls
INDOOR
Set to Indoor when fluorescent
lights start to cause color variation
in ATW mode
MERCURY
SODIUM
BACKLIGHT
OFF
OFF
WDR>
LEVEL (LOW / MIDDLE / HIGH)
MIDDLE
Wide Dynamic Range


