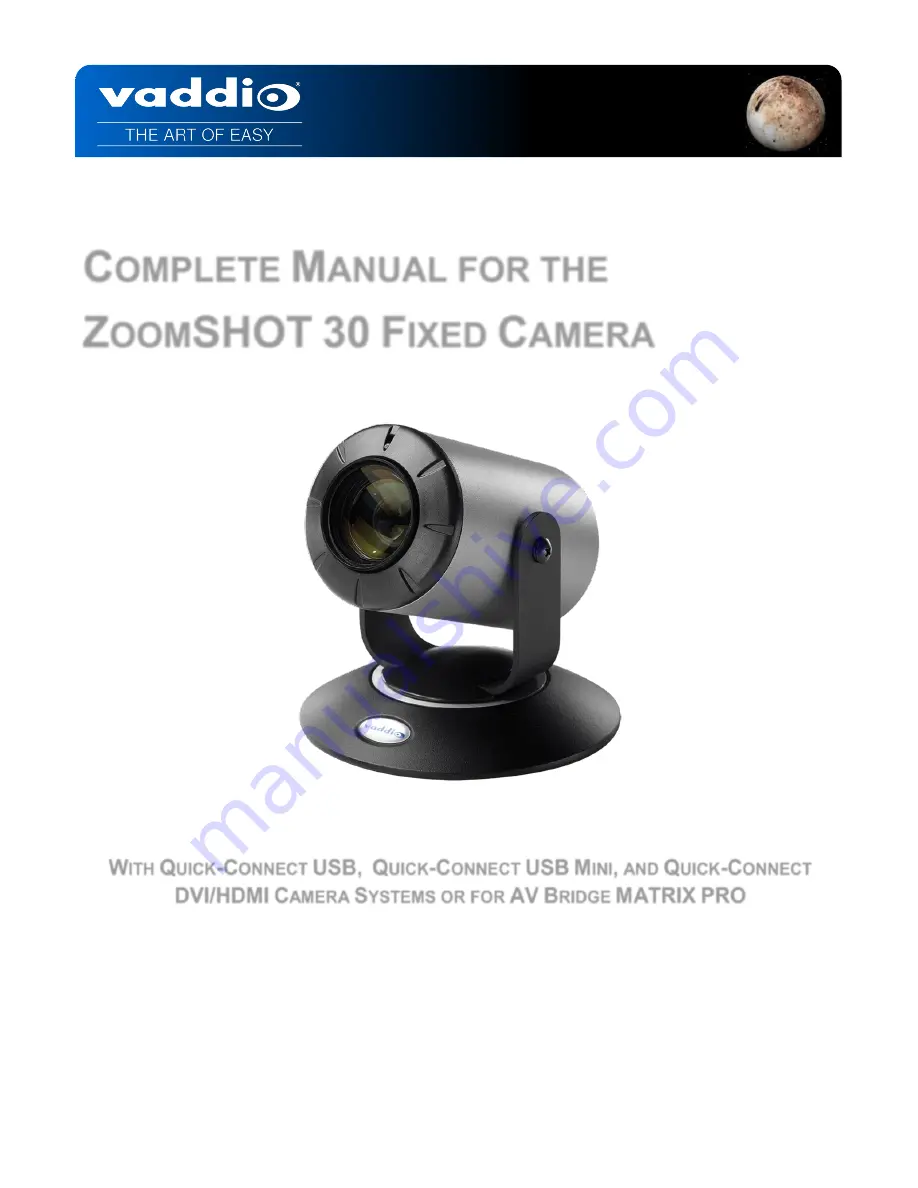
VADDIO ZOOMSHOT 30 Installation And User Manual Download Page 1


44=4 

 
C

OMPLETE 

M

ANUAL FOR THE


Z

OOM

SHOT


30


F

IXED 

C

AMERA


W

ITH 

Q

UICK

-C

ONNECT 

USB,


Q

UICK

-C

ONNECT 

USB


M

INI

,

 AND 

Q

UICK

-C

ONNECT 

DVI/HDMI


C

AMERA 

S

YSTEMS OR FOR 

AV


B

RIDGE 

MATRIX


PRO 


411-0032-30 Rev A 
January 2019 

Installation and User Guide 

Summary of Contents for ZOOMSHOT 30

Page 1: ... MANUAL FOR THE ZOOMSHOT 30 FIXED CAMERA WITH QUICK CONNECT USB QUICK CONNECT USB MINI AND QUICK CONNECT DVI HDMI CAMERA SYSTEMS OR FOR AV BRIDGE MATRIX PRO 411 0032 30 Rev A January 2019 Installation and User Guide ...

Page 2: ...eature Call outs 17 Back Panel with Feature Call outs 17 Basic Application Diagrams ZoomSHOT 30 QUSB System 18 Basic Connections ZoomSHOT 30 with QUSB No Network or PC Integration 18 Basic Connections ZoomSHOT 30 with QUSB USB 2 0 Streaming 19 Basic Connections ZoomSHOT 30 with QUSB IP Streaming 19 Basic Connections ZoomSHOT 30 with QUSB System with Audio and Video 20 Basic Application Diagram Zoo...

Page 3: ...Web Pages and Control 42 Quick Connect USB Mini Web Pages Tour 42 QMini Screen Shot Login 42 QMini Screen Shot Camera Control Page No Camera Detected 42 QMini Screen Shot User Menu Camera Control Page 43 QMini Screen Shot Admin Log in 44 QMini Screen Shot Admin Menu Camera Settings Page 45 QMini Screen Shot Admin Menu Streaming Page 47 QMini Screen Shot Admin Menu Room Labels 48 QMini Screen Shot ...

Page 4: ...and List 2 2 60 ZoomSHOT 30 Inquiry List 1 1 61 QUSB Telnet Command API 62 Telnet Command List 62 Compliance and CE Declaration of Conformity for ZoomSHOT 30 68 Compliance and CE Declaration of Conformity Quick Connect USB Interface 69 Compliance and CE Declaration of Conformity for USB Mini 70 Compliance and CE Declaration of Conformity Quick Connect DVI HDMI SR Interface 71 Warranty Information ...

Page 5: ...OT 30 also has an OSD on screen display for basic image control that s accessible with the IR remote The ZoomSHOT 30 QUSB System This system features the exciting and robust Quick Connect USB or QUSB Interface which was designed to have multi format digital and analog video outputs to be compatible with all Vaddio cameras with HSDS technology and include USB 2 0 or IP streaming outputs with a buil...

Page 6: ...sed in conjunction with a Vaddio AV Bridge MATRIX PRO Refer to the AV Bridge MATRIX PRO documentation for more information on this configuration and let the ZoomSHOT 30 AVBMP be part of your total room solution Intended Use Before operating the device please read the entire manual thoroughly The system was designed built and tested for use indoors with the power supply provided The use of a power ...

Page 7: ...ce 998 1105 038 One 1 24 VDC 2 08 A power supply One 1 US Power Cable One 1 6ft USB 2 0 cable Type A to Type B Four 4 Rubber feet for QUSB if not rack mounted One 1 Quick Start Guide for ZoomSHOT 30 QUSB ZoomSHOT 30 QUSB Camera System Europe UK Part Number 999 6930 101 One 1 ZoomSHOT 30 camera 998 6930 000 One 1 Vaddio IR Shot Commander Remote Two 2 AAA Batteries One 1 Thin Profile Wall Mount Two ...

Page 8: ... Vaddio IR Shot Commander Remote 998 2101 000 Two 2 AAA Batteries One 1 Thin Profile Wall Mount Two 2 1 5 8 Nylon self drilling drywall anchors Two 2 8 x 1 25 sheet metal screws Two 2 black oxide 20 x pan head screws One 1 Quick Connect USB Mini Interface 998 1105 039 One 1 24 VDC 2 08 A power supply One 1 US Power Cable One 1 6ft USB 2 0 cable Type A to Type B One 1 Quick Start Guide for ZoomSHOT...

Page 9: ...able One 1 3 position phoenix style connector Four 4 Rubber feet for QDVI if not rack mounted One 1 Quick Start Guide for ZoomSHOT 30 QDVI ZoomSHOT 30 QDVI Camera System Europe UK Part Number 999 6930 201 One 1 ZoomSHOT 30 camera 998 6930 000 One 1 Vaddio IR Shot Commander Remote Two 2 AAA Batteries One 1 Thin Profile Wall Mount Two 2 1 5 8 Nylon self drilling drywall anchors Two 2 8 x 1 25 sheet ...

Page 10: ...ide Part Number 999 6930 000 One 1 ZoomSHOT 30 camera 998 6930 000 One 1 Vaddio IR Shot Commander Remote Two 2 AAA Batteries One 1 Thin Profile Wall Mount Two 2 1 5 8 Nylon self drilling drywall anchors Two 2 8 x 1 25 sheet metal screws Two 2 black oxide 20 x pan head screws One 1 Quick Start Guide for ZoomSHOT 30 AVBMP ...

Page 11: ...IP switch 3 on the rear panel 3 The Yoke For manual pan and tilt Tilt range is 30 and Pan is limited to the service loop of the cabling 4 Really Cool Logo Badge RCLB The RCLB is affixed to the base in a recessed oval area 5 The Aluminum Base and Steel Cylindrical Body Please don t drop it on your foot it s fairly substantial Rear Panel Connections with Feature Call outs 1 RS 232 Port The RS 232 ac...

Page 12: ...eo Select A rotary switch allows the user to choose the HD output video resolution and format After setting or changing the resolution reboot the camera to ensure proper operation If an unassigned rotary selection position is chosen 9 A B C or D the camera will not output video Simply set the rotary switch to an assigned position to output video See rotary switch settings below Table ZoomSHOT 30 V...

Page 13: ...strength Compatible Cameras Ships with ZoomSHOT 30 and WideSHOT SE Compatible with all Vaddio HD PTZ cameras limited function set and most Sony BRC EVI cameras Power On Off Camera Standby Preset Button Setting Presets Move the camera into position Push and hold P STORE button Touch buttons 1 or 2 to set Preset OSD On Screen Display Menu Red LED indicates IR transmission and the brightness indicate...

Page 14: ...ce laptop or tablet users of UC conference systems Upon power up or power reset this display will indicate when the unit is in initialization mode 2 Power System Reset Switch The System Reset switch on the front panel is a blue back lit tactile switch that will illuminate when power is present at the rear power connector Pressing in and holding this switch will restart reinitialize the Quick Conne...

Page 15: ...the same as the HDMI output resolution SD video resolution Y C and CVBS formats are not supported by the Quick Connect USB interface however some progressive frame analog component SD video is supported 7 HDMI Output The digital video output on the HDMI connector can either be YCbCr color space normal HDMI mode or can be changed to DVI D color space sRGB for older monitors and devices The HDMI and...

Page 16: ...ouch will switch to web control mode and video will no longer pass This allows the administrator to set up the USB Mini with the embedded web pages and when the administrator is finished toggle back to UVC streaming mode for the end user It is highly unlikely that the end user will ever need access to the configuration web pages during use of the USB Mini b For resetting the USB Mini back to facto...

Page 17: ... RS 232 Control Input Camera control input from a Vaddio joystick controller or other controller 5 RS 232 Control Out to Camera Control signals to the camera 6 Daisy Chain Daisy Chain Control Emulation DCCE output to the next Quick Connect DVI HDMI SR interface 7 IR Output Forwards IR signals from the camera to third party equipment such as videoconferencing codecs Use the MOD signal if the IR is ...

Page 18: ... Bridge MATRIX PRO Basic Connections ZoomSHOT 30 with QUSB No Network or PC Integration ZoomSHOT 30 POV Manual Camera shown with the Quick Connect USB Interface video application Quick Connect USB Interface Rear Panel 24VDC 2 08 Amp Power Supply HD Monitor Simulated HD Video Feed HDMI or DVI D Video ZoomSHOT 30 Rear View EZ POWER VIDEO Cat 5 Cable orange to orange Video Power RS 232 Cat 5 Cable bl...

Page 19: ...ance HDMI Near End Room Monitor Simulated Video Feed Host PC with Browser for Control and UC Application IP Network Ethernet PC Video Far End Video Monitor Simulated Video Feed USB 2 0 MJPEG Video Using Standard UVC Drivers EZ POWER VIDEO Cat 5 Cable orange to orange RS 232 Cat 5 Cable blue to blue ZoomSHOT 30 Camera With Mount PC with Browser for Control and UC Application Parakeet not included E...

Page 20: ...ith Browser for Control and UC Application to connect to PC A on other side Ethernet B Video Power and Control Two Cat 5 Cables Up to 150 45 72m ZoomSHOT 30 Camera With Mount Ethernet IP Control from either PC Quick Connect USB Interface Ethernet USB 2 0 UVC Video Legend USB UVC Video USB UAC Audio IP Web Page Control UC Application USB 2 0 UAC Audio PC A with Browser for Control and UC Applicatio...

Page 21: ...Distance up to 150 15 26m ZoomSHOT 30 Camera RS 232 Cat 5 blue to blue Video from Camera Power to Camera EZ POWER VIDEO Cat 5 orange to orange 24 VDC 2 08 Amp Power Supply USB 2 0 Connected to Front Panel Quick Connect USB Mini Rear Panel above Front Panel below HD Video HDMI DVI or RGBHV Extension of PC Video to Room Monitor Room Monitor Simulated video feed Laptop with UC Application USB 2 0 UVC...

Page 22: ...mSHOT 30 with QDVI with Vaddio Joystick Two 2 Cat 5 5e 6 Cables Distance up to 150 15 26m ZoomSHOT 30 Camera RS 232 Cat 5 blue to blue EZ POWER VIDEO Cat 5 orange to orange 24 VDC 2 08 Amp Power Supply Quick Connect DVI HDMI Rear Panel HDMI or DVI video HD Monitor Simulated HD video feed Power to Camera Video from Camera PCC Premier Joystick Controller RS 232 Cat 5 ...

Page 23: ...at 5 5e 6 Cables Distance up to 150 15 26m ZoomSHOT 30 Camera RS 232 Cat 5 blue to blue EZ POWER VIDEO Cat 5 orange to orange AV Bridge MATRIX PRO HDMI video Near End Video Simulated HD video feed Power to Camera Video from Camera USB 2 0 UVC Video and UAC audio Microphone input Speaker Output Far End Video to large monitor Simulated video feed Host PC with Browser for control and UC Application P...

Page 24: ...to be mounted on a 1 gang wall box use the screws supplied with the wall box cover plate to attach the Thin Profile Wall Mount If mounting to the drywall with wall anchors use two quality wall anchors The mount provides for easy leveling Pull the Cat 5 cables though the wall and feed the cables through the back of the mount Level the mount and tighten the mounting screws Step 2 Using the HD VIDEO ...

Page 25: ...rd party software Consult Connecting the ZoomSHOT 30 to the PC and Program of Choice for more streaming information For QMini Systems Connect a USB 2 0 Type A male to USB Type B male cable from the USB Type B jack of the QMini to the USB 2 0 Type A port on the laptop or PC The Quick Connect USB Mini should show up on the connected computer as a UVC video USB 2 0 peripheral and the USB stream can b...

Page 26: ...Bridge MATRIX PRO so access to the internal web pages is a breeze Telnet Control QUSB The camera can be controlled through the Quick Connect USB via Telnet session These exciting commands are listed at the back of the manual Telnet Control AV Bridge MATRIX PRO The camera can be controlled through the AV Bridge MATRIX PRO via Telnet session Those enticing commands are listed at the back of the AV B...

Page 27: ...cture results ZOOM POS INIT AUTO MANUAL x1 x32 OFF OFF Sets initialization zoom position USER PRESET ON 1 128 OFF OFF Do not use LENS INIT MANUAL AUTO Day 1 7 MANUAL Selecting this begins a lens initialization RETURN Returns to the main menu EXPOSURE BRIGHTNESS 0 100 50 IRIS AUTO AUTO MANUAL IRIS F No F1 6 Close F1 6 RETURN Returns to EXPOSURE menu SHUTTER ESC ESC Rec left on default settings MIN ...

Page 28: ... WHITE Changes the color of the On Screen Display Menu LANGUAGE ENGLISH KOREAN JAPANESE CHINESE FRENCH GERMAN SPANISH ITALLIAN RUSSIAN PORTUGUESE ENGLISH Changes the language that the On Screen Display Menu is shown in RETURN VIDEO OUT FORMAT FORMAT Video resolution Use the rear rotary to set do not change here CVBS ON OFF OFF COMPONENT ON OFF ON Do not change ADJUST Executes changes in this menu ...

Page 29: ... or interfaces This may introduce changes in the way that they interact with UVC standards based or MJPEG video sources on your existing hardware Vaddio provides a continuing research and development effort to ensure compatibility with other manufacturer s products If incompatibilities are found contact our Support team and they will investigate for possible solutions USB 2 0 UVC Driver Compatibil...

Page 30: ... depending on the age of the computer you may need a cross over network cable Either way the steps are the same for network or direct connection to a computer The default address of the QUSB camera is 169 254 1 1 and the Subnet mask is 255 255 0 0 Different computer OS types all have their own way of doing things without question but they are essentially doing the same stuff changing the IP addres...

Page 31: ... Shot Camera Control Page No Camera Detected The No Camera Detected window will appear if the Quick Connect USB has no communication with the camera Check the camera power and serial connections if no camera is found within 30 seconds of initialization The QUSB controls the camera over the serial connection ...

Page 32: ...p up dialog box To set presets set up the camera shot click on choice of preset number 1 through 12 The preset is stored and the dialog box closes 4 Camera Presets Twelve 12 presets can be recalled simply by clicking a preset number 5 CCU Scenes The user has access to the CCU scenes set and stored by the Admin There are three 3 user definable presets and six 6 presets preconfigured by the technica...

Page 33: ...ot Admin Log in By selecting the Admin Menu Bar the Admin Login password pop up window will appear and await the entry of the password By entering the Admin menus 9 more menu keys appear on the left side of the screen The default Admin Account password is password The default Admin Account password is password ...

Page 34: ...ronment set the CCU presets and make startup assignments 1 Load Preset at Startup Check this box to move the camera to a predefined preset location that the camera moves to when the QUSB powers up Use the pull down menu to select the Preset 1 through 12 to be loaded when this box is checked 2 Load CCU Scene at Startup Check this box to load a CCU color correction unit Scene into the camera when th...

Page 35: ...djustment slider as required for amount of Red Gain desired A numeric value will be displayed in the box to the right of the slider Blue Gain Move the adjustment slider as required for amount of Blue Gain desired Numeric value will be displayed in the box to the right of the slider Detail Move the adjustment slider as required for amount of detail Aperture desired Numeric value will be displayed i...

Page 36: ...olors are more vibrant and precise 4 IP Streaming Settings The Video Settings allow the selection of the target performance for the IP Streaming The QUSB is set up for a variable bit rate and the user can select the video resolution and the quality such as High Quality Best Standard Quality Better and Low Bandwidth Good Every effort to eliminate stupefyingly bad combinations with the 5 or 6 parame...

Page 37: ...s appear on every page at the top middle of the page Simply enter the room information and click Save QUSB Screen Shot Admin Menu Networking DHCP Configuration Under the Networking menu the Network Configuration and Network Interfaces are displayed This is where the Network administrator assigns either DHCP or a Static address and the associated parameters The QUSB is set to DHCP by default MAC Ad...

Page 38: ...ws the Admin to create or update the user password and update the default or current admin password Updating the user password for the first time will create a secure login page when the web interface is first brought up The default admin password is password The Network administrator can reassign the user name and password as well as the admin password There is only one user password and one admi...

Page 39: ...hnical support team diagnose issues with the QUSB and the attached camera QUSB Screen Shot Admin Menu System Menu The System Menu is where the Firmware Updates are performed There will be firmware updates and upgrades over the life of the Quick Connect USB The file for the firmware update is chosen in this menu and the update is started here too A remote system Reboot and Restore to Factory Settin...

Page 40: ...Confirmation After clicking on Begin Firmware Update a confirmation pop up and warning will be displayed Please contact Vaddio Technical Support for assistance with updates if required Please read and completely understand the pop up warnings as it is easy to lose patience waiting for updates Click on continue to start the update ...

Page 41: ...e load Again please don t interrupt the firmware load QUSB Screen Shot Admin Menu Help Service Help information can be found under the Help menu Phone numbers and e mail to contact Support are listed here A direct link to our online support resources like manuals FAQ s and firmware files is also available TECHNICAL SUPPORT NOTE Please work with your Network Administrator prior to calling Vaddio fo...

Page 42: ...user s camera control page at one level and an administrator s management tool at another level which requires password authentication for access The Login Page will appear if there is a user name assigned by the administrator The administrator can set the password for the User account If no user password is assigned the web page will automatically open to the camera control page when the USB stre...

Page 43: ...p up dialog box To set presets set up the camera shot click on choice of preset number 1 through 12 The preset is stored and the dialog box closes 4 Camera Presets Twelve 12 presets can be recalled simply by clicking a preset number 5 CCU Scenes The user has access to the CCU scenes set and stored by the Admin There are three 3 user definable presets and six 6 presets preconfigured by the technica...

Page 44: ... By entering the Admin menus 9 more menu keys appear on the left side of the screen The default Admin password is password Cancel and Save Buttons Note At the bottom of each of the admin menus there is a Cancel and Save button Please click on the Save button before exiting each web page if the changes made require retention Otherwise hit Cancel to delete any changes made to the page while exiting ...

Page 45: ...orrection unit Scene into the camera when the QUSB powers up The pull down menu will allow the selection of one of the 6 factory scenes or any of the 3 user defined scenes 3 CCU Scenes Click on any of these 9 buttons to load one of the CCU scenes into the camera These scenes can be fine tuned if changes are needed and stored into any of the three admin defined scenes 4 Color Settings When painting...

Page 46: ...ic value will be displayed in the box to the right of the slider Detail Move the adjustment slider as required for amount of detail Aperture desired Numeric value will be displayed in the box to the right of the slider Note If the detail is too high the video can look grainy and appear wicked noisy Chroma Move the adjustment slider as required for the amount of Chroma Color Vibrancy desired A nume...

Page 47: ... Space The UVC drivers will negotiate the color depth but this parameter allows the user to reduce the color depth to 4 2 0 which is used with the older cheaper webcams and applications where image quality is not as critical The 4 2 2 color is used by many applications that take advantage of the performance of the camera where the colors are more vibrant and precise 4 When finished setting up the ...

Page 48: ...n a per USB Mini basis The labels appear on every page at the top middle of the page Simply enter the room information and click Save QMini Screen Shot Admin Menu Networking Under the Networking menu the Network Configuration page displays the Hostname of the device The USB Mini uses Ethernet over the USB port The MAC Address is unique the IP address is set to 169 154 1 1 and the Subnet Mask set t...

Page 49: ...e Admin to UPDATE user PASSWORD and UPDATE admin PASSWORD The default user password is password The default admin password is also password The Network administrator can reassign the user name and password as well as the admin password There is only one user password and one admin password at any given time If changes are made click on Save to store the change ...

Page 50: ...stic log This may help the Vaddio technical support team diagnose issues with the USB Mini and the attached camera QMini Screen Shot Admin Menu System Menu The System Menu is where the Firmware Updates are performed There will be firmware updates and upgrades over the life of the Quick Connect The file for the firmware update is chosen in this menu and the update is started here too ...

Page 51: ... Confirmation After clicking on Begin Firmware Update a confirmation pop up and warning will be displayed Please contact Vaddio Technical Support for assistance with updates if required Please read and completely understand the pop up warnings as it is easy to lose patience waiting for updates Click on continue to start the update ...

Page 52: ... PRO Page 52 of 73 QMini Screen Shot Admin Menu Update in Progress After the firmware load has been started a pop up screen will advise patience and notify in terms of a percentage completed the progress of the firmware update load Again please don t interrupt the firmware load ...

Page 53: ...und under the Help menu Support phone numbers and e mail manuals FAQ s and System information is listed on this page Have this page open when calling Vaddio Tech Support TECHNICAL SUPPORT NOTE Please work with your Network Administrator prior to calling Vaddio for technical support Please have on site network personnel initiate tech support calls with Vaddio only ...

Page 54: ...ibed earlier through the Quick Connect device s web interface Make a test call to ensure the system is working properly VLC Media Player Example 1 Same first step as above 2 Open VLC Media Player and perform the following steps a Click on the Media menu drop down to Open Capture Device and click it b Under Device Name go to the Video Device Name drop down and choose USB Video Device c Under Option...

Page 55: ...Output Resolution Settings Thin Profile Wall Mount 535 2000 237 included Black powder coating sized to fit on 1 gang wall box or with supplied drywall fasteners User Controls IR SHOT Commander and RS 232 for control on screen display OSD for configuration Materials Weight Aluminum Steel Weight 2 75 lbs 1 25kg Dimensions Tube 3 76 2mm Diameter x 4 75 120 65mm Long Base 5 5 139 7mm Diameter Overall ...

Page 56: ... 60 91 4mm H x 4 48 113 8mm W x 1 25 31 75mm D Weight 1 1 lbs 0 5Kg Accessories 6 1 83m USB 2 0 Type A Male to USB Type B Male cable included 24 VDC 2 08 Amp Switching Power Supply with AC Cord Set included Two 2 Cat 5 cables not included unknown length requirement Operating Temperatures 0 C to 40 C 20 to 80 Relative Humidity Quick Connect USB DVI HDMI SR QDVI Interface Quick Connect System Quick ...

Page 57: ...es on the product wipe with a clean soft cloth Use a lens cleaner on the lens OK Do not use any abrasive chemicals Operating and Storage Conditions Do not store or operate the device under the following conditions Temperatures above 40 C 104 F or temperatures below 0 C 32 F High humidity condensing or wet environments In inclement weather In swimming pools or wishing wells Dry environments with an...

Page 58: ... and can only be processed by these interfaces Camera RS 232 RJ 45 Connector Pin out Quick Connect USB and Quick Connect DVI HDMI DE 15 Connector Pin out Analog Component YPbPr Pin Signal Pin 1 Power Pin 2 Power Pin 3 Y Pin 4 PB Pin 5 PB Pin 6 Y Pin 7 PR Pin 8 PR Pin Camera Pins Pin 1 N A Pin 2 N A Pin 3 N A Pin 4 IR Output Not Used with QUSB QMini or AVBMP Pin 5 IR GND Not Used with QUSB QMini or...

Page 59: ...le AutoFocus ManualFocus Auto Manual Direct 8x 01 04 08 00 FF 8x 01 04 08 02 FF 8x 01 04 08 03 FF 8x 01 04 08 2p FF 8x 01 04 08 3p FF 8x 01 04 38 02 FF 8x 01 04 38 03 FF 8x 01 04 38 10 FF 8x 01 04 48 0p 0q 0r 0s FF pqrs Focus position CAM_WB Auto Manual Indoor Outdoor One Push WB 8x 01 04 35 00 FF 8x 01 04 35 05 FF 8x 01 04 35 01 FF 8x 01 04 35 02 FF 8x 01 04 35 03 FF CAM_RGain Reset Up Down Direc...

Page 60: ... No Support No Support GMA Enhance Gamma 8x 01 7E 54 00 00 0p 0q FF pq Gamma 0x00 0x10 CRM Enhance Chroma 8x 01 7E 55 00 00 0p 0q FF pq Chroma 0x00 0x64 KNE Enhance Knee No Support No Support DIS Enhance Digital Image Stabilizer 8x 01 7E 57 02 FF 8x 01 7E 57 03 FF On Off SNR Enhance Super Noise Reduction 8x 01 7E 58 02 FF 8x 01 7E 58 03 FF On Off AGC Enhance AGC Mode 8x 01 7E 59 00 FF 8x 01 7E 59 ...

Page 61: ...reset 0 0xf CAM_IDInq 8x 09 04 3F FF y0 50 0p 0q 0r 0s FF pqrs 0x0000 0xFFFF CAM_ReceiveInq 8x 09 06 08 FF y0 50 02 FF y0 50 03 FF On Off CAM_LR_Reverse 8x 09 04 61 FF y0 50 02 FF y0 50 03 FF On Off TallyInq 8x 09 7E 01 0A FF y0 50 02 FF y0 50 03 FF On Off BLK Enhance No support No Support Pedestal GMA Enhance 8x 09 7E 54 FF y0 50 00 00 0p 0q FF pq Gamma 0x00 0x10 CRM Enhance 8x 09 7E 55 FF y0 50 ...

Page 62: ...and appended with VT100 string ESC J HEX 1B 5B 4A Vaddio Command lines are terminated on carriage return After the carriage return the VT100 appends with ESC J Note Most terminal programs automatically strip the VT100 string General format usage follows a get set structure Usage examples for each type are Set Example Get Example Syntax Error Example COMMAND camera pan right RESPONSE OK COMMAND str...

Page 63: ...p DESCRIPTION Use the ICMP protocol s mandatory ECHO_REQUEST datagram to elicit an ICMP ECHO_RESPONSE from a host or gateway ECHO_REQUEST datagrams have an IP and ICMP header followed by a struct timeval and then an arbitrary number of pad bytes used to fill out the packet OPTIONS count Stop after sending count ECHO_REQUEST packets With deadline option ping waits for count ECHO_REPLY packets until...

Page 64: ...8 116 Netmask 255 255 255 0 Gateway 10 10 8 100 Returns the current network settings for mac addres ip address netmask and gateway Streaming Mode NAME streaming mode Gets or sets the current streaming mode SYNOPSIS streaming mode get usb ethernet DESCRIPTION Method used to get or set the current streaming settings OPTIONS get Get the current streaming mode usb Set the current streaming mode to USB...

Page 65: ...he current streaming quality streaming quality standard OK Sets the streaming quality to standard Streaming Resolution NAME streaming resolution Gets or sets the current streaming quality SYNOPSIS streaming resolution get 1080p 720p 4cif 480p cif DESCRIPTION Method used to get or set the current streaming resolution OPTIONS get Get the current streaming resolution 1080p Set video resolution to 108...

Page 66: ... reset on reboot EXAMPLES system factory reset get factory reset software off factory reset hardware Hardware reset is designated by rear panel dip switches in down position off Returns the factory reset status system factory reset on factory reset software on factory reset hardware off Enables factory reset upon reboot System Reboot NAME system reboot Reboots system SYNOPSIS system reboot seconds...

Page 67: ...e up arrow will move up a single entry in the command history while the down arrow moves down in the command history HISTORY EXPANSION The command history supports the expansion functionality from which previous commands can be recalled from within a single session History expansion is performed immediately after a complete line is read Listed below are examples of history expansion Substitute the...

Page 68: ...uthority to operate this equipment ICES 003 Compliance This digital apparatus does not exceed the Class A limits for radio noise emissions from digital apparatus set out in the Radio Interference Regulations of the Canadian Department of Communications Le présent appareil numérique n emet pas de bruits radioélectriques dépassant les limites applicables aux appareils numeriques de la classe A présc...

Page 69: ...ot expressly approved by Vaddio can affect emission compliance and could void the user s authority to operate this equipment ICES 003 Compliance This digital apparatus does not exceed the Class A limits for radio noise emissions from digital apparatus set out in the Radio Interference Regulations of the Canadian Department of Communications Le présent appareil numérique n emet pas de bruits radioé...

Page 70: ...xpressly approved by Vaddio can affect emission compliance and could void the user s authority to operate this equipment ICES 003 Compliance ICES 003 Issue 4 2004 This digital apparatus does not exceed the Class A limits for radio noise emissions from digital apparatus set out in the Radio Interference Regulations of the Canadian Department of Communications Le présent appareil numérique n emet pa...

Page 71: ...its for radio noise emissions from digital apparatus set out in the Radio Interference Regulations of the Canadian Department of Communications Le présent appareil numérique n emet pas de bruits radioélectriques dépassant les limites applicables aux appareils numeriques de la classe A préscrites dans le Règlement sur le brouillage radioélectrique édicte par le ministère des Communications du Canad...

Page 72: ...e premises Vaddio Technical Support Vaddio technicians will determine and discuss with the customer the criteria for repair costs and or replacement Vaddio Technical Support can be contacted through one of the following resources e mail support at support vaddio com or online at www vaddio com Return Material Authorization RMA Number Before returning a product for repair or replacement request an ...

Page 73: ...64 Email info vaddio com Visit us online for firmware updates specifications drawings manuals technical support information and more 2019 Legrand AV Inc Vaddio is a registered trademark of Legrand AV Inc All other brand names or marks are used for identification purposes and are trademarks of their respective owners All patents are protected under existing designations Other patents pending ...

Reviews: