3-4
Preparation before Use > Touch Panel Display
Touch Panel Display
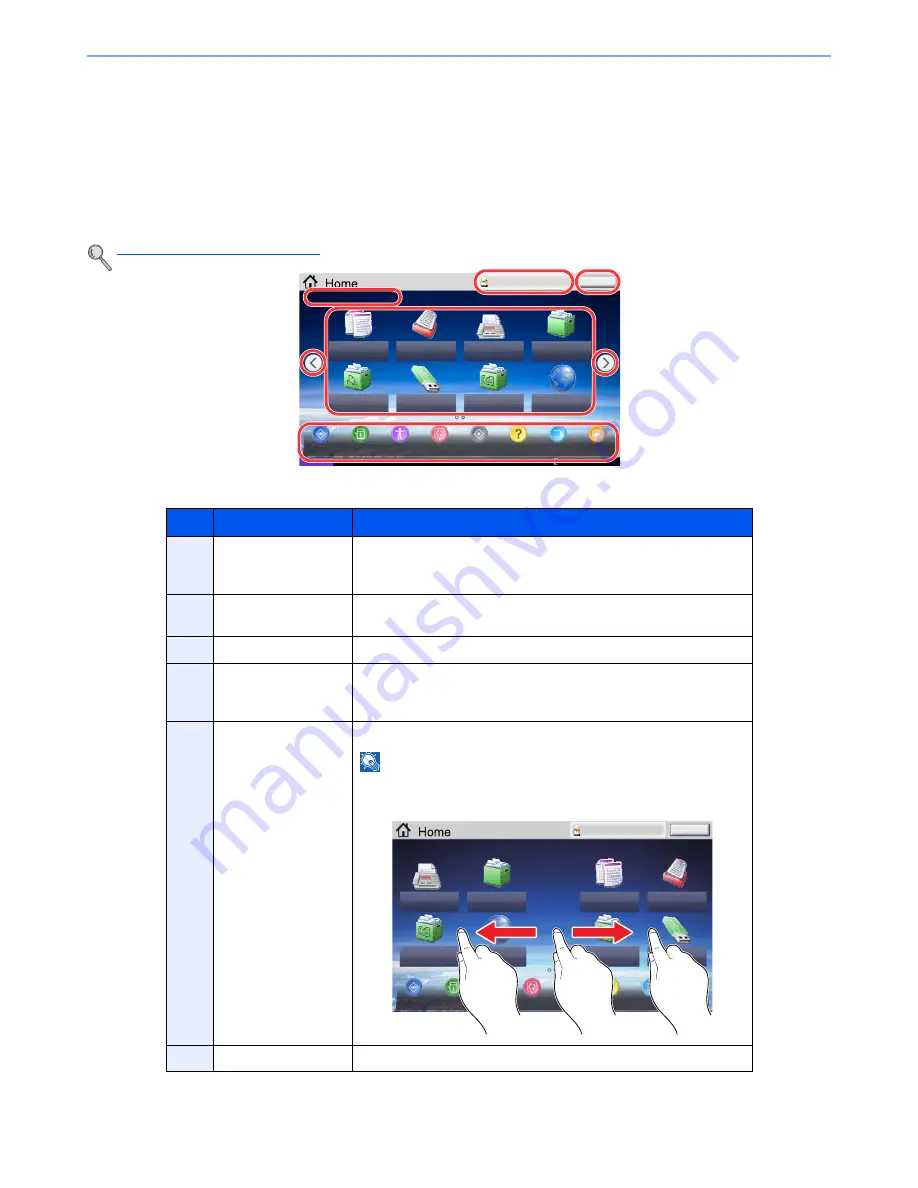
Home Screen
This screen is displayed by pressing the [
Home
] key on the operation panel. Touching an icon will display the
corresponding screen.
You can change the icons to display on the Home screen as well as its background.
Editing the Home Screen (page 3-5)
*
The appearance may differ from your actual screen, depending on your configuration and option settings.
* When the optional FAX Kit is installed, a maximum of 42 icons can be displayed. A maximum of 5 icons can be displayed for
installed applications.
No.
Item
Description
1
Login User Name
Displays the logged-in user name. This is displayed when user login
administration is enabled. Pressing "Login User Name" will display
the information of the logged-in user.
2
[Logout]
Logs out the current user. This is displayed when user login
administration is enabled.
3
Message
Displays the message depending on the status.
4
Desktop
Displays a maximum of 40 function icons* including the functions
registered in program. Icons that are not displayed on the first page
will appear by changing the page.
5
Screen-switching
keys
Use these buttons to switch between desktop pages.
NOTE
You can also switch views by touching the screen and moving the
finger sideways (i.e. swiping).
6
Taskbar
Displays a maximum of 8 task icons.
Status
Status/
Job Cancel
Logout
Copy
Send
Custom Box
Job Box
Removable
Memory
Select the function.
Device
Information
Accessibility
Screen
Language
System
Menu
Help
Program
Message
Board
Admin
FAX
Internet Browser
FAX Box
02/02/2013 10:10
1
2
4
5
5
6
3
Status/
Job Cancel
Logout
Select the function.
Device
Information
Accessibility
Screen
Language
System
Menu
Help
Program
Message
Board
Admin
Custom Box
FAX
Internet Browser
FAX Box
Copy
Send
Job Box
Removable
Memory
1
2
2
Summary of Contents for 6555i
Page 1: ...USER MANUAL 6555i 8055i Copy Print Scan Fax A3 DIGITAL MULTIFUNCTIONAL SYSTEM ...
Page 22: ...xxi Banner Tray Option 11 28 Glossary 11 29 Index Index 1 ...
Page 42: ...xli Menu Map ...
Page 104: ...2 48 Installing and Setting up the Machine Transferring data from our other products ...
Page 176: ...4 18 Printing from PC Printing Data Saved on the Printer ...
Page 436: ...9 42 User Authentication and Accounting User Login Job Accounting Unknown ID Job ...
Page 443: ...10 7 Troubleshooting Regular Maintenance 3 4 5 6 CLICK ...
Page 476: ...10 40 Troubleshooting Troubleshooting Cassettes 3 and 4 1 2 3 4 2 1 B1 B2 ...
Page 477: ...10 41 Troubleshooting Troubleshooting Multi Purpose Tray 1 2 3 4 ...
Page 479: ...10 43 Troubleshooting Troubleshooting Duplex unit 1 2 ...
Page 480: ...10 44 Troubleshooting Troubleshooting Duplex Unit and Cassette 1 1 2 3 CLICK ...
Page 482: ...10 46 Troubleshooting Troubleshooting Fixing unit 1 2 A1 ...
Page 484: ...10 48 Troubleshooting Troubleshooting Right tray 1 2 3 A1 ...
Page 485: ...10 49 Troubleshooting Troubleshooting Bridge Unit 1 2 ...
Page 488: ...10 52 Troubleshooting Troubleshooting Tray B 1 2 3 Tray C 1 D2 D3 ...
Page 489: ...10 53 Troubleshooting Troubleshooting Conveyor 1 2 Mailbox Option 1 D2 D3 1 2 ...
Page 492: ...10 56 Troubleshooting Troubleshooting 5 Cassette 5 Option Side Feeder 3 000 sheet 1 2 2 1 ...
Page 498: ...10 62 Troubleshooting Troubleshooting Staple cartridge holder B C 1 2 3 4 2 1 CLICK ...
Page 539: ......


