


Version 160624
Page 38
The main power switch turns the JSD-100MA on and off. When the power is off, the JSD-100MA enters bypass
mode if the bypass power supply is plugged in. The bypass system in the JSD-100MA uses completely separate
electronics to generate a monaural signal that drives the left and right main audio outputs. The front panel
switches and fader operate the same in bypass and normal modes. All inputs except microphone are available
in bypass mode.
8.2
Automation
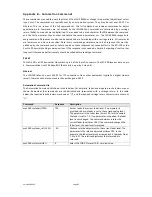
The JSD-100MA accepts external control (such as automation) over Ethernet, RS-232, and a parallel
automation port.
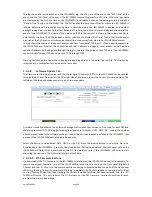
The JSD-100MA accepts up to 5 simultaneous TCP connections on port 10001. A digital cinema server can
send commands to the JSD-100MA through a TCP connection. The JSD-100MA accepts commands over
the RS-232 port. The hardware interface is described in the installation section. The commands are
described in Appendix B.
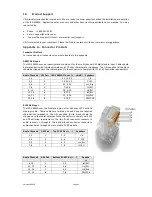
The JSD-100MA accepts and generates parallel automation pulses on the DB25F rear panel automation
connector. Pulsing pin 1 to ground is the same as pushing the first button on the front panel (COAX 1).
Pulsing pin 2 to ground is the same as pushing the second button. The parallel automation interface is
described in more detail in Appendix A.
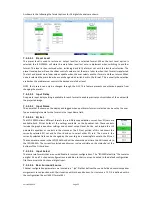
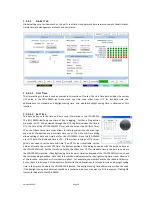
8.3 System Monitoring
A large number of JSD-100MA systems can be monitored simultaneously over
Ethernet. Multiple units can be monitored and controlled using the GUI.
Multiple units can be monitored and controlled using a web browser. The
web interface duplicates the front panel controls, allowing selection of input,
setting fader level, and muting the system. Multiple units can be monitored
using SNMP.
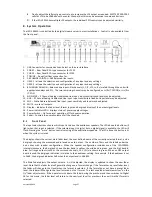
8.3.1 GUI View of Multiple JSD-100MAs
The GUI main screen provides an overview of several JSD-100MA systems. Systems are normally broken into
groups representing theaters. Each group contains the individual JSD-100MA systems for each auditorium.
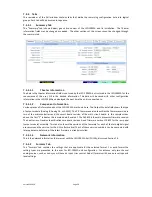
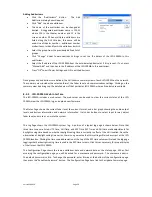
Adding Groups
Create a group for each theater. The group is a collection of JSD-100MAs,
one in each auditorium.
Click the “Groups” button at the top of the screen.
Click “Add”. You will be prompted to enter the name of the new
group.
Click “OK” when you have finished adding groups.


