ACCESSORIES
Section 8-15
FOCAL LENGTH
SPOT SIZE
FOCAL RANGE
1.5 “
.003 “
+ / - .075 “
2.0 “
.005 “
+ / - .100 “
2.5 “
.007 “
+ / - .125 “
4.0 “
.013 “
+ / - .200 “
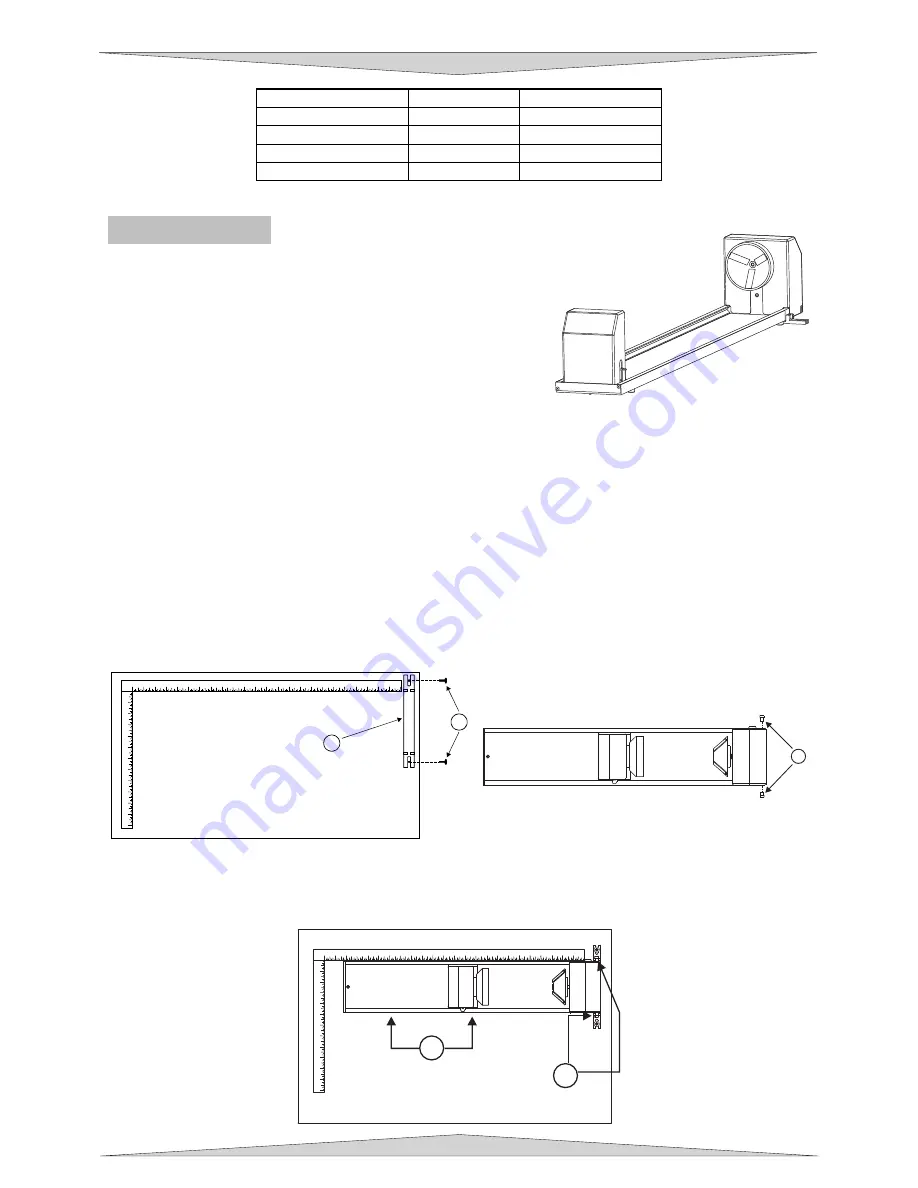
Rotary Fixture
The Rotary Fixture has been designed to engrave cylindrical
objects. Two attachments come with the fixture, a cone shaped
disk attached to the motorized end of the fixture and an inverted
cone shaped disk attached to the adjustable end of the fixture.
These attachments are used to hold wineglasses, mugs, cups,
etc. To make it easier to understand, we will illustrate a step-by-
step procedure to engrave an image on a glass.
NOTE: These instructions apply to many different models
even if your system has a smaller or larger field size. If the rotary is installed and mounted on the
table in any other manner then the one mentioned below please contact the Technical Support
Department for further instructions on calibrating the rotary.
Installation
1.
Turn the UCP and laser system
ON
.
2.
Make sure AUTOFOCUS is
NOT
activated because the Rotary Fixture was not designed to work with
AUTOFOCUS.
3.
Remove any materials that may be underneath the engraving table and lower the table
ALL THE
WAY
down to the bottom or at least far enough down so that the focus carriage will clear the top of
the Rotary Fixture when it is installed on the table.
4.
Now, turn the laser system
OFF
.
5.
Open the top door. Place the bracket on the table (1). Insert the thumbscrews and washers (2) into
the screw holes but do not tighten down completely. Leave the thumbscrews loose enough so that
the bracket can slide.
6.
Place the Rotary Fixture on a flat surface. Using an Allen wrench, attach the two socket head
shoulder screws (3) to the side of the base plate.
7.
Place the Rotary Fixture on top of the bracket so that its pivot bolts set into the forks in the bracket.
Gently push the fixture (4) flat up against the top ruler.
NOW
, tighten down the thumbscrews (5).
1
2
3
4
5
6
7
8
9
10
11
12
13
14
15
16
17
18
19
20
21
22
23 24
1
2
3
4
5
6
7
8
9
10
11
12
2
1
3
1
2
3
4
5
6
7
8
9
10
11
12
1
2
3
4
5
6
7
8
9
10
11
12
13
14
15
16
17
18
19
20
21
22
23
24
4
5
Summary of Contents for PLS3.60
Page 8: ......
Page 20: ...SAFETY Section 1 12 ...
Page 21: ...Part 1 Initial Setup ...
Page 22: ......
Page 30: ...INSTALLATION Section 2 10 ...
Page 44: ...GRAPHICS SOFTWARE SETUP Section 3 14 ...
Page 58: ...MAKING A SAMPLE Section 5 4 ...
Page 59: ...Part 2 Laser System Essentials ...
Page 60: ......
Page 70: ...BASIC SYSTEM FEATURES Section 6 12 ...
Page 76: ...BASIC MAINTENANCE Section 7 6 ...
Page 77: ...Part 3 Accessories ...
Page 78: ......
Page 95: ...Part 4 Advanced User ...
Page 96: ......


