background image

ULEAD VIDEOSTUDIO USER GUIDE

19

USB cameras may require installation of a device driver, depending 
on the Windows version you are using. For information on how to 
install your USB camera, refer to its accompanying manual.

After properly installing your USB camera, check if it is detected by 
your Windows system.

To check if the USB camera is detected:


1. Open the 

Control Panel

, then 

open 

System: Hardware - 

Device Manager

.

2. In the 

Device Manager

double-click 

Imaging devices

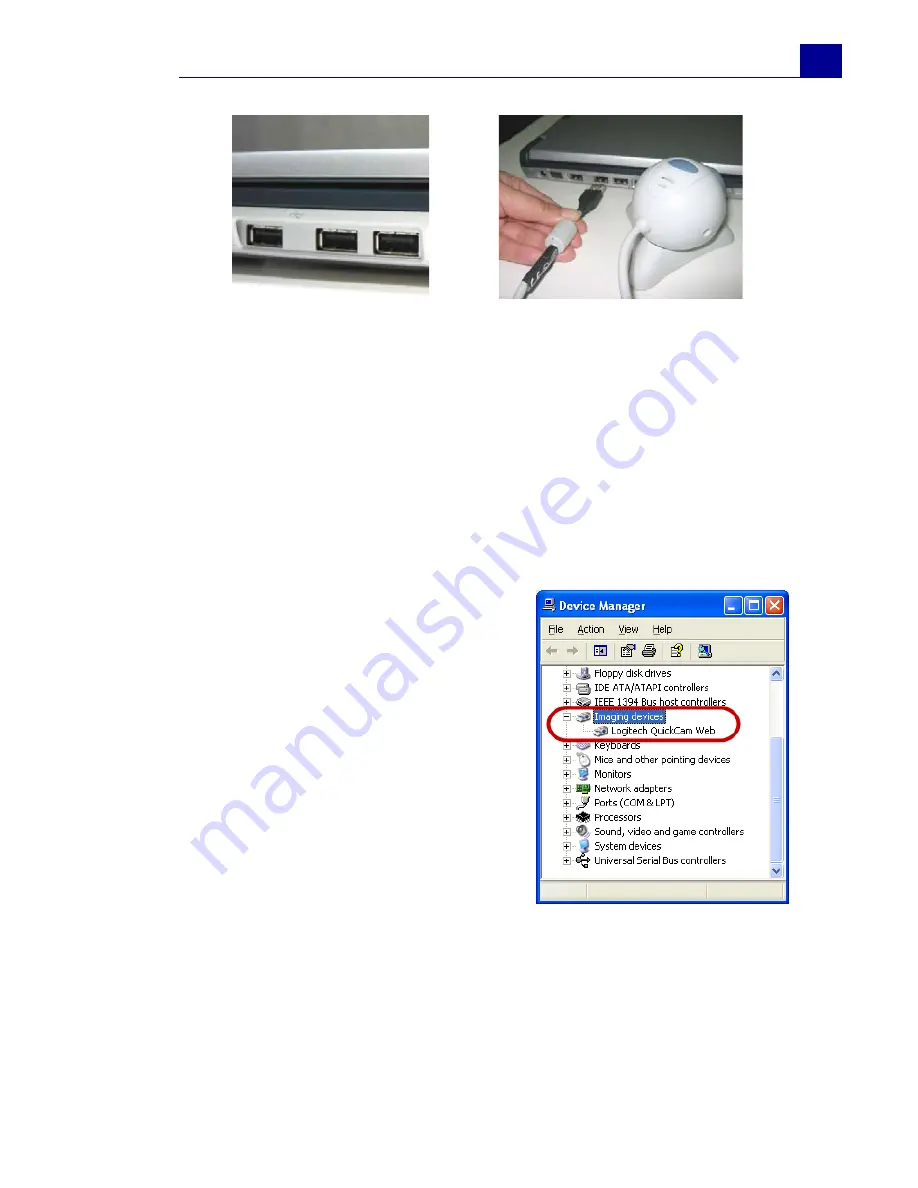
Check if your USB camera is 
listed in this folder.

3. If your USB camera has been 

detected properly, it will be 
listed as a source device in 
VideoStudio's 

Options Panel

In VideoStudio, select the 

Capture Step 

and check if your 

USB camera is displayed under 
the 

Source

 list in the 

Options 

Panel

.

USB ports

Connecting a USB camera

Summary of Contents for VideoStudio 9

Page 1: ...User Guide Ulead Systems Inc March 2005 Control Number ...

Page 2: ...e logo and Acrobat are trademarks of Adobe Systems Incorporated QuickTime and the QuickTime logo are trademarks used under license QuickTime is registered in the U S and other countries All other product names and any registered and unregistered trademarks mentioned in this manual are used for identification purposes only and remain the exclusive property of their respective owners Sample files Fi...

Page 3: ...burn to DVD 23 Movie Wizard 23 Step 1 Add video and images 24 Step 2 Select a template 27 Step 3 Finish 31 VideoStudio Editor 31 The user interface 31 The Step Panel 32 The Menu Bar 33 The Options Panel 34 The Navigation Panel 34 The project timeline 35 The Library 39 Starting a new movie project 43 Setting your preferences 44 Setting project properties 44 Adding clips 45 Previewing 45 Undoing and...

Page 4: ...tness 77 Reversing video playback 77 Playback Speed 77 Resizing and distorting clips 78 Capturing still images in the Edit Step 79 Pan Zoom 80 Applying video filters 82 Key frame settings 83 Effect 86 Adding transitions 86 The Effect Step Options Panel 87 The Album transition 88 The Flashback transition 91 The Mask transitions 92 Overlay 94 Adding clips to the Overlay Track 94 The Overlay Step Opt...

Page 5: ...tep Options Panel 124 Creating movie templates 125 Creating and saving a video file 126 Burning a DVD VCD or SVCD 128 Assembling files 129 Adding Editing chapters 131 Creating selection menus 132 Previewing 134 Burning your project onto a disc 135 Project Playback 136 Exporting your movie 138 Exporting videos to Ulead DVD DiskRecorder 139 Posting your video on a Web page 141 Sending a movie by e m...

Page 6: ...ger 171 Select Device Control 172 Video and Audio Capture Property Settings 173 Video Color Manager 175 Video Save Options 176 Appendix B Shortcuts 182 Menu command shortcuts 182 Step Panel shortcuts 182 Navigation Panel shortcuts 183 Timeline shortcuts 184 Multi trim Video shortcuts 184 Others 185 Appendix C Technology Overview 186 Analog vs Digital 186 SmartRender Technology 187 DV SmartPlay 187...

Page 7: ...n in seconds create in minutes To make a movie production first capture footage from a camcorder or another video source You can then trim the captured videos arrange their order apply transitions and add overlays animated titles voiceover narration and background music These elements are organized in separate tracks Changes to one track do not affect other tracks A movie production is in the form...

Page 8: ...d To run VideoStudio Double click the VideoStudio icon on your Windows desktop OR Select the VideoStudio icon from the VideoStudio program group on the Windows Start menu The VideoStudio CD has an auto run feature that automatically starts up the installation Back up your projects and media files first before installing the new version of VideoStudio Note If the Setup screen does not appear after ...

Page 9: ...ccessful capturing and smooth editing of your videos Installing a capture card If your capture card is a PCI based card install the card on your computer by inserting it in an available PCI slot on the computer s motherboard Connecting a video camera to the computer The type of capture card or interface port that you will need to connect your video camera to your computer depends on the type of vi...

Page 10: ...igital 8 camcorders have a 4 pin connector whereas desktop computers that come with IEEE 1394 ports or installed with IEEE 1394 cards usually have 6 pin connectors The IEEE 1394 cable that is required for desktop computers is a 4 pin to 6 pin cable Most notebook computers have 4 pin connectors which require a 4 pin to 4 pin cable 6 pin IEEE 1394 ports on a desktop computer 4 pin IEEE 1394 ports on...

Page 11: ...l camcorder are detected 1 Insert your video tape into the camcorder and switch it on Make sure it is in playback mode usually named VTR or VCR Check your camcorder s manual for specific instructions 2 Open the Control Panel then open System Hardware Device Manager 3 Make sure the following device names are listed in the Device Manager Under Windows XP or Windows Me Connecting a 4 pin to 6 pin IEE...

Page 12: ...1394 Bus Controller Image Device Microsoft DV Camera and VCR For Microsoft DV driver only Sound video and game controllers 1394 camcorder For Texas Instruments DV driver only Note In addition to commonly used Texas Instruments and Microsoft DV drivers there are other drivers available Consult your camcorder s manual for suitable drivers Windows XP Device Manager Windows 2000 Device Manager ...

Page 13: ...adcast television is also an analog source To capture TV footage you need to have a TV tuner card installed in your computer 4 If your digital camcorder has been detected properly it will be listed as a source device in VideoStudio s Options Panel In VideoStudio select the Capture Step and check if your camcorder is displayed under the Source list in the Options Panel Note TV capture cards provide...

Page 14: ...ite output of your video device connect the yellow plugs of the Composite cable to the video output of your video device and the video input port of the analog capture card Most higher end analog capture cards do not have the Composite S Video input ports crowded on the side of the cards Instead these cards come with an external breakout box that provide all the video input ports at the front of t...

Page 15: ...r card A tuner card has a TV antenna input just like the regular television monitor Plug your TV antenna to the TV connector of the tuner card Note When purchasing a tuner card make sure you acquire one that provides the correct TV system NTSC or PAL for your region Breakout box TV antenna cable Connecting TV antenna to the tuner card ...

Page 16: ...device or TV and to capture the audio into your computer you need to connect the audio output of the capture or tuner card to the sound card s Line In port The required cables for connecting to the sound card are different for each type of video source Line in and audio cables for S Video S Video connection Line in and audio cables for Composite video Composite video connection ...

Page 17: ...e or tuner card is detected 1 If you are using a video device such as a camcorder as your source insert your videotape into the video device and switch it on Make sure it is in the playback mode usually named VTR or VCR See your machine s manual for specific instructions Line in cable for TV tuner card TV tuner connection Line in cable for high end TV capture card High end TV capture card connecti...

Page 18: ...as been detected properly it will be listed as a source device in VideoStudio s Options Panel In VideoStudio select the Capture Step and check if your capture or tuner card is displayed under the Source list in the Options Panel Note If your capture device supports multiple video sources the Video and Audio Capture Property Settings dialog box allows you to select your desired video source such as...

Page 19: ...indows system To check if the USB camera is detected 1 Open the Control Panel then open System Hardware Device Manager 2 In the Device Manager double click Imaging devices Check if your USB camera is listed in this folder 3 If your USB camera has been detected properly it will be listed as a source device in VideoStudio s Options Panel In VideoStudio select the Capture Step and check if your USB c...

Page 20: ...ape It is recommended that you close all other applications when working with VideoStudio You should also turn off any automatically launched software like screen savers to avoid possible interruptions while capturing If you have two hard drives in your system it is recommended that you install VideoStudio to your system drive usually C and store captured videos in your other drive usually D The c...

Page 21: ...res of VideoStudio It provides you total control over the movie production process from adding clips titles effects overlays and music to making the final movie on disc or other medium DV to DVD Wizard Use the DV to DVD Wizard to easily create a movie from the content of your DV tape then burn it onto a disc Step 1 Scan for scenes Scan the DV tape and select the scenes you want to add to your movi...

Page 22: ...rrent position Scans the tape for scenes from the current tape position 3 Specify the scan speed then click Start Scan to begin scanning the DV device for scenes Scenes are video segments that are distinguished by shooting date and time 4 In the Storyboard choose the scenes you want to include in your movie To do this select a scene then click Mark Scene 5 Click Next to go to the next step ...

Page 23: ...you can use the VideoStudio Movie Wizard to assemble Tips After VideoStudio scans for scenes on your device you can preview them by selecting a scene then clicking Use the controls on the Preview window to navigate through the selected scene Hold Ctrl while clicking the mouse to select multiple scenes Note If you have more than one burner installed in your computer or the default drive is not a bu...

Page 24: ...ideo and images on page 26 Click Insert Video to add video files of different formats such as AVI MPEG and WMV Click Insert Image to add still images You can create a photo slideshow if you choose to only add images Click Insert DVD DVD VR to add video from a DVD Video DVD VR formatted disc or from your hard drive Tip Click Library to open the media library that contains media clips that come with...

Page 25: ...nd use the Jog Slider and Navigation Panel buttons When trimming a clip drag the Mark in and Mark out handles to select the desired start and end points of the clip 5 Click to automatically split video clips into smaller clips based on their shooting date and time You can also click to sort clips in the Media Clip List according to their Name or Date Tip You can also arrange clips in the Media Cli...

Page 26: ...apture folder in which to save the files 5 Play the videotape in your camcorder and position the tape on the part of the video where to start capturing 6 Click Capture Video to start capturing Click Stop Capture or press Esc to stop capturing 7 To capture a still image from the video footage pause the video on the desired image then click Capture Image Note Click Options to customize capture setti...

Page 27: ...me template from the Theme template list Home Movies templates allow you to create movies that include both video and images while Slideshow templates are used exclusively for creating image slideshows 2 To set the overall length of your movie click Notes To save your project click then select Save If you accessed VideoStudio Movie Wizard from within VideoStudio Editor the above button will not ap...

Page 28: ...ip to fit the background music s tempo Fit to video duration Keeps the current movie duration Fit to background music Adjusts the movie duration to fit into the length of the background music The background music is added to your movie in the second step of the Movie Wizard Specify duration Lets you define a custom duration for the whole movie For Slideshow templates specify Smart Pan Zoom in the ...

Page 29: ...r Optional to specify whether or not to include the clip in the show 4 To replace the title first select the preset title from the Title list Double click the preset text in the Preview Window then type in your text Note For Home Movies click Auto to let the program decide which clips to retain or exclude ...

Page 30: ...the video s audio 8 Click Next In the Text Properties dialog box select a font type size and color for the text and set the desired shadow color and transparency Note Make sure that your background music is 30 seconds or longer if you want to fit the video to the music If the music duration is less than 30 seconds the music will not be looped leaving the remaining video without any background musi...

Page 31: ...e and briefly explains the steps involved in creating a movie Refer to the succeeding chapters for more in depth information on each step The user interface Click Create Video File to output your movie as a video file that can be played back on the computer Click Create Disc to burn your movie onto a disc For details see Burning a DVD VCD or SVCD on page 128 Click Edit in Ulead VideoStudio Editor ...

Page 32: ... camcorder 6 Library Stores and organizes all of your media clips 7 Timeline Displays all the clips titles and effects included in your project The Step Panel VideoStudio simplifies the process of creating movies into seven simple steps Click the buttons in the Step Panel to switch between steps Once a project is opened in VideoStudio video can be recorded directly to your computer s hard disk in ...

Page 33: ...be complete without opening titles captions and closing credits In the Title Step you can create animated text titles or choose from various presets in the Library See Title on page 103 Background music sets the mood of your movie The Audio Step lets you select and record music files from one or several CD ROM drives attached to your computer You can also dub over your video in this step See Audio...

Page 34: ...n the selected clip See the Options Panel sections in the succeeding chapters for details The Navigation Panel The Navigation Panel is used to preview and edit the clips used in your project Use the Navigation Controls to move around a selected clip or your project Use the Trim Handles and Jog Slider to edit your clips When capturing video from a DV camcorder the Navigation Controls are used for d...

Page 35: ...oves to the end frame 7 Repeat Loops playback 8 System Volume Click and drag the slider to adjust the volume of your computer s speakers 9 Timecode Allows you to directly jump to a part of your project or selected clip by specifying the exact timecode 10 Mark in out Use these buttons to set a preview range in the project or to mark the start and end points where to trim a clip 11 Jog Slider Allows...

Page 36: ...r project The duration of each clip is shown at the bottom of each thumbnail You can drag and drop video clips to insert and arrange them Transition effects can be inserted between video clips A selected video clip can be trimmed in the Preview Window See Trimming a clip on page 70 Click Enlarge to maximize the storyboard display With a larger workspace you can arrange video clips and apply transi...

Page 37: ...w allows you to perform frame accurate editing of your clips 1 Zoom controls Allows you to change the timecode increments in the Timeline ruler 2 Ripple Editing Enable Disable Ripple Editing When enabled allows you to select which tracks to apply it to 3 Track buttons Click the buttons to switch between the different tracks 4 Insert media files Displays a menu allowing you to place video audio or ...

Page 38: ...This color bar represents the trimmed or selected part of a clip or project 8 Timeline ruler Displays the project s timecode increments in hours minutes seconds frames which helps you determine clip and project length 9 Video Track Contains video image color clips and transitions 10 Overlay Track Contains overlay clips which can be video image or color clips 11 Title Track Contains title clips 12 ...

Page 39: ...is a storage depot for everything you need to create a movie video clips video filters audio clips still images transition effects music files titles and color clips These are collectively known as media clips In Audio View the Options Panel also displays the Audio Mixing Panel that can be used to adjust the volume levels of the Video Overlay Voice and Music Tracks For details see Using the Audio ...

Page 40: ... Right click the image to print then select Print Image and select an image size Right click the image then select Print Options to specify print alignment and borders Note You can also drag and drop files from Windows Explorer straight to the Library Load media allows you to locate the clip you want to add to the Library Right click a clip in the Library to view the clip s properties as well as c...

Page 41: ...lete the source file from your hard disk Sorting clips in the Library To arrange clips in the Library click in the Library to open the Options menu then select Sort by Name or Sort by Date The way video clips are sorted by date depends on the file format DV AVI files i e AVI files captured from DV camcorders will be arranged by order of the shooting date and time of the footage Other video file fo...

Page 42: ...k the Folder arrow and select Library Manager from the drop down list 2 Select a media type from the Available custom folders list 3 Click New to display the New Custom Folder dialog box and create a new folder Specify a library Folder name and a Description Click OK Notes You can also right click on the Library then select the desired sorting type in the Sort By submenu To toggle between ascendin...

Page 43: ...rocess by which VideoStudio converts raw video titles sounds and effects into a continuous stream of data which can be played back in your computer You can modify the project settings in the Project Properties dialog box For details see Project Properties on page 169 When you capture or insert your first video clip into the project VideoStudio automatically checks the properties of the clip and yo...

Page 44: ...to use VideoStudio You can find the sample project in C Program Files Ulead Systems Ulead VideoStudio 9 0 Samples Sample NTSC VSP Sample PAL VSP Setting project properties Project Properties serve as your template for previewing your movie projects The project settings in the Project Properties dialog box determine the appearance and quality of a project when it is previewed on screen To customize...

Page 45: ...ore accurate previews of your final movie Adding clips There are three ways you can do to add clips to your project Capture video clips from a video source The video clips will be inserted onto the Video Track Drag clips from the Library onto the correct tracks Click to directly insert media files to the different tracks Previewing The Play button in the Navigation Panel serves two purposes for pl...

Page 46: ...a long time to complete depending on the size of your project and computer resources In High Quality Playback mode VideoStudio uses SmartRender technology which renders only the changes you made such as transitions titles and effects and eliminates re rendering the entire project SmartRender saves time when generating previews Setting a preview range For faster previews you may choose to play only...

Page 47: ...e Options Panel 2 To preview the selected range select what you want to preview Project or Clip then click Play To preview the entire clip hold Shift then click Play Undoing and redoing actions You can undo or redo the last set of actions that you performed while working on your movie by clicking Undo Ctrl Z or Redo Ctrl Y above the Options Panel Showing and hiding grid lines You can use grid line...

Page 48: ...rt clip then select Show grid lines To show grid lines in the Title step select Show grid lines in the Edit tab Saving your project Tip Click to adjust grid line settings While composing your movie project select File Save Ctrl S to frequently save your project and avoid accidental loss of your work VideoStudio project files are saved in VSP file format ...

Page 49: ...tically save your work select File Preferences then select Auto save duration and specify the time interval between saves To open an existing project select File Open Project Ctrl O To create a new project again select File New Project Ctrl N ...

Page 50: ...ms seamless capture saving video into a new file every time the maximum allowable file size for a single video file has been reached Seamless capture will be performed only when capturing DV Type 1 or DV Type 2 from DV camcorder or when capturing MPEG video from DV camcorder or analog capture device The maximum captured file size per video file is 4 GB in Windows operating systems such as Windows ...

Page 51: ...ns Panel Duration Sets the length of time for the capture Source Displays the detected capture device and lists other capture devices installed in your computer Format Where you select a file format for saving your captured video Split by scene Automatically separates captured video into several files based on changes in shooting date and time This feature can be used only when capturing video fro...

Page 52: ...s not affect the audio capture quality If this happens click Disable Audio Preview to mute the audio while capturing To capture video 1 Click the Capture Step then click Capture Video 2 To specify a capture duration enter the values in the Duration box in the Options Panel 3 Select your capture device from the Source list 4 Select a file format to use for saving your captured video from the Format...

Page 53: ...o channels are stored unmodified as a single interleaved stream in the AVI file With DV Type 2 which is Notes When your camcorder is in Record mode usually named CAMERA or MOVIE you can capture live video The available settings in the Video and Audio Capture Property Settings dialog box vary depending on the capture file format that you have chosen See Video and Audio Capture Property Settings on ...

Page 54: ... the hassle of having to capture the segments one by one then save them as separate files The Split by scene feature will do that job for you To use Split by scene option in Capture Step 1 Select the Split by scene option in the Options Panel 2 Click Capture Video VideoStudio will automatically look for the scenes according to their shooting date and time and capture them as separate files Note To...

Page 55: ...or saving the captured video in the Options Panel s Format list Click Options then select Capture Options to choose how you want footage to be captured See Capture Options on page 158 1 Shuttle Control Drag the Shuttle Control to move forward and back through the footage at variable speeds This is a quick way to find scenes you are looking for in your video 2 Play Plays Pauses the DV tape 3 Stop S...

Page 56: ...Video or Composite In the Color tab you can fine tune the video source to ensure good quality captures In the Capture tab set the frame size and compression method to use for saving the captured video For more information on the dialog box see Video and Audio Capture Property Settings on page 173 Adjusting source volume VideoStudio has a Source Volume Panel that allows you to adjust the sound volu...

Page 57: ...ou want to capture Capturing TV footage VideoStudio allows you to capture TV footage through a TV tuner Capture a segment of your favorite television show on regular TV or cable then save it in your hard drive in AVI MPEG or Windows Media Format Note The Source Volume Panel is not available when you are capturing from an analog device that has no audio source or a DV device Tip A delay in capture ...

Page 58: ...ings to open the Video and Audio Capture Property Settings dialog box Check if the Video Input source TV system and Audio Input source are set correctly If not adjust the settings accordingly Click the Channel tab to choose Antenna or Cable TV scan available channels in your region and more For details on this dialog box see Video and Audio Capture Property Settings on page 173 Importing from DVD ...

Page 59: ...import 4 Click Import to finish All imported videos will be added to the thumbnail list in the Library DV Quick Scan Use this option to scan a DV device for scenes to import To use DV Quick Scan refer to the first step in the DV to DVD Wizard section See Step 1 Scan for scenes on page 21 Direct video capturing to MPEG format VideoStudio supports real time capturing from DV analog or any video sour...

Page 60: ... one of these formats from the Format list Click Options and select Video and Audio Capture Property Settings In the dialog box that opens click the Capture tab then click Advanced The MPEG Settings dialog box then appears in which you can customize attributes for the MPEG file Note The Ulead DSW MPEG Capture Plug in will be automatically detected If your capture device does not support this plug ...

Page 61: ...ault profile to complete the capturing process You also have the option to select other profiles to attain preferred captured file quality To select a profile 1 Click Options Video and Audio Capture Property Settings In the dialog box click Select to open Select Profile Now you can capture directly from an analog source or DV camcorder straight to Windows Media Video WMV WMV is an extensible file ...

Page 62: ...mized one base from it A Custom profile can be edited by clicking Edit and changing specific profile attributes You can also create a new profile by clicking New This will launch a task wizard that will guide you in creating your profile To edit and customize a profile 1 Click Options Video and Audio Capture Property Settings In the dialog box click Select to open Select Profile 2 Under Select Pro...

Page 63: ...ned profiles cannot be edited directly You must create a copy before editing the corresponding attributes To do this select a system defined profile and then click Copy Select the created copy of the profile and then click Edit to modify the attributes Clicking Edit invokes Edit Profile It will guide you in specifying your preferred attributes ...

Page 64: ...n addition to video VideoStudio also allows you to capture still images The image format can be BMP or JPEG and the size depends on its source video To choose your image format click File Preferences In the Preferences dialog box click the Capture tab and set the format To capture still images 1 If you are capturing from a DV camcorder click Play in the Navigation Panel to play your videotape If y...

Page 65: ...mage and color clips Video clips There are several ways of inserting video clips on the Video Track Select a clip in the Library and drag and drop it to the Video Track Multiple clips can be selected by pressing Shift or Ctrl Right click a clip in the Library then select Insert To Video Track Select one or more video files in Windows Explorer then drag and drop to the Video Track To insert a clip ...

Page 66: ...t to project size Color clips Color clips are solid colored backgrounds that are useful for titles For example insert a black color clip as background for end credits You can use the preset color clips or create new color clips in the Library To create a color clip in the Color Library 1 Select Color from the Library drop down menu Click Load color to open the New Color Clip dialog box Here click ...

Page 67: ...tion Select File Preferences Edit to set the fade in out duration Rotate Rotates the video clip Reverse video Plays the video backward Color Correction Allows you to adjust the hue saturation brightness contrast and gamma of the video clip Playback Speed Launches the Playback Speed dialog box where you can adjust the pace of your clip Save as Still Image Saves the current frame as a new image file...

Page 68: ...drop down list Customize Filter Allows you to define how a filter transitions throughout the clip Distort clip Allows you to modify the size and proportions of the clip Resampling option Sets how image size is adjusted There are two options Keep aspect ratio maintains the relative width and height of the current image Fit to project size makes the size of the current image the same as the project ...

Page 69: ... captured DVI AVI file scenes can be detected in two ways DV Recording Time Scan detects scenes according to their shooting date and time Frame Content detects content changes such as motion change camera shifting brightness change etc and splits them into separate video files In an MPEG 1 or MPEG 2 file scenes can only be detected based on content changes i e by Frame Content To use Split by Scen...

Page 70: ...The plus sign and a number indicates how many scenes are merged into that particular clip Click Split to undo any Join actions that you have done 7 Click OK to split the video Trimming a clip The best part of editing your movie on your computer is the ease with which you can snip and trim your work with frame by frame accuracy There are three ways of trimming a clip 4 Click Options In the Scene Sc...

Page 71: ...es to set the Mark in Mark out points on the clip For more precise trimming click on a Trim handle hold it and use the left or right arrow keys on your keyboard to trim one frame at a time The Mark in Mark out points can also be set by pressing F3 and F4 respectively 3 Click Play Clip to preview the trimmed clip Tip Click or to set the cutting point more precisely Tip You can also use Zoom control...

Page 72: ... enter the desired clip length 3 Other clips in your project automatically reposition themselves according to changes made Multi trim Video The Multi trim Video feature is another method for breaking down a clip into multiple segments While Split by Scene is automatically done by the program Multi trim Video gives you complete control over the clips you wish to extract making it even easier for yo...

Page 73: ...egments 3 Drag the Jog Slider until you get to the part of the video that you want to use as the beginning frame of the first segment Click Start 4 Drag the Jog Slider again this time to the point where you want the segment to end Click End 5 Do steps 3 and 4 repeatedly until you have marked all the segments you want kept or removed 1 Jog Wheel Use to scroll to different parts of the clip 2 Shuttl...

Page 74: ...s you can also press F3 and F4 while playing the video Click Invert Selection to toggle between marking segments that you want to retain or marking segments that you want taken out from the clip Navigation controls in the Multi trim Video dialog box Reverses or advances through the video in fixed increments By default these buttons move up or down through the video in increments of 25 seconds Play...

Page 75: ...sert clips while automatically moving other clips including empty spaces aside to make room for it on the Timeline Use this mode to maintain the original track synchronizations when inserting additional clips To save select a trimmed clip in the Storyboard Timeline or the Library and select Clip Save Trimmed Video Ripple Editing is enabled for the tracks where content is inserted ...

Page 76: ... Editing 8 Drag the clip to insert from the Library to the desired position on the Timeline As soon as the new clip is in place all clips where Ripple Editing is applied will shift accordingly while maintaining their track positions relative to one another Ripple Editing also works when removing clips In the example below Overlay and Title tracks maintain their position relative to the video after...

Page 77: ... to emphasize a movement or set it to play at lightning speed and give your movie a comical air Simply adjust the speed attributes for your video clip by clicking Playback Speed under the Options Panel of the Edit Step Drag the slider according to your preferences i e slow normal or fast or enter a value The higher the value you set the faster the playback of your clip Values range from 10 1000 Yo...

Page 78: ...ze or distort a clip 1 Select a clip in the Timeline then select the Attribute tab under the Options Panel 2 Select Distort clip then drag any of the following handles Tips Hold Shift then drag the end of the clip on the Timeline to change the playback speed The black arrow means you are trimming or extending the clip while the white arrow means that you are changing the playback speed ...

Page 79: ...red in the Edit Step by selecting a specific frame in the Timeline and saving it as an image file In this manner possible distortions are avoided since the image is not acquired from a running video unlike in the Capture Step To capture still images 3 Drag the Jog Slider to the frame you want to capture 1 Select File Preferences Capture Choose Bitmap or JPEG as the Captured still image save format...

Page 80: ... zoom effect of a video camera To apply this effect to an image select an image clip in the Timeline then select Pan Zoom and click Customize Pan Zoom In the Pan Zoom dialog box the Start Middle and End tabs and the crosshairs in the Image Window represent the three points or key frames in the image clip where settings can be customized to produce the pan and zoom effect When customizing each key ...

Page 81: ...to the subject you want to focus 2 Zoom in on the subject by minimizing the marquee box or by increasing the Zoom ratio 3 Set the Pause time to the amount of time to stay on the subject before panning and zooming out 4 Click the End tab Drag the End key frame represented by the right crosshair in the Image Window to the center of the image Zoom out to show the whole image by enlarging the marquee ...

Page 82: ...r boxes to move the marquee box at fixed positions in the Image Window To zoom in or out of a fixed area without panning the image select No panning To include a fade in out effect increase the Transparency The image will fade to the Background color Click the color box to choose a background color or click to select a color on the Image Window 1 Select a clip in the Timeline 2 Click the Filter ta...

Page 83: ...p where you can specify a different attribute or behavior for your video filter This gives you the flexibility to determine how your video filter will look like at any point in a clip Note By default the filter applied to a clip is always replaced with the new filter dragged onto the clip Clear Replace last filter to apply multiple filters to a single clip VideoStudio allows you to apply a maximum...

Page 84: ...t frame as a key frame in the clip You can adjust the video filter settings for that particular frame 5 Repeat steps 3 and 4 to add more key frames to your clip 6 Use the Timeline controls to edit or to go to a key frame in the clip To delete a key frame click Remove key frame Note Settings available in the dialog box are different for each video filter Note You can use the mouse wheel to zoom in ...

Page 85: ...ected click Go to previous key frame 7 Adjust the video filter settings according to your preferences 8 Preview the changes you ve made by clicking Play in the Preview Window of the dialog box 9 Click OK when finished Tip You can preview the clip with applied video filter on VideoStudio s Preview Window or an external device such as a TV monitor or DV camcorder Click then click to open the Preview...

Page 86: ...gories of transitions from the Folders list 2 Scroll through the effects thumbnails in the Library Select and drag an effect to the Timeline roughly between two video clips You can add transitions either in Storyboard View or Timeline View Note By default you need to manually add transitions to your project If you want VideoStudio to automatically add transitions between clips when you add clips t...

Page 87: ...urther customize your transitions after adding them to your project The Effect Step Options Panel displays the settings of your selected transition so that you can change their various parameters This gives you complete control of exactly how your transitions will behave in your movie Tip Double clicking a transition in the Library automatically inserts it into the first empty transition slot betw...

Page 88: ...smooth progression from one clip to another This option works best for irregular shapes and angles Direction Specifies the direction of a transition effect This is only applicable to some of the transition effects The Album transition One of the transitions you will find in the Library is the Album transition Album simulates the turning pages similar to that of flipping photo album pages You can c...

Page 89: ...um dialog box 3 In the Layout section choose the desired look for the album 4 In the Album tab set the album s Size Position and Orientation To change the album cover select a preset from Album cover templates or select Custom album cover then import your own cover image ...

Page 90: ...o add a shadow select Shadow Set the shadow position by adjusting the X offset and Y offset values To make the shadow look softer increase Soft edge 6 Click the Page A tab Customize the first page of the album To change the image on the page select a preset from Album page templates or select Custom album page then import your own image Note To change the shadow color click the color box and choos...

Page 91: ...he album Follow step 6 to make adjustments 8 Use the slider and buttons below the Preview Window in the dialog box to preview the results 9 Click OK to apply the adjustments The Flashback transition You can use the Flashback transition to simulate a flashback or introduce a dream sequence for the next scene Light is added to the dissolving scenes to create a dreamy effect ...

Page 92: ... light Contrast Set the the color contrast between the two clips Middle flash Adds an element of light to the dissolving mask Inverse Reverses the effect of the mask The Mask transitions Different patterns or objects such as shapes leaves balls and more can be used in transition effects by rendering them as masks You can select from preset masks or import a BMP file and use it as a mask for your t...

Page 93: ...ion of the clip to the motion of the mask Inverse Reverses the effect of the mask X Y Opposite Reverses the path direction of the Mask Mask Select a preset template to use as mask for the transition Current Click to open a dialog box where you can browse BPMP files to use as the transition s mask Interval Specify the distance between each copy of the mask Path Select how the mask will move during ...

Page 94: ...e Overlay Track 1 In the Library select the media folder that contains the overlay clip that you want to add to your project 2 Drag the media file from the Library to the Overlay Track on the Timeline 3 Customize the overlay clip using the options available in the Edit tab See Edit tab on page 99 Tip To load media files into the Library click In the dialog box that opens locate the media file and ...

Page 95: ...a 32 bit alpha channel AVI video file or an image file with an alpha channel You can use an animation program such as Ulead COOL 3D Production Studio or an image editing program such as Ulead PhotoImpact to create these video and image files Another alternative is to use VideoStudio s Chroma Key function to mask a specific color on an image In the Attribute tab select where the overlay clip will E...

Page 96: ...Attribute tab to go to the Overlay Options Panel 2 Select Apply Overlay Options then Chroma Key in Type 3 Click the Color Box then select the color to be rendered as transparent In the Attribute tab click Mask Chroma Key to go to the Overlay Options Panel Drag the Transparency slider to set the opacity of the overlay clip Without Chroma Key With Chroma Key Pause Duration ...

Page 97: ...atio option resizes the overlay clip based on the width or height depending on which is longer in length of the overlay clip In the Attribute tab click Mask Chroma Key to go to the Overlay Options Panel Drag the Border slider to set the thickness of the border of the overlay clip Set the color of the border by clicking the Color Box beside the slider You can also right click the overlay clip on th...

Page 98: ...clip within the title safe area To apply a filter to the current overlay clip You can apply video filters to your overlay clips To learn how to apply See Applying video filters on page 82 To use the same attributes for different overlay clips You can use the attributes size and position of one overlay clip and apply it to a different overlay clip on your movie project To apply the same attributes ...

Page 99: ...ation playback speed and audio properties of the overlay clip The available options in this tab will depend on the selected overlay clip See The Edit Step Options Panel on page 67 Attribute tab The Attribute tab allows you to apply motion transparency filters and border to the overlay clip Tips Select then click on a color in the image that will be rendered as transparent Drag the Similarity Slide...

Page 100: ...et the directions in which the clip will enter and leave the screen Fade in Fade out Select to gradually increase or decrease the transparency of the clip when it enters or leaves the screen Mask Chroma Key Opens the Overlay Options Panel where you can specify the transparency and overlay options to be applied to the overlay clip Goes back to the previous Options Panel Transparency Sets the opacit...

Page 101: ...or the grid lines Adding Objects or Frames Add decorative objects or frames for your videos as overlay clips To add an object or frame 1 In the Library select Decoration Object Frame in the Folder list 2 Select an object frame then drag it onto the Overlay Track on the Timeline 3 Click the Attribute tab to resize and reposition the object frame Adding Flash animations Give more life to your videos...

Page 102: ...ize and reposition the object frame To customize the current object frame or Flash animation Use the various options available in the Edit and Attribute tabs to customize your object and frame You can add animation apply transparency resize the object or frame and more See The Overlay Step Options Panel on page 99 Animated Object Animated Frame ...

Page 103: ...boxes gives you the flexibility to position the different words of your text anywhere on the video frame and allows you to arrange the stacking order of the text Use a single text box when you are creating opening titles and end credits for your projects To add multiple titles 1 In the Options Panel select Multiple titles 2 Use the buttons in the Navigation Panel to scan your movie and select the ...

Page 104: ...dd the title Double click the Preview Window and type in your text 3 In the Options Panel set the Line spacing 4 When you are done typing the text click the Timeline to add the text to your project It is recommended to keep your text within the title safe area The title safe area is the rectangular box on the Preview Window By keeping the text within the bounds of the title safe area the whole tex...

Page 105: ... and alignment apply a Border Transparency and Shadow and add a Text backdrop to your text A text backdrop superimposes your text on a horizontal color bar that stretches across the video frame Click to open the Text Notes Once a title clip has been inserted onto the Timeline you can adjust its duration by either dragging the handles of the clip or entering a Duration value in the Options Panel To...

Page 106: ...or multiple titles To reposition a text in a multiple title clip The Title Step Options Panel The Title Step Options Panel allows you to modify text properties such as font size and color In the Preview Window click the text box you want to rearrange After selecting right click it then on the menu that opens select how you want to restack the text Drag the text box to the new position ...

Page 107: ...t file from older versions of VideoStudio Vertical text Makes the orientation of the title vertical Line spacing Sets the spacing or leading between lines of text Show grid lines Select to display the grid lines Click to open a dialog box where you can specify grid line settings Animation tab Apply Animation Enables or disables animation of the title clip Type Where you can select your preferred a...

Page 108: ...the screen Animation effects Drop dialog box Accelerate Select to start animating the next unit of the title clip before the current unit exits the screen Unit Determines how the title appears in the scene Text The whole title appears in the scene Character The title appears in the scene one character at a time Word The title appears in the scene one word at a time Line A line of text appears in t...

Page 109: ... enters the scene and disappear as it exits the scene Fly dialog box Accelerate Select to start animating the next unit of the title clip before the current unit exits the screen Start End unit Determines how the title appears in the scene Text The whole title appears in the scene Character The title appears in the scene one character at a time Word The title appears in the scene one word at a tim...

Page 110: ...iggered Swing dialog box Pause Applies a break in between the start and end direction of the animation Select No Pause to make the animation run seamlessly Swing degree Select the level of curve applied to the text Enter Exit Denotes the trail from where the motion of the title will start and end Clockwise Select to animate the curve in a clockwise direction Turn dialog box Enter Exit Denotes the ...

Page 111: ...ow the title appears in the scene Text The whole title appears in the scene Character The title appears in the scene one character at a time Word The title appears in the scene one word at a time Line A line of text appears in the scene one at a time Zoom start Zoom end Enter the title zoom ratio at the start and end of the animation ...

Page 112: ...o filters to your audio tracks The Auto Music tab allows you to use third party music tracks for your project Music Voice tab Duration Displays the duration of the audio track in hours minutes seconds frames You can also pre set the length of the recording by entering the desired duration Clip volume Adjusts the volume level of the recorded clip Fade in Gradually increases the volume of the clip F...

Page 113: ...he selected music A value of 100 retains the music s original volume level Fade in Gradually increases the volume of the music Fade out Gradually decreases the volume of the music Scope Specify how the program will search for SmartSound files Local Searches for SmarSound files stored in the hard disk Mounted Searches for SmartSound files stored in the hard disk and CD ROM drives Owned Searches for...

Page 114: ...he video VideoStudio allows you to record your own narration with crisp and clear results To add voiceover narration 1 Click the Music Voice tab 2 Move to the section of the video where you want to insert your narration by using the Jog Slider 3 Click Record Voice The Adjust Volume dialog box appears Note You cannot record over an existing clip When a clip is selected recording is disabled Make su...

Page 115: ...porting music from an audio CD There are two ways to capture music from an audio CD by adding or importing When you add music to your project VideoStudio will record the music track while it is playing On the other hand when you import from an audio CD VideoStudio copies the CDA file then saves it in your hard drive as a WAV file To add music from an audio CD 1 Click the Music Voice tab 2 Insert t...

Page 116: ... tracks to be imported in the Track List 3 Click Browse and select the destination folder where the imported files will be saved 4 Click Rip to start importing the audio tracks To add third party music 1 Click the Auto Music tab 2 Select how the program will search for music files in Scope 3 Select the Library from where to import the music 4 Under Music select the music you want to use 5 Select a...

Page 117: ...ral audio clips ready for you to use Click Load audio to add them to the Library for easy access Trimming and cutting audio clips After recording voice and music you can easily trim your audio clips on the Timeline There are two ways to trim audio clips On the Timeline a selected audio clip has two yellow handles that can be used for trimming Just grab a handle either from the beginning or end and...

Page 118: ... audio clip 1 Click the Music Voice tab in the Options Panel 2 Click Playback Speed to open the Playback Speed dialog box 3 Enter a value in Speed or drag the slider to change the speed of the audio clip A slower speed makes the clip s duration longer while a faster speed makes it shorter Tip You can also trim a clip in the Library by using the Trim handles Tip To play the trimmed portion of the c...

Page 119: ... feature will not trim the clip when you specify a shorter time You can stretch the time of an audio clip in the Timeline by holding Shift then dragging the yellow handles on the selected clip Background music that starts and ends gradually is commonly used to create smooth transitions For each of your music clips you can click and to fade in and fade out the volume at the start and end of the cli...

Page 120: ...You can only see the Audio Mixing Panel when you are in Audio View See Audio View on page 38 To use the Audio Mixing Panel 1 Click Audio View 2 In the Options Panel click the track whose volume level you want to adjust 3 In the Navigation Panel click Project to switch to Project Mode You can only use the Audio Mixing Panel in this mode 4 Click While the project is playing in the Preview Window dra...

Page 121: ...el in the Options Panel then select which audio channel to duplicate Volume rubber banding The volume rubber band is the horizontal line in the middle of the track and can only be seen when you are in Audio View You can use the rubber band to adjust the volume of the audio track of video clip and the audio clips in the Music and Voice tracks Tips Click Solo to only play back the audio of the selec...

Page 122: ... volume level at this point of the clip 5 Repeat steps 3 and 4 to add more key frames to the rubber band and to adjust the volume level Applying audio filters VideoStudio allows you to apply filters such as Amplify Long Echo Normalize and Stadium to your audio clips in the Music and Voice tracks You can only apply audio filters when you are in Timeline View See Timeline View on page 37 To apply au...

Page 123: ...ble filters list select the desired audio filters and click Add 4 Click OK Note An audio filter can be customized if the Options button is enabled Click Options to open a dialog box where you can define the settings for the particular audio filter ...

Page 124: ... DVD authoring wizard and allows you to burn your project in DVD SVCD or VCD format Project Playback Clears the screen and displays the whole project or a selected segment against a black background It can also output to a videotape if you have a VGA to a TV converter camcorder or a video recorder connected to your system It also allows you to manually control the output device when recording Expo...

Page 125: ...or DVD and videotape recording and also set up movie templates that give lower quality but acceptable outputs for different purposes such as Web streaming and e mail distribution To create movie templates 1 Select Tools Make Movie Manager The Make Movie Templates Manager dialog box opens 2 Click New In the New Template dialog box select the File format and type in a Template name Click OK 3 In the...

Page 126: ...e Preferences General tab Playback method To create a video file of the entire project 1 Click Create Video File in the Options Panel A selection menu of movie templates then opens 2 To create a movie file using the current project settings select Same as Project Settings Notes Movie templates will appear in a selection menu when you click Create Video File in the Share Step If you do not want to ...

Page 127: ...eate a video file of the preview range 1 Click the ruler on top of the Timeline to make sure no clip is selected 2 Select a preview range using the Trim Handles Or drag the triangle along the ruler then press F3 and F4 to mark the start and end points respectively Note To check current project settings select File Project Properties To check the saving options provided by a movie template select T...

Page 128: ...er the folder specified in the Preview tab of the Preferences dialog box See Preview tab on page 166 Burning a DVD VCD or SVCD Click Create Disc in the Options Panel to output your project together with other VideoStudio projects or videos to create a VCD SVCD or DVD In the Create Disc dialog box first choose an output format Second decide whether you want to add other projects and videos See the ...

Page 129: ...s VSP you want to include in your final movie To add videos 1 Click Add Video Locate the folder where the videos are and then select one or more video clips you want to add Mark in Jog Slider Set Mark in out Mark out Navigation Panel Project Settings Preferences and Templates Media Clip List ...

Page 130: ... precisely edit the video length Notes You can add video formats such as AVI QuickTime and MPEG files You can also add VCD video DAT files After a video clip is added to the Media Clip List sometimes you may see a black thumbnail This is because the first scene frame of this video clip is a black screen To change it double click to select this video clip and move the Jog Slider to the scene you wa...

Page 131: ...r the playback of the video will start from the selected chapter To create or edit chapters linked to a video clip 1 Select a video in the Media Clip List 2 Click Add Edit Chapters Notes You can create up to 99 chapters for a video clip If the Create menus option is not selected you will be guided to the preview step immediately without creating any menus after clicking Next When you are creating ...

Page 132: ...tch Ulead VideoStudio includes a set of menu templates for you to create your menus and submenus Or click Auto to let VideoStudio automatically select chapters Tips If you want to use Auto your video must be at least one minute long or the video has scene change information If you click Auto and your video is a DV formatted AVI file captured from a DV camcorder Ulead VideoStudio can automatically ...

Page 133: ...g from the beginning To edit menus 1 By default VideoStudio automatically makes all required menus for you Use Currently displayed menu to switch to the menu you want to edit 2 Click My Title to customize the menu heading You can also click the text description under each video thumbnail for customization Note If you do not modify My Title and the thumbnail descriptions or skip Step 2 there will b...

Page 134: ...t to preview the movie Previewing Now it s time to see how your movie looks like before you burn it onto a disc Simply move the mouse and click Play to watch your movie and test the menu selection on your computer Use the navigation controls here as you would on a standard remote control of a home DVD player Tips Select Motion Menu to enable motion attributes to the selected menu template Click Ad...

Page 135: ...o the format of your video into the disc burner 2 Enter a volume name up to 32 characters for the output disc 3 In Output settings select one or more tasks you want to do For example select the recording format that best suits your need See the notes below You can also click Output Advanced Settings if you want to add additional components such as a video disc player or your personal data 4 Select...

Page 136: ...e g menus in the future This option saves time in copying files and hard drive space when you edit the contents of your disc again but may result in your disc not being compatible with some DVD players If DVD Video fast editable is selected options in the Output Advanced Settings dialog box such as Include personal folder to disc will not be available If DVD Video fast editable is selected keep in...

Page 137: ...yback 2 In the Project Playback Options dialog box click Finish To stop the play back press Esc To record your project to a DV camcorder 1 Turn on your DV camcorder and set it to Play VTR VCR mode 2 In the Options Panel click Project Playback 3 In the Project Playback Options dialog box select Use device control then click Next Note If you only want to output the preview range of your project to t...

Page 138: ...ck Finish Exporting your movie VideoStudio provides you with a number of ways to export and share your movie which will be discussed in the following sections The Export button is only enabled after you create a final video file of your project or you select a video file that is in the Library You cannot export project files Tip Click Transmit to device unit for preview to preview your project on ...

Page 139: ... want to export Next click Export and select Ulead DVD DiskRecorder 2 The Ulead DVD DiskRecorder dialog box appears Choose an option below and then click Next To record video files onto a new blank formatted DVD RAM disc click Create Disc To format and view information about the DVD RW disc Click Edit Disc Tip If you record your videos on a new DVD RAM disc it must be pre formatted in the DVD VR f...

Page 140: ... clips are arranged in its original chronological order Once you re done click Next 4 In Step 3 if you select All programs you can select multiple neighboring clips to combine or divide a clip You can also select any clip to preview its content Once you re done click Next Note Program list shows different sets of programs recorded in chronological order ...

Page 141: ...oad However at reasonable file sizes viewers can download your movies from the Internet Creating video for the Internet requires proper use of video format and compression to produce good quality but small file size video files After you have created a movie that is suitable for posting to the Internet VideoStudio can assist with the task of coding the HTML document To export your video onto a Web...

Page 142: ...and location for the new HTML file 5 Click OK Your default browser will open displaying your page When you upload this page to your Web server you need to change one line of code to reflect the relative links to the associated movie file Sending a movie by e mail When you select E mail VideoStudio automatically opens your default e mail client and inserts the selected video clip into a new message...

Page 143: ...ick the Make Default button after the This application is NOT the default Mail handler option 4 Click Apply To enable MAPI in Netscape Mail 1 In Netscape Mail select Edit Preferences 2 Select Mail Newsgroups in the Category list 3 Select Use Netscape Messenger from MAPI based applications 4 Click OK To enable MAPI in Eudora 1 In Eudora select Tools Options 2 Select MAPI in the Category list 3 Sele...

Page 144: ...eight values directly 5 Enter a file name for the card in the Greeting card file entry box 6 Click OK to create the card The background templates that are provided with VideoStudio are JPEG image files You can create your own templates in any graphics editor or even use still frames captured from your movies To use your own backgrounds search for images using Browse next to the Background template...

Page 145: ... it easy for you to create an audio file of your project in MPA RM or WAV format To create an audio file 1 Open your project and click the Share Step Recording back to a DV camcorder After editing your project and creating a video file VideoStudio allows you to record the video to your DV camcorder You can only record a video that is using DV AVI format to your DV camcorder Note You can also creat...

Page 146: ...ck Finish 2 Click the Share Step 3 Select a compatible DV AVI file from the Library 4 Click DV Recording 5 The DV Recording Preview Window dialog box opens You can preview the video file here After you are done previewing click Next 6 In the Project Playback Record Window dialog box use the Navigation Panel to go to the section of the DV tape where to start recording Tip Click Transmit to device u...

Page 147: ...your DV camcorder make sure the video is saved with the correct codec For example the codec DV Video Encoder usually works well for most NTSC DV camcorders You can select it from the Compression tab in the Video Save Options dialog box See Compression tab MPEG files on page 178 ...

Page 148: ...ened in the workspace a message prompts you to save the changes Save Save As Allows you to save your work as a new or existing project file VSP It opens the Save As dialog box where you can assign a file name and location for saving the file Project Properties Displays the Project Properties dialog box that includes information about the currently opened file Here you can also edit the project fil...

Page 149: ...age prompting you to save your current project Edit menu Undo Reverses past actions that you performed on your project Ulead VideoStudio allows you to go back up to the last 99 actions The number of steps that you can undo depends on the settings you specify in the File Preferences General tab See General tab on page 161 Redo Allows you to reverse up to 99 of the last undo commands you performed T...

Page 150: ...ulti trim Video dialog box where you can select useful segments from a video clip and break down the clip into these segments Split by Scene Opens the Scenes dialog box where you can split the video file based on frame content or shooting date This option can also be used for clips in the Library Save Trimmed Video Cuts the selected part according to the Trim Handles and saves it as a new video fi...

Page 151: ...nly export WMV files as screen savers Properties Displays information about the currently selected clip Tools menu VideoStudio DV to DVD Wizard Opens the DV to DVD Wizard that allows you to capture videos from a DV camcorder then burn them onto a video disc VideoStudio Movie Wizard Opens the Movie Wizard that allows you to quickly create a movie See Movie Wizard on page 23 Create Disc Allows you t...

Page 152: ...o File in the Share Step you will be given the option to use that template Preview Files Manager Opens the Preview Files Manager dialog box listing all the preview files created in the project You can select the preview files to delete freeing some of your system resources Library Manager Allows you to create custom media folders in the Library Product Codec Information Opens a dialog box where yo...

Page 153: ...e for online registration easy updates special offers and a plethora of tips tricks and ideas About Ulead VideoStudio Shows program version and copyright information Dialog boxes Advanced Options Standard Select to burn a standard DVD Video disc Fast re editable Select to burn a DVD VR disc DVD VR discs are editable DVD Video discs This means you can add more video files as well as insert addition...

Page 154: ...hapter Select to automatically add chapters based on a specific time Create DVD folders Select to retain the DVD folder in your hard drive after burning This option is only available if the project is in DVD format This also allows you to view the finished DVD title on the computer using a DVD player Display aspect ratio Select from a list of supported pixel aspect ratios By applying the correct a...

Page 155: ... a TV screen Remember to take into account which medium will be your primary mode of display Template music volume Drag the slider to specify the volume level to use for the background music of DVD menus Drive Select a disc burner drive Burning speed Select the rate on which to burn the disc Audio Save Options Ulead VideoStudio tab Entire project Creates an audio file containing the whole project ...

Page 156: ...R GUIDE 156 Compression tab Format Click to open the Audio Format dialog box where you can change the audio characteristics Attributes Select from the drop down list of audio characteristics to use for saving Batch Convert ...

Page 157: ...nverted video files Save as type Select to what file format to convert the video files Convert Starts the conversion process Cancel Closes the dialog box without converting the video files Options Opens the Video Save Options dialog box where you can define save and compression settings for the selected file format See Video Save Options on page 176 Border Shadow Transparency Border tab Outline Se...

Page 158: ...epends on the type of shadow X Sets the horizontal distance between the text and shadow Y Sets the vertical distance between the object and shadow Color Click to select the color of the shadow Transparency Set the transparency of the text The higher the value the more transparent the shadow Soft edge Make the border blend smoothly with the background The higher the value the more the shadow blends...

Page 159: ...the video The higher the frame rate the smoother the video will be Display Source Volume Panel when capturing Select to open the Source Volume Panel when capturing analog videos You can use this panel to adjust the sound volume of the analog source during capture Change Capture Plug in Current capture plug in Allows you to choose a capture plug in for the driver that comes with the capture device ...

Page 160: ...y helps eliminate the buffer underrun problem Availability of this technology depends on the disc burner you use Restart DVD RW background format Select to format the DVD RW before recording Enabling this option will prolong the recording process but will ensure a successful burn This is recommended when you are using the DVD RW disc for the first time Do not close disc Select to keep the CD DVD o...

Page 161: ...rtant when the file in the Library is moved to another folder location Show message when inserting first video clip into Timeline Enables VideoStudio to prompt a message when it detects that an inserted video clip s properties do not match with the current project settings When you capture or insert your first video clip into the project VideoStudio automatically checks the properties of the clip ...

Page 162: ...applied to your project Playback method Choose a method for previewing projects Instant Playback allows you to quickly preview changes in your project without the need to create a temporary preview file however playback may be jerky depending on your computer resources High Quality Playback renders your project as a temporary preview file then plays this preview file Playback is smoother in High Q...

Page 163: ...ault field order Choose the default field option for the selected video clip whose field option is unknown Field based video stores video data as two distinct fields of information for each frame If your video is only for computer playback select Frame based Automatically save project every Select and specify the time interval when VideoStudio automatically saves a currently active project Cache i...

Page 164: ... Choose Best if you are preparing for final output Choose Good for fastest operation Image resampling option Select a method for your image resampling Default inserted image color clip duration Specifies the default clip length for all image clips and colors that will be added in your video project Unit of time for the duration is in seconds Default audio fade in out duration Specifies the default...

Page 165: ...CD Captured still image save format Specifies the format to which your captured still image file will be saved as Image quality Determines the display quality of the captured image The higher the quality the bigger the file Image capture deinterlace Enables constant image resolution when downloading files as opposed to the progressive image resolution available with interlaced images Stop DV tape ...

Page 166: ...eview tab Specify additional folders for preview files Indicates which folder Ulead VideoStudio can use to save preview files The folder shown is the folder specified in the SET TEMP statement of your AUTOEXEC BAT file Specify other folders if you have additional drives or a partitioned drive If you only have one drive leave the other boxes empty Limit hard disk usage to Specifies how much memory ...

Page 167: ...y correctly in these players Select this option to make sure that the VCD created will play in these players Apply anti flickering filter Select to apply the anti flickering filter to the menu pages The anti flickering filter reduces the flickering that happens when using a television interlaced display to view the menu pages However this does not help when the menu page is viewed on progressive s...

Page 168: ...VD menus to 30MB to make the DVD compatible with set top DVD DVD VR recorders Clear cache Select to remove the converted temporary video file when you quit VideoStudio TV system Select the type of your TV system NTSC or PAL DVD disc size Select the capacity of the DVD disc to burn by default Preview Playback Options View on the dialog box Preview Window Select to preview the selected filter in the...

Page 169: ...isplays additional information about the selected external playback device Project Properties Project file information Displays various information about the project file such as file size and duration Project template properties Displays the video file format and other attributes used by the project Edit file format Select the video format you are going to use to create your final movie Click Edi...

Page 170: ...ck to open a menu where you can select a disc template for the selected file format Click Customize to define video save settings such as compression and frame rate Do not convert compliant MPEG files Select to not re render MPEG files that are already compliant to the selected MPEG format Treat MPEG audio as non DVD compliant This is an option under Do not convert DVD compliant MPEG files Select ...

Page 171: ...iew Files Manager Use the Preview Files Manager to free hard disk space occupied by temporary preview files used in your project Preview files list Displays VideoStudio project files VSP that you created and saved Delete Click to remove the temporary files of the selected VideoStudio project file from your computer Delete All Click to remove all the temporary files of all VideoStudio project files...

Page 172: ...for example you have specified the mark in timecode for capturing and then after the process the captured start frame is the frame before the actual mark in timecode you can then set a value of 4 to correct the timing between the device and your capture board Description Displays additional information about the current device control driver Options Opens a dialog box related to the selected curre...

Page 173: ...S video input TV system Specify whether you like to use NTSC or PAL depending on your region NTSC is predominant in North America and many Asian countries PAL is the television standard in Europe and South Pacific Audio Audio device Select the audio device where you want to capture audio Input source Indicates the current sound input device Should there be any problems with your audio simply check...

Page 174: ...using an antenna to watch television or Cable if your television utilizes a cable TV system TV audio Select the audio format currently used by the TV Channel Enter the channel of the television program you plan to capture footage from Advanced Click to open the TV Channel Manager dialog box where you can scan for the TV channels available in your region Color tab Please see Video Color Manager on ...

Page 175: ...ced to specify your preferred software compression Advanced Click to open the Video Compression dialog box where you can customize compression settings Video Color Manager Video Color Manager allows you to adjust the analog source s video properties such as brightness contrast hue and saturation before you capture the video into VideoStudio There are various video property options that you can adj...

Page 176: ...gnizes if contents are still available for faster rendering process Perform non square pixel rendering Select to perform non square pixel rendering when previewing your video Non square pixel support helps avoid distortion and keeps the real resolution of DV and MPEG 2 content Generally the square pixel is suited for the aspect ratio of computer monitors while the non square pixel is best used for...

Page 177: ...p when the menu page is viewed on progressive scan devices such as computer monitors or projectors General tab Encoder driver Select the encoder to use to encode the video file Data track Specify whether to create the video file or the video track only or include the audio track Frame rate Specify the frame rate to use for the resulting video file Frame type Select between saving your work as fiel...

Page 178: ...you want to strictly follow the DVD VCD or SVCD specifications you should select one of the media types available on the drop down menu Select either NTSC or PAL depending on your region Speed Quality Drag the slider to control the compression of a file Dragging the slider to the right produces a higher quality video but at the expense of fluid motion of the video Dragging the slider to the left p...

Page 179: ...ideo stream during the first pass to pre determine the most appropriate compression for each frame This video encoding method adjusts the bit rates more efficiently to create better smoother visual quality Audio settings Audio format Select an audio coding format for DVD Video MPEG video encoding format include audio encoding which use lossy information Linear PCM LPCM is an uncompressed audio for...

Page 180: ...a file Configure Click for additional compression options Key frame for every _ Frames Specify the distance between key frames used by the compression scheme Data type Select from the list of available data types of the currently selected video compression scheme Preview Click to open the Preview dialog box to display the quality of the video compression settings Use common palette Select the colo...

Page 181: ... device Tolerance Specify the acceptable percentage of difference on the specified data rate and the data rate of the compressed file Recompress Select this option to force the program to re render recompress the project In most cases you should leave this option unchecked Interleave audio and video Select to be able to specify the interleave ratio between the audio and video data Pack audio data ...

Page 182: ...Ctrl S Save a project Alt Enter Project Properties F6 Preferences Ctrl Z Undo Ctrl Y Redo Ctrl C Copy Ctrl V Paste Del Delete F1 Help Alt C Go to Capture Step Alt E Go to Edit Step Alt F Go to Effect Step Alt O Go to Overlay Step Alt T Go to Title Step Alt A Go to Audio Step Alt S Go to Share Step Up Go to the previous step Down Go to the next step ...

Page 183: ...ggle between the Trim Handles and Jog Slider When the left Trim Handle is active pressing Tab or Enter switches to the right handle Left If you pressed Tab or Enter to make the Trim Handles or Jog Slider active use the Left arrow key to move to the previous frame Right If you pressed Tab or Enter to make the Trim Handles or Jog Slider active use the Right arrow key to move to the next frame ESC If...

Page 184: ...e same track To select multiple clips in the Library Shift Click or Ctrl Click the clips Left Select the previous clip in the Timeline Right Select the next clip in the Timeline Zoom in out Page Up Page Down Scroll to the right left Ctrl Down Ctrl Right Scroll forward Ctrl Up Ctrl Left Scroll backward Ctrl Home Move to the start of the Timeline Ctrl End Move to the end of the Timeline Del Delete F...

Page 185: ...d to Full Screen Preview press Esc to change back to the VideoStudio Editor interface Double click a tran sition in the Effects Library Double clicking a transition in the Library automatically inserts it into the first empty transition slot between two clips Repeating this process will insert a transition into the next empty transition slot ...

Page 186: ...You can play DVs countless times and still expect the quality to be as sharp as it originally was Digitization also extends a video s life span and allows you to enhance its original sound and picture quality Digitizing analog videos is a breeze with VideoStudio wherein data captured from an analog device are automatically converted to digital format Once digitized you can edit these footage and o...

Page 187: ...t only the edited portions making render times much shorter and faster The SmartRender feature also skips re rendering when the properties of the captured video are consistent with the project settings It only renders your project the first time you inserted your captured video clips When you add more captured video clips VideoStudio directly plays back the project without rendering In addition to...

Page 188: ...uced as single or dual sided and single and dual layered They can be played on stand alone DVD players or on the DVD ROM drive of your PC Video Compact Disc VCD is a special version of a CD ROM that uses the MPEG 1 format The quality of the exported movie is almost the same but usually better than VHS tape based movies A VCD can be played back on a CD ROM drive VCD player and even on a DVD player ...

Page 189: ...from the system s main memory without passing through the CPU Open the Control Panel s System program and in the Device Manager enable DMA Direct Memory Access for all the hard disks in the primary and secondary IDE channels that will be used for capturing video DMA avoids possible drop frame problems when you are capturing video In Windows XP ...

Page 190: ...ULEAD VIDEOSTUDIO USER GUIDE 190 In Windows 2000 ...

Page 191: ...ULEAD VIDEOSTUDIO USER GUIDE 191 In Windows Me and 98SE ...

Page 192: ...ULEAD VIDEOSTUDIO USER GUIDE 192 Disabling Write Behind Caching Disable Write Behind Caching on the hard drive used for video capture In Windows XP ...

Page 193: ...ULEAD VIDEOSTUDIO USER GUIDE 193 In Windows 2000 ...

Page 194: ...ULEAD VIDEOSTUDIO USER GUIDE 194 In Windows Me and 98SE ...

Page 195: ... the Paging File size Change the values of your Paging File Swap File size Set the minimum and maximum to twice your amount of RAM For instance if you have 256MB of RAM set both your minimum and maximum paging file limits to 512 In Windows XP ...

Page 196: ...ULEAD VIDEOSTUDIO USER GUIDE 196 In Windows 2000 ...

Page 197: ...ULEAD VIDEOSTUDIO USER GUIDE 197 In Windows Me and 98SE ...

Page 198: ...ing the IEEE 1394 interface card provides loss proof quality After editing your project you can then render your final movie at any file format of your choice If you don t have an IEEE 1394 card or a DV camcorder the second choice is to use an analog capture card If you intend to record your finished project back to the videotape using an analog capture card with S video output yields better video...

Page 199: ...e timecodes When capturing video or positioning the tape at a particular timecode sometimes VideoStudio may not be able to locate the timecode accurately and may even halt the program itself When this happens you may need to shut down the program Another option is to turn off your camcorder then wait for a few seconds at least six seconds before turning it back on This resets VideoStudio and once ...

Page 200: ...0 If VideoStudio does not work properly Repair VideoStudio if it does not work properly To repair VideoStudio double click Add or Remove Programs in the Control Panel Select Ulead Video Studio 9 click Change Remove then click Repair ...

Page 201: ...deo Interleave is a digital video file format designed specifically for the Microsoft Windows environment Capture The recording of video or images to a computer hard disk Capture Plug ins These are utilities integrated with Ulead VideoStudio that allow the program to recognize capture devices and automatically detect them when they are connected to the computer Clip A short section or part of a mo...
Page 202: ...es than hard disks The data rate of the Internet is very low Device Control A software driver that allows programs to control video sources like the camcorder or VCR Digital Computer data consisting of ones and zeros Contrast digital information with analog Digitizing The process of converting analog input to a digital form so that it can be used by the computer DNLE Digital Non Linear Editing is ...

Page 203: ...t can also hold several times more data than VCDs and SVCDs DVDs make use of the MPEG 2 format which has a much bigger file size than MPEG 1 and can likewise be produced as single or dual sided and single and dual layered They can be played on stand alone DVD players or on the DVD ROM drive of your PC Effect In VideoStudio an effect is a special computer generated transition between two video clip...

Page 204: ... an image intended for the sequence is larger or smaller than the current frame size it must be resized or cropped HiColor A 16 bit image data type that can contain up to 65 536 colors The TGA file format supports images of this type Other file formats require prior conversion of a HiColor image into True Color For displays HiColor normally refers to 15 bit 5 5 5 display adapters that can display ...

Page 205: ...ws a change in the appearance of the video from start to end of the video clip When creating a video assigning key frames on parts where there are high data transfer requirements helps control how smoothly the video plays back Library Ulead VideoStudio The Library is the repository for all of your media clips You can store video audio titles or color clips in the Library and instantly retrieve the...

Page 206: ...used in products like DVD For NTSC DVD its video resolution is 720x480 pixels at 29 97 fps For PAL DVD it works at 720x576 pixels at 25 fps NLE Non Linear Editing Conventional editing on a VCR is necessarily linear because you must access clips on a video tape in order Computer editing can be done in any order that is convenient Noise Small audible or visual discrepancies that adversely affect aud...

Page 207: ...ion to link all associated image audio and video files You need to open a project file first before starting video editing in VideoStudio Render Rendering is the process of making a finished movie from the source files in a project Scenes A scene is a series of frames binded by continuity In Ulead VideoStudio each scene that is captured using the Split by Scene feature is based on the footage s re...

Page 208: ...n Ulead VideoStudio the way scenes are detected depends on which step you are in In the Capture Step Split by Scene detects individual scenes based on the original footage s recording date and time In the Edit Step if Split by Scene is applied to a DV AVI file scenes can be detected in two ways by the recording date and time or by the changes in the content of the video Whereas in an MPEG file sce...

Page 209: ...representation of your movie in chronological order The relative size of clips on the timeline gives you an accurate idea of the length of your media clips Title A title can be a movie title a caption or credit Any text image or video file that overlays in your movie can be referred to as titles Transition Effect A transition is a method of sequencing between two video clips like fading from one i...

Page 210: ...CD player and even on a DVD player Video Filters A video filter is a method of changing the appearance of a video clip like mosaic and ripple Voiceover The narration of a video or movie is commonly called the voiceover This is most notable in documentaries such as nature shows ...

Page 211: ...86 voiceover 114 Adjusting color and brightness 77 Album 88 Allow access to capture device s settings 166 Analog 186 Analog video 13 55 Animation effects 108 Drop 108 Fade 108 Fly 109 Moving Path 109 Pop up 110 Swing 110 Turn 110 Zoom 111 Animation tab 107 Applying 82 audio filters 122 text animation 107 video filters 82 Attribute tab 99 Audio filters 122 Audio Mixing Panel 120 Audio Save Options ...

Page 212: ...setup 11 analog capture or tuner card 17 DV 11 USB camera 19 Chroma Key 96 Clip Volume Control 120 Color Effect Step 88 Color clips 66 Connecting 14 capture or tuner card to the sound card 16 TV antenna to the tuner card 15 USB camera 18 video device to the analog capture card 14 Create Audio File 145 Create Disc 124 adding editing chapters 131 assembling files 129 burning onto a disc 135 creating...

Page 213: ...ustomize Filter 84 Duration 28 Flip Album 89 Multi trim Video 74 New Color Clip 66 Pan Zoom 80 Preferences 161 Capture 165 Edit 164 General 161 Preview 166 Preferences Create Disc 167 Preferences File menu 161 Preview Files Manager 171 PreviewPlaybackOptions 168 Project Options 170 Project Properties 169 Project Settings Create Disc 170 Scanning Sensitivity 70 Scenes 69 Select Device Control 172 V...

Page 214: ...pe 2 53 DV camcorder 9 DV Quick Scan 59 DV SmartPlay 187 DV Type 1 53 DV type 2 53 DV D8 camcorder to the IEEE 1394 interface 10 DVD 188 DVD DVD VR 58 DVD VR compliant 179 DV to DVD Wizard 21 E Edit Step 65 Editing 62 chapters Create Disc 131 Edit Step 65 profile WMV 62 text 104 Effect Step 86 Enable Audio Preview 52 Enlarge Preview Window 35 Export 138 DV Recording 141 E mail 142 Greeting Card 14...

Page 215: ...der 35 K Keep Aspect Ratio 97 Keep aspect ratio 68 Key frame 83 L Library 39 sorting clips 41 Library Manager 42 152 M Make Movie Manager 152 Mark in out 35 Mask Chroma Key 96 97 100 Mask transitions 92 Mixing audio tracks 120 Modifying 105 Modifying text attributes 105 More options 107 Motion 95 overlay clip 95 Movie templates 125 Movie Wizard 23 MPEG 59 Multiple text 103 Multiple titles 107 Mult...

Page 216: ...6 Play Mode 35 Playback method 162 Playback Speed 67 77 Preferences 148 Preferences Create Disc dialog box 167 Preferences dialog box 161 Preview Files Manager dialog box 171 Preview Playback Options dialog box 168 Preview range 38 46 Previewing 45 Print Image 40 Print Options 40 Product Codec Information 152 Profile 61 62 Project Options dialog box 170 Project Playback 136 Project Properties 44 1...

Page 217: ...152 SmartRender 46 187 SmartSound Quicktracks 114 Soft edge Effect Step 88 Sorting clips in the Library 41 Source Volume Panel 56 Specify duration VideoStudio Movie Wizard 28 Speed Quality 178 Split by Scene 150 Split by scene Capture Step 51 54 Split by scene Edit Step 67 69 DV Recording Time 69 Frame Content 69 Split Video 35 71 Startup screen 21 Storyboard View 36 Enlarge 36 Stretching audio du...

Page 218: ...ttings dialog box 173 Video clips 65 Video Color Manager dialog box 175 Video Compact Disc 188 Video data rate 178 Video filter 82 applying to a clip in the Video Track 82 applying to overlay clip 98 key frame 83 Video Save Options dialog box 176 Video Track 37 45 65 73 86 VideoStudio Editor 31 Menu Bar 33 Navigation Panel 34 Options Panel 34 project timeline 35 Step Panel 32 user interface 31 Vid...

Reviews: