


51
EMP
Installation & Service Manual
109529-03 - 11/19
A .
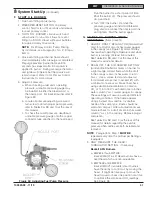
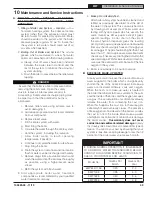
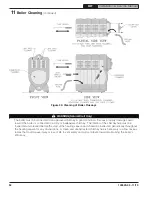
CLEAN THE FLUEWAYS
(See Figure 35).
1. For access to the combustion chamber
remove the
two (2) 3/8" - 16 cap screws. If boiler is equipped
with flexible fuel line(s), swing door open.
2. Remove the two smoke box clean-out covers
from the rear smoke box by removing the four
5/16"-18 hex head bolts. It is NOT necessary to
remove the vent connector from the smoke box
to clean boiler.
If necessary, remove the vent connector if there is
evidence of heavy soot accumulation in the boiler
or to inspect base of chimney for condensate or
accumulation of debris.
3. Remove the baffles (if installed) from the flue
passages. Refer to Section II, Paragraph F for
Baffle Installation.
4. Clean the 3
rd
Pass – Insert a 2" dia. x 42" long
wire or fiber bristle brush into each of the two 3
rd
passes. Using long strokes push the brush all
the way through the boiler until the brush has
exited the smoke box opening. Pull the brush
all the way forward until it has exited the front of
the boiler. Continue this operation for the entire
height of the flue way until clean. Repeat the
operation for the other 3
rd
pass flue way.
5. Clean the 2
nd
Pass - Insert a 2" dia. x 42" long
wire or fiber bristle brush into each of the two
2
nd
passes. Using long strokes push the brush
all the way through the boiler until the brush hits
the back wall of the reversing chamber. Pull the
brush all the way forward until it has exited the
front of the boiler. Continue this operation for the
entire height of the flue way until clean. Repeat
the operation for the other 2
nd
pass flue way.
6. Vacuum the loose debris in the bottom of the
combustion chamber and smoke box.
B . CLEAN THE COMBUSTION CHAMBER
– Use
a wire or fiber bristle brush to clean the surfaces of
the combustion chamber. Vacuum all of the loose
debris in the bottom of the combustion chamber.
C .
AFTER CLEANING,
vacuum all remaining debris
as necessary. Inspect burner swing door insulation,
and rope gasket for signs of damage. If damaged,
replace as needed.
D . REASSEMBLE BOILER .
CAUTION
Do not start the burner unless the burner swing
door and canopy cover plates are secured in
place.
1 Insert the baffles (if originally installed) into the
correct flue way. Refer to Section II, Paragraph
F for Baffle Installation.
2. Attach the smoke box clean-out covers onto the
rear of the boiler. Verify that the rope gasket is in
good working order before assembly. Replace
rope gasket if necessary. Use the 3/8" hardware
originally removed. Do not over tighten. They
should be snug but not bottomed out.
NOTICE:
When securing burner swing door make
sure door is drawn-in equally on both sides.
Tighten swing door hardware to provide adequate
seal to rope gasket around perimeter of door.
Use an alternating tightening method from right
side to left side cap screw to pull door tight
equally.
NOTICE:
Do not overtighten. The rope gasket will
provide sufficient seal when the door is snugged
into place.
11
Boiler Cleaning
WARNING
All boiler cleaning must be completed with burner service switch turned off. Boilers equipped with burner
swing door have a potential hazard which can cause severe property damage, personal injury or loss of life
if ignored. Before opening swing door, turn off service switch to boiler to prevent accidental firing of burner
outside the combustion chamber. Disconnect the burner plug from the receptacle in the front jacket. Be sure
to tighten swing door fastener completely when service is completed.
!
!


