10
38
33
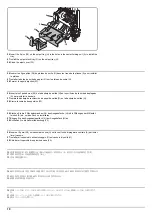
A
38
H
G
26.
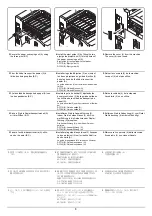
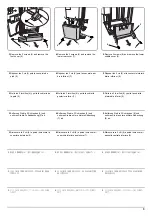
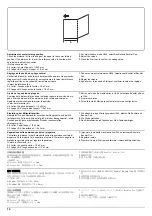
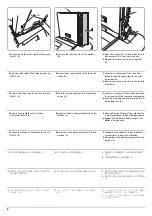
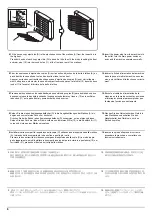
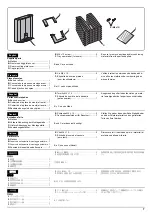
Insert the 2 pins (38) on the output tray (H) in the holes in the center-folding unit (A) to install the
tray.
27.
Install the output stock tray (G) on the output tray (H).
28.
Close the eject cover (33).
26.
Insérer les 2 goupilles (38) du plateau de sortie (H) dans les trous de la plieuse (A) pour installer
le plateau.
27.
Installer la butée de sortie du papier (G) sur le plateau de sortie (H).
28.
Fermer le capot d'éjection (33).
26.
Inserte los 2 pasadores (38) de la bandeja de salida (H) en los orificios de la unidad de plegado
(A) para instalar la bandeja.
27.
Instale la bandeja de recolección de papel de salida (G) en la bandeja de salida (H).
28.
Cierre la cubierta de expulsión (33).
26.
Stecken Sie die 2 Rändelschrauben (38) des Ausgabefachs (H) in die Öffnungen der Mittenfal-
teinheit (A) ein, um das Fach zu installieren.
27.
Bringen Sie das Ausgabestapelfach (G) am Ausgabefach (H) an.
28.
Schließen Sie die Auswurfabdeckung (33).
26.
Inserire i 2 perni (38) sul vassoio di uscita (H) nei fori sull'unità di piegatura centrale (A) per instal-
lare il vassoio.
27.
Installare il vassoio di uscita stoccaggio (G) sul vassoio di uscita (H).
28.
Chiudere il coperchio di esplusione carta (33).
26.
排紙トレイ (H) のピン (38)2 本を中折りユニット (A) の穴に入れ、
排紙トレイ (H) を取り付け
る。
27.
排紙ストックトレイ (G) を排紙トレイ (H) に取り付ける。
28.
排出カバー(33) を閉じる。
26.
将排纸托盘 (H) 的 2 根销钉 (38) 插入中缝装订-折页单元 (A) 的孔中,以安装排纸托盘 (H)。
27.
将堆纸托盘 (G) 安装到排纸托盘 (H) 上。
28.
关闭排纸盖板 (33)。
26.
배지트레이 (H) 의 핀 (38) 2 개를 접기 유니트 (A) 의 구멍에 넣고 배지 트레이 (H) 를 장착합니다
.
27.
배지 저장 트레이 (G) 를 배지 트레이 (H) 에 장착합니다 .
28.
배출커버 (33) 를 닫습니다 .
Summary of Contents for UTAX AK 730
Page 5: ...This page is intentionally left blank ...
Page 11: ...This page is intentionally left blank ...
Page 15: ...3NB 3ND 3N0 3NK This page is intentionally left blank ...
Page 25: ...3NB 3ND 3N0 3NK 1 1 10 This page is intentionally left blank ...
Page 43: ...3NB 3ND 3N0 3NK 1 2 18 3 Remove tape and pad Figure 1 2 23 Tape Pad ...
Page 45: ...3NB 3ND 3N0 3NK 1 2 20 This page is intentionally left blank ...
Page 81: ...3NB 3ND 3N0 3NK 1 3 36 This page is intentionally left blank ...
Page 157: ...3NB 3ND 3N0 3NK 1 4 76 This page is intentionally left blank ...
Page 169: ...3NB 3ND 3N0 3NK 1 5 12 This page is intentionally left blank ...
Page 206: ...3NB 3ND 3N0 3NK 2 2 11 This page is intentionally left blank ...
Page 246: ...1 1 INSTALLATION GUIDE INSTALLATION GUIDE FOR 4000 SHEETS FINISHER ...
Page 269: ...INSTALLATION GUIDE FOR FINISHER ATTACHMENT KIT MFP A ...
Page 283: ...INSTALLATION GUIDE FOR FINISHER ATTACHMENT KIT MFP B ...
Page 284: ...E F A H G I J B D C ...
Page 291: ...INSTALLATION GUIDE FOR FINISHER ATTACHMENT KIT PRINTER ...
Page 295: ...INSTALLATION GUIDE FOR CENTER FOLDING UNIT ...
Page 312: ...INSTALLATION GUIDE FOR MULTI TRAY ...
Page 326: ...INSTALLATION GUIDE FOR MULTI TRAY ATTACHMENT KIT PRINTER ...
Page 330: ...INSTALLATION GUIDE FOR PUNCH UNIT ...


