36
SMMS High-Wall Type
Installation Manual
Toshiba
Wireless remote controller
• A place where there are no obstacles such as a curtain that may block the signal from the indoor unit.
• Do not install the remote controller in a place exposed to direct sunlight or close to a heating source, such
as a stove.
• Keep the remote controller at least 1m apart from the nearest TV set or stereo equipment.
(This is necessary to prevent image disturb-bounces or noise interference.)
• The location of the remote controller should be determined as shown below.
4
INSTALLATION OF INDOOR UNIT
WARNING
Install the air conditioner certainly to sufficiently withstand the weight.
If the strength is insufficient, the unit may fall down resulting in human injury.
Perform a specified installation work to guard against strong wind or earthquake.
An incomplete installation can cause accidents by the units falling and dropping.
REQUIREMENT
Strictly comply with the following rules to prevent damage of the indoor units and human injury.
• Do not put a heavy article on the indoor unit. (Even units are packaged)
• Carry in the indoor unit as it is packaged if possible. If carrying in the indoor unit unpacked by necessity,
be sure to use buffering cloth, etc. to not damage the unit.
• To move the indoor unit, do not apply force to the refrigerant pipe, drain pan, foamed parts, or resin
parts, etc.
• Carry the package by two or more persons, and do not bundle it with plastic band at positions other than
specified.
Be careful to the following items when installing the unit.
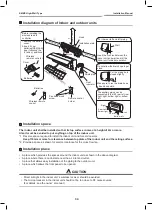
• Considering air discharge direction, select an installation place where discharge air can circulate evenly
in a room. Avoid to install the unit at place with “
NO GOOD
” mark in the right figure.
(Side view)
(Top view)
Remote controller
Reception
range
* : Axial distance
Indoor unit
Remote controller
*
7
m
Indoor
unit
5 m
5 m
7 m
75
°
45°
45°
Reception range
Good installation place
Cooled well all over.
Bad installation place
: Not cooled well.
Screen
OK
NO GOOD
+1111050501_01EN_SMMS_HighWall_IM_B5.book Page 7 Wednesday, November 12, 2008 2:45 PM
SMMS High-Wall Type
Installation Manual
Toshiba
5
CUTTING A HOLE AND MOUNTING INSTALLATION
PLATE
Cutting a hole
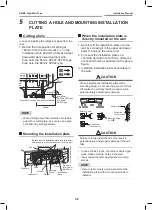
In case of installing the refrigerant pipes from the
rear:
1. Decide the hole position for piping at
180mm from the arrow mark (
Ö
) on the
installation plate and drill a hole at a slight
downward slant toward outdoor side.
Pipe hole; dia.65mm: AP007-AP018 type
Pipe hole; dia.80mm: AP024 type
NOTE
• When drilling a wall that contains a metal lath,
wire lath or metal plate, be sure to use a pipe
hole brim ring sold separately.
Mounting the installation plate
When the installation plate is
directly mounted on the wall
1. Securely fit the installation plate onto the
wall by screwing it in the upper and lower
parts to hook up the indoor unit.
2. To mount the installation plate on a
concrete wall with anchor bolts, utilize the
anchor bolt holes as illustrated in the above
figure.
3. Install the installation plate horizontally in
the wall.
CAUTION
When installing the installation plate with a
mounting screw, do not use the anchor bolt hole.
Otherwise the unit may fall down and result in
personal injury and property damage.
CAUTION
Failure to firmly install the unit may result in
personal injury and property damage if the unit
falls.
• In case of block, brick, concrete or similar type
walls, make 5mm dia. holes in the wall.
• Insert clip anchors for appropriate mounting
screws.
NOTE
• Secure four corners and lower parts of the
installation plate with 6 mounting screws to
install it.
80
65
1111012101
80
65
1111012101
23mm
The centre of the pipe hole is above the arrow
180mm
Pipe hole
dia. 65mm:
AP007-AP018 type
dia. 80mm:
AP024 type
23
dia.65mm
132
170
40
50
170
85
Anchor bolt holes
Hook
Hook
Pipe hole
Indoor unit
Thread
Weight
Mounting
Screw
Installation
plate
Pipe hole
(dia. 65mm
dia. 80mm)
Hook
2m or m
or
e fr
om
fl
oor
Be sure that the installation plate is fix to the wall
with screws to make the indoor unit fit to the wall.
Projection
15mm or less
Clip anchor
(local parts)
Mounting screw
4 × 25
Anchor bolt
5mm dia. hole
OK
NO
GOOD
NO
GOOD
+1111050501_01EN_SMMS_HighWall_IM_B5.book Page 8 Wednesday, November 12, 2008 2:45 PM

