background image

3.Printer-specific Adjustments

 © 2018 TOSHIBA TEC CORPORATION All rights reserved

e-STUDIO2010AC/2510AC/2515AC/3015AC/3515AC/4515AC/5015AC

3-47

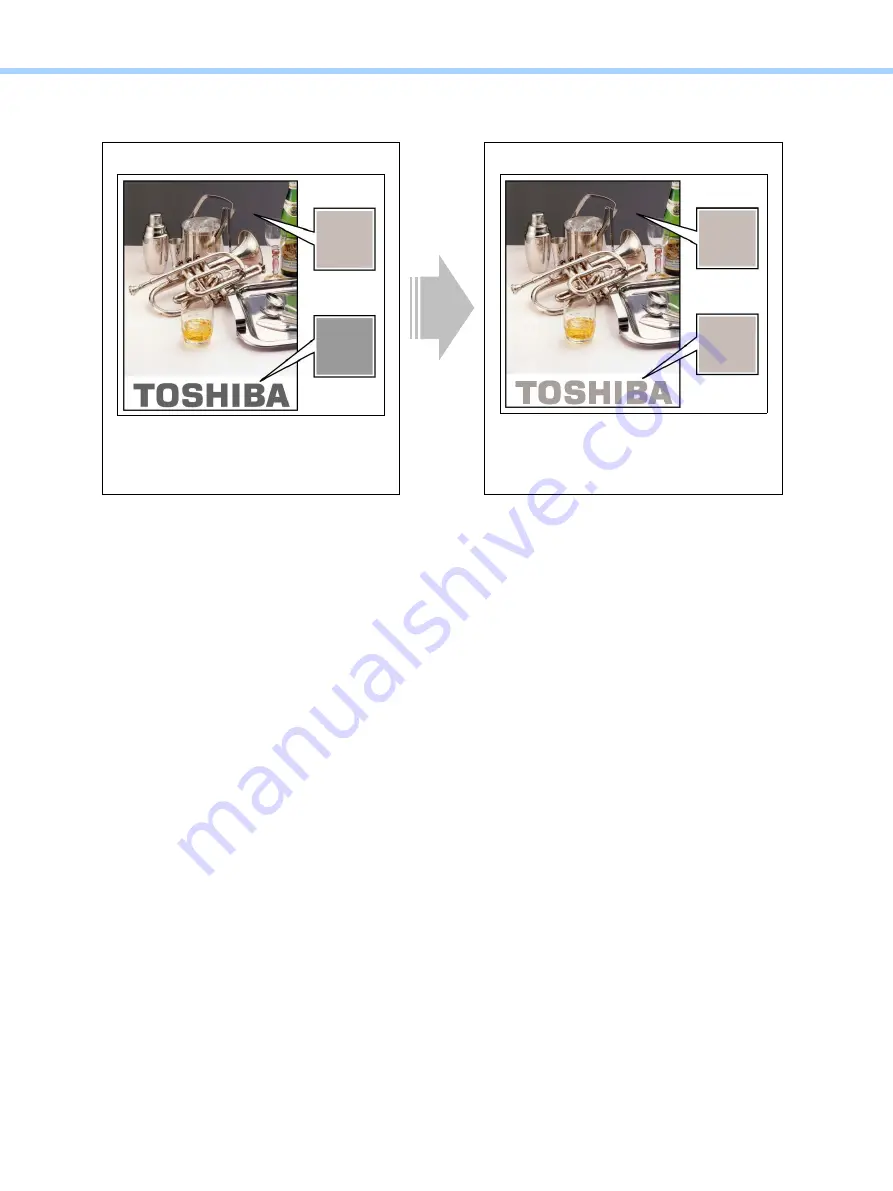
3.4.3

To Maintain a Uniform Gray Hue
(To maintain Consistency in Gray among Text, Photos and Graphics)

Explanation

For printing, only the K toner is usually used to reproduce gray areas of drawing data, lines and text. On 
the other hand, all color toners (C, M, Y and K) are used to reproduce gray areas of image data, such as 
BMP, GIF, JPEG and TIFF. This provides a deeper gray on the printouts. Change the option on the 
printer driver, in order to maintain consistency in the gray hue between the drawing data and the image 
data.

Procedures

Both the service technician and the user can perform all adjustments.

Before adjustment

After adjustment

How gray is reproduced varies depending 
on the type of original. As a result, there 
are variations in gray.

All color toners are used to reproduce 
gray. As a result, consistency is 
maintained in the gray hue.

Photo area

Text area

Photo area

Text area

Summary of Contents for e-STUDIO2010AC

Page 1: ...File No SME18003400 R180821V5800 TTEC Ver00F_2018 10 ...

Page 2: ...c OS Safari iPhone iPod touch TrueType AirPrint AirPrint logo and iPad are trademarks of Apple Inc IOS is a trademark or registered trademark of Cisco in the U S and other countries and is used under license Adobe Acrobat Reader and PostScript are trademarks or Adobe Systems Incorporated Mozilla Firefox and the Firefox logo are trademarks or registered trademarks of Mozilla Foundation in the U S a...

Page 3: ...ration and direct sunlight Provide proper ventilation since the equipment emits a slight amount of ozone To insure adequate working space for the copying operation keep a minimum clearance of 30 cm 11 8 on the left 80 cm 32 on the right and 20 cm 7 9 on the rear The equipment shall be installed near the socket outlet and shall be easily accessible Be sure to fix and plug in the power cable securel...

Page 4: ...igh temperature sections such as the fuser unit damp heater and areas around them Be sure not to touch high voltage sections such as the chargers transfer belt 2nd transfer roller developer high voltage transformer and power supply unit Especially the board of these components should not be touched since the electric charge may remain in the capacitors etc on them even after the power is turned OF...

Page 5: ...els to see if there is any dirt on their surface and if they are properly stuck to the equipment 6 Disposal of the Equipment Supplies Packing Materials Used Batteries and IC RAMs Regarding the recovery and disposal of the equipment supplies packing materials follow the relevant local regulations or rules 7 Batteries and IC RAMs including lithium batteries etc CAUTION RISK OF EXPLOSION IF BATTERY I...

Page 6: ...Revision Record Ver00 2018 10 19 Page Contents All Initial release ...

Page 7: ...entative to study and comprehend what kind of customer requirements for image quality can be satisfied to make proposals to customers to improve image quality and to communicate the customers specific requirements with ease to the service technician In addition this manual is expected to facilitate the marketing of Toshiba MFPs to prospective customers that have a specific demand for image quality...

Page 8: ...ong the Color Type options on the Mac print dialog Scan An adjustment having an effect on scanning in the Full Color mode Copy An adjustment having an effect on copying in the Auto Color mode Scan An adjustment having an effect on scanning in the Auto Color mode An adjustment having an effect on printing with the Windows PCL emulation printer driver An adjustment having an effect on printing with ...

Page 9: ...5 2 8 To Avoid Copying the Image Seen through the Back of a Page Printed on Thin Paper 2 38 2 8 1 To Adjust the Copy Image Quality in the Black Mode 2 39 2 8 2 To Adjust the Copy Image Quality in the Full Color Mode 2 41 2 9 To Eliminate Moiré 2 43 2 10 To Copy Sharply To enhance sharpness 2 47 2 11 To Make Photo Edges Look Softer 2 50 2 12 To Make Solid Filled Bold Text Logo Highly Colored 2 54 2...

Page 10: ... 3 2 To Make Print Suitable for the Original 3 34 3 3 To Maintain a Steady Color Balance 3 38 3 3 1 To Maintain a Steady Color Balance on Plain Paper 3 38 3 3 2 To Maintain a Steady Color Balance on Thick Paper or Special Paper 3 40 3 4 To Adjust Colors 3 43 3 4 1 To Adjust Color Balance and Density 3 43 3 4 2 To Closely Match the Color Balance on the Monitor 3 44 3 4 3 To Maintain a Uniform Gray ...

Page 11: ...riginal To adjust the color balance in Print to Box 4 5 4 4 To Scan and Print while Minimizing Moiré 4 7 4 5 To Finely Print the Image Stored in the e Filing box To print images stored through Copy to Box or Print to Box 4 9 4 6 To Store an Image Suitable for Displaying on the Monitor or Image Editing 4 11 4 7 To Finely Print Color Images Scanned and Stored To print images stored through Scan to B...

Page 12: ...Table of Contents e STUDIO2010AC 2510AC 2515AC 3015AC 3515AC 4515AC 5015AC 2018 TOSHIBA TEC CORPORATION All rights reserved iv ...

Page 13: ...er bias output in order to obtain a darker and sharper image Procedures Perform the adjustment in accordance with the procedures below Both the service technician and the user can perform procedure 1 Only the service technician must perform procedures 2 and 3 1 Perform automatic calibration to correct variations in image density A privilege to perform automatic calibration is set to Administrator ...

Page 14: ...riations in image density in 2 14 To Obtain a Good Color Balance on Thick Paper After performing automatic calibration print and check the image quality If further image quality adjustments are necessary go to step 2 to adjust the transfer 2nd transfer roller bias output To adjust the print image quality Image quality adjustment for 600 dpi full color printing Use steps a through i to perform auto...

Page 15: ...on print and check the image quality If further image quality adjustments are necessary go to step 2 to adjust the transfer 2nd transfer roller bias output Image quality adjustment with simple calibration Use steps a through d to perform simple calibration a Press User Functions User on Home screen to enter the User Functions menu b Press General c Press Auto Calibration d The message Set Auto Cal...

Page 16: ... to the paper type for which you would like to improve the image quality Set the value within a range of 2 to 8 to obtain the highest density of the image Paper type 05 code Sub code Recommended value Acceptable value range Default Full color Front Plain Thick paper 05 2934 0 2 to 8 0 to 10 5 Thick paper 1 1 Thick paper 2 2 Thick paper 3 3 Transparency OHP film 4 Special paper 1 5 Special paper 2 ...

Page 17: ...with asperities on its surface On the other hand the setting value should be decreased when you print on thin paper Black Front Plain Thick paper 05 2936 0 2 to 8 0 to 10 5 Thick paper 1 1 Thick paper 2 2 Thick paper 3 3 Transparency OHP film 4 Special paper 1 5 Special paper 2 6 Recycled paper 7 Thick paper 4 8 Thin paper 9 Envelope 10 Special paper 3 11 Back Plain Thick paper 05 2937 0 2 to 8 0 ...

Page 18: ...rmed and the image quality control value will be initialized c Perform automatic calibration in the same manner as in procedure 1 After replacing any consumable remember to reset the counter corresponding to it to 0 Otherwise it may cause a loss in MFP performance including degradation in the image quality and a reduction in the life of the consumables Caution after the adjustment Nothing in parti...

Page 19: ...n the developer bias adjustment perform image quality adjustment while changing the target value as much as possible Procedures The service technician must perform the adjustment in accordance with the procedures below 1 Select 05 ADJUSTMENT MODE Adjust the density of the copied or printed solid image Use steps a to b to perform the adjustment a Select 05 ADJUSTMENT MODE and change the value for c...

Page 20: ...es 2513 2514 to adjust the developer bias output value The value to use varies depending on the paper type and color to adjust Check the code to use in accordance with the following Code list and refer to the Code setting values list to select a proper value Code The table below shows you the acceptable paper weight for the paper type e STUDIO2515AC 3015AC 3515AC 4515AC 5015AC only Paper type Colo...

Page 21: ...as a photograph is adjusted as well as that of a solid colored image follow the procedure below Caution after the adjustment The adjustment may possibly cause extremely dark images decreased resolving power and lack of gradation reproducibility and extremely light images blurred images and faint thin lines Therefore perform adjustment carefully while checking the copy or print image Depending on t...

Page 22: ...mage quality adjustments are necessary perform the next step 4 Check the life of the consumables particularly the drum and transfer belt unit and replace them if necessary When replacing any consumable use steps a to b a Enter the PM support mode Reset the counter corresponding to the replaced consumable to 0 For further information regarding the PM support mode refer to the Service Manual Be sure...

Page 23: ...e reproducibility of halftones extremely dark images decreased resolving power extremely light images faint thin lines and shorten the life of the consumables Therefore carefully perform the adjustment while checking the copy or print image No effect of the adjustment may appear depending on the installation environment of the MFP Therefore carefully perform the adjustment while checking the copy ...

Page 24: ...hnician The procedure to be followed differs depending on the purpose as follows To adjust Low Middle density image Go to step 1 To adjust images on the high density area only when recycled paper is used Go to step 2 1 Select 05 ADJUSTMENT MODE Change the values for codes 2934 to 2937 to adjust the transfer 2nd transfer roller bias output Adjust the offset voltage of transfer roller bias so as to ...

Page 25: ...y OHP film 4 Special paper 1 5 Special paper 2 6 Recycled paper 7 Thick paper 4 8 Thin paper 9 Envelope 10 Special paper 3 11 Back Plain Thick paper 05 2935 0 2 to 8 0 to 10 5 Thick paper 1 1 Thick paper 2 2 Thick paper 3 3 Special paper 1 5 Special paper 2 6 Recycled paper 7 Thick paper 4 8 Thin paper 9 Envelope 10 Special paper 3 11 Black Front Plain Thick paper 05 2936 0 2 to 8 0 to 10 5 Thick ...

Page 26: ...ined on plain paper other than the TOSHIBA recommended one is used select recycled paper as a paper type To select the paper type refer to the Operator s Manual for Paper Preparation Guide If fine adjustment of image quality in the recycled paper mode is required in accordance with the paper type follow the steps from a to b below a Select 05 ADJUSTMENT MODE Change the value of the codes 2934 to 2...

Page 27: ...paper After setting the value print and check the image quality If further image quality adjustment is necessary go to step b b Select 08 SETTING MODE Change the value of the code 5293 to adjust fusing temperature in the recycled paper mode In this step fusing temperature is adjusted to print the high density area of the image most clearly Paper type 05 code Subcode Recomm ended value Acceptabl e ...

Page 28: ...n 1 1 To Obtain a Darker Image After replacing any consumable remember to reset the counter by making it correspond to 0 Otherwise it may cause a loss in MFP performance including degradation in the image quality and a reduction in the life of the consumables Caution after the adjustment After the fusing temperature was adjusted in step 2 above printing interruption may occur due to improper fusin...

Page 29: ... 3015AC 3515AC 4515AC 5015AC 1 17 1 4 To Minimize Variations in the Image Quality under the Operating Conditions To optimally program image quality control Before adjustment After adjustment The image contrast varies depending on the date and time when copying or printing is performed or the type of job The image quality is constantly maintained ...

Page 30: ...trols must be adjusted by setting the most appropriate value for 08 code in accordance with the status of use or stability level required by a user See the table below for an overview of image quality controls Overview of image quality controls 1 The correction accuracy is high but it takes approx 90 seconds equal to the time taken by existing models This control is performed with a simple calibra...

Page 31: ...dely a Set 1 value 5 R H for code 08 2505 to increase the frequency of image quality control in response to a change in humidity Image quality control will be performed when the relative humidity changes in accordance with the specified difference from the previous image quality control If the difference in the relative humidity exceeds the specified value image quality control is performed first ...

Page 32: ...for 08 9112 while the Auto power save timer setting is set to invalid 0 is set for 08 9111 If both settings are set to invalid this equipment does not enter the energy saving mode so it is always in the ready status Due to this image quality control according to the period of time the MFP is left unused is not performed regardless of the setting value of 08 2507 After setting the value for code 08...

Page 33: ...image and check its quality 7 To start the Short Mode at every 30 pages set the value to 30 for both 08 2497 and 08 9199 However setting a too short interval will use up too much toner even though the consumption in the Short Mode is approximately a quarter of that in the Full Mode A For standard office use mainly business documents Default Code to set number of pages Setting value Starting condit...

Page 34: ...ing blade Changing this setting improves the stability of the image quality However a long application of this change affects the life of consumables It is recommended to make only a minimal change and then return to the default value immediately C To stabilize the image quality on Low Middle density in pictures when interrupting jobs and starting the Full Mode at every 250 pages Code to set numbe...

Page 35: ... how the copy image changes carefully The setting value may be changed to 4 or 2 if required g Place paper to be used on the drawer that you selected in step d above h Perform automatic calibration Refer to step 1 in 1 1 To Obtain a Darker Image After setting the value print and check the image quality If further image quality adjustment is necessary go to the next step 3 Check the life of the con...

Page 36: ... minute A4 LT after the adjustment The Thick 1 paper mode cannot be set for the LCF Large Capacity Feeder optional Therefore the maximum number of sheets acceptable for continuous printing should be the one for the drawer However in the copying mode you can set the Thick 1 paper mode to more than one drawer and copy more paper continuously with the automatic drawer change function The density leve...

Page 37: ...tment cannot improve misaligned colors in the direction perpendicular to paper feeding or primary scanning or in the secondary scanning direction periodically partially at regular intervals Refer to Troubleshooting for the Image 1 Color deviation in the Service Manual Adjustment for plain paper 1 Make sure that no out of registration colors are visible on an original 2 Select 05 ADJUSTMENT MODE se...

Page 38: ...Check the first page of the printed test print pattern to identify a pattern for the out of registration colors There are 2 patterns for the out of registration colors Check which pattern the out of registration colors to adjust on the body are included Pattern A for out of registration colors Code Test print pattern Paper size No of copies 104 Test print pattern for identifying out of registratio...

Page 39: ...he values in accordance with a pattern for the out of registration colors as shown in the table below b Select code 104 and then press TEST PRINT Check all the patches on the second page of the printed test print pattern to check whether the misaligned colors have been improved Pattern for out of registration colors 05 code Subcode Recommended value Acceptable value range Default Pattern A 05 4529...

Page 40: ...lar Remarks Enter a value within the recommended value range mentioned in the procedures Otherwise it may cause a loss in MFP performance including degradation in the image quality Out of registration colors cannot always be perfectly corrected this depends on the type of text or lines to print Also refer to the relevant information in the Service Manual for further information regarding color reg...

Page 41: ...ardware To make printing positions as precise as possible c Fine image positions adjustment Adjust the image positions finely to place the images on both sides in their optimal positions 2 a Image position adjustment Refer to the 6 1 7 Image dimensional adjustment at the printing section of the Service Manual and adjust the image positions by approximating values from A to F below to a target valu...

Page 42: ...he current settings if necessary make adjustments according to the following procedure Notes Since the reproduction ratio may vary due to expansion and contraction of the paper immediately after the image is printed out it is recommended to measure its dimension after at least 3 minutes have passed This adjustment may cause image troubles such as moire disappearance or breaking of thin lines on th...

Page 43: ...out since the line is occasionally vanished Procedure 1 Select 05 ADJUSTMENT MODE 2 Key in a code and press the START button 3 Key in the adjustment value To correct a value press CLEAR 4 Press OK to store the value The equipment goes back to the ready state 5 Check the chart If the image is not in the desired reproduction ratio repeat steps 2 to 5 3 b Image distortion adjustment Adjustment of til...

Page 44: ...mode When this tilted image is printed in the duplex mode image positions on the front and back sides become as shown below Adjustment method e STUDIO2010AC 2510AC Loosen the 2 screws 2 on the fuser unit guide rail front Remove 1 screw 3 Change its position to the adjustment hole 4 and move the fuser unit guide rail front 2 up or down Guideline of the movement One scale There is a 0 5 mm wide scal...

Page 45: ...rail Remove 1 screw 2 and replace it in the adjustment hole 3 Move the fuser unit front guide rail up or down one step 0 5 mm scale 4 Move the fuser unit guide rail upward Move the fuser unit guide rail downward The reproduction ratio in the secondary scanning direction on the front side becomes large The reproduction ratio in the secondary scanning direction on the front side becomes small Front ...

Page 46: ...below in the simplex mode When this tilted image is printed in the duplex mode image positions on the front and back sides become as shown below Move the fuser unit guide rail upward Move the fuser unit guide rail downward The reproduction ratio in the secondary scanning direction on the front side becomes large The reproduction ratio in the secondary scanning direction on the front side becomes s...

Page 47: ...Box 2018 TOSHIBA TEC CORPORATION All rights reserved e STUDIO2010AC 2510AC 2515AC 3015AC 3515AC 4515AC 5015AC 1 35 Adjust the tilted images of leading edge When a printed image at the leading edge of paper is tilted as shown below correct this by the following steps ...

Page 48: ...cleaner unit left cover and receiving tray from the MFP Refer to the following pages of the Service Manual a 4 6 1 Waste toner box b 4 6 2 Developer unit c 4 6 10 Cleaner unit d 4 1 2 Left cover e 4 1 3 Receiving tray 2 Remove 3 screws 1 3 Release the latches 1 and then take off the toner cover 2 Note When taking off the toner cover remove the cooling duct 3 and toner stays 4 and 5 4 Loosen 5 scre...

Page 49: ...itled volume 4 The scale to use when adjusting the tilted volume LSU holder side 5 The scale to use when adjusting the tilted volume frame side 6 The screw hole to use when the value of A B is 0 5 mm 0 5 is marked 7 The screw hole to use when the value of A B is 0 5 mm 0 5 is marked Move the frame 2 to the right Move the frame 2 to the left The writing start position on the front side is moved to ...

Page 50: ...size and check the tilted volume of an image the value of A B 2 Remove 5 screws and take off the left cover Refer to 4 1 2 Left cover in the Service Manual Note Be sure to check the scale positions before carrying out the adjustment Take a memo of the scale positions where the LSU holder 4 and the frame 5 ones are aligned Fig C The scale position is aligned at the center Fig D The scale position i...

Page 51: ...der to be aligned Scale position to be aligned Tilted volume A B Unit mm Frame LSU holder 297 mm A3 279 mm LD Front Eighth Eighth 1 12 1 04 Seventh Seventh 0 98 0 91 Sixth Sixth 0 84 0 78 Fifth Fifth 0 7 0 65 Fourth Fourth 0 56 0 52 Third Third 0 42 0 39 Second Second 0 28 0 26 First First 0 14 0 13 Center 0 0 0 0 Rear First First 0 14 0 13 Second Second 0 28 0 26 Third Third 0 42 0 39 Fourth Four...

Page 52: ...idth 297 mm A B Approx 0 6 mm Select 0 56 from the table and make sure that the scale position located at the fourth one on the rear side is to be aligned Move the LSU holder 1 to the front side so that its scale position of the fourth one on the rear side is aligned to that for the frame 2 E g 2 A3 size paper Width 297 mm A B Approx 0 3 mm Select 0 3 from the table and make sure that the scale po...

Page 53: ...f A B becomes smaller by approx 0 13 mm per 1 scale If the value of A B is plus use the scale in the front side If the value of A B is minus use the scale in the rear side E g 3 The second scales on the front side are aligned and the value of A B is approx 0 5 mm Since the value of A B is plus move the scale to the rear side Since the value of A B is approx 0 5 mm move 4 scales Move the LSU holder...

Page 54: ...however the entire amount of the deviation between image positions on both sides is reduced Precautions after the completion of the adjustment It is very difficult precisely to match the image positions on the front and back sides The deviation amount will not be 0 if minor deviations occurring during continuous printing are included However the amount of the deviation between the front and back s...

Page 55: ... parts of the originals 2 Press Mono Color in the image menu of the touch panel 3 Press Twincolor Copy in the image menu of the touch panel Color mode Explanation Full color original Black and white original Auto Color Automatically judges the type of each color on originals Full color originals are copied in the full color mode and black and white originals are copied in the black mode Yes Yes Fu...

Page 56: ...originals Newspaper Text Intends to the reproduction of text This makes background fogging become difficult Originals whose text and line art are to be improved Originals with lots of text Printed Image Intends to the reproduction of photographs Originals with photogravure e g Magazine brochure Photo Mode for photographs Silver halide photographs Map Intends to the reproduction of fine text and il...

Page 57: ... copying an original containing light text and graphic images or a light copy image when copying an original containing a highly colored text and copy image Procedures The procedure to use varies depending on whether to adjust the copy image quality in the Black mode Full color mode Refer to the procedure corresponding to the user s particular request Before adjustment After adjustment When a ligh...

Page 58: ...ty After increasing the copy density copy and check the copy image quality 2 Select 05 ADJUSTMENT MODE and change the setting values for the codes from 7114 to 7116 7123 to 7125 7134 7137 7138 7141 and 7160 to adjust the copy density The code to use varies according to the original mode or the manual automatic density setting Select the 05 code for the original mode in which the image quality is t...

Page 59: ...ess indicator in the Image menu is set to the center Remember that 1 step of the indicator will increase or decrease the sharpness intensity by 25 If the sharpness intensity of the center value is changed each step of the indicator will be changed accordingly For instance if the center value is increased by 25 sharper the value of each step of the indicator will also be increased by 25 sharper How...

Page 60: ... image quality If further image quality adjustments are still necessary perform the next procedure 6 Select 05 ADJUSTMENT MODE and change the setting values for the codes 7097 7098 and 7252 to adjust blurred or faint text and thin lines Set the value in increments of approximately 1 while checking the copy image until the optimum value is obtained Note Note that if a too small setting value is set...

Page 61: ...area 8 Select 05 ADJUSTMENT MODE and change the setting values for the codes 7218 and 7219 to set up the light emission level resulting in the text density adjustment Set a value larger than the default one to increase the density Set a value smaller than the default one to decrease the density After changing the value make a copy and check the image quality If further image quality adjustments ar...

Page 62: ... for subcode 3 or 7 of code 2620 This adjustment is available only for e STUDIO2010AC This adjustment also influences the printing and fax functions as well as the copying function Caution after the adjustment The adjustment may possibly cause an increase in the amount of toner used moiré blurred text small dark text blurred faint text fine outlines of text shredded diminished photo images or grad...

Page 63: ...y cause a loss in MFP performance including degradation in the image quality and a reduction in the life of the consumables If you perform only step 9 above changing the setting value of subcode 3 of code 08 2548 as an image quality adjustment for the black mode it may cause an extra increase or decrease in the amount of K toner used compared with that for the other colors or it may create a diffe...

Page 64: ... check the copy image quality 2 Select 05 ADJUSTMENT MODE and change the setting values for the codes from 7988 to 7995 to adjust the density of the text for each color The subcode to use varies according to the density area to be adjusted By referring to the table below enter the code of the area to be adjusted After changing the setting value perform copying and check the image quality If an add...

Page 65: ...e varies according to the original mode Select the 05 code for the original mode in which the image quality is to be changed and start the adjustment from the setting value 128 Setting 0 provides the softest image while setting 255 provides the sharpest image Changing the values for these codes will change the sharpness intensity when the Sharpness indicator in the Image menu is set to the center ...

Page 66: ... the reproduction level of the Text Photo User Custom and Red Seal Color original modes The larger the value is the clearer the reproduction of thin text will become Adjustment for the User Custom setting is enabled in the Text Photo mode base only Set the value in increments of 1 while checking the copy image until the optimum value is obtained Set the value to 5 and check the copy image quality ...

Page 67: ...ing the value make a copy and check the image quality If further image quality adjustments are necessary reset all the values changed in steps 1 to 7 above to the default one and then follow the next step 9 Select 08 SETTING MODE Change the value for code 2548 to make the outline of the copied text thicker and clearer or thinner and finer This adjustment can be made applicable to all colors by sel...

Page 68: ...onsumables background fogging or a decrease in the amount of developer material carrier streaks Therefore carefully perform the adjustment while checking the copy image Remarks Enter a value within the recommended value range mentioned in the procedures Otherwise it may cause a loss in MFP performance including degradation in the image quality and a reduction in the life of the consumables If you ...

Page 69: ...t Procedures You can start with any of the procedures But it is recommended to perform the procedures in order as listed below You can perform one procedure in conjunction with another But if this changes the image quality more than required or loses the effectiveness of the adjustment restore the settings made in the previously performed procedure to the original ones Then perform other procedure...

Page 70: ...ted test chart on the original glass i Press the START button to perform calibration When the calibration comes to an end the message Scanning and calibrating will disappear As a result of the above steps the copy image quality will be corrected in the Full color mode and the Black mode simultaneously After performing automatic calibration copy and check the copy image quality If further image qua...

Page 71: ...increments of approx 15 steps while checking the copy image until the optimum value is obtained Each setting value for the Text Photo Text and Photo developing paper original mode is reflected to the quality of the image in the Full color and Auto Color modes The subcode varies according to the area where the hue is adjusted Set the subcode for the area to be adjusted by referring to the following...

Page 72: ...genta Setting a smaller value The tint of Blue becomes closer to that of C Cyan 5 For adjusting the tint of Magenta Setting a larger value The tint of Magenta becomes closer to that of R Red Setting a smaller value The tint of Magenta becomes closer to that of B Blue Color to adjust Original mode 05 code Subcode Recommended value Acceptable value range Default Text Photo Y Yellow 05 7960 0 1 2 Set...

Page 73: ...adjustment may possibly cause offset failure particularly when the highly colored original is copied in the Photo mode Therefore carefully perform the adjustment while checking the copy image Remarks Enter a value within the recommended value range mentioned in the procedures Otherwise it may cause a loss in MFP performance including degradation in the image quality and a reduction in the life of ...

Page 74: ...ness of the adjustment restore the settings made in the previously performed procedure to the original ones Then perform other procedures Both the service technician and the user can perform procedures 1 and 2 Only the service technician must perform procedures 3 4 and 5 1 Perform automatic calibration to correct variations in the copy density For further information regarding the adjustment proce...

Page 75: ...ll color mode and the Auto Color mode The setting value 25 corresponds to one step in the adjustment on the control panel The subcode varies according to the area where the density is adjusted Refer to the table below and set the subcode for the area to be adjusted Color to adjust Original mode 05 code Subcode Recommended value Acceptable value range Default Text Photo Y Yellow 05 7960 0 1 2 Set a...

Page 76: ...loss in MFP performance including degradation in the image quality and a reduction in the life of the consumables 4 Select 08 SETTING MODE and change the setting value of the code 7614 to enable the User Custom mode for the full color For details refer to 2 19 2 To Adjust User Custom Mode Settings in Full Color Mode Base mode Text Photo Setting value 1 5 Select 05 ADJUSTMENT MODE and change the se...

Page 77: ...edures in order as listed below You can perform one procedure in conjunction with another But if this changes the image quality more than required or loses the effectiveness of the adjustment restore the settings made in the previously performed procedure to the original ones Then perform other procedures Both the service technician and the user can perform procedures 1 to 3 Only the service techn...

Page 78: ...tment to adjust the tint of colors in general For further information regarding the adjustment procedures refer to procedure 3 in 2 3 To Closely Match the Color Balance of the Original After adjusting the tint of colors copy and check the copy image quality If further image quality adjustments are still necessary the service technician must perform the next procedure 4 Select 05 ADJUSTMENT MODE Ch...

Page 79: ...ion level increases Setting a smaller value The saturation level decreases 1 For adjusting the tint of Yellow 2 For adjusting the tint of Green 3 For adjusting the tint of Cyan 4 For adjusting the tint of Blue 5 For adjusting the tint of Magenta Color to adjust Original mode 05 code Subcode Recommended value Acceptable value range Default Text Photo Y Yellow 05 7960 0 1 2 Set a value larger than 1...

Page 80: ... a range of 2 to 5 to obtain the highest density of R Red Never change the values for subcodes other than the above Otherwise it may cause a loss in MFP performance including degradation in the image quality Notes The adjustment may possibly decrease the density of G Green B Blue and K Black extremely Therefore carefully perform the adjustment while checking the copy image Unless this adjustment c...

Page 81: ...bly cause offset failure particularly when the highly colored original is copied in the Photo mode Therefore carefully perform the adjustment while checking the copy image Remarks Enter a value within the recommended value range mentioned in the procedures Otherwise it may cause a loss in MFP performance including degradation in the image quality and a reduction in the life of the consumables ...

Page 82: ...this changes the image quality more than required or loses the effectiveness of the adjustment restore the settings made in the previously performed procedure to the original ones Then perform other procedures Both the service technician and the user can perform procedures 1 and 3 Only the service technician must perform procedures 2 4 and 5 1 Press Image tab on the Copy mode Press Background adju...

Page 83: ...nge After adjusting the background density copy and check the copy image quality If further image quality adjustments are still necessary perform the next procedure 3 Press Copy on the Home screen Press to increase the copy density After increasing the copy density copy and check the copy image quality With the copy density set to the maximum if further image quality adjustments are still necessar...

Page 84: ... Original mode 05 code Subcode Recommended value Acceptable value range Default Full color Text Photo Y Yellow 05 7960 0 1 Set a value larger than 128 to increase the density Set a value smaller than 128 to decrease the density 0 to 255 128 M Magenta 05 7965 0 1 C Cyan 05 7970 0 1 K Black 05 7975 0 1 Text Y Yellow 05 7961 0 1 M Magenta 05 7966 0 1 C Cyan 05 7971 0 1 K Black 05 7976 0 1 Printed Ima...

Page 85: ...e setting value for the code 7690 The level of the highlight reproducibility will become higher in the order of the setting value 0 1 4 In addition if the setting value 1 is set not only the highlight reproduction is changed but also the entire color tone is altered against the default one Caution after the adjustment The adjustment may possibly provide an excessively dark background Therefore car...

Page 86: ... the copy Perform background adjustment in order to copy an original with a highly colored background while eliminating the background color or making it white Procedures The procedure to use varies depending on whether to adjust the copy image quality in the Black mode or the Full color mode Refer to the procedure corresponding to the user s particular request Before adjustment After adjustment T...

Page 87: ...MODE Change the values for codes 7100 to 7102 and 7105 to 7107 to adjust the density level of the background The smaller the setting value the lighter the background becomes while the larger the setting value the darker the background becomes Adjust the value and determine the optimal value while checking the copies by considering that the setting value 25 for the 05 code corresponds to one step i...

Page 88: ...efore never change the value for the high density area After adjusting the gamma curve balance copy and check the copy image quality If further image quality adjustments are still necessary perform the next procedure Caution after the adjustment The adjustment may possibly cause text handwritten with a pencil or light text to become illegible on the copy Therefore carefully perform the adjustment ...

Page 89: ...ge the values for the following codes below to adjust the density level of the background Set the value in increments of approximately 10 while checking the copy image until the optimum value is obtained The value for the code corresponding to the original mode Text Photo Text or Printed Image will affect the copy image quality in the Full color mode and the Auto Color mode In the manual density a...

Page 90: ...justed Adjusting the subcode 2 allows you to adjust the high density area But it will not affect the background density Therefore never change the value for the high density area Original mode Color to adjust 05 code Subcode Recommended value Acceptable value range Default Text Photo Y Yellow 05 7960 0 1 Set a value larger than 128 to increase the density Set a value smaller than 128 to decrease t...

Page 91: ...tions To have Text selected from among the original mode options by default perform the following setting Press User Functions User and select Copy in the User tab Select Text in the Original Mode for Color option Caution after the adjustment The adjustment may possibly cause the highlighted area to become less visible on the copy Therefore carefully perform the adjustment while checking the copy ...

Page 92: ...opied Perform background adjustment in order to avoid this problem Procedures The procedure to use varies depending on whether to adjust the copy image quality in the Black mode or the Full color mode Refer to the procedure corresponding to the user s particular request Original printed on thin paper front Original printed on thin paper back Before adjustment After adjustment When a double sided o...

Page 93: ... indicator to the side for 1 or 2 steps The images seen through the back of the page will no longer be copied But remember that text will also be lightly copied depending on the type of original After decreasing the copy density copy and check the copy image quality With the copy density set to the minimum if the images seen through the back of the page are still copied or if you would like to pre...

Page 94: ...n through the back of the page Adjusting the subcode 2 will allow you to adjust the high density area But this will not solve the problem Therefore never change the value for the high density area Caution after the adjustment The adjustment may possibly cause text handwritten with a pencil or light text to become illegible on the copy Therefore carefully perform the adjustment while checking the c...

Page 95: ...opied the service technician must perform the next procedure 2 Select 05 ADJUSTMENT MODE Change the values for the following codes below to adjust the density level of the background Set the value in increments of approximately 10 while checking the copy image until the optimum value is obtained The value for the code corresponding to the original mode Text Photo Text or Printed Image will affect ...

Page 96: ... the following setting Press User Functions User and select Copy in the User tab Select Text in the Original Mode for Color option Caution after the adjustment The adjustment may possibly cause the highlighted area to become less visible on the copy Therefore carefully perform the adjustment while checking the copy image Remarks Enter a value within the recommended value range mentioned in the pro...

Page 97: ...You can start with any of the procedures But it is recommended to perform the procedures in order as listed below You can perform one procedure in conjunction with another But if this changes the image quality more than required or loses the effectiveness of the adjustment restore the settings made in the previously performed procedure to the original ones Then perform other procedures Both the se...

Page 98: ...mode option To change the default original mode in 08 SETTING MODE Select 08 SETTING MODE Change the value for code 9970 or 9976 to change the original mode option which is selected by default at power on In the Black mode In the Full color mode Press Basic tab on the Copy mode Select User Custom from among the original mode options in the Black or the Full color mode If User Custom is not display...

Page 99: ...sity by 25 If the sharpness intensity of the center value is changed each step of the indicator will be changed accordingly For instance if the center value is decreased by 25 softer the value of each step of the indicator will also be decreased by 25 softer However the range of adjustment values that is valid for sharpness level change is from 100 to 100 of the total of the setting value of the 0...

Page 100: ...may decrease Caution after the adjustment Nothing in particular Remarks Enter a value within the recommended value range mentioned in the procedures Otherwise it may cause a loss in MFP performance including degradation in the image quality 3 50 75 1 0 25 0 25 0 2 75 50 4 100 100 4 75 100 2 25 50 1 50 25 3 100 75 Since 25 is assigned to the center the image quality remains the same even if the ind...

Page 101: ...iginal ones Then perform other procedures Both the service technician and the user can perform procedures 1 and 2 Only the service technician must perform procedure 3 1 Press Image tab on the Copy mode Press One Touch Adjustment Press Clear and then press OK After selecting the Clear option copy and check the copy image quality When the copy image quality with the Clear option selected is insuffic...

Page 102: ...tor will be changed accordingly For instance if the center value is increased by 25 sharper the value of each step of the indicator will also be increased by 25 sharper However the range of adjustment values that is valid for sharpness level change is from 100 to 100 of the total of the setting value of the 05 code and that of the indicator For instance if the setting value of the 05 code is 153 2...

Page 103: ...Caution after the adjustment Nothing in particular Remarks Enter a value within the recommended value range mentioned in the procedures Otherwise it may cause a loss in copier performance including degradation in the image quality 3 100 75 1 50 25 0 25 0 2 25 50 4 75 100 4 100 100 2 75 50 1 0 25 3 50 75 Since 25 is assigned to the center the image quality remains the same even if the indicator is ...

Page 104: ... can start with any of the procedures But it is recommended to perform the procedures in order as listed below You can perform one procedure in conjunction with another But if this changes the image quality more than required or loses the effectiveness of the adjustment restore the settings made in the previously performed procedure to the original ones Then perform other procedures Both the servi...

Page 105: ...Select 05 ADJUSTMENT MODE Change the values for codes 7056 to 7058 7061 7062 7249 and 7794 to 7800 to adjust the default value for the sharpness intensity Decreasing the sharpness intensity will minimize the edges of the image The smaller the setting value is the weaker the sharpness intensity becomes The larger the setting value is the stronger the sharpness intensity becomes Changing the values ...

Page 106: ... quality If further image quality adjustments are still necessary perform the next procedure 4 Select 05 ADJUSTMENT MODE Change the values for codes 7889 to 7892 to adjust the maximum color density of text Set the value in increment of 1 while checking the copy image until the optimum value is obtained After adjusting the maximum color density of the text copy and check the copy image quality If f...

Page 107: ... Therefore carefully perform the adjustment while checking the copy image Remarks Enter a value within the recommended value range mentioned in the procedures Otherwise it may cause a loss in MFP performance including degradation in the image quality Color mode Original mode 05 code Recommended value Acceptable value range Default Full color Text Photo 05 7840 Set a value smaller than 5 0 to 9 0 U...

Page 108: ...y density adjustment and level adjustment for black headline text in order to make the solid filled image more highly colored This adjustment will have an effect only on copying in the Full color mode Procedures The procedure to use varies depending on whether to adjust the copy image quality of a black or colored logo Refer to the procedure corresponding to the user s particular request Before ad...

Page 109: ...ion Colors in this manual and also the Service Manual 1 Press Basic on the copy mode If you want to emphasize the reproducibility of text more select Text as an original mode If you want to emphasize that of photos select Text Photo To have Text selected from among the original mode options by default perform the following setting Press User Functions User and select Copy in the User tab Select Te...

Page 110: ... the adjustment on the control panel The subcode varies according to the area where the density is adjusted Refer to the table below and set the subcode for the area to be adjusted Caution after the adjustment The adjustment may possibly cause the highly or deeply colored area such as in a photo to become blurred on the copy Also it may also cause offset failure grained images and degradation in g...

Page 111: ...or RGB adjustment to adjust the tint of the colors in general Use steps a through d to perform the adjustment a Press Image on the Copy mode b Press Color Balance to adjust the color balance by changing the amount of toner C M Y and K or RGB ADJUSTMENT to adjust the color balance by changing the intensity of R G and B c Press to enhance the tint of the color or to decrease it After selecting the c...

Page 112: ... may possibly cause a dark colored area such as in a photo to become blurred on the copy Also it may also cause offset failure grained images and degradation in gradation Therefore carefully perform the adjustment while checking the copy image Original mode Color to adjust 05 code Subcode Recommended value Acceptable value range Default Text Photo Y Yellow 05 7960 0 1 2 Set a value larger than 128...

Page 113: ...hters are special Therefore their hues cannot be accurately reproduced To reproduce the hues of similar highlighters such as yellow and green while producing sharp contrasts on the copy perform color adjustment color balance adjustment or RGB adjustment Before adjustment After adjustment The hues of highlighters are not accurately reproduced The areas marked with 2 different colored highlighters a...

Page 114: ...the next procedure The one touch adjustment can be canceled by pressing One Touch Adjustment again 2 Select 05 ADJUSTMENT MODE Change the value for code 7850 to adjust the tint of colors in Marker mode Set the value in increments of approximately 1 while checking the copy image until the optimum value is obtained The subcode varies according to the color where the adjustment is performed Refer to ...

Page 115: ...e and the Auto Color mode The subcode varies according to the area where the density is adjusted Refer to the table below and set the subcode for the area to be adjusted Original mode Color to adjust 05 code Subcode Recommended value Acceptable value range Default Text Photo Y Yellow 05 7960 0 1 2 Set a value larger than 128 to increase the density Set a value smaller than 128 to decrease the dens...

Page 116: ...he adjustment may possibly vary the hues of areas including photo images and text other than those marked with highlighters Therefore carefully perform the adjustment while checking the copy image Remarks Enter a value within the recommended value range mentioned in the procedures Otherwise it may cause a loss in MFP performance including degradation in the image quality ...

Page 117: ...But it is recommended to perform the procedures in order as listed below You can perform one procedure in conjunction with another But if this changes the image quality more than required or loses the effectiveness of the adjustment restore the settings made in the previously performed procedure to the original ones Then perform other procedures Only the service technician must perform procedures ...

Page 118: ...tion The message WAIT disappears when the calibration is finished The procedure above covers both the color and black copy calibration After the automatic calibration copy and check the image quality If further image quality adjustment is necessary go to the next step 2 Select 05 ADJUSTMENT MODE Change the values for codes 7913 to adjust the amount of toner used The code to use varies according to...

Page 119: ...py and check the copy image quality If further image quality adjustments are still necessary the service technician must perform the next procedure 3 Perform color balance adjustment or RGB adjustment to adjust the tint of the colors in general For further information regarding the adjustment procedures refer to procedure 3 in 2 3 To Closely Match the Color Balance of the Original After adjusting ...

Page 120: ...olor to adjust 05 code Subcode Recommended value Acceptable value range Default Text Photo Y Yellow 05 7960 0 1 2 Set a value larger than 128 to increase the density Set a value smaller than 128 to decrease the density 0 to 255 128 M Magenta 05 7965 0 1 2 C Cyan 05 7970 0 1 2 K Black 05 7975 0 1 2 Text Y Yellow 05 7961 0 1 2 M Magenta 05 7966 0 1 2 C Cyan 05 7971 0 1 2 K Black 05 7976 0 1 2 Printe...

Page 121: ...AC 2 67 Remarks Enter a value within the recommended value range mentioned in the procedures Otherwise it may cause a loss in MFP performance including degradation in the image quality and a reduction in the life of the consumables If the adjustment causes a toner fixing problem decrease the values for codes 05 7899 and 7905 to 7911 ...

Page 122: ...ns To have Photo selected from among the original mode options by default perform the following setting Press User Functions User and select Copy in the User tab Select Photo in the Original Mode for Black option After selecting the Photo mode copy and check the copy image quality If further image quality adjustments are still necessary perform the next procedure 2 Press Basic tab on the Copy mode...

Page 123: ...r mode is selected it will be automatically determined whether an original is colored or black and white Then it will be copied in the Full color mode or the Black mode But adjust the threshold value in order to change the threshold between the Black mode and the Full color mode and suit the preferences of the user Original Before adjustment After adjustment It is copied in the Full color mode Cha...

Page 124: ...lation between the position of the ACS Adjustment indicator and the judgment result is shown below In the actual adjustment the threshold varies depending on the shape and size of the original or the density level of the original image Therefore use the table below only as a reference Position of indicator 0 in the table above denotes the left end of the indicator the original is judged as black m...

Page 125: ...he image area If too small a value is set stains on the edge of the original may be judged as images and thus the desired result may not be obtained Caution after the adjustment When a non standard sized original is copied an area outside the original or the original cover may also be scanned This may prevent the original size from being accurately detected If the original cover is soiled the type...

Page 126: ... or the boundary between black and colors other than black in order to reduce a blend of undesired colors into the black area or adjust the tint of colors other than black Procedures The procedure to use varies depending on whether to adjust the tint of colors other than black the reproducibility of black in the Red and black mode or the boundary between black and colors other than black Refer to ...

Page 127: ...c Press Second Color Press the button for the desired color d Press OK Use procedure 2 2 Press Adjust Press or for the color to be adjusted in order to adjust the tint of colors other than black In the Red and black mode Press to decrease yellow and to enhance magenta in order to enhance the tint of red Press to enhance yellow and to decrease magenta in order to decrease the tint of red In the Twi...

Page 128: ...adjustments are still necessary the service technician must perform the next procedure 3 Select 05 ADJUSTMENT MODE Change the values for codes 7641 7642 to adjust the boundary between black and colors other than black In the Twin color selectable copy mode the larger the setting value the wider the area that is to be reproduced by the color selected as the black in the original becomes while the s...

Page 129: ...the subcode for the specified color Y M C or K is larger the toner amount for the adjusted color increases when the former is smaller the latter decreases If the value is too large the density becomes too dark and the reproducibility of gradations in the high density area may become blurred and degraded Therefore carefully perform the adjustment while checking the copy or print image When all the ...

Page 130: ...rinted in twin color or single color copying Caution after the adjustment Nothing in particular Red Y 05 7649 0 0 to 255 128 M 1 C 2 K 3 Orange Y 05 7650 0 0 to 255 128 M 1 C 2 K 3 Green Y 05 7651 0 0 to 255 128 M 1 C 2 K 3 Blue Y 05 7652 0 0 to 255 128 M 1 C 2 K 3 Purple Y 05 7653 0 0 to 255 128 M 1 C 2 K 3 Specified color from the control panel Color of toner amount to be adjusted 05 code Subcod...

Page 131: ...e reproducibility of the background using either method of how to scan an original Correctly adjusting the installation heights of the MFP and the DF is a prerequisite to perform this adjustment Therefore perform all the necessary adjustments Only if further adjustment is still desired for the reproducibility of background should this adjustment be performed Before adjustment After adjustment The ...

Page 132: ... value copy and check the image quality If further image quality adjustment is necessary go to the next step Color mode 05 code Recommended value Acceptable value range Default Common for full color and black for RADF front side for DSDF 05 3009 Set a value 3 or 4 to increase the background density Set a value 1 to decrease the background density 0 to 4 2 Common for full color and black back side ...

Page 133: ...ning function Caution after the adjustment Correctly adjusting the installation heights of the MFP and the DF is a prerequisite to perform this adjustment Therefore perform all the necessary adjustments Only if further adjustment is still desired for the reproducibility of background should this adjustment be performed Color mode Original mode 05 code Recommended value Acceptable value range Defau...

Page 134: ...er Custom mode In the User Custom mode one of the original modes set by default is selected as a base reference original mode Adjustments required for the intended purpose must be performed based on the selected mode It is also available to use the User Custom mode as an independent original mode This means that the change of the setting values in the User Custom mode does not affect each default ...

Page 135: ... 1 05 7150 ADF noise reduction level setting 0 to 200 100 When the value decreases the effect of reducing streaks set with ADF Noise Reduction becomes larger When the value increases the effect of reducing streaks set with ADF Noise Reduction becomes smaller 2 24 05 7189 Gamma balance adjustment 0 to 255 128 The larger the value the darker the image of the area surrounding the target area becomes ...

Page 136: ... TOSHIBA TEC CORPORATION All rights reserved e STUDIO2010AC 2510AC 2515AC 3015AC 3515AC 4515AC 5015AC 2 82 3 In the normal mode select User Custom in Original Mode on the control panel Cautions after the adjustment Nothing in particular ...

Page 137: ...the user can perform procedure 3 1 Select 08 SETTING MODE Change the value for the code 7614 to enable the functions of the User Custom mode in the full color mode The default adjustment value for the User Custom mode is preset at the one that reproduces the image quality equivalent to that of Text Photo in the full color mode at the time of shipment After setting the value perform the next proced...

Page 138: ...to 255 128 The larger the value the darker the yellow becomes The smaller the value the darker the magenta becomes 2 3 1 Fineadjustment of hue Yellow 0 to 255 128 The larger the value the darker the green becomes The smaller the value the darker the red becomes 2 Fineadjustment of hue Green 0 to 255 128 The larger the value the darker the cyan becomes The smaller the value the darker the yellow be...

Page 139: ...on Green 0 to 255 128 The larger the value the higher the saturation becomes The smaller the value the lower the saturation becomes 3 Fineadjustment of saturation Cyan 0 to 255 128 The larger the value the higher the saturation becomes The smaller the value the lower the saturation becomes 4 Fineadjustment of saturation Blue 0 to 255 128 The larger the value the higher the saturation becomes The s...

Page 140: ...tting value 0 of the base model 1 reproduction which enhances the redness of skin 1 e STUDIO2000AC 2505AC 3505AC 4505AC 5005AC 2 4 05 7718 Density adjustment Manual adjustment Center value 0 to 255 128 The larger the value the darker the image becomes 2 2 2 05 7725 Density adjustment Automatic density adjustment 0 to 255 128 The larger the value the darker the image becomes 2 2 2 05 7795 Sharpness...

Page 141: ...and density area become darker as the value increases 2 3 05 7982 0 1 2 Color balance adjustment C 0 to 255 128 The target color and density area become darker as the value increases 2 3 05 7983 0 1 2 Color balance adjustment K 0 to 255 128 The target color and density area become darker as the value increases 2 3 05 7992 0 1 2 Text gamma balance adjustment Y 0 to 255 128 When a larger value is se...

Page 142: ...ust it to side the area to be detected as that not belonging to the original is widened When you adjust it to side the area to be detected as that not belonging to the original is narrowed Notes The Outside Erase function may not be operated correctly under the following conditions When making copies in a bright room leaving the DF or the Platen Cover opened The density of areas not belonging to t...

Page 143: ... 89 Caution after the adjustment Areas not belonging to the original may not be erased exactly as the user has requested erased too much or not erased at all depending on the type of the original Also the area to be erased may change depending on the orientation of the original Therefore adjust it carefully while checking the copy image ...

Page 144: ...ustment was performed because they cannot be detected as blank pages with this function Target originals The back side of an original with dark images on its front side the dark images can be seen through the back side or an original with light color An original with only 3 letters in 10 5 pt an original that is omitted as a blank page with the default setting Procedures You can start with any of ...

Page 145: ...he edge of the original to be used for the judgment for Omit Blank Page If the judgment of an original whose image is located only on the edge of the paper has not been carried out as desired arrange the threshold by setting a smaller value in order to make the judgment area wider Adjust the code which corresponds to the Image Repeat setting The setting values of 24 steps correspond to 1 mm of the...

Page 146: ...mode unevenness may occur on the copied background Perform this function to avoid density unevenness Procedures Both the service technicians and the users can perform step 1 Only the service technicians can perform step 2 Original After adjustment When the density is adjusted automatically the density on the entire copy image becomes uneven When the density is adjusted manually the density of the ...

Page 147: ...have the service technicians perform the following procedure 2 Select 05 ADJUSTMENT MODE Change the setting values for codes 7237 7286 and 7287 to set the range correction to be fixed Description of the setting value After the adjustment is complete make a copy and confirm the image quality Caution after the adjustment Nothing in particular Color mode Original mode 05 code Recommended value Accept...

Page 148: ...eal is copied users can select the Red Seal Color as the original mode Use this mode if the reproducibility of red seal color copied under the default copy settings is insufficient Procedures 1 Select 08 SETTING MODE Change the value for code 7610 to 1 2 Press Basic tab on the Copy mode Select Red Seal Color among the original modes After selecting Red Seal Color make a copy and check its image qu...

Page 149: ...eaning the original glass in the DF Moreover they can be made inconspicuous by changing the setting of the following self diagnostic code Procedures The procedure of this adjustment differs between When adjusting the image quality of the Black mode and When adjusting the image quality of the Full color mode Refer to the procedure corresponding to the user s particular request Before adjustment Aft...

Page 150: ...TMENT MODE and change the setting values for the codes from 7150 to 7152 to adjust the noise reduction level The smaller the value is the larger the noise reduction level becomes The larger the value is the smaller the noise reduction level becomes When 0 is set for the setting value this function becomes disabled After changing the setting value perform printing and check its image quality Cautio...

Page 151: ...ying Normally the use with the factory default setting Disabled is recommended since the adjustment may decrease the reproducibility of fine characters 1 Press Image tab on the Copy mode and then press ADF Noise Reduction Change the setting value of the noise reduction level After changing the setting value perform printing and check its image quality Caution after the adjustment Nothing in partic...

Page 152: ...d in step 2 in accordance with the message displayed on the panel First scan the front side Place the printed side up Set the pattern on the DSDF while its side with 2 black quadrilaterals comes to the leading edge and press OK Next scan the back side Place the printed side down Set the pattern on the DSDF while its side with 2 black quadrilaterals comes to the leading edge and press OK 4 When an ...

Page 153: ...lect 05 ADJUSTMENT MODE and change the setting value for the code corresponding to the original mode to be used Set the value in increments of 1 while checking the copy image until the optimum value is obtained For the User Custom mode refer to 2 19 To Program Frequently Used Copy Settings To use Custom Mode Before adjustment After adjustment Color mode Original mode 05 Code Recommended value Acce...

Page 154: ...ting value of each original mode as below Caution after the adjustment This adjustment will affect to that for set at 3 in 2 12 1 To Adjust the Copy Image Quality of a Black Logo When performing this adjustment pay attention to the balance against the reproduction level of the black color logos too Original mode Setting value Original mode Setting value Text Photo 3 Printed Image 3 Text 4 Photo Re...

Page 155: ...g the setting to the one giving priority to the halftone dots in gray Procedures The service technician must perform all adjustments 1 Select 05 ADJUSTMENT MODE and change the setting value for the code 7843 Before adjustment After adjustment Before adjustment After adjustment Original mode 05 Code Remarks Text Photo 7843 0 0 Black text priority default 1 Color text halftone dots in gray priority ...

Page 156: ...des below to adjust the density level of the color text Original mode Color to adjust Subcode Area where the density is adjusted Default Recommended value Text Photo Y Yellow Low density 128 When a larger value is set fine lines and thin text become darker When a smaller value is set they become lighter Middle density 128 High density 128 M Magenta Low density 128 Middle density 128 High density 1...

Page 157: ...010AC 2510AC 2515AC 3015AC 3515AC 4515AC 5015AC 2 103 2 28 To Make a Copy by Removing all Colors other than Black Original Normal Black mode copying When the Drop out color function option is enabled Colors other than black are reproduced in gray Colors other than black are not reproduced ...

Page 158: ...ck in color originals including black text can be removed Moreover the removal level of gray like colors such as navy blue can be adjusted Color originals include not only the colored mark sheet originals with notes added in black pencil but also monochrome originals with notes added by a color pen Original Normal Black mode copy When the Drop out color function option is enabled Colors other than...

Page 159: ...ke colors is required have the service technician perform the following step 2 Select 05 ADJUSTMENT MODE and change the setting value for the code 7066 to adjust the removal level of gray like colors A change by 10 in the setting value corresponds to 1 step of the slide bar in the touch panel Caution after the adjustment If a larger value is set gray like colors tend to be removed black areas with...

Page 160: ...2 Copier specific Adjustments 2018 TOSHIBA TEC CORPORATION All rights reserved e STUDIO2010AC 2510AC 2515AC 3015AC 3515AC 4515AC 5015AC 2 106 ...

Page 161: ...lue adjustment To make a uniform gray hue between image elements Y Y Background adjustment To adjust the background density Y Y Sharpness adjustment To adjust the sharpness of the boundary of text and lines Y Y Color balance adjustment To adjust the color tone of entire images or each color Y Y Fine line text density adjustment To adjust the density of fine lines and text Y Graphic line width adju...

Page 162: ... Text Graphic Image 05 7315 0 1 2 Set a value larger than 128 0 to 255 128 Detail Text Graphic Image 05 7316 0 1 2 Auto Text 05 7360 0 1 2 Graphic 05 7361 0 1 2 Image 05 7362 0 1 2 PS 1200 dpi Smooth Text Graphic Image 05 7309 0 1 2 Detail Text Graphic Image 05 7310 0 1 2 Auto Text 05 7357 0 1 2 Graphic 05 7358 0 1 2 Image 05 7359 0 1 2 PCL 600 dpi Smooth Text Graphic Image 05 7317 0 1 2 Detail Te...

Page 163: ...3 Printer specific Adjustments 2018 TOSHIBA TEC CORPORATION All rights reserved e STUDIO2010AC 2510AC 2515AC 3015AC 3515AC 4515AC 5015AC 3 3 Caution after the adjustment Nothing in particular ...

Page 164: ...ly to options Pure Gray allows gray areas to always be reproduced using only the K toner without changing the hue of color areas This adjustment will be effective only if a file created on a general application such as Microsoft Office is printed It may not be effective if a file created on a graphic application e g Illustrator or a DTP application e g QuarkXPress is printed or a PDF file created ...

Page 165: ... selected according to the Image Quality Type For Mac This adjustment will have an effect only on full color printing Open the print dialog box Select Color Settings 1 Black Gray Text Graphic Image from among the Pure Black and Gray options Apply to Auto Text Text Graphic Text Graphic Image Text Black K toner Black K toner Black K toner Black K toner Graphic Black K toner Color CMYK toner Black K ...

Page 166: ...trator is used select File Document Setting Custom and then set to the value to Vector in the Rasterization and Vector Balance option Caution after the adjustment Nothing in particular PDL Original mode 05 code Subcode Recommended value Acceptable value range Default PS Text 8252 0 1 2 3 4 The larger the value the wider the area to be replaced with that for printing with only black toner becomes T...

Page 167: ...an increase the density of light color areas without changing that for dark color areas Printer driver For Windows This adjustment will have an effect only on Auto or Color mode printing Open the property page of the printer driver and click Setting in the Image Quality tab Set the Background adjustment option in the Image Attribute tab within the range of 1 to 4 PCL PS XPS ...

Page 168: ...in particular Resolution Halftone Color mode 05 code Subcode Recommended value Acceptable value range Default 600 dpi Smooth Color 05 8010 0 1 2 Set a value larger than 128 0 to 255 128 Twin color 05 8011 Mono color 05 8012 Detail Color 05 8013 Twin color 05 8014 Mono color 05 8015 1200 dpi Smooth Color 05 8016 Mono color 05 8018 Detail Color 05 8017 Mono color 05 8019 Subcode PDL 0 PS 1 PCL 2 XPS...

Page 169: ...on the outline of lines can be suppressed Change the Sharpness option on the printer driver For Windows This adjustment will have an effect only on Auto or Color mode printing Open the property page of the printer driver Click Setting in the Image Quality tab Set the value for Sharpness within a range of 4 to 4 in the Image Attribute tab Setting 4 provides the sharpest print image Sharpness adjust...

Page 170: ...ights reserved 3 10 For Mac This adjustment will have an effect only on full color printing Open the print dialog box Set the value for Color Settings 2 Sharpness within a range of 4 to 4 Setting 4 provides the sharpest print image After changing the options on the printer driver print and check the print image quality Mac ...

Page 171: ...e blurred If 0 is set the image quality will not be changed even if the sharpness has been adjusted on the printer driver Color mode Original type Object 05 Code Subcode Recommended value Acceptable value range Default Color Standard Text 8110 0 When a larger value is set a sharper result can be obtained When a smaller value is set a softer result can be obtained 0 to 255 128 Graphic 1 Image 2 Pho...

Page 172: ...k lines can be suppressed by applying thin line adjustment to Graphic and increase the sharpness setting level on the printer driver Caution after the adjustment Nothing in particular Color mode PDL Resolution 05 Code Subcode Recommended value Acceptable value range Default Full color PS 600 dpi 8102 0 0 0 to 1 0 Applied to all the contents for Image and Graphic 1 Applied to all the contents the s...

Page 173: ...rinter driver Change the Color Balance option on the printer driver For Windows This adjustment will have an effect only on Auto or Color mode printing Open the property page of the printer driver Click Image Type Quality in the Image Quality tab Change the option in the Color Balance or Image Attribute tab Color Balance tab Change the All Colors or Each Color option Initially change the value by ...

Page 174: ...l color printing Open the print dialog box Change the Color Settings 2 Color Balance option Initially change the value by 4 steps while checking the printouts until the optimum value is obtained After changing the option on the printer driver print and check the print image quality If further image quality adjustments are still necessary the service technician must perform the next procedure Mac ...

Page 175: ...ller than 128 to decrease the density 0 to 255 128 M 05 8051 0 1 2 C 05 8052 0 1 2 K 05 8053 0 1 2 Detail Text Graphic Image Y 05 8054 0 1 2 M 05 8055 0 1 2 C 05 8056 0 1 2 K 05 8057 0 1 2 PS 1200 dpi Smooth Text Graphic Image Y 05 8268 0 1 2 M 05 8269 0 1 2 C 05 8270 0 1 2 K 05 8271 0 1 2 Detail Text Graphic Image Y 05 8272 0 1 2 M 05 8273 0 1 2 C 05 8274 0 1 2 K 05 8275 0 1 2 Auto Text Y 05 8164...

Page 176: ...L 600 dpi Smooth Text Graphic Image Y 05 8058 0 1 2 Set a value larger than 128 to increase the density Set a value smaller than 128 to decrease the density 0 to 255 128 M 05 8059 0 1 2 C 05 8060 0 1 2 K 05 8061 0 1 2 Detail Text Graphic Image Y 05 8062 0 1 2 M 05 8063 0 1 2 C 05 8064 0 1 2 K 05 8065 0 1 2 XPS 600 dpi Smooth Text Graphic Image Y 05 8042 0 1 2 M 05 8043 0 1 2 C 05 8044 0 1 2 K 05 8...

Page 177: ...it will affect every user who uses the printer by connecting it to the MFP After the adjustment the values changed will be applied to all printouts for the Image Quality Type and Halftone options For instance if the value for 05 code for PCL and Smooth is changed it will be applied to printing performed with PCL and Halftone Smooth or Auto selected Carefully perform the adjustment being aware that...

Page 178: ...k PS 600 dpi 05 7340 Set a value larger than 0 0 to 8 The larger the value the darker the thin line or small text becomes 0 PCL 600 dpi 05 7341 XPS 600 dpi 05 7342 Full color PS 600 dpi General 05 8130 0 Line art 3 PCL 600 dpi General 05 8131 0 Line art 3 XPS 600 dpi General 05 8132 0 Line art 3 Color mode PDL Original type Code Subcode Recommended value Acceptable value range Default Black PS 120...

Page 179: ...reserved e STUDIO2010AC 2510AC 2515AC 3015AC 3515AC 4515AC 5015AC 3 19 Notes When the setting value is increased while a 3D object such as Word Art in Microsoft Office is printed at 1200 dpi the boundary may become darker Caution after the adjustment Nothing in particular ...

Page 180: ...All rights reserved 3 20 3 1 7 Graphic Line Width Adjustment You can clearly print thin lines Enable the Distinguish Thin Line option on the printer driver For Windows Open the property page of the printer driver Click Setting in the Image Quality tab Mark the Distinguish Thin Line checkbox in the Basic tab PCL PS XPS ...

Page 181: ...llowing codes when the Distinguish Thin Line checkbox is selected The unit of the setting value is the number of dots line thickness Lines thinner than the setting value will become thicker as specified Set the value while checking the print image until the optimum value is obtained Caution after the adjustment Nothing in particular Resolution Color mode 05 Code Recommended value Acceptable value ...

Page 182: ...Type options on Mac The Color options are available in the Basic tab on the PCL PS and XPS printer drivers The Color Type options are available in the Color Settings 1 menu in the print dialog box on Mac Notes This adjustment is available only when the resolution is 600 dpi Adjust blurred black text and black thin lines To adjust the image quality in black and white printing Black and White is sel...

Page 183: ...form the adjustment while checking the printed images since faint black text or black thin lines may occur Resolution Color PDL 05 Code Recommended value Acceptable value range Default e STUDIO 2010AC 2510AC e STUDIO2515AC 3015AC 3515AC 4515AC 5015AC 600 dpi Black PS 7325 When a larger value than the default one is set black text or black thin lines are thinly printed 0 to 9 2 2 PCL 7326 2 5 XPS 7...

Page 184: ...tone Printing on Mac is performed in PostScript Set the value in increments of approximately 30 while checking the printouts until the optimum value is obtained e STUDIO2515AC 3015AC 3515AC 4515AC 5015AC only Resolution Halftone 05 Code Subcode Recom mended value Acceptable value range Default e STUDIO 2010AC 2510AC e STUDIO 2515AC 3015AC 3515AC 4515AC 5015AC 600 dpi Smooth 05 8071 0 to 4 7 8 11 1...

Page 185: ...reserved e STUDIO2010AC 2510AC 2515AC 3015AC 3515AC 4515AC 5015AC 3 25 Caution after the adjustment The adjustment may possibly cause dark areas such as shades on photo images to look unnaturally faint Therefore carefully perform the adjustment while checking the printouts ...

Page 186: ...ION All rights reserved 3 26 3 1 10 Halftone Adjustment when changing per user You can reduce jaggies by selecting Detail in the Halftone options For Windows Open the property page of the printer driver Click Setting in the Image Quality tab Select Detail from among the Halftone options in the Basic tab PCL PS XPS ...

Page 187: ...rights reserved e STUDIO2010AC 2510AC 2515AC 3015AC 3515AC 4515AC 5015AC 3 27 For Mac Open the print dialog box Select Color Settings 1 Detail from among the Halftone options After changing the option on the printer driver print and check the print image quality Mac ...

Page 188: ... 600 dpi printing Use steps a through f to change the setting value a Press User Functions User on Home screen to enter the User Functions menu b Press Admin c Enter the 6 to 64 digit administrator password Press OK d Press General e Press Smoothness Of Print f Press Low Note This setting applies to print jobs with 600 dpi Set this to color and black printing respectively Changing the setting disp...

Page 189: ...12 0 1 0 Standard 3 1 Reduces white voids occurred on the text and boundary whose color is the same type of the background low 2 Reduces white voids occurred on the text and boundary whose color is the same type of the background High 3 Reduces white voids occurred on the text and boundary whose color is the same type of the background middle Black 600 dpi 7310 0 0 0 Fine priority to gradation rep...

Page 190: ...he control panel 2 This is available when 08 8110 1 is 1 3 This is available when 08 8110 1 is 0 4 This is available when 08 7310 1 is 0 Notes When the setting is changed be sure to perform automatic calibration Caution after the adjustment When the low screen ruling is set jaggedness may appear on diagonal or curved lines In this case check the printed image and then switch the setting if necessa...

Page 191: ...standard speed and decelerating When the value is changed the images to be copied or faxed will be affected Color mode Resolution 08 Code Subcode Subcode description Recommended value Acceptable value range Default Full color Black 600 dpi 2620 0 Standard speed Y Set a smaller value to make lines thinner The value 11 or more is recommended 0 to 255 15 1 Standard speed M 2 Standard speed C 3 Standa...

Page 192: ...ected Caution after the adjustment Nothing in particular Color mode 05 Code Subcode Subcode description Recommended value Acceptable value range Default Full color Black 4837 0 Low density area K Set a smaller value to make lines thinner The value 50 or more is recommended 0 to 255 60 1 High density area K 85 2 Low density area Y 60 3 High density area Y 85 4 Low density area M 60 5 High density a...

Page 193: ...ions available 1 Applicable only to a PS printer driver 2 Applicable only to black K Printer functions 600 dpi 1200 dpi PS only Auto Color Twin Color Black and White Auto Color Twin Color Black and White Image Quality Type General Photograph Presentation Line Art Advanced Image Quality Basic Halftone Use Black for All text Pure Black Pure Gray Black Over Print 1 PostScript Over Print 1 1 Distingui...

Page 194: ...ly used for printing Microsoft Office applications This is suitable to print RGB data for color originals Universal PS printer driver This printer driver is suitable to perform printing from applications in compliance with PostScript used for a DTP operation This is suitable to print both RGB data and CMYK data for color originals Universal XPS printer driver This printer driver is used when print...

Page 195: ...TUDIO2010AC 2510AC 2515AC 3015AC 3515AC 4515AC 5015AC 3 35 3 Select the image type For Windows This adjustment will have an effect only on Auto or Color mode printing Open the property page of the printer driver Change the Image Quality Type option in the Image Quality tab PCL PS XPS ...

Page 196: ...cript PS XPS and Mac It may not be effective if a file created on a graphic application e g Illustrator or a DTP application e g QuarkXPress is printed or a PDF file created on these applications is printed using the C M Y and K toners Unmark the Use PostScript Passthrough checkbox in the PostScript Setting options in the Others tab The Image Quality Type option will be effective if printing on Wi...

Page 197: ...re printed clearly in a balanced manner Contains text photos and graphics Photograph Priority is given to the reproducibility of the low middle density for photographs and gradation Printing can be made in a similar color tone to a monitor with sRGB specified Photograph Presentation Priority is given to the reproducibility of vivid colors The color tone does not match that on the monitor because p...

Page 198: ...A TEC CORPORATION All rights reserved 3 38 3 3 To Maintain a Steady Color Balance 3 3 1 To Maintain a Steady Color Balance on Plain Paper Before adjustment After adjustment The color balance varies according to a change in the environment or a lapse of time The color balance is constantly maintained ...

Page 199: ...below Both the service technician and the user can perform all steps of this adjustment 1 Perform automatic calibration to correct variations in image density A privilege to perform automatic calibration is set to Administrator by default but this can be changed to the User For how to change the privilege refer to the MFP Management Guide Perform each adjustment for 600 dpi and 1200 dpi Use steps ...

Page 200: ...in a steady color balance on any type of paper Automatic calibration is the basic adjustment to accurately reproduce colors on the printouts When you would like to accurately reproduce the desired hue or when you have replaced the consumables and changed the installation environment perform automatic calibration to ensure the color reproducibility Procedures Perform the adjustment in accordance wi...

Page 201: ...ome screen to enter the User Functions menu b Press Admin c Enter an administrator password of 6 to 64 digits Press OK d Press General e Press Calibration f Press 600dpi Print or 1200dpi Print g Press the button for the paper type to be corrected h Press Default to set the default calibration setting or Calibration to adjust the calibration setting When you press Default the system maintains the d...

Page 202: ... rear corner so that two black rectangular marks are on the left side k Press the START button on the control panel The calibration begins Do not operate the equipment until the message Scanning and calibrating disappears If the chart is not properly placed the message Set chart correctly is displayed on the control panel In this case return to step j and realign the chart Caution after the adjust...

Page 203: ... To Adjust Color Balance and Density Explanation If you would like to change the color balance or darkness of the printouts and reproducibility of low middle density in accordance with a type of original or the user s requirements change the color balance option on the printer driver Procedures 1 Perform color balance adjustment For details of the adjustment procedure refer to 3 1 5 Color Balance ...

Page 204: ... perfectly matched with the one on the monitor Change the Image Quality Type option in order to closely match the color balance on the printout with the one on the monitor at a user s request This adjustment will be effective in closely matching the color balance on the printout with the one on the monitor if the sRGB is selected as a color space Therefore remember that it may not be matched with ...

Page 205: ...ator or a DTP application e g QuarkXPress is printed or a PDF file created on these applications is printed using the C M Y and K toners Unmark the Use PostScript Passthrough checkbox in the PostScript Setting options in the Others tab The Image Quality Type option will be effective if printing on Windows PS is performed but not on Mac or if a file created on the above applications is printed Howe...

Page 206: ... after the adjustment Nothing in particular Remarks Setting a color space to sRGB is a prerequisite to maximize the effectiveness of this adjustment Therefore if the monitor does not support sRGB or if color management cannot be performed the effectiveness of the adjustment may be significantly lost In general it is impossible to reproduce color saturation closely matching the true colors as viewe...

Page 207: ...sed to reproduce gray areas of image data such as BMP GIF JPEG and TIFF This provides a deeper gray on the printouts Change the option on the printer driver in order to maintain consistency in the gray hue between the drawing data and the image data Procedures Both the service technician and the user can perform all adjustments Before adjustment After adjustment How gray is reproduced varies depen...

Page 208: ...s adjustment will be effective only if a file created on a general application such as Microsoft Office is printed It may not be effective if a file created on a graphic application e g Illustrator or a DTP application e g QuarkXPress is printed or a PDF file created on these applications is printed For Windows This adjustment will have an effect only on Auto or Color mode printing Open the proper...

Page 209: ...full color printing Open the print dialog box Select Color Settings 1 Black Auto from among the Pure Black and Gray options Caution after the adjustment The adjustment allows gray areas always to be reproduced using all color toners C M Y and K As a result undesired colors may look blended depending on the print image Therefore carefully perform the adjustment while checking the printouts Mac ...

Page 210: ...Internet Explorer word processing or spreadsheet software A semi transparent gray color or gradient of gray is used in the Format AutoShape dialog box on Microsoft Office The gray area printed out as raster data in the same manner as a photo image is reproduced using C M and Y toners or C M Y and K toners Change the option on the printer driver in order to use only the black toner to reproduce the...

Page 211: ...To Easily Adjust the Overall Brightness Explanation The brightness of the print image can be easily adjusted by changing the Brightness setting on the printer driver Before adjustment The image is printed with a natural brightness Default printing After adjustment After adjustment A darker print image is obtained A brighter print image is obtained ...

Page 212: ... the service technician and the user can perform all adjustments 1 Change the Brightness option on the printer driver Select the desired value for brightness on a scale of 4 Darkest to 4 Lightest For Windows Open the property page of the printer driver Click Setting in the Image Quality tab Change the Brightness option in the Image Attribute tab PCL PS XPS ...

Page 213: ...15AC 3515AC 4515AC 5015AC 3 53 For Mac This adjustment will have an effect only on full color printing Open the print dialog box Change the Color Settings 2 Brightness option Caution after the adjustment Nothing in particular Remarks The brightness adjustment does not affect black text CMY 100 K 100 or RGB 0 Mac ...

Page 214: ... 54 3 4 6 To Adjust the Overall Saturation Explanation The saturation of the print image can be easily adjusted by changing the Saturation option on the printer driver Before adjustment The image is printed with a natural saturation Default printing After adjustment After adjustment The saturation is decreased The saturation is increased ...

Page 215: ... user can perform procedure 1 Only if the saturation of R Red is still insufficient even after procedure 1 has been performed must the service technician perform procedure 2 1 Change the Saturation option on the printer driver For Windows Open the property page of the printer driver Click Setting in the Image Quality tab Change the Saturation option in the Image Attribute tab PCL PS XPS ...

Page 216: ... 56 For Mac Open the print dialog box Change the Color Settings 2 Saturation option After changing the option on the printer driver print and check the print image quality Only if the saturation of R Red is still insufficient even after all the above procedures have been performed must the service technician perform the next procedure Mac ...

Page 217: ...lity Notes The adjustment may possibly decrease the density of G Green B Blue and K Black extremely Therefore carefully perform the adjustment while checking the printout Unless this adjustment changes the density of R Red return the values to the default setting value 5 This adjustment may affect not only the printouts but also every type of image quality such as the copy image Therefore perform ...

Page 218: ...l Contrast Explanation The contrast of the print image can be easily adjusted by changing the Contrast option on the printer driver Procedures Both the service technician and the user can perform all adjustments Before adjustment The image is printed with a natural contrast Default printing After adjustment After adjustment The contrast is decreased The contrast is increased ...

Page 219: ...AC 3515AC 4515AC 5015AC 3 59 1 Change the Contrast option on the printer driver Select the desired value for contrast on a scale of 4 Lowest to 4 Highest For Windows Open the property page of the printer driver Click Setting in the Image Quality tab Change the Contrast option in the Image Attribute tab PCL PS XPS ...

Page 220: ...515AC 4515AC 5015AC 2018 TOSHIBA TEC CORPORATION All rights reserved 3 60 For Mac This adjustment will have an effect only on full color printing Open the print dialog box Change the Color Settings 2 Contrast option Caution after the adjustment Nothing in particular Mac ...

Page 221: ...ion images can be reduced by adjusting the sharpness to softer Text and lines on the background of a gradational image as well as text in the Format AutoShape dialog box with transparency selected on Microsoft Office may be blurred especially Procedures 1 Perform sharpness adjustment For details of the adjustment procedure refer to 3 1 4 Sharpness Adjustment Print data Before adjustment After adju...

Page 222: ...3 Printer specific Adjustments e STUDIO2010AC 2510AC 2515AC 3015AC 3515AC 4515AC 5015AC 2018 TOSHIBA TEC CORPORATION All rights reserved 3 62 Caution after the adjustment Nothing in particular ...

Page 223: ...ts of lines For details on how to make the change refer to 3 2 To Make Print Suitable for the Original The halftone level of Line Art is a finer setting Therefore jaggies can be suppressed This adjustment will be effective only if a file created on a general application such as Microsoft Office is printed in PostScript PS XPS and Mac It may not be effective if a file created on a graphic applicati...

Page 224: ...type and the halftone setting 4 Change the applicable range of the halftone When Auto is set for the halftone setting on the printer driver a rough halftone will be applied to the graphics If you want to apply the fine halftone setting to graphics in the above condition change the value of 05 7383 2 to 1 Detail After the halftone setting has been changed perform automatic calibration When the half...

Page 225: ...3 Printer specific Adjustments 2018 TOSHIBA TEC CORPORATION All rights reserved e STUDIO2010AC 2510AC 2515AC 3015AC 3515AC 4515AC 5015AC 3 65 Caution after the adjustment Nothing in particular ...

Page 226: ...6 3 6 2 To Reduce Jaggies on Text and Lines Improvement by means of density adjustment Explanation If the colors of text and lines are light ones conspicuous jaggies can be made difficult to see by changing the color level to become darker Print data Before adjustment After adjustment Unadjusted settings A smoother softer image is obtained ...

Page 227: ...ipt Passthrough checkbox in the PostScript Setting options in the Others tab The Image Quality Type option will be effective if printing on Windows PS is performed but not on Mac or if a file created on the above applications is printed However the color balance may be changed and also the image quality may be diminished depending on the type of file Color tones may be changed accordingly 2 Perfor...

Page 228: ...d since they are too much thin 3 1 7 Graphic Line Width Adjustment You cannot make lines thinner 2 Change the image type By selecting General thin lines are reproduced darkly and clearly By selecting Line Art the difference of the line width is reproduced expressly For details on how to make the change refer to 3 2 To Make Print Suitable for the Original 3 Perform sharpness adjustment By enhancing...

Page 229: ...15AC 5015AC 3 69 5 Perform pulse width adjustment By performing this adjustment the line thickness can be changed If you want to arrange dark lines adjust the code to give priority to high density For details of the adjustment procedure refer to 3 1 12 Pulse Width Adjustment Caution after the adjustment Nothing in particular ...

Page 230: ...e Original 2 Perform sharpness adjustment By deselecting the Use Sharpness Filter checkbox the enhancement of the outline form of text and lines can be suppressed and thus smudges are able to be reduced For details of the adjustment procedure refer to 3 1 4 Sharpness Adjustment This adjustment will be reflected only when printing is performed by selecting 600 dpi 3 Perform PureBlack Gray threshold...

Page 231: ...3 Printer specific Adjustments 2018 TOSHIBA TEC CORPORATION All rights reserved e STUDIO2010AC 2510AC 2515AC 3015AC 3515AC 4515AC 5015AC 3 71 Caution after the adjustment Nothing in particular ...

Page 232: ...rder listed below However the service technician needs to judge whether or not to perform both procedures 1 and 2 while checking the print image 1 Perform pulse width adjustment By performing this adjustment the line thickness can be changed If you want to arrange dark lines adjust the code to give priority to high density For details of the adjustment procedure refer to 3 1 12 Pulse Width Adjustm...

Page 233: ...rming this adjustment on thin lines may not give satisfactory results In this case it is recommended to perform the adjustment in conjunction with 3 6 1 To Reduce Jaggies on Text and Lines Improvement by means of halftone adjustment In some consumption conditions background fogging or a decrease in the amount of developer material carrier streaks may occur Therefore carefully perform the adjustmen...

Page 234: ... Black and White mode the colored text may turn gray on the printout and eventually become illegible In this case change the option on the printer driver in order to reproduce the colored text except the white text in black and make it more legible on the printout This adjustment will have an effect only on printing on a Windows PCL or PS or XPS emulation printer driver This adjustment cannot be p...

Page 235: ... adjustment will be effective only if a file created on a general application such as Microsoft Office is printed in PostScript PS It may not be effective if a file created on a graphic application e g Illustrator or a DTP application e g QuarkXPress is printed or a PDF file created on these applications is printed Caution after the adjustment Nothing in particular Remarks Not all colored text may...

Page 236: ...d darker to make the light colored area darker the highly colored area may become much darker and blurred To print only the light area in a higher density and leave the dark area as it is change the setting for the printer driver and adjust the background and color balance Before adjustment After adjustment The light colored area becomes darker but the highly colored area becomes blurred Only the ...

Page 237: ...ils of the adjustment procedure refer to 3 1 3 Background Adjustment This adjustment makes all light colors darker To adjust a particular light color perform procedures 2 to 4 To adjust the color image Go to procedures 2 and 3 To adjust the black and white image Go to procedure 4 This adjustment will have an effect only on Auto or Color mode printing 2 Perform color balance adjustment For details ...

Page 238: ...nsity and reduce the amount of toner used Change the option on the printer driver and perform printing in the toner saving mode for instance if a large number of copies have to be printed or if the image density is too high If image density in the toner saving mode needs to be adjusted according to your customer s request change its upper limit value Procedures Both the service technician and the ...

Page 239: ...ATION All rights reserved e STUDIO2010AC 2510AC 2515AC 3015AC 3515AC 4515AC 5015AC 3 79 1 Enable the Toner Save option on the printer driver For Windows Open the property page of the printer driver Mark the Toner Save checkbox in the Others tab PCL PS XPS ...

Page 240: ...on after the adjustment The adjustment may possibly provide the image density lower than the user desires when printing is performed in the toner save mode Therefore carefully perform the adjustment while checking the printouts Remarks The print density in the toner save mode can also be adjusted For further information regarding the adjustment procedures refer to 3 8 2 To Adjust the Image Density...

Page 241: ...utomatically decrease the image density and reduce the amount of toner used Adjust the upper limit of the image density in the toner saving mode in order to obtain the desired image density requested by a particular user Procedures The service technician must perform all adjustments Before adjustment After adjustment The image density is too dark even when printing is performed in the toner saving...

Page 242: ...ac The Color options are available in the Basic tab on the PCL PS and XPS printer drivers The Color Type options are available in the Color Settings 1 menu in the print dialog box on Mac a Select 05 ADJUSTMENT MODE Change the value for codes 8160 or 8161 to adjust the upper limit of the image density in the toner save mode Printing on Mac is performed in PostScript See the PS row in the table belo...

Page 243: ...toner save mode Printing on Mac is performed in PostScript See the PS row in the table below Set the value in increments of approximately 30 while checking the printouts until the optimum value is obtained Caution after the adjustment The adjustment may possibly cause an increase of the amount of toner used if the image density is increased or provide faint print images if the image density is dec...

Page 244: ...anation Some applications may be designed to automatically insert blank pages for laying out the pages of a document Change the option on the printer driver in order to ignore all blank pages for printing Procedures Both the service technician and the user can perform all adjustments Before adjustment After adjustment A blank page is also delivered A blank page is ignored for printing ...

Page 245: ...ts reserved e STUDIO2010AC 2510AC 2515AC 3015AC 3515AC 4515AC 5015AC 3 85 1 Enable the Do not Print Blank Pages option on the printer driver For Windows Open the property page of the printer driver Mark the Do not Print Blank Pages checkbox in the Others tab PCL PS XPS ...

Page 246: ...tment The adjustment may not possibly operate the following options as programmed Therefore pay special attention to the combination of options Booklet printing N up printing Use Front Cover Use Back Cover Interleave Pages Remarks If any data are inserted in the header or footer of a particular page on Excel or Word even though no data are present in the body the page will not be recognized as a b...

Page 247: ...his is because the C M Y and K toners may be overlaid the paper may be extremely thick or the surface may be rough and the amount of toner used may be insufficient Adjust the limit value of the maximum amount of toner used in order to avoid a toner fixing problem This adjustment does not affect a single color of C M Y and K or bright colors such as red and green Procedures 1 Perform toner used amo...

Page 248: ...ed on a Mac printer driver Procedures Both the service technician and the user can perform all adjustments As an example of using Customer Color Settings if Presentation is selected as the base type from among the Image Quality Type options the procedure below is to set a larger value for the Middle density of the color in the Color Balance Details option and register the name of Draft agenda 1 Op...

Page 249: ...r the name for what has been specified in procedure 1 in the Basic tab in the Setting option Use steps a to c to register the name a Mark the Save Current setting as checkbox in the Custom Color Settings option b Enter an optional name in the Name option c Select the type you would like to use as the base one from among the Image Quality Type options in Original Image Quality Type PCL PS XPS a b c...

Page 250: ...he icons for the registered Custom Color Settings The icon of Presentation is displayed in the background as illustrated below Caution after the adjustment The Custom Color Settings indicate a condition where the default setting has been changed Adjusting the values in detail in the Setting option allows the user to register the desired print image quality Remarks The checkbox in the Custom Color ...

Page 251: ... is selected for the PS printer driver Procedures The procedure to use varies depending on whether To Adjust Colors To Adjust the Sharpness or To Print a Full Color Original in Two Colors Refer to the procedure corresponding to the particular user s request Before adjustment After Adjustment The original is printed in the Full color mode The areas other than black is printed in the same color Red ...

Page 252: ...ed 3 92 3 12 1 To Adjust Colors 1 Select Twin Color from among the Color options on the printer driver For Windows Open the property page of the printer driver Select Twin Color from among the Color options in the Basic tab Click Details Select the color to be used for the area other than black from among the Color options PCL PS XPS ...

Page 253: ...515AC 4515AC 5015AC 3 93 For Mac Open the print dialog box Select Twin color Black from among the Color Type options After selecting these options print and check the print image quality If color tone adjustment is required for colors to be used in the area other than black perform procedures 2 and 3 sequentially Mac ...

Page 254: ... of approximately 20 while checking the printouts until the optimum value is obtained Selected color Color to adjust 05 code Sub code Recommended value Acceptable value range Default Red Y Yellow 05 8033 0 1 2 Set a value larger than 128 to increase the density Set a value smaller than 128 to decrease the density 0 to 255 128 M Magenta 05 8034 0 1 2 C Cyan 05 8035 0 1 2 Green Y Yellow 05 8036 0 1 ...

Page 255: ...used for the area other than black selected in the Twin color mode Refer to the table below and select the color to be adjusted 3 Perform halftone adjustment For details of the adjustment procedure refer to 3 1 11 Halftone Adjustment when changing all print jobs Caution after the adjustment Nothing in particular Selected color Color to be adjusted Y Yellow M Magenta C Cyan Red Green Blue Cyan Mage...

Page 256: ...s on the printer driver For Windows Open the property page of the printer driver Select Twin Color from among the Color options in the Basic tab Click Details Select the color to use for the area other than black from among the Color options 2 Change the Use Sharpness Filter option on the printer driver 3 Perform sharpness adjustment For details of the adjustment procedure refer to 3 1 4 Sharpness...

Page 257: ...3 Printer specific Adjustments 2018 TOSHIBA TEC CORPORATION All rights reserved e STUDIO2010AC 2510AC 2515AC 3015AC 3515AC 4515AC 5015AC 3 97 Caution after the adjustment Nothing in particular ...

Page 258: ... is performed in the Twin color mode The area to be printed in black can be extended by setting a larger value 1 Select 05 ADJUSTMENT MODE Change the values for codes 8213 to 8215 to adjust the boundary between black and colors other than black As the setting value is increased the area of CHANGE BLACK TO will become larger On the other hand if the value is decreased the area of SECOND COLOR will ...

Page 259: ...ble only for PS and XPS printer drivers of Windows and a PS printer driver of Mac Procedures The setting procedure differs depending on how the user wants to use ICC profiles Follow the most suitable procedure referring to the subsections To Create ICC Profiles for Printing on the Paper to be Used To Print Precise Colors Using Existing RGB Source ICC Profiles To Perform Simulated Printing with CMY...

Page 260: ... in the Image Quality Type option patch printing for the printer must be performed but some users have difficulty to select the correct setting items on the printer driver menu To create a proper ICC profile with the correct print image the suitable setting items must be selected Procedures Both the service technician and the user can perform all settings 1 Open the Properties page of the printer ...

Page 261: ...C 5015AC 3 101 2 Select Advanced in the Image Quality Type option on the Image Quality tab menu and then click Setting 3 Select the desired type of halftone on the Halftone option on the Basic tab menu It is not recommended to select Auto on this option because several types of halftone may be used on the same page PS XPS PS XPS ...

Page 262: ...C 3515AC 4515AC 5015AC 2018 TOSHIBA TEC CORPORATION All rights reserved 3 102 4 Select the desired resolution level on the Resolution option 1200dpi is selectable only for PS printer driver 5 Uncheck Use Sharpness Filter on the Image Attribute tab menu PS XPS PS XPS ...

Page 263: ...TION All rights reserved e STUDIO2010AC 2510AC 2515AC 3015AC 3515AC 4515AC 5015AC 3 103 6 Select None on the CMYK Source Profile option on the Advanced tab menu At this step you can set any printer profile 7 Uncheck Apply to Device Color Only PS XPS PS XPS ...

Page 264: ...ofile creation software 9 Create the ICC profile following the operational procedure provided by the ICC profile creation software Caution after the adjustment Nothing in particular Remarks Read the precautions provided by the ICC profile creation software carefully before starting printing The correct image may not be printed on some paper types that are out of the MFP s specifications PS XPS PS ...

Page 265: ...must be printed with Adobe RGB color space Namely when the user has a standard ICC profile that is most suitable for particular images he or she can apply this profile to the color conversion at the printing so that ideal print images whose colors are precisely converted can be obtained Procedures Both the service technician and the user can perform all settings 1 Create the desired printer profil...

Page 266: ... the desired profile The Maintenance Destination Profiles page for the selected profile is displayed d Click Browse of Import new Profile to select a file for the profile Then click Import e Click Previous The display returns to the ICC Profile submenu f Click Save A confirmation dialog box is displayed g Click OK For the details of TopAccess see the TopAccess Guide ...

Page 267: ...510AC 2515AC 3015AC 3515AC 4515AC 5015AC 3 107 3 Open the Properties page of the printer driver and then select Advanced on the Image Quality Type option on the Image Quality tab menu Then click Setting 4 Select the uploaded RGB profile on RGB Source Profile on the Advanced tab menu PS XPS PS XPS ...

Page 268: ... Select the profile of the printer uploaded in Printer Profile in the Advanced tab Caution after the adjustment Nothing in particular Remarks Not all colors may be printed precisely because the color gamut reproducible with MFPs differs depending on the models The accuracy of color reproduction differs depending on printer profiles used PS XPS ...

Page 269: ...inting using one of these profiles This simulation is possible by using ICC profiles for CMYK ink of particular ink manufacturer as a CMYK source profile Procedures Both the service technician and the user can perform all settings 1 Create the desired printer profile using the ICC profile creation software 2 Access TopAccess and open the Administration tab menu Then upload the desired CMYK source ...

Page 270: ... the desired profile The Maintenance Destination Profiles page for the selected profile is displayed d Click Browse of Import new Profile to select a file for the profile Then click Import e Click Previous The display returns to the ICC Profile submenu f Click Save A confirmation dialog box is displayed g Click OK For the details of TopAccess see the TopAccess Guide ...

Page 271: ...10AC 2515AC 3015AC 3515AC 4515AC 5015AC 3 111 3 Open the Properties page of the printer driver and then select Advanced on the Image Quality Type option on the Image Quality tab menu Then click Setting 4 Select the uploaded CMYK profile on CMYK Source Profile on the Advanced tab menu PS XPS PS XPS ...

Page 272: ... Select the profile of the printer uploaded in Printer Profile in the Advanced tab Caution after the adjustment Nothing in particular Remarks Not all colors may be printed precisely because the color gamut reproducible with MFPs differs depending on the models The accuracy of color reproduction differs depending on printer profiles used PS XPS ...

Page 273: ...ile printing with a specific color reproduction is possible Procedures Only the service technician must perform step 1 Both the service technician and the user can perform steps 2 or later 1 Create the RGB source ICC profile for the desired color reproduction using e BRIDGE Color Profile Tool V3 0 2 Access TopAccess and open the Administration tab menu Then upload the desired RGB source profile Fo...

Page 274: ...he custom RGB profile The Maintenance Destination Profiles page for the selected profile is displayed d Click Browse of Import new Profile to select a file for the profile Then click Import e Click Previous The display returns to the ICC Profile sub menu f Click Save A confirmation dialog box is displayed g Click OK For the details of TopAccess see the TopAccess Guide ...

Page 275: ...510AC 2515AC 3015AC 3515AC 4515AC 5015AC 3 115 3 Open the Properties page of the printer driver and then select Advanced on the Image Quality Type option on the Image Quality tab menu Then click Setting 4 Select the uploaded ICC profile on Custom RGB profile on the Advanced tab menu PS XPS PS XPS ...

Page 276: ... 3015AC 3515AC 4515AC 5015AC 2018 TOSHIBA TEC CORPORATION All rights reserved 3 116 Caution after the adjustment Nothing in particular Remarks Not all colors may be printed precisely because the color gamut reproducible with MFPs differs depending on the models ...

Page 277: ...rofile previously specified by the user so that he or she can obtain print images whose quality is equivalent to that of Fiery images Procedures Both the service technician and the user can perform all settings 1 Create the desired printer profile using the ICC profile creation software 2 Access TopAccess and open the Administration tab menu Then upload the desired RGB source profile CMYK source p...

Page 278: ... the desired profile The Maintenance Destination Profiles page for the selected profile is displayed d Click Browse of Import new Profile to select a file for the profile Then click Import e Click Previous The display returns to the ICC Profile submenu f Click Save A confirmation dialog box is displayed g Click OK For the details of TopAccess see the TopAccess Guide ...

Page 279: ...5AC 3015AC 3515AC 4515AC 5015AC 3 119 3 Open the Properties page of the printer driver and then select Advanced on the Image Quality Type option on the Image Quality tab menu Then click Setting 4 Select the uploaded profile on RGB Source Profile or CMYK Source Profile on the Advanced tab menu PS XPS PS XPS ...

Page 280: ...IO2010AC 2510AC 2515AC 3015AC 3515AC 4515AC 5015AC 2018 TOSHIBA TEC CORPORATION All rights reserved 3 120 5 Uncheck Apply to Device Color Only 6 Select the uploaded printer profile on Profile of the Destination Profile option PS XPS PS XPS ...

Page 281: ... 2510AC 2515AC 3015AC 3515AC 4515AC 5015AC 3 121 Caution after the adjustment Nothing in particular Remarks Colors printed in this procedure may not be completely the same as those of Fiery images because the color measurement method of this procedure is not completely equal to the one for Fiery ...

Page 282: ...anation After printer profiles were applied by selecting Advanced on the Image Quality Type option on the printer driver menu a user can perform further image adjustments Procedures Both the service technician and the user can perform all settings 1 Open the Properties page of the printer driver and then select Advanced on the Image Quality Type option on the Image Quality tab menu Then click Sett...

Page 283: ...2010AC 2510AC 2515AC 3015AC 3515AC 4515AC 5015AC 3 123 2 Select the desired profiles on RGB Source Profile CMYK Source Profile or Profile of the Destination Profile option 3 Open the Color Balance tab menu and then change each setting items to obtain the desired color balance PS XPS PS XPS ...

Page 284: ...2515AC 3015AC 3515AC 4515AC 5015AC 2018 TOSHIBA TEC CORPORATION All rights reserved 3 124 4 Open the Image Attribute tab menu and then change each setting items to obtain the desired image quality Caution after the adjustment Nothing in particular PS XPS ...

Page 285: ...f the reproducibility of red seal color printed under the default settings is insufficient Procedures 1 Select 08 SETTING MODE Change the value for code 8005 to 1 2 Select the Red Seal Color Mode check box on the printer driver For Windows This adjustment will only have an effect on Auto or Color mode printing Open the property page of the printer driver Select General in the Original Image Qualit...

Page 286: ...ights reserved 3 126 For Mac This adjustment will only have an effect on Color mode printing Open the print dialog box Select the Color Settings 1 Red Seal Color Mode check box After changing the setting on the printer driver print the image and check its image quality Caution after the adjustment Nothing in particular Mac ...

Page 287: ...ecomes visible In such a case these phenomena can be reduced by changing the halftone roughness Besides the above white voids may occur on the boundary when the color of the background and text on it is the same type or there are thin lines with the same color type on evenness data In such a case these phenomena can be reduced by changing the halftone level Procedures 1 Perform halftone adjustment...

Page 288: ...r the one for the subcode 1 1 When a larger value is set it will get stronger against a wider gap off registration however overlapped areas will become more conspicuous 2 The smaller the value is the darker the boundary color becomes In this case the gaps will not become conspicuous however overlapping areas will become more conspicuous The above setting will be referred to when Auto Trapping on t...

Page 289: ... CORPORATION All rights reserved e STUDIO2010AC 2510AC 2515AC 3015AC 3515AC 4515AC 5015AC 3 129 Remarks This adjustment will be reflected only when 600dpi is set in Resolution This adjustment is effective only to the boundary of the text or graphics ...

Page 290: ...3 Printer specific Adjustments e STUDIO2010AC 2510AC 2515AC 3015AC 3515AC 4515AC 5015AC 2018 TOSHIBA TEC CORPORATION All rights reserved 3 130 ...

Page 291: ... Box it is stored with binary data with reference to a threshold value This may make a dark area blurred and a light area eliminated Adjust the threshold value in order to clearly store the black and white original in the Auto Color mode This adjustment will have an effect on the image stored using Scan to File and Scan to E mail After adjustment Before adjustment The light image becomes blurred a...

Page 292: ...s stored in the Auto Color mode 2 Select High Quality from among the Image Quality for Black in ACS options to store the black and white original in the Image smoothing mode Use steps a to c to select the Image Quality for Black in ACS option a Press User Functions User on Home screen to enter the User Functions menu b Press Scan c Press High Quality in the Image Quality for Black in ACS option Ca...

Page 293: ...w is selected from among the compression rate options the file size will be 2 to 3 times larger than the one when High is selected When storing the original if a higher priority is given to file size reduction than the image quality change the compression rate This adjustment will have an effect on images stored using Scan to File and Scan to E mail Procedures Both the service technician and the u...

Page 294: ...e the template Recall the template where High is selected from among the compression rate options and scan the original The user may want to select a compression rate depending on the type of original or purpose of the image stored In this case it is recommended to utilize the template Initially select the desired compression rate in the template and recall it as necessary This facilitates changin...

Page 295: ...ment The image stored in the e Filing box looks different in the color balance from the original The color balance of the image stored is closely matched with that of the original Original image Photograph Original image Photograph e Filing box Client PC Displayed on the computer monitor Downloaded Stored Print to Box Image Quality Type Photograph e Filing box Client PC Displayed on the computer m...

Page 296: ...ng on the printer driver in order to minimize the difference in the color balance and closely match the color balance of the image stored with that of the original Procedures Both the service technician and the user can perform all adjustments This adjustment will have an effect only on the image stored in the Auto mode or the Color mode 1 Open the property page of the printer driver Select Genera...

Page 297: ...unction with another But if this changes the image quality more than required or loses the effectiveness of the adjustment restore the settings made in the previously performed procedure to the original ones Then perform other procedures Both the service technician and the user can perform procedures 1 to 3 Only the service technician must perform procedure 4 1 When scanning the original press Sca...

Page 298: ...ing the sharpness intensity scan and store the original Then print and check the print image quality With the sharpness intensity set to the minimum if moiré still occurs perform other procedures 4 Select 05 ADJUSTMENT MODE Change the values for codes 7430 to 7433 7470 8335 8336 8354 and 8375 to adjust the sharpness intensity in the scanning functions This adjustment will have an effect only on an...

Page 299: ...tment After adjustment If the image stored in the e Filing box is downloaded to a PC and then printed out the image data conversion may diminish the image quality If the image is printed out directly from the e Filing box the image quality will be maintained e Filing box Client PC Downloaded Converted into RGB Stored Copy to Box Print to Box Print data Stored Print Converted into print data again ...

Page 300: ...g box Scan to Box or Fax to Box download it to the client PC once select the desired Image Quality Type option on the printer driver and print it out rather than printing it out directly from the e Filing box Then the image may be finely printed For further information regarding how to print full color images scanned and stored refer to 4 7 To Finely Print Color Images Scanned and Stored To print ...

Page 301: ...le for monitor display since it is optimized for printing on paper This may diminish the image quality The original is stored as RGB data by Scan to Box This can avoid unnecessary data conversion As a result the image quality can be maintained e Filing box Client PC Downloaded Converted into RGB Stored Copy to Box Print data Storedand edited Displayed on the computer monitor RGB data e Filing box ...

Page 302: ...ors to be misaligned or grainy on the printout so if the image is edited on the PC its quality may be diminished To store a full color original and display it on the computer monitor while minimizing image degradation scan and store it in the e Filing box Scan to Box This allows it to be stored as data optimized for display on the computer monitor Procedures Both the service technician and the use...

Page 303: ...ment Unless the printing image mode is selected printing may be performed with image processing not suitable for the stored data When the printing image mode suitable for the stored data is selected the data can be printed finely with optimal image processing e Filing box Stored Scan to Box RGB data Print Converted into print data Ex Printing image mode Presentation e Filing box Stored Scan to Box...

Page 304: ...red in the Full color mode including the Auto Color mode 1 Scan the full color image and store it in the e Filing box For further information regarding how to scan and store images refer to the Operator s Manual for e Filing Guide and Scanning Guide 2 Select a printing image mode suitable for the stored image Use steps a to c to change the printing image mode a Press User Functions User on Home sc...

Page 305: ...setting value for the code 8107 When 0 is set sharpness processing will not be applied Set a larger value than 128 to enhance the sharpness level Set a smaller value than 128 to decrease the sharpness level After changing the setting value perform printing and check its image quality Caution after the adjustment Nothing in particular Objective image 05 Code Recommended value Acceptable value range...

Page 306: ...hile reducing its file size Scan to Box Displaying on a computer monitor 4 3 To match the color balance of the scanned image to that of the original Print to Box Displaying on a computer monitor 4 4 To scan and print originals while avoiding Moiré Scan to Box Printing on paper 4 5 To print images stored in e Filing boxes more clearly Copy to Box Print to Box Printing on paper 4 6 To scan images op...

Page 307: ...edure in conjunction with another But if this changes the image quality more than required or loses the effectiveness of the adjustment restore the settings made in the previously performed procedure to the original ones Then perform other procedures Both the service technician and the user can perform this procedure However step 3 in the procedure must be performed only by the service technician ...

Page 308: ... the table below just for your reference The file size in a resolution of 200 dpi is 1 If the resolution selected in procedure 2 is too high moiré may possibly occur in the scanned in image Therefore carefully adjust the resolution while checking the scanned in image Remarks Use the following steps to change the default compression rate and resolution options a Press User Functions User on Home sc...

Page 309: ...or loses the effectiveness of the adjustment restore the settings made in the previously performed procedure to the original ones Then perform other procedures Both the service technician and the user can perform procedures 1 and 2 Only the service technician must perform procedure 3 1 Set the density adjustment method to the automatic adjustment by pressing Auto of the Exposure option 2 When scan...

Page 310: ...accordingly For instance if the center value is decreased by 5 lighter the value of each step of the indicator will also be decreased by 5 lighter Caution after the adjustment The adjustment may possibly diminish the quality of the light colored image Therefore carefully perform the adjustment while checking the scanned in image Remarks When scanning the original use the following steps to change ...

Page 311: ...he color mode options Caution after the adjustment The adjustment may possibly increase the size of the file to be stored Therefore carefully perform the adjustment while checking the scanned in image quality The correlation between color mode and file size is as described below The ratio of the file size may vary depending on the type of original Therefore use the description below just for your ...

Page 312: ...ill diminish the image quality but reduce the file size to approximately 1 8 to 1 10 compared to the scanned in image 300 dpi compression rate MID in JPEG format Procedures The procedure to use varies depending on whether to reduce the file size by changing the options when scanning the original or in Slim PDF Refer to To Reduce the File Size by Changing the Options when Scanning the Original in o...

Page 313: ... and Auto color After changing the resolution scan the original and check the scanned in image quality If further image quality adjustments are still necessary perform other procedures 2 When scanning the original press Scan Setting on the Control Panel Select Text from among the original mode options Perform this adjustment only if a black and white original containing no photo images is scanned ...

Page 314: ...T MODE Change the value for the code 8304 to change the JPEG compression ratio Caution after the adjustment The table below shows you the correlation between the adjustment and file size The ratio of the file size may vary depending on the type of original Therefore use the table below just for your reference Correlation between the resolution and the file size procedure 1 The file size in a resol...

Page 315: ...mpress and or Background Adjustment option press the desired button to change the default The default resolution can be selected on a color mode basis Full color mode including the Auto Color mode Gray scale mode and Black mode The following resolution options are available as the default Full color mode including Auto Color mode 600 400 300 200 150 100 dpi Gray scale mode 600 400 300 200 150 100 ...

Page 316: ...ecommended to scan them in JPEG or PDF Originals blurred when scanned in JPEG or PDF If the original is scanned in Slim PDF the image quality may be further diminished Complicated originals such as tables or maps containing lines or small sized text Originals where stable image quality is required such as critical documents 1 When scanning the original press Slim PDF on the Control Panel After adj...

Page 317: ...on to turn the original After changing the Rotation option scan the original and check the scanned in image quality If further image quality adjustments are still necessary perform the next procedure b When scanning the original press Scan Setting on the Control Panel Press to decrease the sharpness intensity Decrease the sharpness intensity by 1 step from the current value To eliminate the backgr...

Page 318: ...nal To increase the sharpness intensity Explanation Adjust the sharpness intensity in order to sharply scan the soft and blurred original This adjustment will have an effect on the image scanned in all color modes Full color Gray scale Black and Auto color Before adjustment After adjustment The image looks too soft and blurred The edges are enhanced The image looks sharp ...

Page 319: ...ity scan the original and check the scanned in image quality With the sharpness intensity set to the maximum if further image quality adjustments are still necessary the service technician must perform the next procedure 2 Select 05 ADJUSTMENT MODE Change the values for codes 7430 to 7433 7470 8335 8336 8354 and 8375 to adjust the sharpness intensity Setting 0 provides the softest image while sett...

Page 320: ...d to the original In general the scanned in image is likely to become less dark Finely adjust the black density of the scanned in image in order to darken black and closely match it with the original hue This adjustment will have an effect only on the image scanned in the Full color mode including the Auto Color mode Before adjustment After adjustment Black is not dark enough compared to the origi...

Page 321: ...ack density of a scanned in image Setting 0 provides the lightest black while setting 4 the darkest Caution after the adjustment The adjustment may possibly provide the extremely dark background Therefore carefully perform the adjustment while checking the scanned in image Color mode Original mode 05 code Recommended value Acceptable value range Default Full color Text Photo 05 8314 Set a value la...

Page 322: ...ng to density area low middle or high density area allows a user to adjust the reproducibility of low middle density gradation Adjust the gamma curve balance in order to change the gradation depending on the type of original or at a user s request This adjustment will have an effect only on the image scanned in the Black mode or the Gray scale mode Before adjustment The image is scanned with natur...

Page 323: ...is adjusted Refer to the table below and set the subcode for the area to be adjusted Gradation in the Black mode will vary if the middle density area is mainly adjusted But remember that adjusting the low or high density area will rarely affect the gradation in the Black mode Caution after the adjustment Nothing in particular Color mode Original mode 05 code Subcode Recommended value Acceptable va...

Page 324: ... Color mode selected select the existing original mode or e document mode option where the value has been adjusted to identify whiteout areas as reference original mode This adjustment will have an effect only on the image scanned in the Black mode or the Full color mode including the Auto Color mode e document This is the mode that corresponds to the law in Japan Procedures Perform the adjustment...

Page 325: ...larger the value the darker the background becomes The smaller the value the lighter the background becomes 5 2 05 7470 Sharpness adjustment The larger the value the sharper the image becomes The smaller the value the softer the image becomes and the less moire appears 5 5 05 7475 Density adjustment Manual adjustment Center value The larger the value the darker the image at the center value become...

Page 326: ...e smaller the value the duller the image becomes 05 8375 Sharpness adjustment The larger the value the sharper the image becomes The smaller the value the softer the image becomes and the less moire appears 5 5 05 8380 Density adjustment Manual adjustment Center value The larger the value the darker the image at the center value becomes 05 8381 Automatic density adjustment When a larger value is s...

Page 327: ...ginal press SCAN SETTING on the Control Panel Select User Custom from among the original mode options Caution after the adjustment Nothing in particular Color mode 05 Code Sub code Adjustment Acceptable value range Default Setting value Reference section Full color 05 8428 0 RGB color balance adjustment R 0 to 255 128 When a larger value is set red becomes darker When a smaller value is set it bec...

Page 328: ...ing the setting value The setting value is applied to all resolutions and color modes Procedures All the steps in the adjustment procedure shall be performed by the service technician 1 Select 05 ADJUSTMENT MODE Change the value for the code 7489 to 7491 to adjust the white void amount around the scanned image When the value is increased the white void amount all around the scanned image is made w...

Page 329: ...oes not become fine in the Text Photo mode perform the following steps 2 Press Scan Setting on the control panel and then in Saturation to increase the saturation of the copy image Note This increases the saturation not only for yellow but also for other colors After adjusting the saturation copy and check the copy image quality If the yellow does not become vivid even though the saturation is inc...

Page 330: ...Color Balance c Set the color balance with a combination of both a and b To scan yellow more vividly Use steps a through c to perform the adjustment a Set B blue to side in Color Balance b Set R red and G green to side in Color Balance c Set the color balance with a combination of both a and b Note This adjustment influences not only yellow but also other colors After adjusting the color balance c...

Page 331: ...hnician can perform step 2 Note Normally the use with the factory default setting Disabled is recommended since the adjustment may decrease the reproducibility of fine characters and lines 1 Press Scan Setting on the control panel and select ADF Scan Noise Reduction By pressing Low Middle or High adjust the noise reduction level to reduce streaks in scanning with the DF After adjusting perform sca...

Page 332: ...tting value this function becomes disabled The noise reduction level for each Low Middle or High of ADF Scan Noise Reduction set from the control panel is changed Setting the recommended value provides the most effective result After changing the setting value perform scanning and check its image quality Caution after the adjustment Perform the adjustment while checking the scanned images since th...

Page 333: ...s reserved e STUDIO2010AC 2510AC 2515AC 3015AC 3515AC 4515AC 5015AC 5 27 5 12 To Change Judgment Area of Omit Blank Page and Auto Color To make judgment properly for originals whose images are only located near the edges Original sample Before adjustment After adjustment ...

Page 334: ...res The service technician must perform the adjustments 1 Select 05 ADJUSTMENT MODE and change the setting value for the code 7616 to adjust the image area to be used for the judgment for the Omit Blank Page and Auto Color modes When a smaller value is set the void amount is decreased and thus the image area to be used for the judgment is increased The setting value of 24 steps correspond to 1 mm ...

Page 335: ...2010AC 2510AC 2515AC 3015AC 3515AC 4515AC 5015AC 5 29 5 13 To Make a Scan by Removing all Colors other than Black Original Normal Black mode scanning When the Drop out color function option is enabled Colors other than black are reproduced in gray Colors other than black are not reproduced ...

Page 336: ... in color originals including black text can be removed Moreover the removal level of gray like colors such as navy blue can be adjusted Color originals include not only the colored mark sheet originals with notes added in black pencil but also monochrome originals with notes added by a color pen Original Normal Black mode scanning When the Drop out color function option is enabled Colors other th...

Page 337: ...kes gray like colors tend to remain If further fine adjustment of the removal level of gray like colors is required have the service technician perform the following step 2 Select 05 ADJUSTMENT MODE and change the setting value for the code 7472 to adjust the removal level of gray like colors A change by 10 in the setting value corresponds to 1 step of the slide bar in the touch panel Caution afte...

Page 338: ...5 Scanning specific Adjustments e STUDIO2010AC 2510AC 2515AC 3015AC 3515AC 4515AC 5015AC 2018 TOSHIBA TEC CORPORATION All rights reserved 5 32 ...

Page 339: ......

Page 340: ......

Reviews: