e-STUDIO162/162D/151/151D UNPACKING AND INSTALLATION 5 - 11
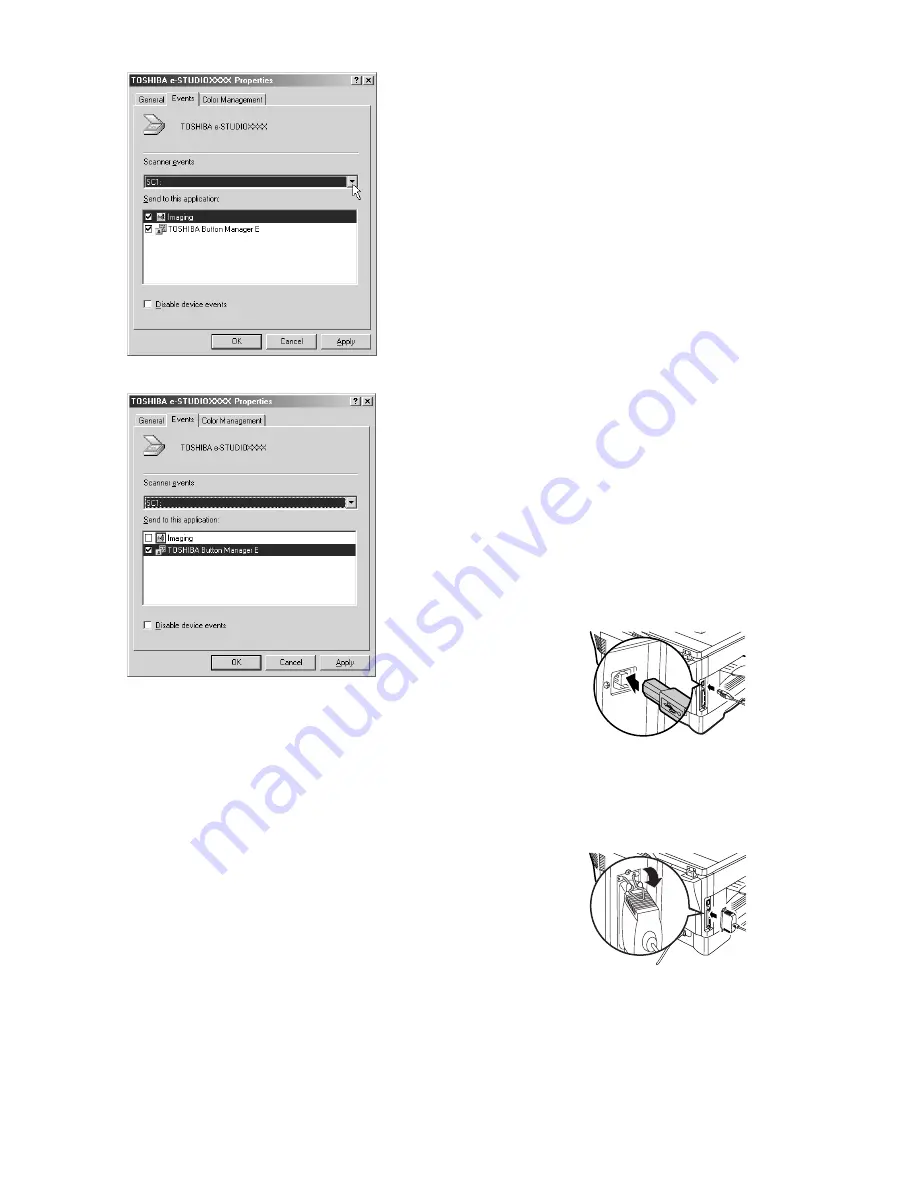
5) Select "SC1:" from the "Scanner events" pull-down menu.
6) Select "TOSHIBA Button Manager E" in "Send to this application".
Note: If other applications are shown, deselect the checkboxes for the
other applications and leave only the Button Manager checkbox
selected.
7) Click the "Apply" button.
8) Repeat Steps 5) through 7) to link Button Manager to "SC2:"
through "SC6:".
Select "SC2:" from the "Scanner events" pull-down menu. Select
"TOSHIBA Button Manager E" in "Send to this application" and
click the "Apply" button. Do the same for each ScanMenu through
"SC6:".
When the settings have been completed, click the "OK" button to
close the screen.
Button Manager is now linked to the scan menu (1 through 6).
The scan settings for each of scan menus 1 through 6 can be changed
with the setting window of Button Manager.
For the factory default settings of the scan menu and the procedures
for configuring Button Manager settings.
D. Connecting the machine to your computer
(1) Connecting a USB cable
Follow the procedure below to connect the machine to your computer.
A USB cable for connecting the machine to your computer is not
included with the machine. Please purchase the appropriate cable for
your computer.
Caution:
• USB is available with a PC/AT compatible computer that was origi-
nally equipped with USB and had Windows 98, Windows Me, Win-
dows 2000 Professional, Windows XP Professional or Windows XP
Home Edition preinstalled.
• Do not connect the USB cable before installing the MFP driver. The
USB cable should be connected during installation of the MFP
driver.
Note:
• If the machine will be connected using a USB 2.0 port of your com-
puter, please purchase a USB cable that supports USB 2.0.
• The machine's USB connector will transfer data at the speed speci-
fied by the USB 2.0 (Hi-Speed) only if the Microsoft USB 2.0 driver is
preinstalled in the computer, or if the USB 2.0 driver for Windows
2000 Professional/XP that Microsoft provides through its "Windows
Update" Web page is installed.
• To obtain the fastest USB 2.0 data transfer speed, "USB2.0 MODE
SWITCH" in the machine's user programs must be set to "HI-
SPEED".
• Use the machine's "HI-SPEED" mode only when using a computer
that is running Windows 2000/XP.
• Even when the Microsoft USB 2.0 driver is used, it may not be possi-
ble to obtain full USB 2.0 speed if a PC card supporting USB 2.0 is
used. To obtain the latest driver (which may enable a higher speed),
contact the manufacturer of your PC card.
• Connection is also possible using a USB 1.1 port on your computer.
However, the specifications will be USB 1.1 specifications (Full-
Speed).
1) Insert the cable into the USB connector on the machine.
2) Insert the other end of the cable into your computer's USB port.
(2) Connecting a parallel cable
1) Obtain an IEEE1284 shielded parallel interface cable.
2) Insert the cable into the parallel interface connector located on the
rear of the unit, and fasten with clasps.
3) Insert the other end of the cable into the interface connector of your
computer.
e-STUDIO162_151.book 11
ページ
2004年12月2日 木曜日 午後9時37分
Summary of Contents for e-studio 151
Page 170: ...Memo ...
Page 171: ...Memo ...
Page 172: ...Memo ...
Page 176: ...2 17 2 HIGASHIGOTANDA SHINAGAWA KU TOKYO 141 8664 JAPAN ...


