background image

2.SETTING ITEMS (ADMIN)

IEEE 802.1X Authentication Setting    137

2 SETTING ITEMS (ADMIN)

3

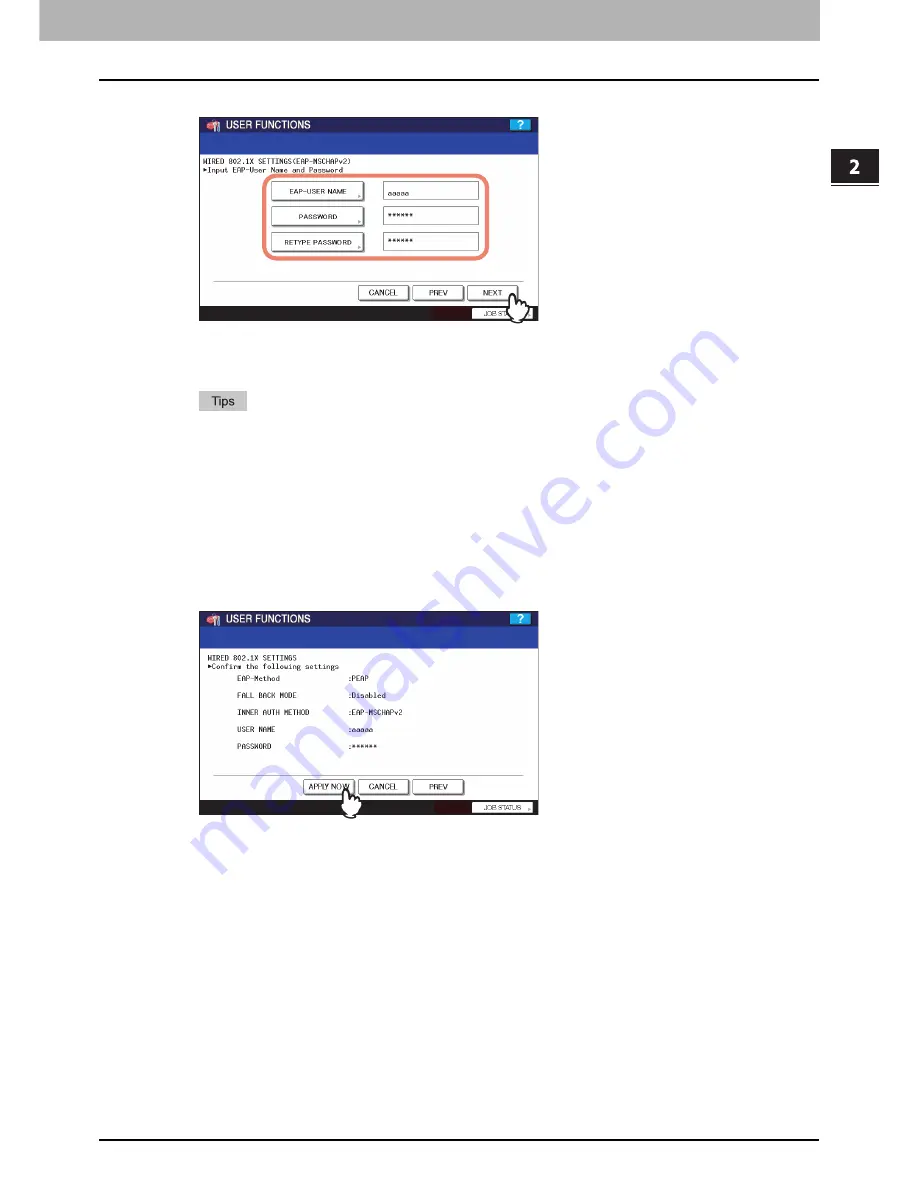
Specify the following items as required and press [Next].

[EAP-USER NAME]

 — Press this button to enter the EAP-User name.

[PASSWORD]

 — Press this button to enter the authentication password.

[RETYPE PASSWORD]

 — Press this button to re-enter the authentication password.

y

When you press the above buttons, the on-screen keyboard is displayed. Enter a value using the keyboard 
and digital keys, and press [OK] to set the entry.

y

Up to 127 alphanumeric characters can be entered for [EAP-USER NAME] and [PASSWORD]. However, 
the following characters cannot be entered:

- {
- }
- “
- , (comma)
- space
- =

4

Confirm the settings and press [APPLY NOW].

The “NETWORK INITIALIZING” message is displayed and this equipment starts initializing the network interface 
card to apply the changes.

Summary of Contents for 5520

Page 1: ...MULTIFUNCTIONAL DIGITAL SYSTEMS MFP Management Guide ...

Page 2: ... All rights reserved Under the copyright laws this manual cannot be reproduced in any form without prior written permission of TTEC No patent liability is assumed however with respect to the use of the information contained herein ...

Page 3: ...s Microsoft Windows Server 2003 Operating System y Microsoft Windows Windows NT and the brand names and product names of other Microsoft products are trademarks of Microsoft Corporation in the US and other countries y Apple AppleTalk Macintosh Mac Mac OS Safari TrueType and LaserWriter are trademarks of Apple Inc in the US and other countries y Adobe Adobe Acrobat Adobe Reader Adobe Acrobat Reader...

Page 4: ......

Page 5: ... Entering Admin Menu 63 Setting General Functions 65 Setting the device information 65 Setting the notification 66 Changing the administrator password 68 Setting the date and time 70 Setting the energy saver mode 72 Setting the calibration and registration display level 74 Setting the drawer set pop up and paper jam recovery pop up 75 Setting the status message 76 Setting the calibration 77 Settin...

Page 6: ...nt Out Total Counter 149 Department Counter 150 Managing Department Codes 154 Logging on as administrator 154 Printing department code list 156 Enabling department codes 157 Resetting all department counters 158 Deleting all department codes 159 Registering a new department code 160 Editing department codes 162 Deleting department codes 165 Resetting the counter for each department 166 Setting out...

Page 7: ...CONTENTS 5 INDEX 195 ...

Page 8: ...6 CONTENTS ...

Page 9: ...Adjusting the display contrast 12 Setting the calibrations 13 Setting the registration 15 Setting Copy Functions 16 Setting Fax Functions 19 Setting Scan Functions 20 Setting e Filing Functions 23 Printing Lists 24 Setting Drawer 27 Managing Address Book 30 Managing contacts in address book 30 Managing groups in address book 42 Checking E mail 58 Setting BIP Printing 59 ...

Page 10: ...e user setting operation that you require P 9 Setting General Functions P 16 Setting Copy Functions P 19 Setting Fax Functions P 20 Setting Scan Functions P 23 Setting e Filing Functions P 24 Printing Lists P 27 Setting Drawer P 30 Managing Address Book P 58 Checking E mail P 59 Setting BIP Printing BIP PRINTING is available only when the Bluetooth Module optional is installed For instructions on ...

Page 11: ...u is displayed To display the USER menu see the following page P 8 Entering User Menu 2 Press AUTO CLEAR The AUTO CLEAR screen is displayed 3 Press the button that indicates the desired time in seconds The auto clear mode has been set to the selected time If you want to disable the auto clear mode press NO LIMIT Even if NO LIMIT is selected the screen will be cleared after 45 seconds when users ar...

Page 12: ...an be changed to a different one 1 Press GENERAL in the USER menu The GENERAL menu is displayed To display the USER menu see the following page P 8 Entering User Menu 2 Press CHANGE LANGUAGE The CHANGE LANGUAGE screen is displayed 3 Press the desired language button The touch panel is displayed in the selected language ...

Page 13: ...mode in which the white portion is black and the black portion is white Changing to the reversed display mode helps to display the touch panel more clearly when it is too bright 1 Press GENERAL in the USER menu The GENERAL menu is displayed To display the USER menu see the following page P 8 Entering User Menu 2 Press REVERSED DISPLAY The REVERSED DISPLAY screen is displayed ...

Page 14: ...eversed display When you select ON the touch panel is displayed in the reversed display mode Adjusting the display contrast This function allows you to adjust the touch panel contrast 1 Press GENERAL in the USER menu The GENERAL menu is displayed To display the USER menu see the following page P 8 Entering User Menu ...

Page 15: ...egistration display level y Place LT or A4 paper recommended paper in the drawer before starting the calibration If any other paper is used calibration may not be performed properly y If the glass is dirty or any foreign objects are stuck to the glass the calibration may not be performed properly Keep the glass clean y Never raise the original cover or the Reversing Automatic Document Feeder or op...

Page 16: ...s CALIBRATION The CALIBRATION menu is displayed 4 Refer to Step 1 in the following operations To perform the copy calibration see the following page P 79 Setting the copy calibration To perform the print calibration see the following page P 80 Setting the print calibration Instructions on how to perform the copy and print calibrations are the same when they are performed in the ADMIN menu ...

Page 17: ...tor has set the registration display level to USER P 74 Setting the calibration and registration display level 1 Press GENERAL in the USER menu The GENERAL menu is displayed To display the USER menu see the following page P 8 Entering User Menu 2 Press REGISTRATION The REGISTRATION menu is displayed 3 Refer to Step 3 in the following operation P 82 Setting the registration Instructions on how to p...

Page 18: ...he following page P 8 Entering User Menu 2 Specify the following items as you require and press EXPOSURE FOR COLOR Press the desired mode button EXPOSURE FOR BLACK Press the desired mode button COLOR MODE Press the desired mode button Only BLACK can be selected when the no limit black function is enabled IMAGE DIRECTION Press the desired mode button For details on the image direction option refer ...

Page 19: ...ed media type button and press For e STUDIO2330C 2820C 2830C 3520C 3530C 4520C For e STUDIO5520C 6520C 6530C For more information about the paper type refer to the Copying Guide 4 Press the desired mode button for the ORIGINAL MODE FOR COLOR and ORIGINAL MODE FOR BLACK options and press ...

Page 20: ...lank pages from the scanned data in a copy job The higher the level is the more likely the equipment is to detect blank pages For more information about the omit blank page function refer to the Copying Guide ACS ADJUSTMENT Use the buttons to select the appropriate sensitivity from 7 levels to detect whether the data scanned in the auto color copy mode is color or black The higher the level is the...

Page 21: ...e FAX Unit optional is not installed the setting items in this menu are applied to Internet Fax transmission jobs 1 Press FAX in the USER menu The FAX screen is displayed To display the USER menu see the following page P 8 Entering User Menu 2 Specify the following items as you require and press OK RESOLUTION Press the desired mode button ORIGINAL MODE Press the desired mode button EXPOSURE Press ...

Page 22: ...ired mode button that applies to scan jobs in gray scale full color or auto color mode SINGLE 2 SIDE SCAN Press the desired mode button y SINGLE Press this button to set single page scan mode as the default scan mode y BOOK Press this button to set book scan mode as the default scan mode This enables scans of both sides of originals in the same direction y TABLET Press this button to set tablet sc...

Page 23: ...nt is to detect the scanned data as a color document IMAGE QUALITY FOR BLACK Press the desired mode button that applies when scanning a black original in the auto color mode B W ADJUSTMENT IN ACS Press the or button to specify the exposure that applies when scanning a black original in the auto color mode If you move to the left the black and white in an original will be scanned lightly If you mov...

Page 24: ...ill be lighter If you move to the right the background color will be darker 6 Specify the following items as you require and press OK RESOLUTION Select the corresponding button for the default resolution applied when scanning in black mode ORIGINAL MODE Press the desired mode button applied for black scans EXPOSURE Press the or button to specify the default exposure for black scans manually or pre...

Page 25: ...g page P 8 Entering User Menu 2 In the PRINTING IMAGE MODE option press the desired mode button and press OK GENERAL Press this button to apply proper color quality for printing a general color document PHOTOGRAPH Press this button to apply proper color quality for printing photos PRESENTATION Press this button to apply proper image quality for printing a vivid document LINE ART Press this button ...

Page 26: ...s in the equipment y Function List User You can print the function list that shows the function flow under USER of the user functions The list is printed on paper that is fed from the drawer in which LT R or A4 R paper is set and exits to the inner tray 1 Press LIST in the USER menu The LIST menu is displayed To display the USER menu see the following page P 8 Entering User Menu 2 Continue the ope...

Page 27: ... print it as sorted by the last name y When the department management is disabled the address book information is printed y When the department management is enabled the screen to input the department code is displayed Enter the department code using the digital keys and press OK to print the address book information For an output example of the address book information see the following page P 17...

Page 28: ...to print the group number information For an output example of the group number information see the following page P 175 Group number information Printing the function list User 1 Press FUNCTION y When the department management is disabled the function list is printed y When the department management is enabled the screen to input the department code is displayed Enter the department code using th...

Page 29: ...ing User Menu 2 Press the drawer portion in the illustration to highlight the drawer for which you want to change the paper size and press the desired paper size button For e STUDIO2330C 2820C 2830C 3520C 3530C 4520C y The selected paper size is displayed in the drawer in the illustration y If you want to change the paper type from plain paper to another or want to specify the use purpose of paper...

Page 30: ...nd A4 press AUTO mm To set LT format paper such as LD and LT press AUTO inch When paper is placed in the drawer the equipment automatically detects the paper size The equipment may fail to detect the paper size and indicates UNDEF for the drawer if the LT format paper is placed in the drawer for which AUTO mm is set or vice versa In this case select the correct button 3 Press the drawer portion in...

Page 31: ... PLAIN 2 RECYCLED PAPER THICK1 THICK2 or THICK3 for the paper type y For details on the paper type refer to the Copying Guide y You can select either INSERT COVER SPECIAL or FAX to restrict the uses for a specific job For example if you select INSERT for a drawer the paper in the drawer is always used for copy insertion ...

Page 32: ...he registered fax numbers to specify the destinations for fax transmissions only when the FAX Unit optional is installed In the ADDRESS BOOK menu you can perform the following operations to manage contacts y P 30 Registering contacts y P 34 Editing contacts y P 36 Deleting contacts y P 38 Searching for contacts You can import and export address book data in CSV format in the TopAccess administrato...

Page 33: ...R 2 Press ADDRESS BOOK The ADDRESS BOOK screen is displayed 3 Press an undefined button to create a new contact and press ENTRY The ADDRESS BOOK REGISTRATION screen is displayed If the touch panel does not display an undefined contact press to display the next screen ...

Page 34: ...tton to enter the department name of the contact KEYWORD Press this button to enter a keyword for the contact This keyword can be used to search for this contact y You must at least enter either FIRST NAME or LAST NAME and either FAX NO or E MAIL to register the contact y Press PAUSE on the touch panel to enter in FAX NO and 2ND FAX If you enter in them a three second pause is added for dialing th...

Page 35: ...ed or that were searched for by the LDAP server The following information can be registered from the Receive log y Remote fax numbers that were dialed by direct entry using the digital keys or that were searched for by the LDAP server for a polling reception y E mail address of the sender The following information can be registered from the Scan log y E mail addresses that were manually entered 1 ...

Page 36: ...ax transmission y This is available only when the FAX Unit optional is installed y For details on the settings refer to the GD 1250 GD 1260 GD 1270 Operator s Manual for FAX Unit 6 Press OK to register the contact The contact is registered in the address book Editing contacts You can edit existing contacts in the address book 1 Press ADDRESS in the USER menu The ADDRESS menu is displayed To displa...

Page 37: ...arch for the contact that you want to edit To search for the contact see the following page P 38 Searching for contacts 4 Press each button on the touch panel to edit the contact information For the description of each item see step 4 in the following operation P 30 Registering contacts from the USER FUNCTIONS button 5 Press OPTION to specify the default settings for a fax transmission y This is a...

Page 38: ...e contact is edited Deleting contacts You can delete existing contact in the address book 1 Press ADDRESS in the USER menu The ADDRESS menu is displayed To display the USER menu see the following page P 8 Entering User Menu 2 Press ADDRESS BOOK The ADDRESS BOOK screen is displayed ...

Page 39: ... that you want to delete and press DELETE The delete confirmation screen is displayed If the touch panel does not display the contact that you want to delete press to display the next screen 4 Press YES to delete the contact The selected contact is deleted Press NO to cancel the deletion ...

Page 40: ...ou want to edit P 38 Searching for contacts by ID number P 39 Searching for contacts by entering a search string Searching for contacts by ID number 1 Press ADDRESS in the USER menu The ADDRESS menu is displayed To display the USER menu see the following page P 8 Entering User Menu 2 Press ADDRESS BOOK The ADDRESS BOOK screen is displayed 3 Press KNOWN ID The KNOWN ID screen is displayed ...

Page 41: ...Press the contact and press EDIT to edit the contact information or press DELETE to delete the contact For instructions on editing the contact see the following page P 34 Editing contacts Searching for contacts by entering a search string 1 Press ADDRESS in the USER menu The ADDRESS menu is displayed To display the USER menu see the following page P 8 Entering User Menu ...

Page 42: ...ok 2 Press ADDRESS BOOK The ADDRESS BOOK screen is displayed 3 Press SEARCH The ADDRESS SEARCH screen is displayed 4 Press the corresponding button s for the desired search category When you press each button the on screen keyboard is displayed ...

Page 43: ...cts that contain the search string for the specified items will be found 6 Specify the search string in the items that you require and press SEARCH 7 The touch panel displays the found contacts Press the desired contact and press OK to edit the contact information For instructions on editing the contact see the following page P 34 Editing contacts ...

Page 44: ... contains both a fax number and an e mail address it results in two destinations in the group y You can register fax numbers in the groups however you can use them to specify the destinations for fax transmission only when the FAX Unit optional is installed In the GROUP menu you can perform the following operations to manage groups y P 42 Creating new groups y P 45 Editing groups y P 51 Deleting g...

Page 45: ...o create a new group and press ENTRY The GROUP NO registration screen is displayed If the touch panel does not display an undefined group press to display the next screen 4 Press GROUP NAME The on screen keyboard is displayed 5 Enter the group name using the keyboard and digital keys and press OK ...

Page 46: ...selecting each contact manually see the following page P 47 Adding or removing contacts y To add contacts by searching for them by ID number see the following page P 48 Adding contacts by searching by ID number y To add contacts by searching for them with a search string see the following page P 49 Adding contacts by searching with a search string 8 The new group is created and it appears on the t...

Page 47: ...1 Press ADDRESS in the USER menu The ADDRESS menu is displayed To display the USER menu see the following page P 8 Entering User Menu 2 Press GROUP The GROUP screen is displayed 3 Press the group that you want to edit and press EDIT The GROUP NO edit screen is displayed If the touch panel does not display the group that you want to edit press to display the next screen ...

Page 48: ...anaging Address Book 4 Press GROUP NAME to edit the group name The on screen keyboard is displayed 5 Enter the group name using the keyboard and digital keys and press OK 6 Press OK The Check of Group Member screen is displayed ...

Page 49: ...the following page P 49 Adding contacts by searching with a search string 8 Press OK to save the settings Adding or removing contacts 1 Press contacts that are not highlighted to add them to the group or press highlighted contacts to remove them from the group y To add both the fax number and e mail address of a contact to the group press the contact name y To add only the fax number of a contact ...

Page 50: ... Press the contact to add it to the group y To add both the fax number and e mail address of a contact to the group press the contact name y To add only the fax number of a contact to the group press in the contact y To add only the e mail address of a contact to the group press in the contact y Press or to display contacts on different pages y You can also clear all highlighted contacts by pressi...

Page 51: ...EARCH The ADDRESS SEARCH screen is displayed 2 Press the corresponding button s for the desired search category When you press each button the on screen keyboard is displayed 3 Enter the search string using the keyboard and digital keys and press OK Contacts that contain the search string for the specified items will be found ...

Page 52: ...he contacts that you want to add to the group y To add both the fax number and e mail address of a contact to the group press the contact name y To add only the fax number of a contact to the group press in the contact y To add only the e mail address of a contact to the group press in the contact Press or to display contacts on different pages 6 Press OK to save the group ...

Page 53: ... menu The ADDRESS menu is displayed To display the USER menu see the following page P 8 Entering User Menu 2 Press GROUP The GROUP screen is displayed 3 Press the group that you want to delete and press DELETE The delete confirmation screen is displayed If the touch panel does not display the group that you want to delete press to display the next screen ...

Page 54: ... two methods can be used to search the address book for groups This function is useful for finding a group that you want to edit P 52 Searching for groups by ID number P 54 Searching for groups by group name Searching for groups by ID number 1 Press ADDRESS in the USER menu The ADDRESS menu is displayed To display the USER menu see the following page P 8 Entering User Menu ...

Page 55: ...G ITEMS USER Managing Address Book 53 1 SETTING ITEMS USER 2 Press GROUP The GROUP screen is displayed 3 Press KNOWN ID The KNOWN ID screen is displayed 4 Enter the ID Number using the digital keys and press OK ...

Page 56: ... information or press DELETE to delete the group For instructions on editing groups see the following page P 45 Editing groups Searching for groups by group name 1 Press ADDRESS in the USER menu The ADDRESS menu is displayed To display the USER menu see the following page P 8 Entering User Menu 2 Press GROUP The GROUP screen is displayed ...

Page 57: ...SEARCH The GROUP SEARCH screen is displayed 4 Press GROUP NAME to specify the search string The on screen keyboard is displayed 5 Enter the search string using the keyboard and digital keys and press OK Groups that contain the search string in the GROUP NAME box will be found ...

Page 58: ...o edit the group information For instructions on editing groups see the following page P 45 Editing groups Confirming the members of a group You can confirm the contacts that are registered in a group 1 Press ADDRESS in the USER menu The ADDRESS menu is displayed To display the USER menu see the following page P 8 Entering User Menu ...

Page 59: ...EMS USER Managing Address Book 57 1 SETTING ITEMS USER 2 Press GROUP The GROUP screen is displayed 3 Press CONTENTS of the group whose members you want to confirm The contacts registered in the group are displayed ...

Page 60: ...ions on how to configure the POP3 server refer to the TopAccess Guide The equipment also automatically checks for new e mails on the POP3 server 1 Press CHECK E MAIL in the USER menu The equipment begins communicating with the POP3 server If a new e mail is on the POP3 server the equipment automatically prints the e mail data after retrieving it from the POP3 server To display the USER menu see th...

Page 61: ...ing BIP Printing 59 Setting BIP Printing BIP PRINTING is available only when the Bluetooth Module optional is installed For instructions on how to set the BIP printing refer to the GN 2010 Operator s Manual for Bluetooth Module ...

Page 62: ......

Page 63: ... protocol 87 Setting the IPX SPX protocol 94 Setting the NetWare settings 96 Setting the SMB protocol 98 Setting the AppleTalk protocol 100 Setting the HTTP network service 102 Setting the Ethernet speed 104 Setting the LDAP SNMP network services and the filtering functions 105 IPsec IP security setting 107 Decrypting the user certificate 109 Network check 111 Setting Copy Functions 114 Setting Fa...

Page 64: ...IEEE 802 1X Authentication Setting 130 Setting IEEE802 1X authentication 130 ...

Page 65: ...rol panel to enter the USER FUNCTIONS menu 2 Press the ADMIN tab The ADMINISTRATOR PASSWORD screen is displayed 3 Press PASSWORD The on screen keyboard is displayed 4 Enter the administrator password and press OK The ADMIN menu is displayed If the administrator password has not been changed before enter the default administrator password 123456 If you enter incorrect passwords three times in a row...

Page 66: ...rinter e Filing Functions P 128 Wireless Settings and Bluetooth Settings P 129 Change User Password P 130 IEEE 802 1X Authentication Setting y WIRELESS SETTINGS in the ADMIN menu is available only when the Wireless LAN Module optional is installed For instructions on how to use the WIRELESS SETTINGS refer to the GN 1050 Operator s Manual for Wireless LAN Module y Bluetooth SETTINGS in the ADMIN me...

Page 67: ...ce information of this equipment These items appear in the Device page of TopAccess a web based device management utility 1 Press GENERAL in the ADMIN menu The GENERAL menu is displayed To display the ADMIN menu see the following page P 63 Entering Admin Menu 2 Press DEVICE INFORMATION The DEVICE INFORMATION screen is displayed ...

Page 68: ... only the digital keys Setting the notification You can set the notification mail to send a notification message when specified events occur on the equipment such as toner empty paper empty and serviceman call You can specify up to three e mail addresses for the destination of the notification message You can specify events that you want to be notified about using the TopAccess web utility For ins...

Page 69: ...een is displayed 3 Press E MAIL The on screen keyboard is displayed 4 Enter the e mail address using the keyboard and digital keys and press OK You can specify up to three e mail addresses to which notification messages will be sent as required When you enable notification you must enter at least one e mail address ...

Page 70: ... e mail address press OFF ON is available after you enter an e mail address Changing the administrator password You can change the administrator password 1 Press GENERAL in the ADMIN menu The GENERAL menu is displayed To display the ADMIN menu see the following page P 63 Entering Admin Menu 2 Press PASSWORD SETUP The PASSWORD SETUP screen is displayed ...

Page 71: ...the first time enter 123456 in the OLD PASSWORD box 5 Set new password and complete the setting 1 Press NEW PASSWORD to enter new password 2 Press RETYPE NEW PASSWORD to enter the new password again 3 Press OK When you press NEW PASSWORD and RETYPE NEW PASSWORD the on screen keyboard is displayed Enter the value using the keyboard and digital keys and press OK to set the entry You can enter 6 10 a...

Page 72: ...nd time using the digital keys 1 Press GENERAL in the ADMIN menu The GENERAL menu is displayed To display the ADMIN menu see the following page P 63 Entering Admin Menu 2 Press CLOCK The CLOCK menu is displayed 3 Press DATE TIME y If you want to change the date format only skip to step 5 y When you press DATE TIME the DATE TIME screen is displayed ...

Page 73: ...er the number using the digital keys and press OK You will be returned to the CLOCK menu The DAY section describes the days of week using numbers The numbers corresponding to the days of the week are as follows 1 Sun 2 Mon 3 Tue 4 Wed 5 Thu 6 Fri 7 Sat 5 Press DATE FORMAT The DATE FORMAT screen is displayed 6 Press the desired date format button ...

Page 74: ...e and closing time of your office so that the copier will automatically turn itself ON and OFF at those specified times You can turn on the power by simply pressing the START button on the control panel when the device is in the sleep mode by the weekly timer When the power switch is turned off the weekly timer does not work 1 Press GENERAL in the ADMIN menu The GENERAL menu is displayed To displa...

Page 75: ...o enter the time the device wakes up from the sleep mode Use the arrow buttons to move the cursor and enter Hour and Minute 3 Press OFF to enter the time to put the device into the sleep mode Use the arrow buttons to move the cursor and enter Hour and Minute 4 Press OK to save the settings y If you want to clear an entered time press the CLEAR button on the control panel y If you want to disable t...

Page 76: ...the calibration display level CALIBRATION under the ADMIN menu disappears When you select the admin mode for the registration display level REGISTRATION under the USER menu disappears When you select the user mode for the registration display level REGISTRATION under the ADMIN menu disappears 1 Press GENERAL in the Admin menu The GENERAL menu is displayed To display the ADMIN menu see the followin...

Page 77: ... The GENERAL menu is displayed To display the ADMIN menu see the following page P 63 Entering Admin Menu 2 Press POP UP The POP UP screen is displayed 3 Press ENABLE or DISABLE for each option and press OK DRAWER SET When this option is enabled this equipment displays a message asking users to change the paper size setting every time they open the drawer PAPER JAM RECOVERY When this option is enab...

Page 78: ...essage at the bottom of the touch panel to notify you of the occurrence of specified events such as when paper has run out and toner is low 1 Press GENERAL in the Admin menu The GENERAL menu is displayed To display the ADMIN menu see the following page P 63 Entering Admin Menu 2 Press STATUS MESSAGE The STATUS MESSAGE menu is displayed ...

Page 79: ...tely because the shading or the hue of the image has deviated y The calibration setting in the ADMIN menu can be performed only when an administrator has set the calibration display level to ADMIN P 74 Setting the calibration and registration display level y Place LT or A4 paper recommended paper in the drawer before starting the calibration If any other paper is used calibration may not be perfor...

Page 80: ...lay the ADMIN menu see the following page P 63 Entering Admin Menu 3 Press CALIBRATION The CALIBRATION menu is displayed 4 Continue the operation that you require P 79 Setting the copy calibration P 80 Setting the print calibration For e STUDIO 5520C 6520C 6530C 600dpi PRINT and 1200dpi PRINT are provided instead of PRINT ...

Page 81: ... is printed out and the calibration guide illustration is displayed on the touch panel 3 Place the printed chart face down on the glass with the bottom toward you and the top left aligned against the original scale on the left side so that two black rectangular marks are placed on the left side 4 Press the START button on the control panel When the calibration setting is completed the GENERAL menu...

Page 82: ...ess this button to calibrate for the 600 dpi print jobs y 1200dpi PRINT Press this button to calibrate for the 1200 dpi print jobs 2 Press DEFAULT to set the default calibration setting or CALIBRATION to adjust the calibration setting y When you press DEFAULT the system maintains the default calibration setting and returns to the previous screen y When you press CALIBRATION a chart is printed out ...

Page 83: ...so that two black rectangular marks are placed on the left side 4 Press the START button on the control panel After scanning the printed chart the following message is displayed Apply Calibration Setting If the chart is not properly placed the message Set chart correctly is displayed on the touch panel In this case return to step 3 and realign the chart 5 Press YES to apply the calibration setting...

Page 84: ...can be performed only when an administrator has set the registration display level to ADMIN P 74 Setting the calibration and registration display level 1 Press GENERAL in the Admin menu The GENERAL menu is displayed To display the ADMIN menu see the following page P 63 Entering Admin Menu 2 Press REGISTRATION The REGISTRATION menu is displayed 3 Press YES to start the registration The registration...

Page 85: ...ess and SMTP server address from the DHCP server if the network supports the DHCP If the network does not support the DHCP this equipment will assign the appropriate IP address using the auto IP addressing However the auto IP addressing may not work properly when the router is placed in the network y When you assign the TCP IP using only the DHCP server If your local area network has been configur...

Page 86: ...eration that you require P 84 Setting the TCP IP for auto IP and DHCP server P 85 Setting the TCP IP for DHCP server only P 86 Setting the TCP IP for static IP address Setting the TCP IP for auto IP and DHCP server 1 Press DYNAMIC in the ADDRESS MODE option and press OK You will be returned to the NETWORK menu ...

Page 87: ...starts initializing the network interface card to apply the changes Setting the TCP IP for DHCP server only 1 Press NO AUTO IP in the ADDRESS MODE option and press OK You will be returned to the NETWORK menu 2 Continue to another network setting if required then press APPLY NOW The NETWORK INITIALIZING message is displayed and this equipment starts initializing the network interface card to apply ...

Page 88: ...ting 1 Press IP ADDRESS and enter the IP address of this device using the digital keys 2 Enter the subnet mask and default gateway as required 3 Press OK You will be returned to the NETWORK menu 3 Continue to another network setting if required then press APPLY NOW The NETWORK INITIALIZING message is displayed and this equipment starts initializing the network interface card to apply the changes ...

Page 89: ... can be registered on this equipment P 90 Setting the IPv6 protocol automatically in a stateless network environment Up to 7 IPv6 addresses can be obtained from routers One IPv6 address can be obtained from the DHCPv6 server One link local address is also generated automatically y When you select the stateful mode You can automatically obtain the IPv6 address from the DHCPv6 server In this mode yo...

Page 90: ...le the IPV6 protocol LLMNR Press ENABLE to enable the LLMNR Linklocal Multicast Name Resolution protocol or DISABLE to disable the LLMNR protocol ADDRESS MODE Select MANUAL Link Local Address The unique address used for the IPv6 is displayed y The link local address cannot be connected to another routed IPv6 network y ENABLE and DISABLE for the LLMNR protocol are available when you select ENABLE f...

Page 91: ...IX Press this button to assign the prefix for the IPv6 address GATEWAY Press this button to assign the default gateway In MANUAL mode you cannot select the DHCP IP Address option When you press IP ADDRESS PREFIX or GATEWAY the on screen keyboard is displayed Enter the value using the keyboard and digital keys and press OK to set the entry 5 Continue to another network setting if required then pres...

Page 92: ...ng items as required and press IPv6 PROTOCOL Press ENABLE to enable the IPv6 protocol or DISABLE to disable the IPV6 protocol LLMNR Press ENABLE to enable the LLMNR Linklocal Multicast Name Resolution protocol or DISABLE to disable the LLMNR protocol ADDRESS MODE Select STATELESS Link Local Address The unique address used for the IPv6 is displayed y The link local address cannot be connected to an...

Page 93: ...ess network environment or DISABLE not to use it DHCP OPTIONS Press ENABLE to use the optional information IPv6 address for the DNS server etc issued from the DHCPv6 server in a stateless network environment or DISABLE not to use it When you select ENABLE for the DHCP IP Address option ENABLE is automatically set for the DHCP OPTIONS option 5 Press IPv6 addresses obtained from routers are displaye...

Page 94: ... interface card to apply the changes If Duplicate Address Detection DAD detects duplicate addresses the message IPv6 ADDRESS CONFLICT is displayed on the touch panel Setting the IPv6 protocol automatically in a stateful network environment 1 Press NETWORK in the ADMIN menu The NETWORK menu is displayed To display the ADMIN menu see the following page P 63 Entering Admin Menu 2 Press IPv6 The IPv6 ...

Page 95: ... DISABLE for the LLMNR protocol are available when you select ENABLE for the IPv6 protocol 4 Specify the following items as required and press OK DHCP IP Address Select whether or not the IPv6 address issued by the DHCPv6 server is used for this equipment Press ENABLE to use the address or DISABLE not to use it DHCP OPTIONS Select whether or not the optional information IPv6 address for the DNS se...

Page 96: ...s Detection DAD detects duplicate addresses the message IPv6 ADDRESS CONFLICT is displayed on the touch panel Setting the IPX SPX protocol You can set the IPX SPX protocol on this equipment The IPX SPX protocol is usually used to communicate with the NetWare file server through the network 1 Press NETWORK in the ADMIN menu The NETWORK menu is displayed To display the ADMIN menu see the following p...

Page 97: ...isable the IPX SPX protocol FRAME TYPE Press AUTO to automatically detect the appropriate frame type or press another frame type button If you do not know the frame type that must be used select AUTO 4 Continue to another network setting if required then press APPLY NOW The NETWORK INITIALIZING message is displayed and this equipment starts initializing the network interface card to apply the chan...

Page 98: ...de and the NetWare configuration to be connected This option must be set when you use the NetWare file server for Novell printing 1 Press NETWORK in the ADMIN menu The NETWORK menu is displayed To display the ADMIN menu see the following page P 63 Entering Admin Menu 2 Press NETWARE The NETWARE screen is displayed ...

Page 99: ...tWare file server in NDS mode TREE Press this button to enter the NDS tree This must be entered when you connect the NetWare file server in NDS mode SEARCH ROOT Press this button to enter the NetWare file server name It is recommended that this be entered when you connect the NetWare file server in bindery mode y When you press CONTEXT TREE and SEARCH ROOT the on screen keyboard is displayed Enter...

Page 100: ...s the WINS server to allow SMB communications across segments you must specify the WINS server address so that this equipment will be visible from the different segments This must be enabled for SMB printing Save as file to the network folder using SMB and sharing the FILE_SHARE folder that is the local folder of this equipment in the network 1 Press NETWORK in the ADMIN menu The NETWORK menu is d...

Page 101: ...s displayed Enter the value using the keyboard and digital keys and press OK to set the entry y IPv4 and IPv6 for the INTERNET PROTOCOL VERSION option are available when you enable the IPv6 protocol P 87 Setting the IPv6 protocol y When you select DISABLE or DISABLE FILE SHARE the Save as File to MFP Local function will be disabled y If this equipment is configured to log on to the domain in the S...

Page 102: ...nitializing the network interface card to apply the changes Setting the AppleTalk protocol The AppleTalk protocol must be enabled and properly configured to enable AppleTalk printing with a Macintosh computer 1 Press NETWORK in the ADMIN menu The NETWORK menu is displayed To display the ADMIN menu see the following page P 63 Entering Admin Menu 2 Press APPLETALK The APPLETALK screen is displayed ...

Page 103: ...n to enter the AppleTalk zone name this equipment has joined If your AppleTalk network has not been configured with a zone you do not have to enter the zone name When you press DEVICE NAME and DESIRED ZONE the on screen keyboard is displayed Enter a value using the keyboard and digital keys and press OK to set the entry 4 Continue to another network setting if required then press APPLY NOW The NET...

Page 104: ...r disable the HTTP network server service that provides the web based utility on this equipment such as TopAccess and the e Filing web utility 1 Press NETWORK in the ADMIN menu The NETWORK menu is displayed To display the ADMIN menu see the following page P 63 Entering Admin Menu 2 Press HTTP The HTTP screen is displayed ...

Page 105: ...recommended that you use the default port number 8080 if you are not sure about changing this port number ENABLE SSL Press ENABLE to enable the SSL for accessing TopAccess and the e Filing web utility or DISABLE to disable the SSL for accessing TopAccess and the e Filing web utility When this option is enabled the data transferred between the equipment and client computers will be encrypted using ...

Page 106: ...ntering Admin Menu 2 Press ETHERNET The ETHERNET screen is displayed 3 Press AUTO to automatically detect the appropriate ethernet speed or press another ethernet speed button then press OK y When you select a specific ethernet speed you must select the same ethernet speed as set in the connected network If you do not know the ethernet speed that must be used select AUTO y If the network is not st...

Page 107: ...ing menu you can also change the SNMP read community name and change the IP MAC address filtering functions from ENABLE to DISABLE or vice versa If the LDAP network service is enabled you can register the LDAP directory service and then this equipment can search for contacts in the LDAP server To add the LDAP directory service you must operate using TopAccess For more information about registering...

Page 108: ...function or DISABLE to disable it When you press SNMP READ COMMUNITY the on screen keyboard is displayed Enter a value using the keyboard and digital keys and press OK to set the entry y If you specify a community name other than public for the read community the applications that use MIB TopAccessDocMon TWAIN driver File Downloader and AddressBook Viewer will be unavailable The SNMP communication...

Page 109: ...munication is enabled using the IPsec IP Security Protocol The following operations are available in this menu y Viewing the IPsec policy name currently applied y Enabling Disabling IPsec communication y Flushing IPsec session Settings required for IPsec such as entry of IPsec policies can be performed using TopAccess For details refer to the TopAccess Guide IPsec is available only when the IPSec ...

Page 110: ...ec communication FLUSH CONNECTIONS Press this button to manually clear flush the current IPsec session for starting a new session FACTORY DEFAULT Press this button to reset the IPsec settings back to the factory defaults When you press FLUSH CONNECTION a message asking you to perform the operation is displayed 4 Continue to another network setting if required then press APPLY NOW The NETWORK INITI...

Page 111: ...ate y Server certificate used for SSL y Certificate for IPsec y Certificate for IEEE802 1X This function must be performed after importing the required certificate using TopAccess For more information about importing the certificate refer to the TopAccess Guide 1 Press NETWORK in the ADMIN menu The NETWORK menu is displayed To display the ADMIN menu see the following page P 63 Entering Admin Menu ...

Page 112: ...ORD The on screen keyboard is displayed 4 Enter the password for the certificate using the keyboard and digital keys and press OK The input password appears as asterisks 5 Press OK Pressing OK returns you to the ADMIN menu and displays NETWORK INITIALIZING This equipment starts initializing the network interface card to apply the changes ...

Page 113: ...check the connection status between this equipment and the servers on the network You can also use the traceroute function to view and check the network path of the desired server 1 Press NETWORK in the ADMIN menu The NETWORK menu is displayed To display the ADMIN menu see the following page P 63 Entering Admin Menu 2 Press NETWORK CHECK The NETWORK CHECK screen is displayed ...

Page 114: ... ping traceroute command can reach a server the IP address is displayed for the check result for the server If the command cannot reach it for some reason the host name is displayed instead of the IP address There are two ways to select the server you want to check To select the desired server from the server list displayed on the touch panel Checkable servers and supported protocols are as follow...

Page 115: ...u press the Manual Input column the on screen keyboard is displayed Enter the value using the keyboard and digital keys and press OK to set the entry When you enter a WINS name for the network path of the remote server 1 2 in TopAccess Save as file Setting the network check function cannot be performed with those servers selected from the server list In this case designate the IP address of the re...

Page 116: ...Feeder y OFF When this button is selected the initial setting of the 2 Sided mode will be 1 1 SIMPLEX when originals are placed in the Automatic Document Feeder y 1 2 When this button is selected the initial setting of the 2 Sided mode will be 1 2 DUPLEX when originals are placed in the Automatic Document Feeder y 2 2 When this button is selected the initial setting of the 2 Sided mode will be 2 2...

Page 117: ...more about APS refer to the Copying Guide PAPER OF DIFFERENT DIRECTION Selecting ON for this function and the AUTOMATIC CHANGE OF PAPER SOURCE option allows the equipment to feed the same size of paper that is set in a different direction if the drawer from which paper is being fed is empty SUSPEND PRINTING IF STAPLER EMPTY When this is set to ON this equipment quit a job with stapling when the st...

Page 118: ...iscard print and reduction print Discard Print ON OFF y ON default setting When originals are up to 10mm larger than the printing area the area of the originals that exceeds the paper printing area is discarded y OFF The received original is printed on two sheets of paper if its length exceeds the paper printing area For DISCARD setting details contact your service technician RX Reduction Print ON...

Page 119: ... ITEMS ADMIN Setting Fax Functions 117 2 SETTING ITEMS ADMIN 3 Press ON or OFF for each item as required and press OK The registered items can be confirmed in the function list P 178 Function list Administrator ...

Page 120: ...u The MAINTENANCE menu is displayed To display the ADMIN menu see the following page P 63 Entering Admin Menu 2 Enable the storage maintenance function and complete the setting 1 Press ON 2 Using the digital keys enter the number of days that the system will preserve files before deleting them You can enter 1 to 99 days To correct the value press the CLEAR button on the control panel to delete the...

Page 121: ...screen is displayed To display the ADMIN menu see the following page P 63 Entering Admin Menu 2 Specify the following items as required and press OK FROM ADDRESS Press this button to enter the e mail address of this equipment FROM NAME Press this button to enter the identification name of this equipment BODY Press this button to enter the body message FRAGMENT MESSAGE SIZE KB Press the desired fra...

Page 122: ...INTERNET FAX screen is displayed To display the ADMIN menu see the following page P 63 Entering Admin Menu 2 Specify the following items as required and press OK FROM ADDRESS Press this button to enter the e mail address of this equipment FROM NAME Press this button to enter the identification name of this equipment BODY Press this button to enter the body message FRAGMENT PAGE SIZE KB Press the d...

Page 123: ...t a report after every transmission Reports can be printed automatically only This function allows you to select the conditions for printing communication reports for each transmission type separately y Reception list The reception list allows you to print a reception list after receiving a document to a mailbox on this equipment This function allows you to enable or disable printing a reception l...

Page 124: ...fy the following items as required and press OK AUTO Press ON to enable printing the transmission and reception journals automatically When you enable this option the transmission and reception journals will be printed when specified numbers of transmissions are completed TX JOURNAL Press the number button to specify the number of transmissions that will be printed in a transmission journal RX JOU...

Page 125: ...ress this button to print a communication report for every transmission ON ERROR Press this button to print a communication report only when an error occurs The DIRECT TX and POLLING settings are available only when the FAX Unit optional is installed When you press ALWAYS or ON ERROR for MEMORY TX or MULTI TX the PRINT 1st PAGE IMAGE message is displayed Press YES to print the communication report...

Page 126: ...ilable only when the FAX Unit optional is installed When you press ALWAYS or ON ERROR for each transmission type the PRINT 1st PAGE IMAGE message is displayed Press YES to print the communication report with the first page image or press NO to print the communication report without the page image Setting the reception list 1 Press RECEPTION LIST The RECEPTION LIST screen is displayed ...

Page 127: ...OK RELAY STATION Select ON to print the reception list when receiving a relay transmission from an originator LOCAL Select ON to print the reception list when reserving a document to a mailbox within the machine locally REMOTE Select ON to print the reception list when receiving a document to a mailbox within the machine remotely from another facsimile ...

Page 128: ...ist For examples of each list format see the following page P 172 List Print Format 1 Press LIST REPORT in the ADMIN menu The LIST REPORT screen is displayed To display the ADMIN menu see the following page P 63 Entering Admin Menu 2 Press LIST The LIST screen is displayed 3 Press the button for the list that you want to print The selected list is printed ...

Page 129: ...ialog box allows the equipment to feed the same size of paper from a different drawer if the drawer from which paper is being fed is empty For more information about the print dialog box refer to the Printing Guide PAPER OF DIFFERENT DIRECTION Selecting ON for this function and the AUTOMATIC CHANGE OF PAPER SOURCE option allows the equipment to feed the same size of paper that is set in a differen...

Page 130: ...ess LAN Module optional is installed For instructions on how to operate the WIRELESS SETTINGS refer to the GN 1050 Operator s Manual for Wireless LAN Module There is also Bluetooth SETTINGS in the ADMIN menu This button will be available only when the Bluetooth Module optional is installed For instructions on how to operate the Bluetooth SETTINGS refer to the GN 2010 Operator s Manual for Bluetoot...

Page 131: ...FP Local Authentication feature is enabled For more information about enabling this feature refer to the TopAccess Guide 2 Set a new password 1 Press USER NAME to enter the user name for which the password is to be changed 2 Press NEW PASSWORD to enter the new password 3 Press RETYPE NEW PASSWORD to enter the new password again 4 Press OK to save the new password y When you press each button USER ...

Page 132: ...ificates are required for each authentication method using TopAccess to enable IEEE 802 1X authentication For instructions on how to install certificates refer to the TopAccess Guide The settings for IEEE 802 1X authentication depend on the authentication method you select Setting IEEE802 1X authentication 1 Press 802 1X SETTING in the ADMIN menu The WIRED 802 1X SETTINGS screen is displayed To di...

Page 133: ...s button to confirm the options currently selected FACTORY DEFAULT Press this button to reset the IEEE802 1X authentication settings back to the factory defaults CHECK SETTINGS and FALL BACK MODE are available when you enable IEEE802 1X authentication When changing IEEE802 1X authentication from ENABLE to DISABLE press Next and on the Confirm the following settings screen that appears press APPLY ...

Page 134: ...ton to enter the EAP User name PASSWORD Press this button to enter the authentication password RETYPE PASSWORD Press this button to re enter the authentication password y When you press the above buttons the on screen keyboard is displayed Enter a value using the keyboard and digital keys and press OK to set the entry y Up to 127 alphanumeric characters can be entered for EAP USER NAME and PASSWOR...

Page 135: ...MIN 3 Confirm the settings and press APPLY NOW The NETWORK INITIALIZING message is displayed and this equipment starts initializing the network interface card to apply the changes Setting EAP MD5 1 Select EAP MD5 and press Next The WIRED 802 1X SETTINGS EAP MD5 screen is displayed ...

Page 136: ...uthentication password y When you press the above buttons the on screen keyboard is displayed Enter a value using the keyboard and digital keys and press OK to set the entry y Up to 127 alphanumeric characters can be entered for EAP USER NAME and PASSWORD However the following characters cannot be entered comma space 3 Confirm the settings and press APPLY NOW The NETWORK INITIALIZING message is di...

Page 137: ...nstructions on how to install the certificates refer to the TopAccess Guide 1 Select EAP TLS and press Next The WIRED 802 1X SETTINGS EAP TLS screen is displayed 2 The user certificate installed in this equipment is displayed Confirm the certificate and press Next 3 Confirm the settings and press APPLY NOW The NETWORK INITIALIZING message is displayed and this equipment starts initializing the net...

Page 138: ...rforming settings for IEEE 802 1X authentication For instructions on how to install the certificate refer to the TopAccess Guide 1 Select PEAP and press Next The WIRED 802 1X SETTINGS PEAP screen is displayed 2 Select EAP MSCHAPv2 for the inner authentication method and press Next The WIRED 802 1X SETTINGS EAP MSCHAPv2 screen is displayed ...

Page 139: ...enter the authentication password y When you press the above buttons the on screen keyboard is displayed Enter a value using the keyboard and digital keys and press OK to set the entry y Up to 127 alphanumeric characters can be entered for EAP USER NAME and PASSWORD However the following characters cannot be entered comma space 4 Confirm the settings and press APPLY NOW The NETWORK INITIALIZING me...

Page 140: ...and press Next The WIRED 802 1X SETTINGS EAP TTLS screen is displayed 2 Select the desired inner authentication method and continue the operation that you require P 138 Setting EAP MSCHAPv2 for inner authentication P 140 Setting PAP for inner authentication P 141 Setting CHAP for inner authentication P 143 Setting EAP MD5 for inner authentication Setting EAP MSCHAPv2 for inner authentication 1 Sel...

Page 141: ...enter the authentication password y When you press the above buttons the on screen keyboard is displayed Enter a value using the keyboard and digital keys and press OK to set the entry y Up to 127 alphanumeric characters can be entered for EAP USER NAME and PASSWORD However the following characters cannot be entered comma space 3 Confirm the settings and press APPLY NOW The NETWORK INITIALIZING me...

Page 142: ...on to enter the EAP User name PASSWORD Press this button to enter the authentication password RETYPE PASSWORD Press this button to re enter the authentication password y When you press the above buttons the on screen keyboard is displayed Enter a value using the keyboard and digital keys and press OK to set the entry y Up to 127 alphanumeric characters can be entered for EAP USER NAME and PASSWORD...

Page 143: ...nfirm the settings and press APPLY NOW The NETWORK INITIALIZING message is displayed and this equipment starts initializing the network interface card to apply the changes Setting CHAP for inner authentication 1 Select CHAP and press Next The WIRED 802 1X SETTINGS CHAP screen is displayed ...

Page 144: ...uthentication password y When you press the above buttons the on screen keyboard is displayed Enter a value using the keyboard and digital keys and press OK to set the entry y Up to 127 alphanumeric characters can be entered for EAP USER NAME and PASSWORD However the following characters cannot be entered comma space 3 Confirm the settings and press APPLY NOW The NETWORK INITIALIZING message is di...

Page 145: ...E Press this button to enter the EAP User name PASSWORD Press this button to enter the authentication password RETYPE PASSWORD Press this button to re enter the authentication password y When you press the above buttons the on screen keyboard is displayed Enter a value using the keyboard and digital keys and press OK to set the entry y Up to 127 alphanumeric characters can be entered for EAP USER ...

Page 146: ...e displayed on the touch panel Message Cause 802 1X Auth Server Switch couldn t be contacted y The RADIUS server service is stopped y Configuration for the RADIUS server is not correct y The IEEE 802 1X switch has problem 802 1X Authentication failed y The username or password that the user entered is not correct y The certificates uploaded are wrong 802 1X Falling back to non 802 1X mode Network ...

Page 147: ...tment code list 156 Enabling department codes 157 Resetting all department counters 158 Deleting all department codes 159 Registering a new department code 160 Editing department codes 162 Deleting department codes 165 Resetting the counter for each department 166 Setting output limitations for all departments 167 Setting the no limit black function 168 Change User Password 169 ...

Page 148: ...counter Indicates the number of sheets that have been printed by system page print operations y Scan counter The scan counter contains the following counters Copy counter Indicates the number of originals that have been scanned by copy operations Fax counter Indicates the number of originals that have been scanned by fax and Internet Fax transmissions Network counter Indicates the number of origin...

Page 149: ...layed 3 Press the following buttons as required y Press COPY to display the total number of copies classified by size group y Press FAX to display the total number of faxes classified by size group y Press PRINTER to display the total number of prints classified by size group y Press LIST to display the total number of printed lists classified by size group ...

Page 150: ...3 MANAGING COUNTERS COUNTER MENU 148 Total Counter Displaying scan counter 1 Press SCAN COUNTER 2 The SCAN COUNTER is displayed ...

Page 151: ...his menu allows you to print the total counter list 1 Press the COUNTER button on the control panel to enter the COUNTER menu 2 Press PRINT OUT TOTAL COUNTER The total counter list is printed For an output example of the total counter list see the following page P 172 Total counter list ...

Page 152: ...ounter for department code This feature allows you to display the number of the scan counter for each department code The scan counter contains the following counters Copy counter Indicates the number of originals that have been scanned by copy operations Fax counter Indicates the number of originals that have been scanned by fax and Internet Fax transmissions Network counter Indicates the number ...

Page 153: ...that you require P 151 Displaying print counter for department code P 152 Displaying scan counter for department code P 153 Displaying fax communications counter for department code Displaying print counter for department code 1 Press PRINT COUNTER 2 The Print Counter for the specified department code is displayed ...

Page 154: ...roup y Press FAX to display the total number of faxes classified by size group y Press PRINTER to display the total number of prints classified by size group y Press LIST to display the total number of printed lists classified by size group Displaying scan counter for department code 1 Press SCAN COUNTER 2 The SCAN COUNTER for the specified department code is displayed ...

Page 155: ...ER MENU Department Counter 153 3 MANAGING COUNTERS COUNTER MENU Displaying fax communications counter for department code 1 Press FAX COMMUNICATION 2 The FAX COMMUNICATION counter for the specified department code is displayed ...

Page 156: ...inistrator password for this equipment It is recommended that this action be performed only by an authorized administrator If the User Management Setting is enabled and you log in using a user name with Account Manager privileges you do not have to enter the administrator password to display the DEPARTMENT MANAGEMENT menu 1 Press the COUNTER button on the control panel to enter the COUNTER menu 2 ...

Page 157: ... Continue the operation that you require P 156 Printing department code list P 157 Enabling department codes P 158 Resetting all department counters P 159 Deleting all department codes P 160 Registering a new department code P 162 Editing department codes P 165 Deleting department codes P 166 Resetting the counter for each department P 167 Setting output limitations for all departments P 168 Setti...

Page 158: ...ist and counters for each department code 1 In the DEPT MANAGEMENT menu press PRINT OUT DEPARTMENT CODES Printing begins y For instructions on how to display the screen above see the following page P 154 Logging on as administrator y For an output example of the department code list see the following page P 173 Department code list ...

Page 159: ...rtment code P 160 Registering a new department code y Using TopAccess you can also configure department code enforcement settings specifying whether invalid jobs for which a department code is not specified or for which the department code is invalid will be printed or stored in the invalid job list when department management is enabled For instructions on how to set the department code enforcemen...

Page 160: ...ment code is enabled y This function clears only the department counters You cannot clear the total counter 1 In the DEPT MANAGEMENT menu press RESET ALL COUNTERS The clear confirmation screen is displayed For instructions on how to display the screen above see the following page P 154 Logging on as administrator 2 Press YES to clear all department counters Press NO to cancel the clear operation ...

Page 161: ... enable the department management function and register a department code P 157 Enabling department codes P 160 Registering a new department code 1 In the DEPT MANAGEMENT menu press DELETE ALL The delete confirmation screen is displayed For instructions on how to display the screen above see the following page P 154 Logging on as administrator 2 Press YES to delete all department codes Press NO to...

Page 162: ...157 Enabling department codes 1 In the DEPT MANAGEMENT menu press DEPARTMENT REGISTRATION The DEPARTMENT CODE screen is displayed For instructions on how to display the screen above see the following page P 154 Logging on as administrator 2 Press an undefined button to create a new department code and press CHANGE The on screen keyboard is displayed If the touch panel does not display an undefined...

Page 163: ...Press the NEW CODE box and enter a 5 digit code using the digital keys 2 Press the RETYPE NEW CODE box and re enter the 5 digit code using the digital keys 3 Press OK to save the department code The LIMITATION screen appears The department code must be a 5 digit code excluding 00000 y If you enter the code asterisks appear in the NEW CODE and RETYPE NEW CODE boxes y If you want to clear the code t...

Page 164: ...ode in the Limitation box using the digital keys You can enter up to 9999999 If not setting an output limitation for black outputs press OFF y If you enter 0 for the limitation it will disable printing any copies or prints using this department code y When the No Limit Black function is enabled you cannot set the limitation for black y When the number of outputs exceeds the limitation during the j...

Page 165: ...age This department code is already registered Do you wish to replace this code is displayed If the touch panel does not display the department code that you want to edit press to display the next screen 3 Press OK The on screen keyboard is displayed 4 Enter the department name using the keyboard and digital keys and press OK The CHANGE DEPARTMENT CODE screen is displayed ...

Page 166: ... using the digital keys 4 Press OK to save the department code The LIMITATION screen appears y When you enter the code asterisks appear in each box CURRENT CODE NEW CODE and RETYPE NEW CODE y If you want to clear the code to retype it press the CLEAR button on the control panel The department code must be a 5 digit code excluding 00000 6 Set the limitation of this department code as required and p...

Page 167: ...e DEPARTMENT CODE screen is displayed For instructions on how to display the screen above see the following page P 154 Logging on as administrator 2 Press the department button that you want to delete and press DELETE The delete confirmation screen is displayed If the touch panel does not display the department code that you want to delete press to display the next screen 3 Press YES to delete the...

Page 168: ...screen is displayed For instructions on how to display the screen above see the following page P 154 Logging on as administrator 2 Press the department button whose counter you want to reset and press RESET COUNTERS The clear confirmation screen is displayed If the touch panel does not display the department code whose counter you want to clear press to display the next screen 3 Press YES to clear...

Page 169: ... code P 162 Editing department codes 1 In the DEPT MANAGEMENT menu press ALL LIMIT The ALL LIMIT screen is displayed For instructions on how to display the screen above see the following page P 154 Logging on as administrator 2 Specify the following items as required and press OK COLOR Press ON to disable color copies prints for all departments or OFF to permit unlimited color copies prints for al...

Page 170: ...sabled Therefore the no limit black function is disabled every time you enable the department management function If you want to enable the no limit black function you must enable it after enabling the department management function 1 In the DEPT MANAGEMENT menu press NO LIMIT BLACK The NO LIMIT BLACK COPY PRINT screen is displayed For instructions on how to display the screen above see the follow...

Page 171: ...s displayed CHANGE USER PASSWORD is available only when the MFP Local Authentication feature is enabled 3 Change the password 1 Press NEW PASSWORD to enter the new password 2 Press RETYPE NEW PASSWORD to re enter the new password 3 Press OK to save the new password You will be returned to the User Authentication screen y When you press each button NEW PASSWORD and RETYPE NEW PASSWORD the on screen...

Page 172: ......

Page 173: ...t 172 Total counter list 172 Department code list 173 Address book information 174 Group number information 175 Function list User 176 NIC configuration page 177 Function list Administrator 178 PS3 font list 192 PCL font list 193 ...

Page 174: ...WIN MONO COLOR 16666 16665 33331 BLACK 16667 16667 33334 TOTAL 399996 399996 99999 FAX FULL COLOR SMALL 16667 LARGE TOTAL 16667 33334 TWIN MONO COLOR 16666 16665 33331 BLACK 16667 16667 33334 TOTAL 399996 399996 99999 PRINTER FULL COLOR SMALL 16667 LARGE TOTAL 16667 33334 TWIN MONO COLOR 16666 16665 33331 BLACK 16667 16667 33334 TOTAL 399996 399996 99999 LIST FULL COLOR SMALL 16667 LARGE TOTAL 166...

Page 175: ...99 99999 199998 DEPT NO PRINT COUNTER FULL COLOR DEPARTMENT D 2 00002 TWIN MONO COLOR COPY SMALL 99999 199998 LARGE 99999 199998 199998 399996 TOTAL LIMIT PRINT 99999 99999 199998 COPY SMALL 99999 199998 LARGE 99999 199998 199998 399996 TOTAL PRINT 99999 99999 199998 FAX 99999 99999 199998 PRINT 99999 99999 199998 LIST 99999 99999 199998 799992 TOTAL LIMIT TRANSMIT SMALL 99999 LARGE 99999 199998 R...

Page 176: ...2 abcd com 003 USER01 OFF MEMORY OFF 0 00000000003 user03 abcd com 004 USER01 OFF MEMORY OFF 0 00000000004 user04 abcd com 005 USER01 OFF MEMORY OFF 0 00000000005 user05 abcd com 006 USER01 OFF MEMORY OFF 0 00000000006 user06 abcd com 007 USER01 OFF MEMORY OFF 0 00000000007 user07 abcd com 008 USER01 OFF MEMORY OFF 0 00000000008 user08 abcd com 009 USER01 OFF MEMORY OFF 0 00000000009 user09 abcd c...

Page 177: ...NFORMATION TIME 15 05 08 20 47 FAX NO 1 99999999999 FAX NO 2 99999999990 NAME MFP_00000183 NO NAME ADDRESS BOOK 001 GROUP01 001 007 014 019 001 008 014 019 002 008 015 020 003 009 015 020 004 009 016 005 010 016 005 010 017 006 011 017 006 012 018 007 013 018 003 GROUP03 005 005 006 007 008 009 002 GROUP02 005 007 009 015 060 065 ...

Page 178: ... DISABLE BYPASS FEED PLAIN ORIGINAL MODE FOR COLOR TEXT PHOTO ORIGINAL MODE FOR BLACK TEXT PHOTO ORIGINAL MODE FOR AUTO COLOR TEXT PHOTO SCAN COLOR MODE BLACK COMPRESS MID B W ADJUSTMENT IN ACS 3 ROTATION 0 SINGLE 2 SIDE SCAN SINGLE IMAGE QUALITY FOR BLACK STANDARD PREVIEW SETTING OFF INITIAL PREVIEW TYPE PAGE FIT OMIT BLANK PAGE ADJUSTMENT 0 ACS ADJUSTMENT 2 COLOR RESOLUTION 200dpi ORIGINAL MODE ...

Page 179: ...4 enabled Address Mode Static IP IP Address 10 10 70 120 Subnet Mask 255 255 255 0 Default Gateway 10 10 70 1 Primary DNS Server 0 0 0 0 DNS Name Host Name MFP 04998820 Primary WINS Server 0 0 0 0 NetBios Name MFP 04998820 IPP Network Information enabled IPP without SSL http 10 10 70 120 631 Print IPP with SSL https 10 10 70 120 443 Print AppleTalk Network Information enabled AppleTalk Printer Nam...

Page 180: ... feeder YES AUTO CLEAR Shows the time in seconds it takes the touch panel display to clear the previous settings and return to the initial screen YES GENERAL TOTAL COUNTER 9999 MAIN PAGE MEMORY SIZE 512 MB 256 MB DRAWER DRAWER 1 LT DRAWER 2 LD DRAWER 3 LT R DRAWER 4 A4 AUTO CLEAR 45 ENERGY SAVER WEEKLY TIMER ON OFF TIMER SUNDAY 00 00 24 00 TIMER MONDAY 00 00 24 00 TIMER TUESDAY 00 00 24 00 TIMER W...

Page 181: ...pies YES ORIGINAL MODE FOR BLACK Shows the default original mode for black copies YES ORIGINAL MODE FOR AUTO COLOR Shows the default original mode for auto color copies YES OMIT BLANK PAGE ADJUSTMENT Shows the omit blank page adjustment level YES ACS ADJUSTMENT Shows the ACS adjustment level YES MAXIMUM COPIES Shows the maximum copies that are allowed to be set NO AUTO 2 SIDE MODE Shows the defaul...

Page 182: ... Shows the resolution for black scans YES BLACK ORIGINAL MODE Shows the default original mode for black scans YES BLACK EXPOSURE Shows the default exposure setting for black scans YES BLACK BACKGROUND ADJUSTMENT Shows the default background adjustment setting for black scans YES FAX Function Description User FAX ROM VERSION Shows the ROM version of the Fax unit YES RESOLUTION Shows the default res...

Page 183: ...X STORED TIME 1 Shows how many hours a recovery transmission job is to be stored NO FAX RECEIVED FORWARD AGENT1 1 Shows the agent type if the Fax Received Forward is registered NO FAX RECEIVED FORWARD AGENT2 1 Shows the agent type if the Fax Received Forward is registered NO E FILING Function Description User PRINTING IMAGE MODE Shows the default printing image mode YES FILE Function Description U...

Page 184: ...RNAL RX JOURNAL Shows how many receptions will be printed in a reception journal NO COMM REPORT MEMORY TX Shows the conditions for printing a memory transmission report NO COMM REPORT DIRECT TX Shows the conditions for printing a direct transmission report NO COMM REPORT MULTI TX Shows the conditions for printing a multi transmission report NO COMM REPORT POLLING 1 Shows the conditions for printin...

Page 185: ...tion User WIRELESS LAN Shows whether the Wireless LAN function is enabled or disabled NO BLUETOOTH SETTINGS Function Description User BLUETOOTH Shows whether the Bluetooth function is enabled or disabled NO BLUETOOTH NAME Shows the Bluetooth name of this equipment NO DEVICE ADDRESS Shows the device address of this equipment NO ALLOW DISCOVERY Shows whether the Allow Discovery function is enabled o...

Page 186: ...ss of this equipment NO PREFIX LENGTH Shows the prefix length of the IPv6 address NO DEFAULT GATEWAY Shows the default gateway address of this equipment NO USE DHCPv6 SERVER FOR OPTIONS Shows whether the optional information is obtained from the DHCPv6 server NO KEEP CONFIGURATION FOR STATELESS Shows whether the stateless address configuration is kept NO USE STATFULL FOR IP ADDRESS M FLAG Shows wh...

Page 187: ... whether the stateful usage IP address acquisition is enabled or disabled NO USE STATFUL FOR OPTIONS Shows whether the stateful usage optional information acquisition is enabled or disabled NO NETWORK SETTING NETWORK IPX SPX Function Description User ENABLE IPX SPX Shows whether the IPX SPX protocol is enabled or disabled NO FRAME TYPE Shows the frame type to be selected NO NETWORK SETTING NETWORK...

Page 188: ...NO NETWORK SETTING SESSION SMB SESSION Function Description User SMB SERVER PROTOCOL Shows whether the SMB protocol is enabled or disabled NO ENABLE IPv6 Shows whether the IPv6 protocol is enabled or disabled NO NETBIOS NAME Shows the NetBIOS name of this equipment NO LOGON Shows the logon setting NO WORKGROUP Shows the workgroup of this equipment NO DOMAIN Shows the domain name of this equipment ...

Page 189: ... enabled or disabled NO PRIMARY PORT NUMBER Shows the primary port number for the HTTP network service NO SECONDARY PORT NUMBER Shows the secondary port number for the HTTP network service NO ENABLE SSL Shows whether the SSL for the HTTP network service is enabled or disabled NO SSL PORT NUMBER Shows the SSL port number for the HTTP network service NO NETWORK SETTING NETWORK SERVICE SMTP CLIENT NE...

Page 190: ...OP3 login type NO ACCOUNT NAME Shows the POP3 account name if it has been set NO SCAN RATE Shows the scan rate to check the POP3 server for new messages in minutes NO PORT NUMBER Shows the port number to be used for accessing the POP3 server NO ENABLE SSL Shows whether the SSL for the POP3 network service is enabled or disabled NO SSL PORT NUMBER Shows the SSL port number to be used for accessing ...

Page 191: ...N RATE Shows the scan rate to check the SNTP server for adjusting the time setting NO NETWORK SETTING NETWORK SERVICE WEB SERVICES SETTING Function Description User FRIENDLY NAME Shows the display name of this equipment NO WEB SERVICES PRINT Shows whether Web Service print is enabled or disabled NO PRINTER NAME Shows the printer name of this equipment NO PRINTER INFORMATION Shows the printer infor...

Page 192: ...be used for IPP printing NO SSL URL Shows the SSL URL for IPP printing NO NETWORK SETTING PRINT SERVICE SETTING FTP PRINT Function Description User ENABLE FTP PRINT Shows whether FTP printing is enabled or disabled NO PRINT USER NAME Shows the user name for FTP printing NO PRINT PASSWORD Shows the password for FTP printing NO PORT NUMBER Shows the port number to be used for FTP printing NO NETWORK...

Page 193: ...e will be sent if it is to be set NO ENABLE PARTIAL E MAIL Shows whether the equipment allows printing an e mail job that is partially received NO PARTIAL WAIT TIME Shows how long the equipment will wait to receive data for a partial e mail job before printing in seconds NO MDN REPLY Shows whether MDN Reply is enabled or disabled NO NETWORK SETTINGS PRINT AND NOTIFICATION SERVICE E MAIL PRINT Func...

Page 194: ...4 APPENDIX 192 List Print Format PS3 font list Output example of the PS3 Font List ...

Page 195: ...4 APPENDIX List Print Format 193 4 APPENDIX PCL font list Output example of the PCL Font List ...

Page 196: ......

Page 197: ...NTACT INFORMATION 66 Contacts Deleting 36 Editing 34 Registering 30 Searching 38 CONTENTS 57 CONTEXT 97 COPY 16 Copy calibration 79 CORP 32 COUNTER MENU 145 D DATE FORMAT 71 DATE TIME 70 DEFAULT MODE OF AUTO COLOR 115 DELETE ALL 159 Department Code Registering 160 Department code Deleting 159 165 Editing 162 Enabling 157 Printing 156 Resetting all counters 158 Resetting counter 166 Department code...

Page 198: ...n 24 GROUP SEARCH 55 H HTTP 102 I ID SORT 25 IEEE802 1X SETTING 130 IMAGE DIRECTION 16 IMAGE QUALITY FOR BLACK 21 INITIAL PREVIEW TYPE 21 Inner authentication CHAP 141 EAP MD5 143 EAP MSCHAPv2 138 PAP 140 INTERNET PROTOCOL 99 IP ADDRESS 89 IP ADDRESS 86 IP Filtering 106 IPsec 108 IPv4 84 IPv6 88 90 92 IPv6 Protocol 88 90 93 IPX SPX 94 J JOB STATUS 33 JOURNAL 122 K KEEP CONFIGURATION 91 KEYWORD 32 ...

Page 199: ...ception list 121 Reduction Print 116 REGISTRATION 15 82 RELAY DESTINATION 124 RELAY ORIGINATOR 124 RELAY STATION 124 125 REMOTE 125 REPORT SETTING 121 RESET ALL COUNTERS 158 RESET COUNTERS 166 RESOLUTION 19 21 REVERSED DISPLAY 11 ROTATION 20 RX JOURNAL 122 RX PRINT 116 RX Print 116 S SCAN 20 33 SCAN COUNTER 148 152 SEARCH 40 49 55 SEARCH ROOT 97 SECONDARY PORT NUMBER 103 SEND 33 SERVICE PHONE NUMB...

Page 200: ...198 INDEX ...

Page 201: ...FC 5520C 6520C 6530C FC 2330C 2820C 2830C 3520C 3530C 4520C OME080018A0 ...

Page 202: ...2 17 2 HIGASHIGOTANDA SHINAGAWA KU TOKYO 141 8664 JAPAN MULTIFUNCTIONAL DIGITAL SYSTEMS MFP Management Guide 2008 TOSHIBA TEC CORPORATION All rights reserved R071220F0101 TTEC ASD Ver01 2008 06 ...

Reviews: