24
Gea-Top/001
UK
PL
ES
6.
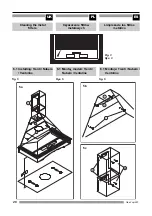
Zdj¹æ os³ony przewodu
wentylacyjnego;
7.
Umieœciæ górn¹ podpórkê (G) na
odpowiedniej wysokoœci,
zaznaczyæ miejsca i wywierciæ
otwory na ko³ki (M) i wkrêciæ œruby
(M) i zamocowaæ na nich podpórkê
(G);
8.
Zamocowaæ wewnêtrzny
przewód wentylacyjny za
pomoc¹ klamry (nie do³¹czona)
do wylotu silnika lub do redukcji
150/120 (rys. 7);
9.
Je¿eli wewnêtrzny przewód
wentylacyjny jest zamontowany,
zamocowaæ os³ony przewodu
wentylacyjnego zahaczaj¹c je za
podpórki.
10.
Pod³¹czyæ przewód wentylacyjny
do kana³u wentylacyjnego i
zamocowaæ go przy pomocy
klamry.
7. Filtry z wêgla
aktywnego
Rys. 8
W przypadku braku mo¿liwoœci
odprowadzania oparów na zewn¹trz,
nale¿y zainstalowaæ filtry z wêgla
aktywnego.
Skutecznoœæ dzia³ania filtrów
wêglowych wynosi od 3 do 6
miesiêcy zale¿nie od intensywnoœci
u¿ycia. Filtrów tych nie mo¿na
czyœciæ ani regenerowaæ.
Jak zamontowaæ filtry wêglowe?
Za³o¿yæ filtry (A) na otwory wlotowe
wentylatora (B) i przekrêciæ jak na
rysunku 8.
6.
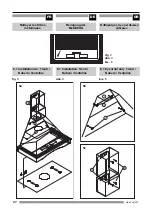
Remove the fixed and mobile
chimneys;
7.
Centre the upper support (G)
around the shape marked, trace
and drill the fixing points for
fitting wall plugs (M), then fix the
support (G) by using bolts (M);
8.
Attach the inner tube, possibly
flexible, with a clamp (not
supplied) to the motor’s air outlet
or to the 150/120 reduction as
the case may be (fig.7);
9.
Once the inner tube is fitted, fit
the fixed and mobile chimney
around the extractor fan outlet
and hook them onto respective
supports;
10.
Connect the scavenging pipe to
the outdoor duct and fix it with a
pipe tightening clamp.
7. Active carbon filters
(Optional)
fig.8
When exterior gas extraction is not
possible, then the kitchen hood may
be set to purify the air by recycling it
through active carbon filters.
The active carbon filters have an
active life of between three to six
months, depending on the individual
conditions of use. These filters cannot
be washed nor regenerated. They
must be replaced once their useful
life comes to an end.
How to set active carbon filters
1.
Put the filters into the lateral
draught section of the motor
through the holes presents on
each filter and the pivots of the
motor carcass.
Turn as indicated in the diagram
fig.8.
5.
Monte la chimenea móvil y
levántela hasta la altura donde
la desea colocar y marque su fi-
gura en la pared;
6.
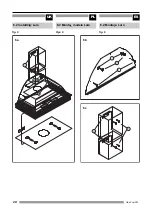
Remueva las chimeneas fija y
móvil;
7.
Centre el soporte de arriba (G)
en la figura marcada, trace y
perfore los orificios de fijación
para la colocación de los tacos
(M), luego fije el soporte (G)
utilizando los pernos (M);
8.
Según el caso, sujete la cámara
de aire, si es posible flexible, con
una abrazadera (no suministra-
da) a la salida de aire del motor
o al reductor (Fig.7);
9.
Una vez que se ha instalado la
cámara de aire, coloque la chime-
nea fija y móvil alrededor de la
salida del extractor de aire y engán-
chelas a sus respectivos soportes;
10.
Conecte el tubo de barrido al
conducto exterior y fíjelo con una
abrazadera de cierre de tubo.
7. Filtros de carbón activo
(opcional)
fig.8
Si no es posible la extracción de los
gases hacia el exterior, la campana de
cocina purificará el aire reciclándolo
mediante la utilización de filtros de
carbón activo.
Los filtros de carbón activo tienen una
vida útil de entre tres y seis meses,
dependiendo de las condiciones
específicas de uso. Estos filtros no
podrán lavarse ni regenerarse. Deben
ser sustituidos una vez que han
finalizado su ciclo útil de uso.
Cómo instalar los filtros de carbón
activo
1.
Coloque los filtros en la sección
de tiro lateral del motor en los
orificios presentes en cada filtro y
en los pivotes del cárter del motor.
Prendalos como se indica en el
diagrama de la Fig.8
Summary of Contents for LARO 90
Page 32: ...32 Gea Top 001 UK PL ES ...
Page 34: ...34 Gea Top 001 UK PL ES ...
Page 35: ...FR DE GR 35 Gea Top 001 ...


