


10
Gea-Top/001
UK
PL
ES
3. Czyszczenie i
konserwacja.
3.1 Czyszczenie obudowy
W ¿adnym wypadku nie nale¿y
u¿ywaæ metalizowanych g¹bek do
szorowania ani proszków i mleczek
szoruj¹cych, które mog¹ rysowaæ
czyszczone powierzchnie.
Zewnêtrzne powierzchnie
urz¹dzenia czyœci siê szmatk¹
zwil¿on¹ wodnym roztworem
p³ynnego detergentu.
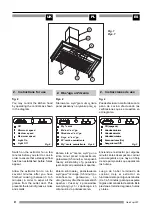
3.2 Rozwi¹zywanie problemów
Aby wyj¹æ filtry metalowe z
obudowy, nacisn¹æ na przycisk a
nastêpnie wyj¹æ filtry.
(Rys.3)
Filtry nale¿y myæ w zmywarce do
naczyñ lub rêcznie uprzednio
namaczaj¹c w gor¹cej wodzie z
dodatkiem œrodka myj¹cego.
Dopuszczalne jest stosowanie
specjalnych œrodków/sprayów do
usuwania t³uszczu. P³ukaæ pod
bie¿¹c¹ wod¹ i pozostawiæ do
wyschniêcia. Filtr nale¿y czyœciæ co
najmniej raz w miesi¹cu.
Niektóre œrodki myj¹ce u¿ywane w
zmywarkach mog¹ odbarwiæ
metalow¹ powierzchniê filtra na
czarno. Nie ma to ¿adnego wp³ywu
na prawid³owe funkcjonowanie
urz¹dzenia.
Prosimy zwróciæ uwagê, ¿e podczas
gotowania na filtrze osadza siê
t³uszcz równie¿, gdy urz¹dzenia nie
jest w³¹czone.
3.3 Wymiana ¿arówek
• Wyj¹æ filtry metalowe.
• Wymieniæ przepalon¹ ¿arówkê.
Stosowaæ ¿arówki 40 W.
• Zamontowaæ filtry metalowe.
3.
Cleaning and
maintenance
During cleaning and maintenance
work, make sure the safety
instructions set out on page 14 are
complied with.
3.1 Cleaning the Hood body
• Never use metallic scourers, nor
abrasive or corrosive products.
• Dry the kitchen hood using a cloth
that does not produce fibres.
3.2 Problem solving
To remove the filters from their
fittings, press lightly on the locks and
then pull them off
(fig. 3)
.
The metal filters can be cleaned by
soaking them in hot water with
neutral detergent until the fat
dissolves and then rinsing them
under the tap or using special anti-
grease products.
They can also be washed in a
dishwasher. In this case, it is
advisable to stack them vertically to
avoid food residues to stick to them.
Cleaning in a dishwasher with ag-
gressive detergents or polish may
damage the metallic surface
(blackening it), although this will not
affect its fat retention capacity.
Once clean, leave them to dry off
and then fit them onto the kitchen
hood.
3.3 Changing the light bulbs
Proceed as follows:
• Remove the metal filters.
• Change the broken/burnt out
lamp. Maximum lamp power is
40W.
• Fit the metal filters.
3. Limpieza y
mantenimiento
Durante la limpieza y los trabajos
de mantenimiento deben observar-
se las instrucciones de seguridad
incluidas en la página 14.
3.1 Limpieza del cuerpo de
la campana
• No utilice esponjillas metálicas o
productos abrasivos o corrosivos.
• Seque la campana con un paño
que no produzca pelusas.
3.2 Resolución de problemas
Para remover los filtros de sus
asientos, presione suavemente en
los retenes y luego extráigalos
(Fig.3).
Los filtros metálicos pueden
limpiarse sumergiéndolos en agua
caliente con detergente neutro hasta
que se disuelvan las grasas y luego
enjuagándolos debajo del grifo o
utilizando un producto especial
desgrasante. Pueden lavarse
también en lavaplatos.
En este caso, es aconsejable
colocarlos en posición vertical para
evitar que se le peguen los residuos
de comida.
Si se los lava en un lavaplatos con
detergentes agresivos o abrillan-
tador podría dañarse la superficie
metálica (ennegreciéndose), de
todos modos esto no afectaría su ca-
pacidad de retención de las grasas.
Una vez lavados, déjelos secar y
luego vuélvalos a colocar en la cam-
pana de cocina.
3.3 Cambiar las lamparitas
Seguir el siguiente procedimiento:
• Quite los filtros metálicos
• Cambie la lámpara rota/quema-
da.
Se pueden utilizar lam-
paritas de hasta 40 W.
• Coloque los filtros metálicos.
Summary of Contents for LARO 90
Page 32: ...32 Gea Top 001 UK PL ES ...
Page 34: ...34 Gea Top 001 UK PL ES ...
Page 35: ...FR DE GR 35 Gea Top 001 ...