background image

QuickStart - First Session

TASCAM 788 Operational Tutorial  •  8/2000 Edition  

4

Section I

QuickStart - First Session  

(Continued)

Routing Tracks to the Main Mixer

When you're done with your recording, reassign the 
tracks to return in the main mixer section, not in the 
TRACK CUE section.  (This gives you access to the EQ 
and effect sends of the 788.)  To assign the tracks to the 
main mixer, hold down TRACK (just to the right of the 
input buttons) and press 
SELECT for channels 1 and 2.  
The LEDs should reflect the 
new routing as you enter it.

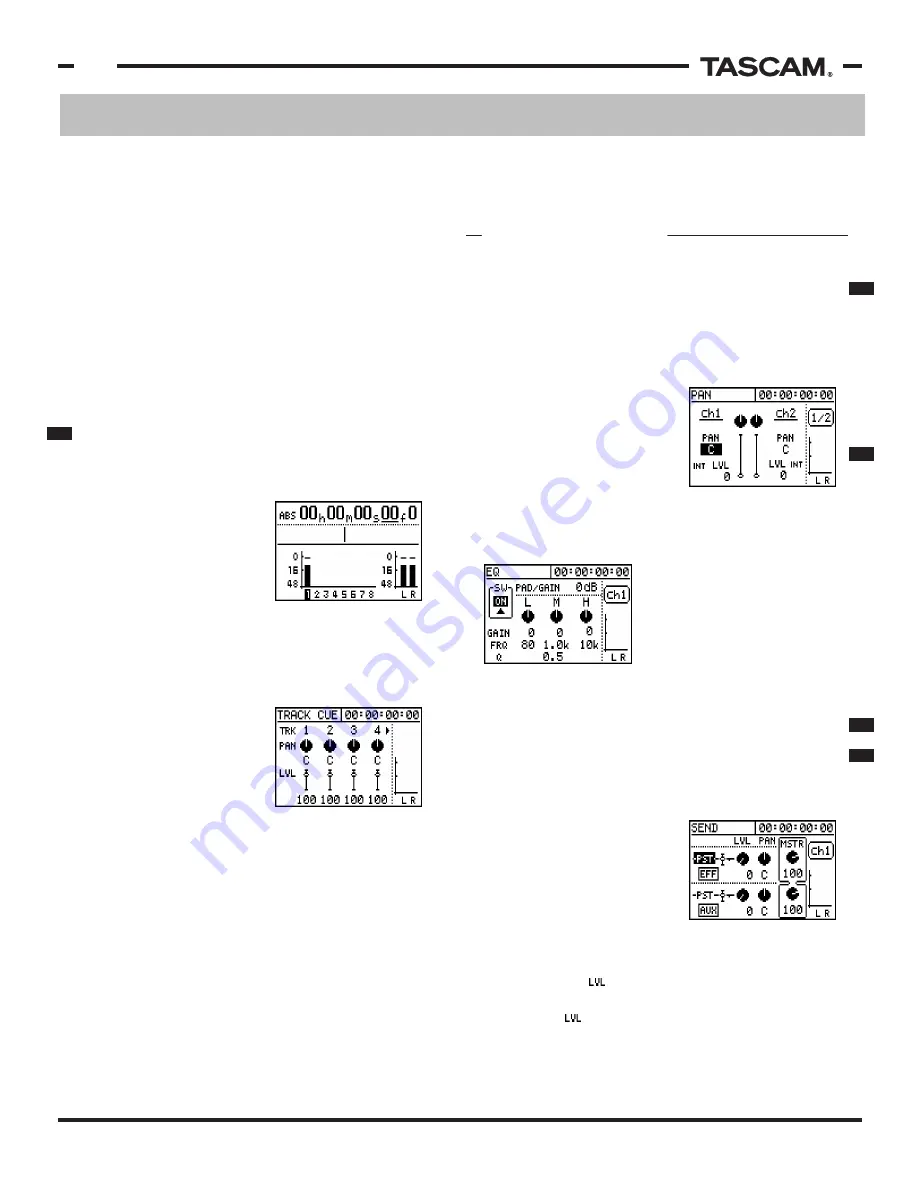
Panning and EQ

Panning and EQ are handled in 
separate screens for each 
function and each channel.  They can be accessed by 
pressing EQ or FADER/PAN, and pressing the SELECT 

button for the channel of the 
mixer that you wish to view.  
Essentially, select the function 
and channel that you want to 
view.  The CURSOR keys will 
navigate through the 
parameters and the JOG/DATA 
wheel alters the settings.  

Adding Effects

In order to add effects to the tracks, we'll need to assign
the effect processors to the effect and auxiliary sends.  
To check that these are properly assigned, hold down 
SEND.  If the LEDs for EFFECT 1 and EFFECT 2 blink, 
then they are assigned to the sends.  If not, hold down
SEND and press EFFECT 1 and 
EFFECT 2 to assign them there.

Press SEND to view the send 
levels of a particular channel.
(The SELECT LEDs in the mixing
section will light to indicate 
which channel you are viewing.
The channel number is also listed just above the L/R 
meters in the right side of the screen.)  Use the arrow 
keys to go to the      dial, and turn it up.  The top send 
feeds EFFECT 1, the bottom send feeds EFFECT 2.  When 
you raise the      control, you should hear some effects.

To change the effect, press EFFECT 1 or EFFECT 2.  
(Choose the processor that you want to change.)  The 
display should show the parameters for the effect.  Use 

MIXING TRACKS

Plug your source into INPUT D, and flip the switch
next to it to "MIC".  (You could plug it into any input
from INPUT A-D, but we're using INPUT D so the 
directions can match the guitar input routing.)

To route INPUT D to track 1 of the recorder, you 
need to assign INPUT D to channel 1 of the mixer.  
(Channel 1 feeds track 1, channel 6 feeds track 6, 
etc.)  Route INPUT D to channel 1 by holding down 
INPUT D and pressing SELECT for channel 1.  The 
LEDs should confirm the routing as you enter it by 
flashing the LEDs for INPUT D and SELECT LED for 
channel 1.  If you raise channel 1's fader and the 
stereo fader, you should hear the audio source.

Recording the First Track

To set your levels, press REC READY on track 1.  
Track 1's LED will blink, and track 1's color will invert
in the screen.  Your levels should be showing up in 
the meters on the screen.  
Set the level as loud as 
possible, without clipping 
the "0" point at the top of 
the meter.

Once you've got your tracks 
enabled and the levels are 
properly set, press PLAY + 
RECORD and start playing.  When you're done, press 
STOP, and disarm the track by pressing REC READY on 
track 1.  The REC READY LED will stop flashing, and 
the track number in the main 
display will go back to 
normal color.

To listen to audio from the 
recorded track, raise the level 
for track 1 in the cue section.  
To do that, press TRACK CUE 
(just above the stereo fader) 
to view the TRACK CUE section.  The TRACK CUE faders 
on the screen will control the volume of track playback 
directly from the recorder.  Raise the TRACK CUE fader 
(in the screen) on track 1. When you press PLAY, you 
should hear the track playing back.

Recording Another Track

To route INPUT D to channel 2 on the mixer, hold down 
INPUT D and press SELECT for channel 2 of the mixer.  
Notice that the LEDs indicate INPUT "D" has moved 
from channel 1 to channel 2.  Raise the fader for 
channel 2, and you should hear the source.  If you are 
using the guitar input with guitar effects, notice that 
the guitar effects are still intact with the new 
assignment.

You should be able to arm track 2, and record just as you
did on track 1.  When you're done, raise the fader for 
track 2 in the TRACK CUE section.

P  7

P 13

P  8

P 20

P  9

+

Summary of Contents for PORTASTUDIO 788

Page 1: ...OPERATIONAL TUTORIAL PN 9101437700 Edition Date 08 16 00 2000 TEAC TASCAM All Rights Reserved INPUT A PHONES REMOTE INPUT D MIC GUIT INPUT C R L INPUT B AUX INPUT STEREO MONITOR AUX OUTPUT...

Page 2: ...oll Editing Functions Pitch Control SSA Formatting Hard Drives Selecting Target Record Drives Built in Effect Processing Effect Overview Routing Assigning Effects Recalling Editing Effects Available E...

Page 3: ...record at 16 or 24 bit 24 bit offers higher sound quality 16 bit takes less disk space In the top of the screen the generic CREATE SAVE A SONG Plugging a Guitar Directly In If you are plugging a guit...

Page 4: ...MIC You could plug it into any input from INPUT A D but we re using INPUT D so the directions can match the guitar input routing To route INPUT D to track 1 of the recorder you need to assign INPUT D...

Page 5: ...going to and how many times you want to copy the part The tracks can be edited on individual track level stereo pair or across all 8 tracks simultaneously Use the arrow keys to move between the vario...

Page 6: ...ss REC READY on tracks 7 and 8 Press PLAY and set your mix the way you want to hear it complete with effects EQ and so forth The recording levels will appear in the meter so you can set your recording...

Page 7: ...c EQ band There are also two stereo sends labeled EFFECT SEND and AUX SEND each of which can be adjusted as pre or post fader sends Analog inputs and recorder tracks can both be routed to these channe...

Page 8: ...INPUT D to both channels 1 and 6 press and hold INPUT D then press SELECT for channels 1 and 6 then release INPUT D The routing is verified by LEDs when you make the selection Whenever you route an in...

Page 9: ...on the level of the send PRE FADER When a send is placed before the fader the send level is totally independent of the fader This is typically used for headphone monitor mixes allowing the performer t...

Page 10: ...OR keys and JOG DATA wheel to change the values to your liking To assign inputs to the input submixer and route the submixer to the stereo fader 1 Press and hold SUB MIX The SUB MIX light should flash...

Page 11: ...outing library that you wish to wish to name and press SHIFT MENU TITLE See Section V Assigning Names on p23 for complete naming capabilities and instructions When a scene is recalled the display will...

Page 12: ...own to a stereo or mono mix This process allows you to add more tracks to the song by freeing up the individual tracks from the other parts Since the 788 has 250 virtual tracks per song you don t have...

Page 13: ...tereo pair of tracks at 85 65 or 50 without dropping the pitch This function is great for learning difficult passages from your favorite tunes RECORDING OVERVIEW On the 788 each project is stored in i...

Page 14: ...and more accurate project navigation than the traditional fast forward and rewind The 788 can store up to 999 locate points for each song so you won t run short on memory points that should be clearl...

Page 15: ...ccuracy using 10 sub frames to a frame This yields a 1 300th of a second accuracy The time display shows hours minutes seconds frames and sub frames One of these time denominations will be underlined...

Page 16: ...Select with the JOG DATA wheel and press ENTER YES 3 Select with the JOG DATA wheel and press ENTER YES VIRTUAL TRACKS One Button Punch Punching in and out of record on the fly is commonly done to al...

Page 17: ...ssigning Names on p23 for complete naming capabilities and instructions All of the editing is non destructive with 999 levels of undo that are saved to disk This means you have lots of opportunity to...

Page 18: ...ied The key difference between MOVE INSERT and COPY INSERT is that MOVE PASTE deletes the original audio between the IN and OUT point IN OUT TO MOVE INSERT IN OUT IN OUT inserts blank space between th...

Page 19: ...to use The parameter determines the size of the disk partitions determines the level of drive formatting to be used If is set to the 788 will only set up the drive directory If is set to it will perfo...

Page 20: ...the routing of the input press EFFECT 1 and INPUT A B C or D This will keep the processing chained with the input through any channel assignment on the main mixer This only works on one channel at a...

Page 21: ...ween the various effects in the chain press the LEFT and RIGHT CURSOR keys If EFFECT 2 is assigned as Dynamic Processors across all eight mixer channels you will need to select which channel s compres...

Page 22: ...ate EQ Chorus Reverb Compressor Gate EQ Chorus Delay Compressor Gate De esser Chorus Reverb Compressor Gate De esser Chorus Delay Compressor Gate Exciter EFFECT 2 DYNAMICS CHANNEL STEREO Compression A...

Page 23: ...e effect patch that you wish to select with the JOG DATA wheel then press SHIFT MENU TITLE THE NAMING PROCEDURE Selecting a locate point for naming 1 Press LOCATE to get to the locate menu 2 Highlight...

Page 24: ...of the naming screen without saving any changes Editing the USER WORD List Since everybody works differently the USER WORD list is fully editable The naming procedure is the same as the previous item...

Page 25: ...EAT PPQ The terms bar measure and beat should be familiar but PPQ is a new one for some PPQ stands for Part Per Quarter PPQ is the internal subdivision of the quarter note As with any other synchroniz...

Page 26: ...s MIDI Time Code works in much the same way as SMPTE time code counting time in a video based language that looks like this HOURS MINUTES SECONDS FRAMES While hours minutes and seconds are familiar th...

Page 27: ...the machine can play independently again MIDI Machine Control is a simple command set to control transport commands ie PLAY STOP REC LOCATE etc It is important to realize that MMC is only transport co...

Page 28: ...or other MIDI device to control the 788 In other words pressing play on your sequencer will send an MMC message to the 788 to start playing Typically the 788 will be set to transmit MTC or MIDI Clock...

Page 29: ...sent the level the actual processed fader position The fader matching parameter determines the relationship between the physical fader I m changing the EQ on the 788 and I m not hearing the changes I...

Page 30: ...der matching to either or Everything is in mono I can t hear any stereo effects You probably don t have the effects assigned correctly or the monitor section is not selected properly Make sure the STE...

Page 31: ...sure the frame rate is the same on both your master machine and your 788 If you are only experiencing minor variation over time and your frame rate is a variation of 30 or 29 97 pay particular attent...

Page 32: ...unds for your drum loops or simply trying to create a unique sound effect these effects can be the highlight of your project Guitar Processing 0 Hz Flanging The multi effect processing chain used for...

Page 33: ...408 462 Phone 03 9644 2442 TEAC ITALIANA S p A Phone 02 66010500 3 7 3 Nakacho Musashino shi Tokyo 180 8550 Japan 7733 Telegraph Road Montebello California 90640 5939 Wallace Street Mississauga Ontar...

Reviews: