2
W587-0011E
K - 1 .
K - 1 .
Crane Cab Glass
[NOTICE]
Wipe away any excessive adhesive.
11. Fit the molding on the circumference of the new
glass and bond its end joint with an instant
aneous adhesive.
[NOTICE]
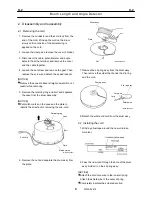
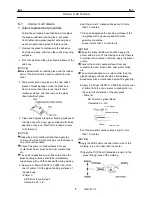
Apply the adhesive so that its cross sectional form
is as shown in the figure by shaping it with a
spatula.
For a portion where there is a clearance between
the glass and rubber dam, apply the adhesive to a
bead height of more than 5 mm (0.2 in).
◆
Install the glass in less than 30 minutes after
application of the adhesive.
12. After installing the trim on the glass bonding
portion frame of the cab body, apply the adhesive
to the glass bonding surfaces.
• Adhesive:
S-511A [Black paste to use when room
temperature is higher than 15°C (59°F)]
S-511F-1 [Black paste to use when room
temperature is lower than 15°C (59°F)]
Cemedine Co., Ltd.
Unit : mm (1mm = 0.039 in)
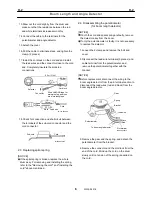
13. Remove the rubber dam backing paper.
(Refer to the figure.)
[NOTICE]
◆
When the glass installed, press it only once. Do not
press it repeatedly (This can form air bubbles).
Excess adhesive must be wiped away with a
spatula and white gasoline.
14. Set and press the new glass against the cab
while aligning the marks (masking tape pieces put
in Step 3) on the glass with those on the cab body.
2. Bonding the joint between windshield
glass and roof glass
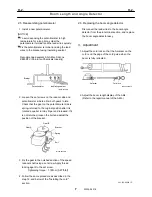
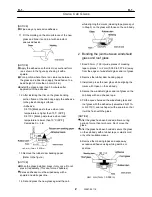
1. Bond 50 mm (1.95 in) wide pieces of masking
tape to places 1 to 2 mm (0.039 to 0.078 in) away
from the edges of windshield glass and roof glass.
2. Remove the rubber dam backing paper.
3. Install and press the new glass while aligning the
marks with those on the cab body.
4. Secure the windshield glass and roof glass on the
cab body with an adhesive tape.
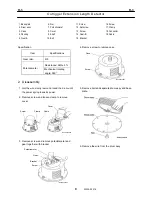
5. Fill the space between the windshield glass and
roof glass with the adhesive (cemedine’s S-511A
or S-511F-1) and reshape it with a spatula so that
it will be flush with the glass.
[NOTICE]
After the glass has been bonded, allow a curing
period of more than two hours. Don’t move the
glass.
After the glass has been bonded, secure the glass
on the cab body with a rubber tape or elastic cord,
or by other suitable means.
6. Remove the masking tapes and wipe away
excessive adhesive using white gasoline or
acetone.
Unit : mm (1mm = 0.039 in)
Summary of Contents for TR-800XXL4
Page 47: ...B 9 B 9 Rotary Joint 27 W181 0440E Upper view A Lower view B...
Page 119: ...F 1 F 1 Winch System 1 WF02 0251E F 1 Winch System 1 General Hydraulic Circuit for Winch...
Page 135: ...G 1 G 1 Telescoping System 3 WG02 0321E Telescoping cylinder at select...
Page 143: ...G 2 G 2 Boom Five Section Boom G 2 11 W536 0761E 11...
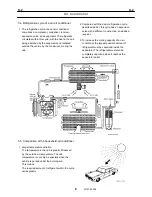
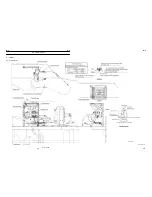
Page 196: ...13 13 W701 0220E K 2 K 2 Air Conditioner K 2 4 Layout 4 1 Overall layout 4 345 107 61000...
Page 197: ...14 14 W701 0220E K 2 K 2 Air Conditioner K 2 4 2 Overall layout 0 345 110 73000...
Page 198: ...15 15 W701 0220E K 2 K 2 Air Conditioner K 2 4 3 Evaporator section 5 345 107 02000...
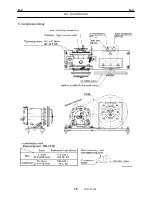
Page 199: ...16 W701 0220E K 2 K 2 Air Conditioner 5 Compressor Assy...
Page 200: ...17 17 W701 0220E K 2 K 2 Air Conditioner K 2 6 Evaporator Assy...
Page 201: ...18 18 W701 0220E K 2 K 2 Air Conditioner K 2 7 Condenser Assy...
Page 202: ...19 19 W701 0220E K 2 K 2 Air Conditioner K 2 8 Electric 8 1 Electric circuit 0 363 205 60030...
Page 203: ...20 20 W701 0220E K 2 K 2 Air Conditioner K 2 8 2 Main harness A...
Page 204: ...21 21 W701 0220E K 2 K 2 Air Conditioner K 2 8 3 Main harness B...
Page 222: ...39 K 2 K 2 K 2 Air Conditioner 39 W701 0220E 12 2Compressor diagnosis chart 1 2...
Page 223: ...40 K 2 K 2 K 2 Air Conditioner 40 W701 0220E Compressor diagnosis chart 2 2...
Page 224: ...K 2 K 2 Air Conditioner 41 W701 0220E 13 Troubleshooting...
Page 225: ...K 2 K 2 Air Conditioner 42 W701 0220E...
Page 226: ...K 2 K 2 Air Conditioner 43 W701 0220E...
Page 227: ...K 2 K 2 Air Conditioner 44 W701 0220E...
Page 228: ...K 2 K 2 Air Conditioner 45 W701 0220E...
Page 229: ...K 2 K 2 Air Conditioner 46 W701 0220E...
Page 237: ...L 1 L 1 Control System 2 WL02 0090E 2 General of pneumatic control devices Pneumatic Circuit...
Page 291: ...T 5 T 5 Air Dryer 26 W232 0032E Heater View A 39 C B B A 58 59 2 IW232 0030E03...
Page 370: ...8 8 WZ03 3300E Z 5 Z 5 Electric Circuit MDT Carrier Upper Z 5 IWZ03 3300E01...
Page 372: ...10 Z 6 Z 6 Electric Circuit MDT Carrier Lower Z 6 10 WZ03 3310E IWZ03 3310E01...
Page 400: ...38 Z 24 Z 24 Harness Lower Sub 38 WZ04 2450E Z 24 Z 24 Harness Lower Sub 2 349 310 00200...


