


5-6
S
uper
W
orkstation 5035B-T User's Manual
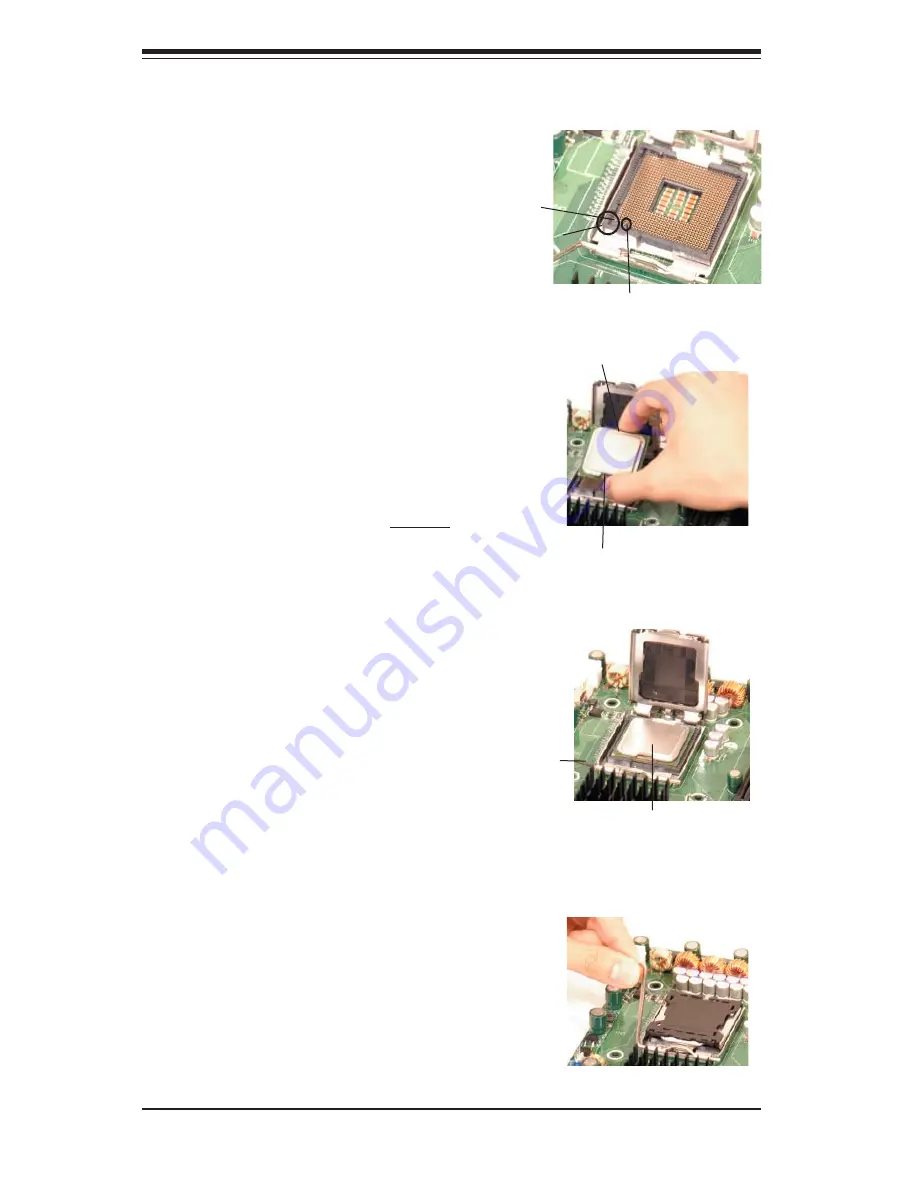
3. Locate Pin 1 on the CPU socket. (Pin
1 is closest to the notched corner of the
housing.) Please note that a North key
and a South key (notches) are located
at opposite sides of the CPU housing.
Pin 1
South Key
North Key
Notched
corner
4. Use your thumb and index fi nger to
hold the CPU at the north center and
south center edges of the CPU.
5. Align Pin 1 of the CPU with Pin 1
of the socket. Once aligned, carefully
lower the CPU straight down and into
the socket.
Do not drop the CPU on
the socket. Do not move the CPU
horizontally or vertically. Do not rub
the CPU against the surface of the
socket or against any pins of the socket,
which may damage the CPU and/or
the socket.
6. With the CPU inside the socket,
inspect the four corners of the CPU
to make sure that the CPU is properly
installed.
7. Use your thumb to gently press the
lever down and lock it in the hook.
South Center Edge
North Center Edge
Socket Lever
CPU in the socket
Summary of Contents for SuperWorkstation 5035B-T
Page 1: ...SUPER SuperWorkstation 5035B T USER S MANUAL Revision 1 0a...
Page 5: ...v Preface Notes...
Page 10: ...Notes x SuperWorkstation 5035B T User s Manual...
Page 16: ...1 6 SuperWorkstation 5035B T User s Manual Notes...
Page 19: ...Chapter 2 System Setup 2 3 Figure 2 1 Accessing the Inside of the 5035B T...
Page 24: ...3 4 SUPERWORKSTATION 5035B T User s Manual Notes...
Page 62: ...6 8 SUPERWORKSTATION 5035B T Manual Figure 6 5 Removing a SATA Drive Carrier...
Page 88: ...7 24 SuperWorkstation 5035B T User s Manual Notes...
Page 94: ...A 6 SuperWorkstation 5035B T User s Manual Notes...
Page 100: ...B 6 SuperWorkstation 5035B T User s Manual Notes...
Page 114: ...D 4 SuperWorkstation 5035B T User s Manual Notes...
Page 118: ...E 4 SuperWorkstation 5035B T User s Manual Notes...


