46
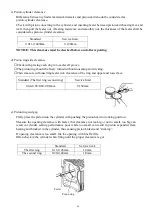
c) Piston-cylinder clearance
Difference between cylinder maximum diameter and piston skirt should be considered as
piston-cylinder clearance.
Check with piston converting in the cylinder, and inserting feeler between piston skirt bearing face and
wall, then pull the feeler out, if feeling resistance and smoothly out, the thickness of the feeler shall be
considered as piston-cylinder clearance.
NOTICE: This clearance must be checked before and after repairing.
d) Piston ring side clearance
・
Check with placing each ring into each-self groove.
・
The piston ring should be freely turned without loosening and sticking.
・
Then measure with inserting feeler into clearance of the ring and upper and lower face.
e) Piston ring end gap
Flatly place the piston into the cylinder with pushing the piston head to working position.
Measure the opening clearance with feeler, that clearance not too big or not to small, too big can
result in cylinder sealing performance poor while too small can result in piston expanded from
heating and blocked in the cylinder, thus causing piston broken and
“
sticking
”
.
If opening clearance is too small, file the opening with fine flat file.
Often check in the cylinder when filing until the proper clearance is got.
Standard
Service limit
0.011-0.049mm
0.120mm
Standard (The first ring/second ring)
Service limit
0.04-0.08/0.04-0.08mm
0.150mm
Standard
Service limit
The first ring
0.13-0.28mm
1.0mm
The second ring
0.20-0.40mm
1.0mm
Piston ring
Feeler
Summary of Contents for EA190V
Page 1: ...EA190V SERVICE MANUAL...
Page 2: ......
Page 8: ...8 II DIMENSION AND TORQUE 2 1 Engine dimension 2 1 1 Appearance dimension...
Page 9: ...9 2 1 2 Installation hole position 2 1 3 P T O dimension figure Engine Mounting Face...
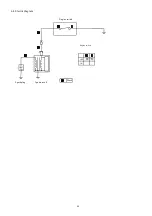
Page 49: ...49 4 4 Electric diagram Engine switch Engine switch Spark plug Ignition coil Black OFF ON...
Page 50: ......
Page 51: ......

