21
IV. DISASSEMBLING AND SERVICING
4-1 Troubleshooting
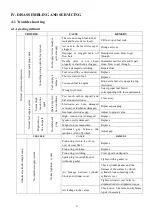
4-1-1 starting difficult
TROUBLE
CAUSE
REMEDY
There is no enough fuel in fuel
tank and fuel cock is closed.
Fill fuel, open fuel cock.
Air vent in the fuel filler cap is
clogged
Dredge air vent.
Improper or clogged main oil
flow hole.
Readjust or clean, blow to get
through.
Needle valve is not closed
properly or start hole is clogged.
Dismantle needle valve and repair,
clean, blow to get through.
Fu
el
suppl
y
is
n
ot
sm
oot
h
or
no
fu
el
suppl
y.
Float is damaged or sticking.
Repair float
Fuel is too filthy or deteriorated
Replace
There is water in fuel.
Replace
Too much fuel in engine
Drain extra fuel, dry up spark plug
electrodes.
N
or
m
al
sp
ar
k
pl
ug
spa
rk
So
m
et
hi
ng
w
rong
w
ith
th
e
fu
el
sy
st
em
.
Fu
el
suppl
y
is
no
rm
al
.
Wrong fuel brand
Select proper fuel brand
corresponding with the requirements.
Too much carbon deposit and
dirt around electrodes.
Clear away.
Electrodes are burn damaged
seriously or insulators damaged.
Replace spark plug.
N
or
m
al
h
igh
–
te
ns
ion
lin
e
sp
ar
k
.
Sp
ar
k
pl
ug
is
in
ba
d
co
nd
iti
ons
Improper electrodes gap.
Adjust to proper value.
High
–
tension line is damaged.
Replace
Ignition coil is damaged.
Replace
Magneto loses magnetism.
Replace
N
or
m
al
c
yli
nde
r c
om
pr
essi
on
N
or
m
al
fu
el
su
pp
ly
sy
st
em
.
H
ig
h-
te
nsi
on
lin
e
no
spa
rk
N
or
m
al
sp
ar
k
pl
ug
Abnormal gap between the
ignition coil and flywheel.
Adjust gap
TROUBLE
CAUSE
REMEDY
Piston ring is worn to or even
over its wear limit
Replace
Piston ring is broken.
Replace
Piston ring is sticking.
Clear up carbon deposits
Spark plug is not tightened or
without a gasket.
Tighten with a gasket in.
Check cylinder gasket, and the
flatness of the surface by which
cylinder block contacting with
cylinder cover
Air leakage between cylinder
block and cylinder cover
Tighten cylinder cover bolts in
stipulated order to stipulated torque.
A
bn
or
m
al
c
yli
nde
r c
om
pr
es
sion
N
or
m
al
fu
el
su
pp
ly
sy
st
em
N
or
m
al
ign
iti
on
s
ys
te
m
Air leakage in the valves
Check valve. Clearance and tightness,
repair if necessary.
Summary of Contents for EA190V
Page 1: ...EA190V SERVICE MANUAL...
Page 2: ......
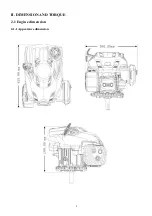
Page 8: ...8 II DIMENSION AND TORQUE 2 1 Engine dimension 2 1 1 Appearance dimension...
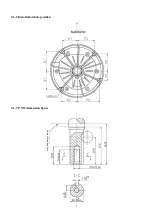
Page 9: ...9 2 1 2 Installation hole position 2 1 3 P T O dimension figure Engine Mounting Face...
Page 49: ...49 4 4 Electric diagram Engine switch Engine switch Spark plug Ignition coil Black OFF ON...
Page 50: ......
Page 51: ......


