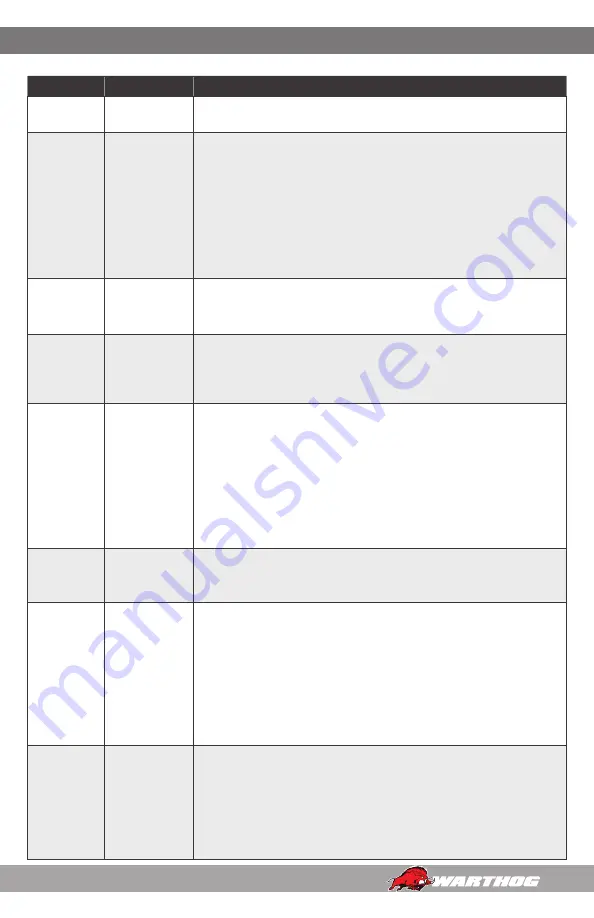
Stone Age WARTHOG WGR MAGNUM Series User Manual Download Page 25

ITEM

FREQUENCY

MAINTENANCE REQUIRED

Nozzle

Weekly

•  Rinse the nozzle with clean water to remove debris between the 

head, body and shaft. 

Inserts

Weekly

•  Inspect all inserts for blockages. 

•  Remove inserts with blockages and clean and dry them thoroughly.
•  Use thread sealant and ensure inserts are not cross threaded when 

inserting them back into the head. 

•  Install the inserts back into the exact locations from which they were 

removed to ensure the nozzle remains balanced.

•  If using the nozzle in recycled water, remove inserts and check for 

the following; Erosion or chipping of the orifice, missing or damaged 
flow straighteners, and/or visible damage to the insert itself.

Backplates

Weekly

•  Inspect the backplate screws. 
•  If the screws are loose, remove all of them and check screws, body, 

and threads are clean and dry.

Fins

Weekly

•  Inspect Fins for movement, wear (using wear indicators), and chips 

on the ends.

•  If the fins are loose, remove all of them and check screws, body, and 

threads are clean and dry.

Head

Weekly

•  Ensure head is rotating properly; when turned by hand, head should 

turn free with slight, smooth resistance.

•  If head spins too fast or sounds different than usual, nozzle may be 

low on viscous fluid or fluid is contaminated.

•  If head feels gritty when turning, flush between head and body.
•  If head still feels gritty when turning, rebuild recommended.
•  CONTROL CLEAN SWITCHER ONLY- Check the depth of the groove 

on the head. If the groove becomes too shallow, it will allow for wear 
on the nozzles.

Insert 
Orifice  
Size

Every 6 

months

•  Inspect insert orifice size with pin gages. 
•  Replace inserts as needed to retain most effective jetting capability 

and cleaning efficiency during operation.

Body

After one Year

•  See “Viscous Fluid Replacement” section of the User Manual. 

•  Flush viscous fluid with same type (BJ 048-M).
•  This procedure is 

only

 recommended for replacing with the 

same

 fluid. Not all of the fluid will be replaced during the flushing 

procedure, therefore full disassembly and cleaning of the tool is 
recommended when changing to a different speed, or viscosity of 
fluid. 

•  Full fluid change is necessary when replacing bearings and shaft 

seals. 

Nozzle

After two 

Years

•  Full disassembly, inspection, and overhaul. See complete 

Disassembly  
and Assembly instructions in the User Manual or Maintenance Video. 
(Links provided below.)

•  Take care throughout the entire procedure to keep the internals clean 

and free from grit, lint, and contamination. Failure to do so could 
result in premature failure after service. 

WGR SWITCHER ASSEMBLY 

WGR MAGNUM AND SWITCHER MAINTENANCE SCHEDULE 

25

866-795-1586 • WWW.SEWERNOZZLES.COM

Summary of Contents for WARTHOG WGR MAGNUM Series

Page 1: ...WGR MAGNUM SERIES CONTROLLED ROTATION SEWER NOZZLE AND SWITCHER HEAD USER MANUAL PL 533 REV G 04 2020...

Page 2: ...NSTRUCTIONS 6 OPERATION 8 TROUBLESHOOTING 9 FLUID REPLACEMENT 10 WGR MAGNUM MAINTENANCE TOOLS AND MATERIALS 11 DISASSEMBLY 12 ASSEMBLY 16 WGR SWITCHER 1 AND 1 21 OVERVIEW 21 WGR SWITCHER MAINTENANCE T...

Page 3: ...eamlined design prevents tool from catching inside of pipe Replaceable fins made of hardened steel for longer life available in different sizes Flush style head protects front shaft seals for extended...

Page 4: ...n standard descaling and pulling configurations Standard nozzles utilize controlled rotation technology and a balanced jetting configuration to deliver superior results in nearly all applications We a...

Page 5: ...NING MODE CLEANING MODE MODEL INLET CONNECTION PRESSURE FLOW HEAD TYPE 1 8 NPT NOZZLE PORTS JET TYPE PORT PLUG psi bar gpm lpm FRONT JET SIDE JET BACK JET WGR 1 SWT 1200 5000 83 345 50 80 189 303 WGR...

Page 6: ...d incorporated safety features in the design StoneAge WILL NOT accept responsibility for the results of misuse IT IS THE RESPONSIBILITY OF THE INSTALLER OPERATOR to conduct a job specific risk assessm...

Page 7: ...efore servicing or replacing any parts Failure to do so can result in severe injury and or death PRE RUN SAFETY CHECK Refer to WJTA IMCA s Recommended Practices For The Use Of High pressure Waterjetti...

Page 8: ...osition the WGR and Tiger Tail so it can enter the pipe to be cleaned The recommended cleaning direction is upstream from the manhole Slowly bring the pump up to pressure making certain that the WGR b...

Page 9: ...e viscous fluid may be contaminated In this case add or change the fluid as appropriate Continued operation in this state can mechanically damage the tool and a rebuild may be required to replace the...

Page 10: ...cing the fluid with the same fluid Not all of the fluid will be replaced using this procedure therefore full disassembly and cleaning of the tool is recommended when changing to a different speed or v...

Page 11: ...nch NECESSARY MATERIALS Clean lint free rags or blue shop towels Anti Seize Swagelok Blue Goop StoneAge PN GP 043 Grease Mobil Mobilux EP1 StoneAge PN GP 049 Loctite Blue 242 Isopropyl Alcohol When in...

Page 12: ...T CLAMP FLATS IN A VISE WGR 102 Inlet Nut WGR 003 Body WGR 180 Shaft Lock Pin WGR 040 RXX XXX Head 5 32 Hex Key Not Included WGR 020 or 022 Back Plate WGR 004 Front Nut DISASSEMBLY 2 Keep the flats of...

Page 13: ...the Wave Spring with a pick 7 Remove the Port Plug that is closest to the Front Nut with a medium size flat head screw driver 8 Place the Body flat onto an Arbor Press with the Front Nut facing up Ge...

Page 14: ...place onto an Arbor Press Seat the Removal Tool against the inside of the Shaft Seal to press the Shaft Seal Seal Spacer and Bearing out of the Body 11 Using a pick remove the Shaft Seal and O Ring f...

Page 15: ...Bearing in the next step Inspect the polished faces if damaged replace HP Seal set and together 15 Use a pick to remove the O Rings from the Shaft Do not scratch the glands in the shaft otherwise lea...

Page 16: ...e Inlet Nut and spring return Clean the polished face with Isopropyl alcohol The polished face needs to be clean and free from lint grease and oils O Ring ANTI SEIZE ANTI SEIZE Figure 14 For Steps 3 4...

Page 17: ...of the Body Install the Seal Spacer on top of the Shaft Seal 9 Pack and coat every surface of the Front Bearing with grease Install the Front Bearing and into the Body on top of the Seal Spacer 10 In...

Page 18: ...chet with a 3 extension and insert it into the internal hex in the end of the Shaft Rotate the Shaft slowly in a Counterclockwise direction to work out all the air bubbles from the system FILL LINE TE...

Page 19: ...into the Shaft Rocking the Shaft HP Seal in a small circular pattern while applying light pressure may aid in installation Pressing too hard will damage or chip the seal Always use the Seal Install To...

Page 20: ...back plate Clean the threads of the six GS 519 02 Screws then apply Blue Loctite 242 to the threads Replace the Back Plate and insert the Screws and evenly tighten in a star pattern with a 5 32 Hex Ke...

Page 21: ...flushing or cleaning Bushing Poppet Product training and proper tools are required to service this nozzle If you are uncomfortable performing the service bring the nozzle to your authorized dealer Tak...

Page 22: ...ure gauge reads zero This may take several seconds Then bring the hose and nozzle back to operating pressure Repeat these steps to switch between modes as necessary WGR SWITCHER NOZZLE WGR Switcher He...

Page 23: ...31 For Step 5 PUNCH O Rings 4 Figure 32 For Step 6 3 Within the Switcher there is a Poppet with a Spring beneath it Push and turn the Poppet inwards until it can be removed Set the Pop pet and Spring...

Page 24: ...Equal 2 Install the prepped Front Jet into the Front Port with a 3 8 Nut Driver 3 Use the small punch to press the Cartridge Assembly back into the Head Use the Arbor Press on the punch to tap the Ca...

Page 25: ...cous fluid or fluid is contaminated If head feels gritty when turning flush between head and body If head still feels gritty when turning rebuild recommended CONTROL CLEAN SWITCHER ONLY Check the dept...

Page 26: ...IT 1 BJ 062 S Anti seize 2g 2 GP 805 Container Round Lid 2 WGR 050 O Ring 2 WGR 052 HP Seal Wave Spring 1 WGR 058 M90 HP Seal Shaft 1 WGR 059 M90 HP Seal Nut WGR 610 OVERHAUL KIT 2 BJ 026 Port Plug 1...

Page 27: ...NOTES PAGE LEFT BLANK INTENTIONALLY 27 866 795 1586 WWW SEWERNOZZLES COM...

Page 28: ...ESENTATIONS AS TO THE PERFORMANCE OF ANY PRODUCT EXCEPT AS SET FORTH IN THE STONEAGE LIMITED WARRANTY PROVIDED WITH THE PRODUCT 4 Delivery Seller is not obligated to make delivery by a specified date...

Page 29: ...connection with such a dispute it shall only be commenced in such courts Seller and Buyer agree to the exclusive jurisdiction of such courts and neither will raise any objection to the jurisdiction an...

Page 30: ...Warranty StoneAge reserves the right to change or improve the material and design of the Product at any time without notice to End User and StoneAge is not obligated to make the same improvements dur...

Page 31: ...OSS OF PROFITS LOSS OF GOODWILL DIMINUTION OF VALUE WORK STOPPAGE INTERRUPTION OF BUSINESS RENTAL OF SUBSTITUTE PRODUCT OR OTHER COMMERCIAL LOSS EVEN TO THE EXTENT SUCH DAMAGES WOULD CONSTITUTE DIRECT...

Page 32: ...1 866 795 1586 www STONEAGETOOLS com 2020 StoneAge Inc All Rights Reserved...

Reviews: