background image

Maintenance

6

Maintenance as required

123

456

789

PRG

PRG

1044_606-008

1

%

2

1044_606-016

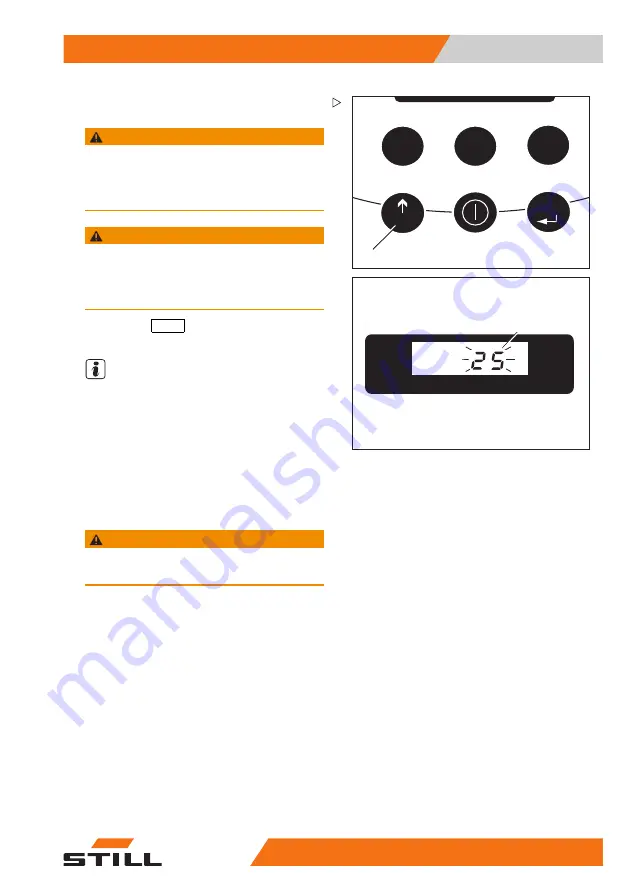
Charging the lead battery

WARNING

The battery could be damaged, shorted or an

explosion could occur.
Do not place any metallic objects or tools on the

battery. No naked lights, no smoking permitted!

WARNING

The electrolyte (diluted sulphuric acid) is poisonous

and caustic!
Follow the safety precautions for handling battery

electrolyte.

– Press the

PRG ↑

(scrolling) button (1) to

display the existing battery charge (2).

NOTE

After the battery is connected, the correct state

of charge appears only after approx. 1 minute.

Charging the gel battery

– Refer to instructions for this battery.

WARNING

Disconnect the battery plug only when the truck and

charger are switched off.

50108043033 [EN]

127

Summary of Contents for KANVAN-05

Page 1: ...Original instructions Forklift towing tractor KANVAN 05 KANVAN 10 1067 1068 50108043033 EN 00 10 2013 ...

Page 2: ......

Page 3: ...atteries 9 2 Introduction Technical description 12 Operating the truck 14 Intended use of the trucks 14 Approved applications 14 Unintended use 14 Place of use 15 Residual risks 17 Residual dangers residual risks 17 Special risks arising from use of the truck and its accessories 18 Overview of hazards and countermeasures 20 Hazards to employees 22 3 Safety Definition of responsible persons 26 Opera...

Page 4: ...4 Overview Total overview 42 Control and display elements 43 Control devices 43 Cockpit 45 Markings 46 Marking positions 46 Labels 49 Chassis frame labelling 51 Data plate 51 Options and variants 52 Standard equipment and options 52 Battery electrolyte level indicator LED optional 56 5 Operation Intended use of the trucks 58 Checks and actions prior to use 58 List of checks prior to start up 58 Ch...

Page 5: ... forward travel using the throttles 72 Driving in pedestrian mode with backrest push buttons 75 Steering 75 Braking 76 Emergency stop brake 77 Parking brake 78 Automatic shutdown 78 Lifting 79 Lift controls 79 Handling trailers 81 Proper use during towing 81 Coupling trailers 83 Single position or multi position trailer coupling 84 Automatically closing trailer coupling 86 ROCKINGER trailer coupli...

Page 6: ...attery holder 109 Servicing the battery 110 Decommissioning 111 Leaving the truck unattended 111 Storage 111 Measures when taking the truck out of service for a long period 111 Recommissioning after storage 111 6 Maintenance General maintenance information 114 General 114 Staff training and qualifications for maintenance and repairs 115 Maintenance personnel for batteries 115 Services not requiring...

Page 7: ...Servicing the pump motor 133 Service the electrical system 134 Servicing the brake 135 Checking the condition of the forks 135 Servicing the mast 136 Maintenance every 1000 hours 137 Work that must also be carried out 137 Insulation resistance check earthing 137 Performing the accident prevention check 138 Maintenance every 2000 hours 139 Other tasks 139 Maintaining the hydraulic system 140 Servic...

Page 8: ...Table of contents g 7 Technical data Datasheet VDI 146 Wheels and tyres 149 VI 50108043033 EN ...

Page 9: ...1 Foreword ...

Page 10: ...s for the country in which it is being used The driving permit must be obtained from the appropriate office The trucks have been fitted with state of the art technology All that remains is to handle the truck safely and maintain its functionality These operating instructions provide the necessary information to do this Read and observe the information provided before commissioning the truck This wil...

Page 11: ...ße 10 D 22113 Hamburg Germany We declare that the Industrial truck according to these operating instructions Model according to these operating instructions conforms to the latest version of the Machinery Directive 2006 42 EC Personnel authorised to compile the technical documents See EC compliance declaration STILL GmbH 50108043033 EN 3 ...

Page 12: ...n located on the nameplate Chapter Data plate P 4 51 in the field provided Production no Year of production Please quote these numbers for all technical enquiries Operating instructions are provided with each truck These instructions must be stored carefully and must be available to the driver and operator at all times If the operating instructions are lost the oper ator must immediately request a ...

Page 13: ...ut documentation Thank you for reading and complying with these operating instructions If you have any questions or suggestions for improvements or if you have found any faults please contact your service centre 50108043033 EN 5 ...

Page 14: ...d therefore reserves the right to implement changes and to accept no claims concerning the information provided in this manual To receive technical assistance please contact the service centre authorised by your closest manufacturer Copyright and trademark rights These instructions must not be reproduced translated or made accessible to third par ties including as excerpts except with the express ...

Page 15: ... followed to avoid material damage and or destruction NOTE For technical requirements that require special attention ENVIRONMENT NOTE To prevent environmental damage Explanation of the cross references Cross references are used to direct the reader to the appropriate section or chapter Examples Cross reference to a section Chap ter Explanation of the cross refer ences P 1 7 Cross reference to a ch...

Page 16: ...entation explains the cycle usu ally sequential of certain functions or opera tions Schematic diagrams of a truck are used to illustrate these cycles NOTE These schematic diagrams are not represen tative of the constructed state of the docu mented truck 8 50108043033 EN ...

Page 17: ... of properly after delivery of the truck Disposal of components and batteries The truck is composed of different materials If components or batteries need to be replaced and disposed of they must be disposed of treated or recycled in accordance with regional and national regulations NOTE The documentation provided by the battery manufacturer must be observed when dispo sing of batteries ENVIRONMEN...

Page 18: ...1 Foreword Environmental considerations 10 50108043033 EN ...

Page 19: ...2 Introduction ...

Page 20: ...ng to move your hand The cockpit brings together the following functions Driving Steering Lifting and lowering Hour meter Battery charge indicator Adjustable driving programs PIN code access control included as standard Diagnostics by service codes Furthermore the multi function joystick on the STILL cockpit control panel allows steady and tension free steering during driving Handling functions Th...

Page 21: ...r integrated into the control ensures that the KANVAN accelerates smoothly and gradually up to the maximum speed regardless of the load towed or carried on the forks The truck uses two types of braking by simply releasing the accelerator pedal in the cockpit or by activating the brake The AC motor works as a generator restoring battery energy lost through braking Mast The KANVAN Simplex mast offer...

Page 22: ...ble him to put in place any necessary additional safety measures CAUTION Never use the trailer mode and the pallet stacker mode at the same time This machine can be operated in trailer mode OR pallet stacker mode Therefore it is prohibited to tow a trailer and stack another load at the same time Approved applications The truck is suitable for carrying and transport ing loads in a way described and...

Page 23: ...cified in the Road Traffic Licensing Regulations is installed The various regulations applicable in different countries for driving the truck on public roads must be observed The sites on which the truck is used must comply with the current regulations condition of the ground lighting etc The ground must have sufficient load capacity concrete asphalt The driveways work areas and working widths must c...

Page 24: ...2 Introduction Operating the truck truck for its use If necessary additional fire protection must be provided on the truck If in doubt contact the relevant authorities 16 50108043033 EN ...

Page 25: ...ion incident or breakdown etc WARNING All persons that are in the vicinity of the truck must be instructed regarding these risks that arise through use of the truck In addition we draw attention to the safety regulati ons in these operating instructions The risks can include Escape of consumables due to leakages rupture of lines and containers etc Risk of accident when driving over difficult ground...

Page 26: ...n cannot be excluded in extreme cases and will impact stability The risks can include loss of stability due to unstable or sliding loads etc cornering at excessive speeds moving with the load raised moving with a load that is protruding to the side e g sideshift turning and driving diagonally across slopes driving on slopes with the load on the downhill side loads that are too wide swinging loads ...

Page 27: ...Introduction 2 Residual risks CAUTION In lifting mode allow sufficient space for the forks to be extended 50108043033 EN 19 ...

Page 28: ...G 925 VDI 3313 driver permit Usage by unautho rised persons Access with key only for authorised persons O Truck not in a safe condition Recurrent testing and rectification of defects O BetrSichVO Workplace Safety Ordinance Risk of falling when using working platforms Compliance with national regulations different national laws O BetrSichVO Workplace Safety Ordinance and employer s liability insuran...

Page 29: ...lace Safety Ordinance operating instructions and VDMA German Engineering Federation rules O b LPG Observe BGV D34 operating instructions and VDMA rules O When charging the traction battery Observe BetrSichVO Workplace Safety Ordinance operating instructions and VDMA German Engineering Federation rules O VDE 0510 In particular Ensure ventilation Insulation value within permissible range When using ...

Page 30: ...ards to employees In accordance with the operating safety ordinance BetrSichVO and the German law on health and safety at work ArbSchG the operator see Chapter Definition of responsible persons P 26 must identify and assess hazards during operation and establish health and safety measures at the workplace necessary to protect employees BetrSichVO The operator must therefore draw up appropriate oper...

Page 31: ...o assist in satisfying the conditions of this regulation The overview specifies the main causes of accidents in the event of non compliance If other major operational hazards are involved these must also be taken into consideration The conditions of use for trucks are broadly similar in many plants so that the hazards can be summarised in one overview Follow the information provided by the relevant...

Page 32: ...2 Introduction Residual risks 24 50108043033 EN ...

Page 33: ...3 Safety ...

Page 34: ... the manufacturer or a person who fulfils the following requirements A completed vocational qualification that demonstrably proves their professional expertise This proof should consist of a vocational qualification or a similar document Professional experience indicating that the qualified person has gained practical experience of trucks over a proven period during their career During this time they ...

Page 35: ...able per sons who are at least 18 years of age have been trained in driving have demonstrated their skills in driving and handling loads to the operating company or an authorised rep resentative and have been specifically in structed to drive the truck Specific knowledge of the truck to be operated is also required The training obligations under 3 of the Health and Safety at Work Act and 9 of the pl...

Page 36: ...n complete safety Be physically and mentally capable of driving the truck safely DANGER The use of drugs alcohol or medications that have an effect on reactions impair a person s ability to drive the truck Individuals under the influence of the aforementio ned substances are not permitted to perform any work on or with an industrial truck Prohibition on use by unauthorised persons The operator is r...

Page 37: ...uch products may there fore have a negative impact on the design features of the truck and thus impair active and or passive driving safety We recommend that you obtain approval from the manufacturer and if necessary from the relevant regulatory authorities before installing such parts The manufacturer accepts no liability for any da mage caused by the use of non original parts and accessories wit...

Page 38: ...d implemented by one or more engineers who are experts in the field of industrial trucks and their safety records are kept of the design test s and implementation of the modification or alteration appropriate changes are approved and made to the capacity plate s decals labels and operating instructions a permanent and clearly visible label is attached to the truck indicating the nature of the modific...

Page 39: ...ecked for damage that could potentially have been caused by improper use A test log must be created The results from the inspection must be retained until a further two inspections have been carried out The inspection date is indicated by an adhe sive label on the truck Arrange for the service centre to perform periodic safety inspections on the truck Observe guidelines for checks carried out on t...

Page 40: ...st 1000 Ohms V against the chassis Ask our service department Measuring the insulation resistance of the electrical system NOTE Nominal battery voltage test voltage 500V Before testing the circuit check that it is electrically dead Measure insulation resistance using a suitable meter The insulation resistance is sufficient when it has a nominal value of at least 1000 Ohms V against the chassis Ask ...

Page 41: ...bstances that are necessary for operation see Chapter Table of mainte nance characteristics P 6 119 Oils DANGER Oils are flammable Follow the statutory regulations Do not allow oils to come into contact with hot engine parts No smoking fires or naked flames DANGER Oils are toxic Avoid contact and consumption If vapour or fumes are inhaled move to fresh air immediately In the event of contact with the...

Page 42: ...oved immediately with oil binding agents and disposed of according to the regulations ENVIRONMENT NOTE Oil is a water polluting substance Always store oil in containers that comply with the applicable regulations Avoid spilling oils Spilt oil should be removed immediately with oil binding agents and disposed of according to the regulations Dispose of old oils according to the regula tions Hydrauli...

Page 43: ... use appropriate personal protective equipment e g protective gloves industrial goggles skin protection and skin care products ENVIRONMENT NOTE Hydraulic fluid is a water polluting substance Always store hydraulic fluid in containers that comply with regulations Avoid spills Spilt hydraulic fluid should be removed immediately with oil binding agents and disposed of according to the regulations Dispos...

Page 44: ...ollow the statutory regulations ENVIRONMENT NOTE Dispose of used battery acid in line with the applicable regulations Disposal of consumables ENVIRONMENT NOTE Materials that accumulate during repair maintenance and cleaning must be collected properly and disposed of in accordance with the national regulations for the country in which the truck is being used Work must only be carried out in areas d...

Page 45: ...e using an identical machine and calculated from the weighted values under driving lifting and idling conditions Time proportions Lifting 0 Idling 60 Driving 40 However the noise measurements taken near the truck cannot be used to calculate the noise level at the work places in compliance with the European Community Directive 86 188 EEC daily personal noise exposure Noise levels must be measured d...

Page 46: ...The personal stress on the operator caused by vibrations during a day s work must be noted if necessary at the actual workplace so as to be able to consider all the other factors such as the state of the track the intensity of use etc Traction battery emissions Battery charging releases an explosive oxygen hydrogen gas mixture oxyhydrogen This gas mixture is highly explosive and must not be ignite...

Page 47: ...c reduction in speed when turning Ramp Stop function Ramp Stop function The Ramp Stop function enables a gentle start off when stopping on a slope without the vehicle rolling backwards at all DANGER Do not climb on the dashboard DANGER Do not stand on the forks or the rear of the tractor CAUTION Always exit the tractor on the side where there is no traffic CAUTION Risk of crushing your feet in pede...

Page 48: ...aired Do not remove or deactivate safety devices and switches Fixed set values may only be changed with the approval of the manufacturer Work on the electrical system e g connecting a radio additional headlights etc is only permitted with the manufacturer s written approval All electrical system interventions must be documented Battery connection cables CAUTION Using sockets with NON ORIGINAL batt...

Page 49: ...4 Overview ...

Page 50: ...peration push button op tional 8 Tow coupling 9 Foldable forks 10 Load wheels 11 Traction controller 12 Platform 13 Battery 14 Steering controller 15 Power steering motor 16 Drive wheel 17 Reducer 18 Traction motor 19 Electromagnetic brake 20 Hydraulic tank 21 Pump motor 22 Fuses 23 Buttons for fork extension folding 42 50108043033 EN ...

Page 51: ...G PRG 1050_003 005 5 4 3 2 1 10 9 7 6 8 1 Storage compartment 2 Battery compartment lock 3 Cockpit 4 Battery connector 5 Presence zone 6 Storage compartment 7 Accompanied operation push button op tional 8 Backrest 9 Accompanied operation push button op tional 10 Storage compartment 50108043033 EN 43 ...

Page 52: ...4 Overview Control and display elements 1 Foldingof forks 2 Extending of forks 44 50108043033 EN ...

Page 53: ...g 3 Horn button 4 Button tortoise 5 PRG button scroll 6 Number button 123 7 Display 8 Button I start 9 Number button 456 10 PRG button confirmation 11 Number button 789 12 Button hare 13 Horn button 14 Raising 15 Lowering 16 Handle 17 Drive control throttle valve 18 Emergency brake push button 19 Drive control throttle valve 20 Handle 50108043033 EN 45 ...

Page 54: ... product identifi cation 2 Manufacturer s symbol 3 Slinging symbol 4 Stop label 5 Decal information label 6 Foot crushing labels 7 Non slinging label 8 Non slip foot panels 9 Plug label 10 Not to be stood on label 11 Serial number label barcode on the chassis 46 50108043033 EN ...

Page 55: ...verview 4 Markings 1 Manufacturer s symbol and product identifi cation 2 Danger load label 3 Do not step onto the forks label 4 Hand crushing label 5 UVV plate and mounting Germany only 50108043033 EN 47 ...

Page 56: ...4 Overview Markings 1 Decal information label 2 Non slinging label 3 Stop label 4 Loading diagram 5 Forks label 6 Company plate 48 50108043033 EN ...

Page 57: ...er s logo 8 Truck identification example 9 Company decal 10 Do not fold the forks when they are holding a load 11 Do not lift a load with the initial lift in the upper position 12 Do not step under a raised load 13 Do not climb 14 Do not stand on the forks 15 Risk of crushing hands 16 Risk of crushing feet 17 Slinging point 18 Do not sling here 19 Electrical plate example 20 Gel battery 50108043033...

Page 58: ...de confirmation EXU H autolift only 32 Automatic mode selection indicator EXU H autolift only 33 Manual or automatic mode selection EXU H autolift only 34 Automatic lifting lowering mode selection 35 Arrows 36 Cold store 37 Traction controller label 38 Slow forward travel pedestrian mode 39 Raising lowering of forks 40 Slow forward travel pedestrian mode raising lowering of forks NOTE The labels li...

Page 59: ...ial no 4 Year of manufacture 5 Unladen weight without battery in kg 6 Maximum battery weight 7 Minimum battery weight 8 Additional weight ballast in kg 9 Nominal power rating in kW 10 Battery voltage V 11 Rated capacity in kg 12 EC conformity symbol Data plate NOTE Please indicate the serial no for all technical enquiries 50108043033 EN 51 ...

Page 60: ...20 mm Optional Forks Length 790 mm Width 120 mm With non slip coating Optional Optional Forks Length 990 mm Width 120 mm Standard Forks Length 990 mm Width 120 mm With non slip coating Optional Standard Forks Length 1190 mm Width 120 mm Optional Forks Length 1 190 mm Width 120 mm With non slip coating Optional Optional Load wheels 250x80 mm Polyurethane 75 Shore A Standard Standard Drive wheel 250...

Page 61: ... traction load 1 t Optional Metal battery cover For boot 97 Optional Padded backrest Standard Standard Front accessory bar lower drive area Optional Optional Front accessory bar upper drive area Optional Optional Upper front accessory bar with drive area cross piece Optional Optional Pedestrian mode in forward reverse gear with throttle release in the cockpit Optional Optional Pedestrian mode in f...

Page 62: ...l Optional Standard hour meter connected to travel and lifting Standard Standard Permanent reading standard hour meter connected to travel and lifting Optional Optional Combination hour meter counter for open lead acid battery with speed limitation Standard Standard Combi hour meter for sealed battery with speed limitation Optional Optional DIN A4 format adjustable clipboard mounted on the accesso...

Page 63: ...SBE 160 A red Optional Optional Fixed battery socket SBE 320 A red Optional Optional Right hand or left hand rear view mirror mounted on the accessories bar curved shape 200x140 mm Optional Optional MMS preparation front mechanical and electrical preparation for STILL 8 4 or 12 1 computer terminal with scanner including 24 V 5 A electrical power supply interface cable with a 3 pole WAGO CAGE CLAMP...

Page 64: ...e LED indicates whether it is necessary to top up the distilled water in the battery Operation If the LED 1 or 2 is green there is a sufficient level of electrolyte in the battery The battery must not be topped up with distilled water If the LED 1 or 2 is red there is an insufficient level of electrolyte in the battery The battery must be topped up with distilled water 56 50108043033 EN ...

Page 65: ...5 Operation ...

Page 66: ... measures CAUTION Never use the trailer mode and the pallet stacker mode at the same time This machine can be operated in trailer mode OR pallet stacker mode Therefore it is prohibited to tow a trailer and stack another load at the same time Checks and actions prior to use List of checks prior to start up WARNING Damage or other defects on the truck or attach ments special equipment can result in ...

Page 67: ...or other load bearing equip ment must not show any visible damage crumpling cracks significant wear etc The chain must be in perfect condition and must be correctly extended The battery cover must be closed The key must be removed Check that the battery cover is put back in place Check that all warning and safety plates are present and legible Damaged or missing stickers must be replaced in complia...

Page 68: ... engages securely when locked Make sure that the trailer coupling 2 is securely attached to the frame The warning device eg horn must function properly The wheels must not be damaged or worn and must be fastened correctly Connecting the battery plug charg ing station 1044_606 013 1 Disconnect the battery socket 1 from the charging station and insert into the plug on the truck 60 50108043033 EN ...

Page 69: ...ould not be misused Do not tell third persons your driver code except if expressly ordered to do so Other codes can be entered Chap ter Digicode control P 5 96 123 456 789 PRG PRG 1044_505 001 1 2 3 4 5 6 7 Entering the user code Press the I key on 6 The display 4 shows the message Code 8 This message switches off after approximately one second You can then enter the 4 digit user code The digits a...

Page 70: ...igits again After the fourth digit has been entered confirm this code by pressing PRG 5 The name of the truck manufacturer is displayed It is now possible to activate the truck NOTE If an error code is displayed e g E380 10 stop the truck by pressing the key 6 and carry out the activation procedure again NOTE It is possible to show the following displays by repeatedly depressing the PRG key scroll ...

Page 71: ...1 1 2 3 4 5 6 7 Starting with FleetManager op tional Push the I key START 6 Do not pay attention to the Code alert that appears in the display Start the truck directly via the FleetManager keyboard or reading device depending on the version 50108043033 EN 63 ...

Page 72: ..._505 006 4 Battery charge Press the PRG scrolling button 4 to display the available battery charge 3 NOTE After the battery is connected the correct state of charge appears only after about 1 minute The charge is shown in per cent and changes in steps of 5 NOTE The factory setting of the battery charge indicator is for a lead battery The indicator can also be set to a gel battery Please contact yo...

Page 73: ...s 6 and a flat wrench symbol 5 Carry out the maintenance repair when the display is 0 in accordance with the maintenance schedule NOTE Our service department can modify the maintenance interval management for you Please contact the service centre in your area The display can show subsequent informa tion Chapter Error display P 5 103 123 456 789 PRG PRG 1047_003 008 2 Operating the horn Press the ho...

Page 74: ...e throttle actuated 123 456 789 PRG PRG 1047_003 009 6 4 5 7 Checking the emergency brake Drive the truck slowly using the traction control 4 Press the belly button 5 The truck is braked to a stop SToP appears in the display 6 NOTE After the disappearance of StoP in the display press the I ON button 7 to restart work CAUTION This brake may only be used in an emergency 66 50108043033 EN ...

Page 75: ...ing on the truck is prohibited except on the step plate and the user detection platform The KANVAN is designed to be used in ride on standing mode or pedestrian mode therefore The truck must not be used as a stepladder Do not drive on an incline Always stay within the truck clearance Using a telephone or radio in the truck is permitted but avoid using these devices when driving as they may distrac...

Page 76: ... aisles The dimensions specified in the description section apply under established conditions and should ensure safe manoeuvring Check in each case whether a wider aisle is required when for example the load dimensions deviate Observe your local and national regulations The truck may only be used on roadways without too tight curves too large gradients and too narrow and too low passages Condition...

Page 77: ... necessary by additional warning signs 123 456 789 PRG PRG 7 8 1050_003 004 Behaviour in emergency situations In an emergency all the functions of the truck can be cut off To do so disconnect the battery connector 7 The truck will come to a halt CAUTION This safety feature may only be used in an emer gency NOTE To resume operation first reconnect the battery connector and then re enter the driver s...

Page 78: ... 456 789 PRG PRG 1 1044_501 001 Driving ride on standing mode Stand upright with feet placed in the presence zone 1 of the platform NOTE The truck must be activated WARNING The platform floor must be kept free of any object that could activate the operator presence mat by its weight WARNING Wait until the truck has completely stopped before dismounting it Always dismount the truck on the non travel...

Page 79: ...released the truck brakes electrically Reversing the direction of travel Release the throttle Operate it in the opposite direction progres sively until the required speed is reached 123 456 789 PRG PRG 1047_003 013 2 3 4 5 Selecting the driving mode NOTE The pallet truck has 2 selectable driving modes For regular driving depress the hare button 3 For driving with gentle acceleration depress the to...

Page 80: ...n the cockpit can be operated with the right or left hand The driving speed is reduced the cockpit can be used at any time to steer so that the truck continues to advance in a straight line Always operate the travel throttle slowly as the truck reacts immediately Abrupt starts or braking or reversalof direction of travelmust be avoided at all costs If the travel throttle is held in position for a ...

Page 81: ...progres sively until the required speed is reached 1050_003 007 1 3 2 Driving in pedestrian mode with backrest push buttons NOTE The truck is fitted with push buttons 1 and 2 on both sides of the backrest enabling the truck travel to be controlled on both sides by a pedestrian operator The speed is reduced the cockpit 3 can be used at any time to direct the truck so that it continues to move forwar...

Page 82: ...h button and press it again CAUTION Take care when operating especially if the user is not familiar with using this function DANGER Risk of crushing feet Do not use this function for turning This function is designed to maintain à straight line Proceed from the cockpit with very slight move ments 74 50108043033 EN ...

Page 83: ... 5 km h To stop release the push button 5 The truck will stop Reverse travel with push button Depress the push button 4 The truck travels in reverse the speed is reduced to 2 5 km h To stop release the push button 4 The truck will stop Steering The truck is turned by turning the cockpit to the angle indicated 1 50108043033 EN 75 ...

Page 84: ...WARNING The stopping distance of the truck is affected by the condition of the floor surface Take this into consideration when driving Light braking Release the throttle 1 or 2 when driving 123 456 789 PRG PRG 3 1044_501 010 Leave the presence area 3 76 50108043033 EN ...

Page 85: ...rection 123 456 789 PRG PRG 1047_003 020 7 1 6 2 8 Emergency stop brake CAUTION This brake may only be used in an emergency Depress the emergency brake switch 6 The truck is braked to a fast stop SToP appears in the display 7 NOTE After the disappearance of StoP in the display press the I ON button 8 to restart work 50108043033 EN 77 ...

Page 86: ... the electromagnetic brake Automatic shutdown NOTE If you leave the truck with the control turned on it will be shut off automatically after approx 15 minutes The truck can only be operated again after the driver code is entered The delay time is adjustable Please contact your Service Engineer in this regard 78 50108043033 EN ...

Page 87: ...eously press the two buttons 2 until the forks are fully deployed CAUTION Check that the forks are correctly extended before using traction NOTE The fork extension phase is fully complete when the forks are in the horizontal position and the actuator piston is fully retracted The fork carriage may only be raised when the fork extension is fully complete CAUTION It is not permitted to step onto the...

Page 88: ...14 Raising 15 Lowering 16 Handle 17 Drive control throttle valve 18 Emergency braking push button 19 Drive control throttle valve 20 Handle Lifting the forks NOTE The fork carriage may only be raised when the fork extension is fully complete After extending the forks press the cockpit button 2 The forks are raised to the maximum height It is always possible to stop the movement of the forks by rel...

Page 89: ...y or slippery surfaces it is the braking capacity and NOT the maximum traction capacity of the tractor that will determine the maximum load for using the truck in complete safety CAUTION The maximum permissible towing loads are only valid for towing unbraked on flat surfaces It is necessary to reduce the maximum loads when towing on inclines or slopes Loading and discharge operations are prohibited...

Page 90: ...tance km 2 Speed km h 3 Gradient 4 Wheel traction nominal force N 5 Load kg Reading from the diagram On a 4 slope with a towed weight of 1500 kg the KANVAN can pull this load continuously at 5 6 km h over 7 7 km of ramp and in addition brake it when descending NOTE The values and curves of the towing capac ity diagram apply only to dry surfaces with a good grip The permitted journey per hour is th...

Page 91: ...locked to prevent any unintentional movement Reverse the tractor to the trailer so that the tow pin and the trailer draw bar are aligned as seen from the driver s position 123 456 789 PRG PRG 1 1047_003 039 Step off the presence area 1 The tractor will be braked Depending on the type of trailer coupling proceed as follows Single position or multi position trailer coupling see Chapter Single positi...

Page 92: ...nto the coupling jaw 3 on the tractor NOTE The multi position coupling provides 3 hitch heights It is recommended to choose the height at which the drawbar is horizontal Coupling height distance from the ground Position Height mm A 300 B 355 C 410 1050_003 020 2 3 Lower the tow pin 2 into the trailer coupling 3 and rotate it 90 The tow pin is now secured CAUTION Always make sure that the tow pin i...

Page 93: ...sence area 1 The tractor will be braked Secure the trailer with chocks or engage the trailer brake 1050_003 020 2 3 Turn the tow pin 2 90 and pull it out of the trailer coupling 3 Reverse the tractor slowly Insert the tow pin 2 again into the trailer coupling 3 and secure it 50108043033 EN 85 ...

Page 94: ...up a rigid drawbar trailer Reverse the tractor slowly DANGER Do not allow anyone to stand between the tractor and trailer during the coupling procedure Only drive the tractor to the trailer DANGER Risk of accident Make sure that after each coupling procedure the safety 3 fully contacts the securing sleeve A projecting safety 3 indicates improper hitching The trailer may not be driven in this state...

Page 95: ...3 456 789 PRG PRG 1 1047_003 039 Step off the presence area 1 The tractors will be braked Secure the trailer with chocks or engage the trailer brake Pull the safety lever 3 Swivel the lever 2 up Drive the tractor slowly forward 50108043033 EN 87 ...

Page 96: ...ER Do not allow anyone to stand between the tractor and trailer during the coupling procedure Only drive the tractor to the trailer DANGER Risk of accident Make sure that the tow pin is in the specified position If the locking system is blocked do not intervene Risk of crushing your fingers Please contact your service centre Remove the chocks at the trailer Unhitching 123 456 789 PRG PRG 1 1047_003 ...

Page 97: ...ure that regulation plates conform to local highway regulations Release trailer braking system and remove any chocks from the trailer wheels Check width of the widest trailer or load to ensure free passage en route Check that the direction of travel is clear slowly move the tractor forward taking up the slack in the trailer couplings before gently accelerating to the required speed When approachin...

Page 98: ...er exceed the maximum loads specified on the load capacity label Otherwise stability cannot be ensured DANGER Risk of accident Do not step onto the forks Do not lift people Never grab or step onto moving parts of the truck Before picking up a load Load capacity Example 1 Weight of load to be lifted 500 kg Distance between load centre of gravity fork back 500 mm Permissible load height 1250 mm Examp...

Page 99: ...ift mast are not guaranteed Improper or incorrect use or the placement of persons to increase load capacity is prohibited Picking up a load In order to guarantee load stability ensure that the load is well balanced and centred on the fork arms and that the fork arms have been sufficiently slid underneath the load The load should not excessively extend over the fork arms nor should the fork arms exc...

Page 100: ...nd underneath suspended loads Transporting pallets or other contain ers The load units e g pallets must generally be transported individually Simultaneous transporting of several load units is only authorised when the safety conditions are fulfilled the technical requirements have been met specifically instructed by the supervisor The operator must ensure that the load is properly packaged The opera...

Page 101: ... 79 Lift the forks Approach the trailer at a moderate speed Slow down progressively and immobilise the truck perpendicular to the trailer Gently insert the forks up to the heel without coming up against either the trailer or the load Insert the forks as far under the load as possible Stop the truck when the back of the fork touches the load The centre of gravity of the load must be located in the ...

Page 102: ... position maintaining a sufficient ground clearance Manoeuvre the drive control throttle and move forwards CAUTION Avoid quick starts and forceful stops Approach bends slowly and carefully DANGER Risk of injury when the load is on the forks in the upper position With the exception of the manoeuvre used to pick up or put down the load on the trailer it is not permitted to drive or turn when the load...

Page 103: ...those ascending and descending slopes that are marked as traffic routes may be can be used in complete safety in accordance with the technical data for this truck see Chapter Datasheet VDI P 7 146 The driver must check that the ground is clean with a good grip It is not permitted to perform turns on ascending slopes to approach them diagonally or to park the truck on them Drive at a reduced speed o...

Page 104: ...granted with three different codes Driver s code master code service code Driver s code The driver s code consists of four digits and must be created by the Pool Manager It is used for the regular utilisation and opera tion of the truck by the driver and operator The knowledge of the code should be re garded as a key and must not be misused The driver s code must not be given to other persons with...

Page 105: ...imum of five master codes NOTE If master codes or driver s codes are forgotten or get lost please contact the Service Engin eer for he alone can make the stored codes visible Service code The service code is only intended for the after sales service It allows the diagnosis of the truck for inspections and the access to the driver s and master code Adding the master code NOTE The truck is turned off...

Page 106: ...r code with the buttons 1 2 or 3 as described above NOTE The controller can store a maximum of five master codes If one attempts to add a sixth master code Err will appear in the display 9 1044_505 013 Confirm with the PRG enter button 4 until the new master code 9 blinks an example is shown 10 1044_505 011 Then release the button Add 10 will appear again in the display 11 1044_505 014 Press the PRG...

Page 107: ...croll with the PRG scrolling button 6 until Pin 7 appears in the display 10 1044_505 015 Confirm with the PRG enter button 4 until dEL 10 appears in the display 8 1044_505 012 Confirm with the PRG enter button 4 A flashing line cursor 8 will appear in the display Enter the 4 digit master code to be deleted with the buttons 1 2 or 3 as described above NOTE If one attempts to delete an erroneous master...

Page 108: ...tton dEL 10 will appear again in the display 11 1044_505 014 Press the PRG scrolling button 6 until a normal readout 11 eg battery charge appears in the display The master code is deleted Adding a driver s code NOTE The truck is turned off the battery is connec ted 123 456 789 PRG PRG 1044_505 009 1 2 3 4 5 6 Press the I ON button 5 Enter the valid 4 digit master code with the buttons 123 1 456 2 ...

Page 109: ...with the buttons 1 2 or 3 as described above NOTE The controller can store a maximum of 200 driver s codes If one attempts to add a 201st driver s code Err will appear in the display 9 1044_505 013 Confirm with the PRG enter button 4 until the new driver s code 9 blinks an example is shown 10 1044_505 011 Then release the button Add 10 will appear again in the display 11 1044_505 014 Press the PRG ...

Page 110: ...Scroll with the PRG scrolling button 6 until USEr 7 appears in the display 10 1044_505 015 Confirm with the PRG enter button 4 until dEL 10 appears in the display 8 1044_505 012 Confirm with the PRG enter button 4 A flashing line cursor 8 will appear in the display Enter the 4 digit driver s code to be deleted with the buttons 2 3 or 3 as described above NOTE If one attempts to delete an erroneous dr...

Page 111: ...on dEL 10 will appear again in the display 11 1044_505 014 Press the PRG scrolling button 6 until a normal readout 11 eg battery charge appears in the display The driver s code is deleted Error codes Error display 1044_505 019 15 Error codes The cockpit display 15 can show an error code e g E380 If an error code is displayed please call our service department 50108043033 EN 103 ...

Page 112: ...k can not be towed without functioning electrically NOTE The brake can be released Please contact your after sales service Loading with a hoist CAUTION Use a hoist and hooks of sufficient capacity See the truck data plate for the authorised load weight Attach a sling to each location indicated by a hook symbol 3 CAUTION Slinging the truck via the cockpit or any other point not provided for this pur...

Page 113: ...be charged and the charger The room must be well ventilated Fire extinguishers must be kept ready Safe parking When the battery is being worked on the truck must be properly parked and it may only be started when the battery cover is closed and the battery plug connected Battery weight and dimensions The weight and size of the battery influence the stability of the truck When changing the battery t...

Page 114: ... removal Make sure all covers are properly put in place Damage to cables CAUTION When removing and replacing the battery take care not to damage the battery cables Opening closing the battery com partment Opening Park the truck 1044_001 006 1 Disconnect the female battery connector 1 106 50108043033 EN ...

Page 115: ... battery 1044_606 002 2 3 Insert the key 2 into the battery lock and turn it 180 Depress the battery lock The battery cover 3 is unlocked and can be opened to rear 4 1050_003 022 Open the battery latch 4 90 50108043033 EN 107 ...

Page 116: ...e battery latch 1 Push the battery cover 4 forward until it engages in the lock 2 5 1044_606 015 Turn the key 5 for the battery compartment lock 180 and remove it Battery replacement There are 2 ways of replacing the battery 1 Vertically with a lifting tackle all trucks 2 With a lateral battery removal trolley option To avoid short circuits cover batteries with unprotected terminals or connectors ...

Page 117: ...t squeezed together Hooks must be attached in such a way that they cannot fall onto the battery cells when the lifting tackle is slack Battery change with a roller battery holder WARNING Be careful not to trap your hand During dismantling or installation of the battery never put your hands between the chassis and the battery Dismantling Unplug the battery connector 7 Open the battery compartment 8...

Page 118: ...rk producing materials may be located within at least 2 metres of the truck to be charged and the charger The room must be well ventilated Keep fire extinguishers ready Safe parking When the battery is being worked on the truck must be properly parked and it may only be started when the battery cover is closed and the battery plug connected Battery servicing Keep the battery cell lid dry and clean ...

Page 119: ... Also perform the following measures Measures before taking out of service Thoroughly clean the truck Cover all blank moving parts lightly with oil or grease Check the condition and specific gravity of the battery Service the battery according to the instructions of the manufacturer Follow the manufacturer s instructions Spray all open electric contacts with a suitable contact spray CAUTION Jack up...

Page 120: ...heck the condition and electrolyte level and if necessary recharge the battery Carry out the same maintenance work as for the first time it was used Commission the truck In particular check the following on activa tion the traction control and steering the brakes service brake and parking brake the coupling device the fork lift lowering device the fork extension folding device 112 50108043033 EN ...

Page 121: ...6 Maintenance ...

Page 122: ...ing the maintenance procedures are located after the maintenance chart In a dusty environment and with fluctuating temperatures reduce all lubrication and maintenance intervals as required Quality and quantity of required lubri cants Only use the lubricants specified in these operating instructions The fluids and lubricants and other materials required for the periodic maintenance of the truck are li...

Page 123: ...e with the rules of technology and the basic princi ples of fork trucks Maintenance personnel for batteries Batteries may only be charged serviced and replaced by specially trained personnel and in accordance with the instructions of the battery charger Observe the battery handling and charger operating instructions Services not requiring special qualifications Simple maintenance operations such as...

Page 124: ...Cleaning the truck 5 Servicing the wheels 6 Servicing the battery 8 Servicing the brake as required 2 Servicing the lifting device 11 Maintaining the hydraulic system 7 10 Servicing the electric motor 1 Maintaining the electrical system 8 Servicing the brake 4 Check the forks 2 Servicing the lifting device every 3 months 500 hours 3 Coupling check 116 50108043033 EN ...

Page 125: ... Accident prevention technical inspection 11 Maintaining the hydraulic system 2 Servicing the lifting device 1 Maintaining the electrical system Checking the insulation annual 2000 hours Accident prevention technical inspection 5000 hours 9 Servicing the reducer 50108043033 EN 117 ...

Page 126: ...find the neces sary information for making an order in the spare parts and fitting catalogue Only use spare parts recommended by the manufacturer Unauthorised spare parts may increase the risk of accidents due to quality faults or incorrect choice Anyone who uses non compliant spare parts is entirely responsible in the event of an accident 118 50108043033 EN ...

Page 127: ... API GLA 80W90EP STILL part number 7326000010 approx 1 5 l Hydraulic system Hydraulic oil EQUIVIS XV 32 DIN 51524 P3 HVLP ISO 6743 4 HV up to the mark on the gauge approx 6 l Brushes 2 2 kW pump motor min length 11 mm Straddles Drive wheel ø 250 x 100 mm Rear wheels ø 250 x 80 mm Drive wheel nuts Torque wrench 140 Nm Safety instructions for maintenance Safety measures for maintenance and repair To...

Page 128: ...the vehicle before doing any electric welding Safety devices Refit and check all safety devices for proper operation after maintenance and servicing Settings Retain the vehicle specific settings when repairing and replacing hydraulic and electric components They are specified in the appropriate sections Preparatory procedures for maintenance Slinging or jacking the truck To lift the truck its sub ass...

Page 129: ...re lifting the truck Jacking the chassis Lift up the truck until the wheels are no longer in contact with the ground Fit chocks under the truck Lift the forks Start to raise the truck from the rear 1044_001 003 1 3 2 Removing the cover Remove the cover before the maintenance work For this reason it is necessary to undo the two screws 1 and 2 and remove the cover 3 CAUTION Do not damage the electri...

Page 130: ...tructions Always park the truck in compliance with the instructions Disconnect the battery plug 1 CAUTION The battery must be disconnected during clea ning procedures Washing the outside of the truck WARNING Do not use flammable liquid to wash the truck The safety rules set out above must be followed to pre vent the formation of sparks that could lead to a short circuit remove the battery socket Al...

Page 131: ...it must be lubricated WARNING Do not expose electric motors or other electrical equipment to direct jets Cleaning the chain CAUTION The use of cold or chemical detergents as well as acidic and corrosive or chlorine based liquids can damage the chain Clean the chain with a paraffin derivative e g petrol follow the manufacturer s instructions When cleaning with a steam jet do not use additives Dry th...

Page 132: ...rs Clean the electrical parts with a non metal brush and dry with lightly compressed air After washing Carefully dry the truck e g with com pressed air Start the truck in accordance with the instructions If despite taking precautions traces of moisture persist in the motor dry it using compressed air clean and dry otherwise there is a short circuit risk ONLY then may the truck be reactivated and r...

Page 133: ...undamaged Dimensions Traction wheel 250 x 100 mm Rear wheels 250 x 80 mm Replace damaged or worn wheels with new ones 3 1050_003 027 Tighten wheel fasteners Check the wheel fasteners 3 for tightness and retighten them if necessary Torque 140 Nm Servicing the battery CAUTION Before performing any work on the electrical in stallation remove any power from the system by disconnecting the battery conn...

Page 134: ...ry cover open Battery type Lead or gel batteries are used as traction batteries As the various types are structured differently always use the correct type of charging device without fail Before charging check if the battery charger is suitable for your battery CAUTION Gel batteries are subject to special charging mai ntenance and handling regulations Use of the wrong type of charging device can r...

Page 135: ...ted WARNING The electrolyte diluted sulphuric acid is poisonous and caustic Follow the safety precautions for handling battery electrolyte Press the PRG scrolling button 1 to display the existing battery charge 2 NOTE After the battery is connected the correct state of charge appears only after approx 1 minute Charging the gel battery Refer to instructions for this battery WARNING Disconnect the b...

Page 136: ...of the charger unit NOTE Please follow the information in the operating instructions for the battery and the charging station equalising charge WARNING The gases released during charging are explosive Ensure that the room is well ventilated CAUTION Never squeeze the battery cables 3 128 50108043033 EN ...

Page 137: ...e display press the I ON button 6 to restart work WARNING Should the brakes show signs of wear or be defective please contact your Service CAUTION This brake may only be used in an emergency Emergency stop of the truck To make an emergency stop disconnect the battery plug 4 The truck comes to a stop CAUTION This safety feature may only be used in an emer gency NOTE To restart the truck first reconn...

Page 138: ...ings and friction points with OM oil 1044_604 001 1044_604 002 1 3 2 Fuses CAUTION Before working on the electrical system the vehicle must be de energised by disconnecting the battery connector Remove the two screws 1 and 2 Remove the cover 3 The following fuses are located on the fuse holder F1 Main fuse 400 A F3 Control fuse 24 V 7 5 A F4 Other equipment fuse horn 7 5 A F5 Steering fuse 20 A F8...

Page 139: ...Maintenance 6 Maintenance as required 1050_003 028 F5 F3 F1 F4 F8 50108043033 EN 131 ...

Page 140: ...6 Maintenance Maintenance as required 132 50108043033 EN ...

Page 141: ...ening If necessary add oil OG according to the table of maintenance data Checking the gearbox for leaks Inspect the gearbox for leaks traces of oil CAUTION During lubrication services and oil changes do not allow any oil or grease to get on the brake disc Servicing the pump motor Checking the electrical connections Check the mounting condition and insula tion of the pump motor cables NOTE Oxidised...

Page 142: ...k that there is no trace of burning on the collec tor The new brushes must be bedded before refitting If old brushes are refitted do not re verse them or turn them over Consult your service department Put back the pump motor cover Put back the front cover 1050_003 031 F5 F3 F1 F4 F8 2 1 Service the electrical system Check connections and fuses DANGER Before beginning the following services park the ...

Page 143: ...ding to this standard industrial tractors with 1 or 2 braked wheels travelling at 13 km h must have a braking distance of less than 3 91 m WARNING Keep the braking path clear and ensure there is sufficient safety distance Drive the truck at 13 km h Activate the brake and measure the braking distance If the distance measured is greater than 3 91 m the brake must be changed by our service department ...

Page 144: ...hain using S chain spray Checking the guard grille screen Check the mounting and condition no damage of the guard grille or screen Replace the guard grille or screen if it is damaged Adhere to the number of fastenings as defined by the manufacturer DANGER The grille or screen MUST be installed and cor rectly attached do not attach anything to the grille screen that could affect the visibility on th...

Page 145: ...dustrial trucks should have sufficient insulation resistance Test the truck and battery separately Testing the insulation resistance of the electrical system Have the insulation resistance of all active electrical components checked in accordance with DIN 57117 and DIN 43539 VDE 0117 and VDE 0520 Measurement voltage nominal voltage 500 V Insulation is considered correct when it is measured in relat...

Page 146: ... vehicle must be tested at least once a year by an expert This annual test by an expert must cover the condition of the assemblies and equipment and the completeness and efficacy of the safety features The truck must also be examined thoroughly for damage which may have occurred through improper operation An inspection report must be prepared The results must be kept on file until the next inspectio...

Page 147: ...sks Carry out the services of the maintenance as required see Chapter Maintenance as required P 125 Carry out the 500 hour maintenance see Chapter Maintenance every 500 hours P 133 Carry out the 2000 hour maintenance see Chapter Maintenance every 1000 hours P 137 50108043033 EN 139 ...

Page 148: ...ulic connections of the pump motor 1 Unscrew the clip 2 and remove the pump motor from the hydraulic oil tank 4 Replace the filter 6 Remove the tank 4 Recover the hydraulic oil approx 6 l and drain it Refit the pump unit Unscrew the gauge 3 and fill up with fresh hydraulic oil in compliance with the table of lubricants and ingredients until the max mark on the gauge is reached filling capacity approx ...

Page 149: ...ARNING Risk of personal injury due to arcing Do not reverse the battery poles or cause a short Insulation resistance check earth ing The insulation of industrial trucks should have sufficient insulation resistance Test the truck and battery separately Testing the insulation resistance of the electrical system Have the insulation resistance of all active electrical components checked in accordance w...

Page 150: ...rt This annual test by an expert must cover the condition of the assemblies and equipment and the completeness and efficacy of the safety features The truck must also be examined thoroughly for damage which may have occurred through improper operation An inspection report must be prepared The results must be kept on file until the next inspection The operator must ensure that any defects are remedie...

Page 151: ...rature Follow the safety precautions for handling gear oil Park and secure the truck and remove the cover Turn the tiller until the filler plug 1 is accessible Remove the drain plug 2 and filler plug 1 and allow the oil to drain completely ENVIRONMENT NOTE Dispose of the used oil as specified Tighten the oil drain plug with a new seal again Filling gear oil Fill fresh oil OG according to the table of...

Page 152: ...6 Maintenance Maintenance every 5000 hours 144 50108043033 EN ...

Page 153: ...7 Technical data ...

Page 154: ... kg 1510 1645 2 2 Load per laden axle drive side load side kg 530 1480 380 2265 2 3 Load per unladen axle drive side load side kg 780 730 890 755 WHEELS 3 1 Tyres Polyurethane Polyurethane 3 2 Drive wheel sizes Øxl mm Ø250x100 Ø250x100 3 3 Wheel sizes load side Øxl mm Ø250x80 Ø250x80 3 5 Number of wheels drive side load side x drive wheel 1x 2 1x 2 3 6 Track width drive side b10 mm 0 0 3 7 Track w...

Page 155: ...isle width with a 1000 x 1200 pallet width wise Ast mm 2940 3040 4 34 Aisle width with an 800 x 1200 pallet length wise b12xl6 Ast mm 3040 3140 4 35 Turning radius Wa mm 1410 1500 PERFORMANCE DATA 5 1 Travel speed laden unladen km h 7 5 13 7 5 13 5 2 Lifting speed laden unladen m s 0 16 0 20 5 3 Lowering speed laden unladen m s 0 28 0 23 5 5 Nominal traction force with load N 400 400 5 6 Maximum n...

Page 156: ...sts table Simplex h1 1650 2200 h2 150 150 h3 1250 1800 h4 1650 2200 Maximum load CDG distance in mm 400 500 600 h3 1250 mm 500 kg 500 kg 450 kg KANVAN 05 h3 1800 mm 500 kg 500 kg 450 kg h3 1250 mm 1000 kg 1000 kg 830 kg KANVAN 10 h3 1800 mm 1000 kg 1000 kg 830 kg Load diagram 148 50108043033 EN ...

Page 157: ... the same slope and towed load a new start and a new run is possible Maximum hourly travel is the total possible travel taking reversing into account Use of a trailer with brakes is recommended when the tractor load exceeds 2 5 tonnes and whenever travelling on slopes Wheels and tyres Approved types of tyres Only the specified types of wheels may be installed 50108043033 EN 149 ...

Page 158: ...7 Technical data Wheels and tyres 150 50108043033 EN ...

Page 159: ...he gearbox oil level 133 Checks prior to start up 58 Cleaning instructions 123 Cleaning the electrical system 124 Cleaning the truck 122 Closing the battery compartment 106 Cockpit 45 Condition of roadways 68 Consumables 33 Disposal 36 Safety information for handling battery acid 35 Safety information for handling oils 33 Safety information for hydraulic fluid 34 Control devices 43 Copyright and tr...

Page 160: ... 111 Lift controls 79 Light braking 76 Load Before picking up 90 Handling 92 M Maintenance chart 114 Maintenance interval 65 Maintenance personnel for batteries 115 Maintenance staff 105 Marking positions 46 Mast Maintenance 136 Master code 96 Measures before taking out of service 111 Measures when taking the truck out of service for a long period 111 Measuring battery insulation resistance 32 Mea...

Page 161: ...on or multi position trailer coupling 84 Slinging or jacking the truck 120 Slow forward travel using the throttles 72 Stability 18 Staff training and qualifications for maintenance and repairs 115 Standard equipment and options 52 Steering 75 T Table of maintenance characteristics 119 Technical description 12 Tie down 104 Tighten wheel fasteners 125 Total overview 42 Towing Proper usage 81 Towing a...

Page 162: ......

Page 163: ......

Page 164: ...STILL GmbH Berzeliusstrasse 10 D 22113 Hamburg Ident no 50108043033 EN ...

Reviews: