12
13
08.07.2020
08.07.2020
EN
EN
3
2
8
6
1
9 7
10
4
5
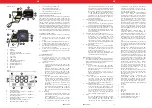
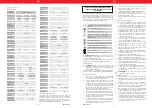
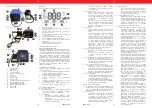
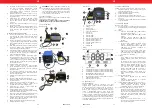
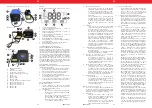
Model S-LS-71
1.
Power button
2. Display
3.
Soldering iron
4.
Stand with handle
5.
Tip cleaning sponge
6.
"#" Button
7.
”3/*” Button
8.
”2/▼” Button
9.
”1/▲” Button
10. Soldering iron connection socket
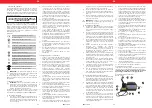
11. Quick access button "1"
12. Quick access button "2"
13. Quick access button "3"
14. ”▲” Button
15. ”▼” Button
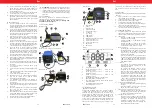
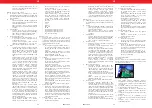
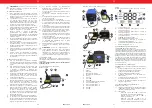
Display
Model: S-LS-62,S-LS-63, S-LS-64, S-LS-65, S-LS-71, S-LS-72
G
H
E
A
B
C
D
I
F
A.
Temperature value
B. Saved temperature value 1 - access to the
temperature value
C. Saved temperature value 2 - access to the
temperature value
D. Saved temperature value 3 - access to the
temperature value
E.
SET (Set Mode): soldering in the SET state
F.
REAL (Real Mode): real temperature
G.
CAL (Calibration): soldering iron in the temperature
calibration mode
H.
Current temperature power value
I.
Temperature unit: "F" or "C"
3.2. PREPARING FOR USE
APPLIANCE LOCATION
Ensure good ventilation in the room in which the device
is being used. There should be at least 10 cm distance
between each side of the device and the wall or other
objects. Keep the product away from hot surfaces. The
device should always be used when positioned on an
even, stable, clean, fireproof and dry surface, and be out
of the reach of children and persons with limited mental
and sensory functions. Position the device such that you
always have access to the power plug. The power cord
10
Model S-LS-68
1
3
4
5
2
16
14
15
6
connected to the appliance must be properly grounded
and correspond to the technical details on the product
label.
3.3. DEVICE USE
PLEASE NO
TE: During the first heating the heating element
"burns out".
1.
Place the device on a flat, stable surface and place
the soldering iron in the holder.
2.
Connect the soldering iron lead to the socket.
3.
Connect the device to the power supply.
4.
Turn the device on using the power switch.
5.
The mode of operation of the device, depending on
the model, is described in section 3.3.1.
6.
After you have finished working, put the soldering
iron in the holder and turn off the device.
3.3.1. OPERATING THE DEVICE
a)
The display will turn on automatically and the last
temperature setting will be displayed for 3 seconds,
then the display will show the current temperature.
b) Temperature
• Pressing the "2/▼" or "1/▲" buttons enters the
temperature change setting.
• Holding the "2/▼" or "1/▲" buttons changes
the temperature.
• Pressing the "1/▲" or "2/▼" or "3/*" buttons
changes the temperature value to the value
which has been saved (memory buttons).
c)
Memory buttons
• To change the saved temperature value, set the
desired temperature and then press and hold
the selected "1/▲" or "2/▼" or "3/*" button
and with the "#" button at the same time. The
temperature will be saved.
• In the case of model S-LS-71: it is recommended
to set the temperature for the speed dial button
"1/▲" up to 200° C, for the speed dial button
"2/▼" between 300 and 350° C, for button "3/*"
from 380° C upwards.
d) Calibration
• The soldering iron should be calibrated after
replacing the heating element, tip or the
soldering iron itself.
• An external temperature sensor must be
connected for the calibration (not included).
Enter the temperature calibration mode hold
the "3/*" button. The value of the last calibration
appears on the display, the value "flashes". Set
the calibration values using "▲" or "▼," and
confirm with "*" (temperature correction range
- 50°C~+50°C). Compare with the temperature
sensor, if necessary, set the temperature
difference repeating the steps.
e)
Changing the temperature units
• The device must be turned off before changing
the units.
• Press and hold the "#" button and turn on the
device. The units will be changed
f)
Temperature lock function, only in S-LS-71
• Pressing and holding the "#" button will lock the
selected temperature. Pressing and holding the
"#" button again will unlock the device.
g)
Standby mode, only in S-LS-71
• The device has an automatic sleep mode that
will turn on when the soldering iron is not used
for approx. 10 minutes. The soldering iron
temperature automatically drops to 100° C.
Picking the soldering iron up or pressing any
button deactivates the sleep mode.
1
3
10
2
4
5
9
8
6
7
f)
Do not overestimate your abilities. When using the
device, keep your balance and remain stable at all
times. This will ensure better control over the device
in unexpected situations.
g)
The device is not a toy. Children must be supervised
to ensure that they do not play with the device.
h)
When working with the device, harmful fumes are
generated. The workplace must be well ventilated
to protect unauthorized persons from the harmful
effects of fumes.
2.4. SAFE DEVICE USE
a) Do not overload the device. Use the appropriate
tools for the given task. A correctly-selected device
will perform the task for which it was designed better
and in a safer manner.
b)
Do not use the device if the ON/OFF switch does not
function properly (does not switch the device on and
off). Devices which cannot be switched on and off
using the ON/OFF switch are hazardous, should not
be operated and must be repaired.
c) Disconnect the device from the power supply
before commencement of adjustment, cleaning and
maintenance. Such a preventive measure reduces
the risk of accidental activation.
d)
When not in use, store in a safe place, away from
children and people not familiar with the device who
have not read the user manual. The device may pose
a hazard in the hands of inexperienced users.
e) Keep the device in perfect technical condition.
Before each use check for general damage and
especially check for cracked parts or elements and
for any other conditions which may impact the safe
operation of the device. If damage is discovered,
hand over the device for repair before use.
f)
Keep the device out of the reach of children.
g)
Device repair or maintenance should be carried out
by qualified persons, only using original spare parts.
This will ensure safe use.
h)
To ensure the operational integrity of the device, do
not remove factory-fitted guards and do not loosen
any screws.
i)
Do not move, adjust or rotate the device in the
course of work.
j)
Do not leave this appliance unattended while it is in
use.
k)
Clean the device regularly to prevent stubborn grime
from accumulating.
l)
Do not cover the air intake and outlet.
m) The device is not a toy. Cleaning and maintenance
may not be carried out by children without
supervision by an adult person.
n) It is forbidden to interfere with the structure of
the device in order to change its parameters or
construction.
o)
Keep the device away from sources of fire and heat.
p)
Always place the soldering iron on the holder if it is
not in use.
q) Keep the soldering tip and parts that can get hot
away from your body, clothing and flammable
objects / substances.
r)
The soldering tip remains hot even after the power
is turned off. Before cleaning or replacing parts, wait
until the device has cooled down completely.
s)
Exercise caution and do not inhale solder fumes.
t)
Do not cover the ventilation openings!
Model: S-LS-63, S-LS-64, S-LS-65, S-LS-72
3
2
12
11
10
1 13
15
14
5
4
3. USE GUIDELINES
The device is designed for soldering, desoldering or
shrinking electronic and electrical connections.
The user is liable for any damage resulting from
unintended use of the device.
3.1. DEVICE DESCRIPTION
Model: S-LS-62
ATTENTION!
Despite the safe design of the device
and its protective features, and despite the use of
additional elements protecting the operator, there is
still a slight risk of accident or injury when using the
device. Stay alert and use common sense when using
the device.


