


21
c
Disc tray
Insert discs here.
d
Emergency eject hole
If the disc tray does not open when you press the
Z
EJECT button, insert a long, thin object such as a
straightened paper clip into this hole to open the disc
tray.
e
Z
EJECT button
Use this to open the disc tray.
f
X
PAUSE button
Use this while recording is in progress to pause
recording. Press this button again to resume
recording. A chapter separator is also created at the
position in which recording was paused.
You can also use this button to pause playback.
To resume playback, press this button again or press
the
B
PLAY button.
“PAUSE” appears on the front panel display during
pause.
g
x
STOP button
Use this to stop recording or playback.
A title separator is also created at the position in
which recording was stopped.
h
z
REC button
Use this to start video/audio recording.
During recording, “REC” appears on the front panel
display in addition to the recording time.
For details on use, see “Manual Recording”
(page 50).
i
B
PLAY button
• Use this to play back the most recent recorded data
stored on the internal hard disk, or to play back the
recorded data selected in the [Recording List] or
[Image List] screen.
• Press this button while playback is paused to
resume playback.
j
CAPTURE button
Use this to capture still images.
A chapter separator is also created at the position in
which the still image was captured.
For details on use, see “Capture Still Images”
(page 51).
k
NEW FOLDER button
Use this to display the [Recording Preparation]
screen to start recording a new surgical procedure or
examination.
For details on use, see “Recording Preparation”
(page 46).
CLOSE FOLDER button
Use this to display the [End Recording] screen which
is used to end surgical procedure or examination
recordings.
For details on use, see “Step 4: End Recording”
(page 45).
l
Infrared receiver
Point the infrared remote control unit toward this
receiver.
m
BD/DVD indicator
Displays the status of the BD/DVD drive.
You cannot remove the disc when this indicator is
blinking green.
n
HDD indicator
Displays the status of the internal hard disk.
o
SERVER indicator
Displays the server access status.
p
USB ports/indicators 1 and 2
Connect USB memory devices, external hard disks,
and other USB media here.
The indicators display the status of USB media
access.
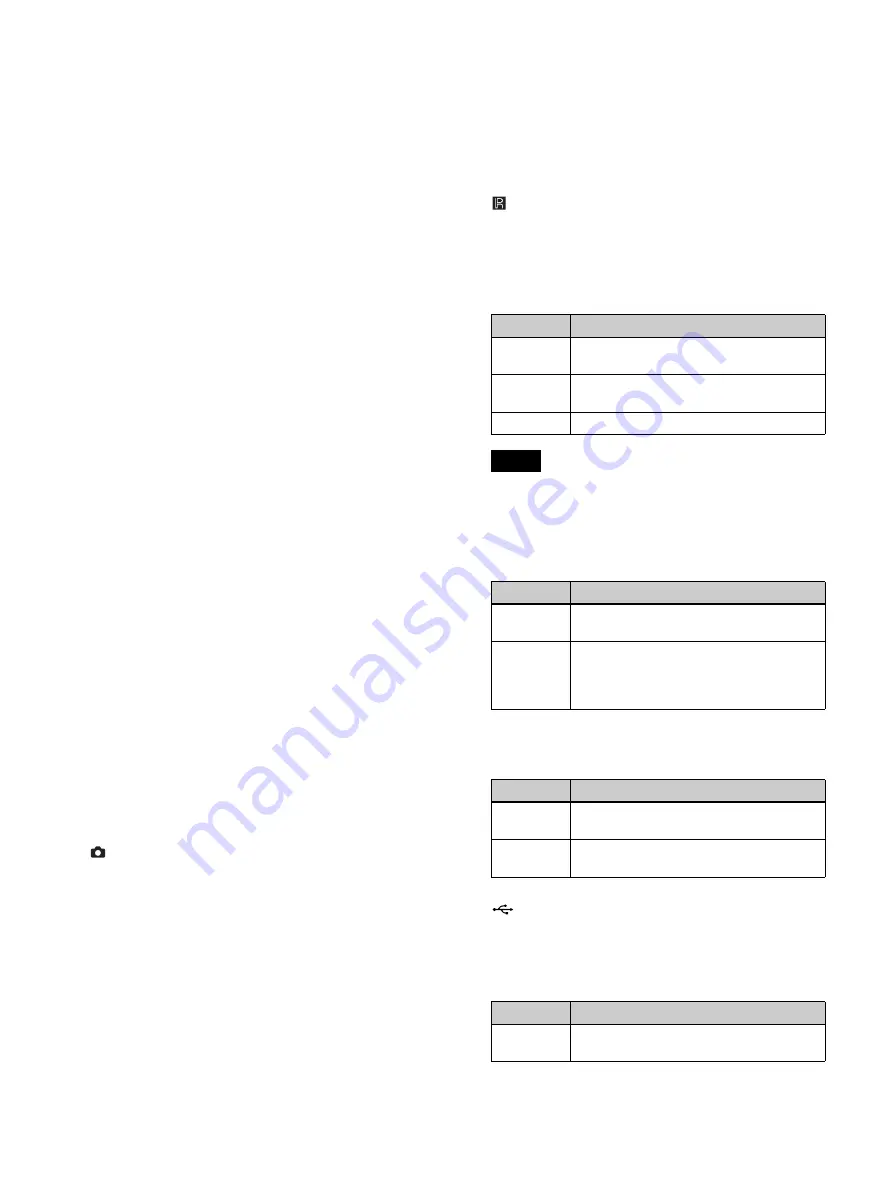
Indicator
Status
Blinking
green
Data is being written to the BD/DVD disc.
Lit green
The recording area of the BD/DVD disc is
full. Insert a different disc.
Lit orange
An error has occurred.
Note
Indicator
Status
Blinking
green
Data is being recorded to the internal
hard disk.
Lit orange
An error has occurred.
The recording area of the internal hard
disk is full. Delete any unnecessary
recorded data.
Indicator
Status
Blinking
green
The server is being accessed.
Lit orange
An error has occurred.
The recording area of the server is full.
Indicator
Status
Blinking
green
Data is being written to the USB media.
Summary of Contents for HVO-4000MT
Page 117: ......


