background image

SonicWALL TZ 210 Series Getting Started Guide  

Page 51

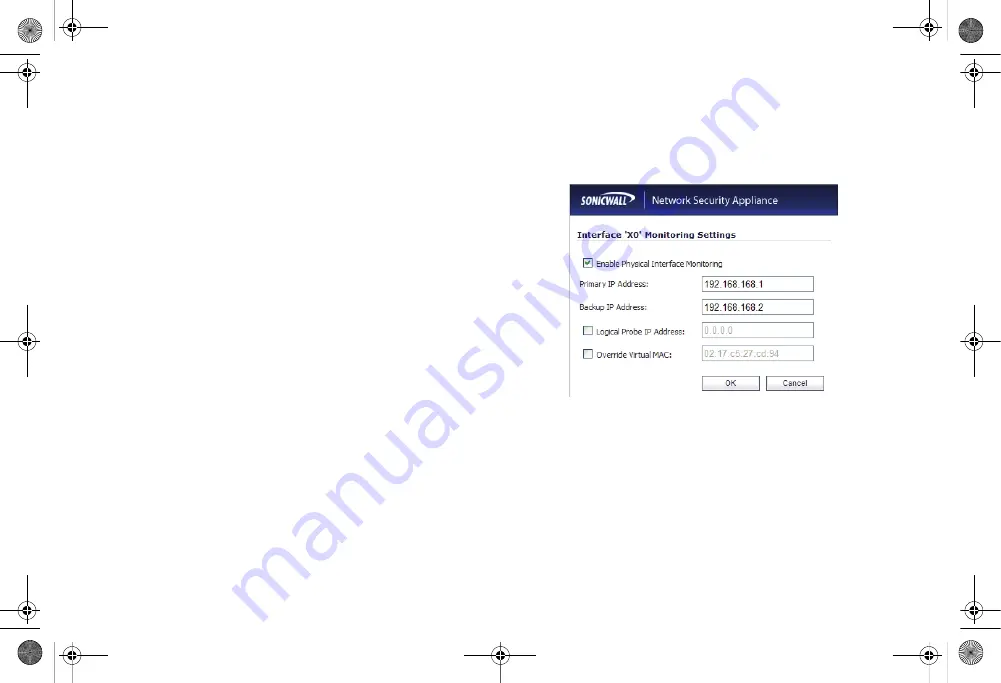
Configuring HA Monitoring

On the 

High Availability > Monitoring

 page, you can configure 

both physical and logical interface monitoring. By enabling 
physical interface monitoring, you enable link detection for the 
designated HA interfaces. The link is sensed at the physical 
layer to determine link viability. 

Logical monitoring involves configuring the SonicWALL to 
monitor a reliable device on one or more of the connected 
networks. Failure to periodically communicate with the device 
by the Active unit in the HA Pair will trigger a failover to the Idle 
unit. If neither unit in the HA Pair can connect to the device, no 
action will be taken.

The Primary and Backup IP addresses configured on this page 
are used for multiple purposes:

As independent management addresses for each unit (only 
on X0 and X1 interfaces)

To allow synchronization of licenses between the Idle unit 
and the SonicWALL licensing server

As the source IP addresses for the probe pings sent out 
during logical monitoring

To set the independent LAN management IP addresses and 
configure physical and/or logical interface monitoring, perform 
the following steps on the Primary unit:

1.

Navigate to the 

High Availability

 >

 Monitoring

 page. 

2.

Click the 

Configure

 icon for the 

X0

 interface.

3.

To enable link detection between the designated HA 

interfaces on the Primary and Backup units, leave the 

Enable Physical Interface Monitoring

 checkbox 

selected.

4.

In the 

Primary IP Address

 field, enter the unique LAN 

management IP address of the Primary unit.

5.

In the 

Backup IP Address

 field, enter the unique LAN 

management IP address of the Backup unit.

TZ_210_GSG.book  Page 51  Friday, November 14, 2008  10:29 AM

Summary of Contents for TZ 210 Series

Page 1: ...Getting Started Guide SonicWALL Network Security Appliances NETWORK SECURITY TZ 210 Series TZ_210_GSG book Page 1 Thursday November 13 2008 7 41 PM...

Page 2: ...com us support html Antennas included with TZ 210 Wireless N Only SonicWALL TZ 210 Series Quick Start Start here if you are new to SonicWALL appliances The next few pages provide a Quick Start to conn...

Page 3: ...t the SonicWALL TZ 210 series appliance using standard CAT 5 Ethernet cables as shown in the illustration below Verify Contents Connect Network Connect Power Boot Appliance Setup Wizard TZ_210_GSG boo...

Page 4: ...Start Connect the included power cable and adaptor and plug into a properly grounded 120V AC outlet Verify Contents Connect Network Connect Power Boot Appliance Setup Wizard TZ_210_GSG book Page 3 Thu...

Page 5: ...st LED blinks during the boot sequence Continue to the next step when the test LED is no longer lit This process may take up to 2 minutes For troubleshooting this step see page iv of this guide Verify...

Page 6: ...ted to the LAN port of the SonicWALL TZ 210 series appliance navigate to http 192 168 168 168 in a Web browser The SonicWALL Setup Wizard displays Continue to page 4 of this guide to complete the Setu...

Page 7: ...TZ_210_GSG book Page 6 Thursday November 13 2008 7 41 PM...

Page 8: ...iance running SonicOS Enhanced Document Contents This document contains the following sections Setting Up Your Network page 1 Registering Your Appliance page 9 Enabling Security Services page 13 Advan...

Page 9: ...Front Panel Provides Provides dedicated LAN WAN port status as follows link spd activity LAN WAN Port Status 10 100 Ethernet Port Status Off 10M Green 100M Solid link Blinking activity Solid wireless...

Page 10: ...network resources WAN Port X1 Provides dedicated WAN Internet Power Supply Provides power connection using supplied power cable Reset Button Press and hold to manually reset the appliance to SafeMode...

Page 11: ...Page iv SonicWALL TZ 210 Series LED Reference SonicWALL TZ 210 Series LED Reference X0 X1 X2 X3 X4 X5 X6 TZ_210_GSG book Page iv Thursday November 13 2008 7 41 PM...

Page 12: ...etting up your SonicWALL TZ 210 series appliance System Requirements page 2 Recording Configuration Information page 2 Completing the Setup Wizard page 4 Accessing the Management Interface page 5 Veri...

Page 13: ...ord the serial number found on the bottom panel of your SonicWALL appliance Authentication Code Record the authentication code found on the bottom panel of your SonicWALL appliance LAN IP Address Sele...

Page 14: ...sword Note Your ISP may require your user name in the format name ISP com T1 E1 Static broadband Cable or DSL with a static IP Static IP IP Address Subnet Mask Default Gateway IP Address Primary DNS S...

Page 15: ...o the Internet This information is provided by your Internet Service Provider ISP WAN Settings Required for some WAN modes This information is also provided by your ISP LAN Settings Enter custom local...

Page 16: ...gement interface 1 Enter the default IP address of http 192 168 168 168 or the LAN IP address you chose during the Setup Wizard in the Location or Address field of your Web browser Tip If you changed...

Page 17: ...ing Your Network Devices Wireless Clients Desktop Clients Local Server W0 WLAN X2 LAN X3 LAN X4 LAN Good for small networks less than 5 clients Easy to setup Requires less equipment Each interface may...

Page 18: ...nected between your computer and the LAN X0 port on your SonicWALL Do you need to add the SonicWALL appliance to your list of trusted sites in your Web browser Use the default IP address 192 168 168 1...

Page 19: ...ically and Obtain a DNS address automatically 6 Click OK and then click OK again for the settings to take effect Windows XP 1 From the Start menu highlight Connect To and then select Show All Connecti...

Page 20: ...LL TZ 210 series appliance Creating a MySonicWALL Account page 10 Registering and Licensing Your Appliance on MySonicWALL page 10 Note Registration is an important part of the setup process and is nec...

Page 21: ...the following subsections Product Registration page 10 Security Services and Software page 11 Activating Security Services and Software page 12 Trying or Purchasing Security Services page 12 Product...

Page 22: ...ith either a license key or an expiration date The following products and services are available for the SonicWALL TZ 210 series appliances Gateway Service Bundles Client Server Anti Virus Suite Compr...

Page 23: ...r key into the Activation Key field and then click Submit Once the service is activated you will see an expiration date or a license key string in the Status column on the Service Management page Tryi...

Page 24: ...sential component of a secure network deployment This section provides instructions for registering and enabling security services on your SonicWALL TZ 210 series appliance Enabling Security Services...

Page 25: ...SonicOS user interface See the following procedures to enable and configure your security services Verifying Licenses page 14 Enabling Gateway Anti Virus page 15 Enabling Intrusion Prevention Service...

Page 26: ...s when content is blocked File Type Restrictions blocks various non scannable files Exclusion Lists for network nodes where Gateway Anti Virus enforcement is not necessary Tip For a complete overview...

Page 27: ...ks attacks of the chosen priority and Detect All saves a log of these attacks that can be viewed on the Log View page 4 Click the Accept button to apply changes Intrusion Prevention contains other use...

Page 28: ...ges Anti Spyware contains other useful features including Exclusion Lists excludes network nodes when Anti Spyware enforcement is not necessary Log Redundancy controls log size during high volume intr...

Page 29: ...e Accept button to apply changes Content FIltering Service contains other useful features including URL Rating Review allows the administrator and users to review blocked URL ratings if they think a U...

Page 30: ...y for internal network traffic To apply services to network zones 1 Navigate to the Network Zones page 2 In the Zone Settings table click the Configure icon for the zone where you want to apply securi...

Page 31: ...Page 20 Verifying Security Services on Zones TZ_210_GSG book Page 20 Thursday November 13 2008 7 41 PM...

Page 32: ...WALL TZ 210 series appliance to various network devices An Introduction to Zones and Interfaces page 22 SonicWALL Wireless Firewalling page 23 Configuring Interfaces page 24 Creating Network Access Ru...

Page 33: ...and FTP servers VPN Trusted endpoints in an otherwise untrusted zone such as the WAN The security features and settings that zones carry are enforced by binding a zone to one or more physical interfa...

Page 34: ...wo users connected by a common hub or wireless access point wish to exchange data SonicWALL addresses this security shortcoming by managing the SonicPoint access points from the UTM appliance This all...

Page 35: ...terfaces panel click the Configure button for the interface you wish to configure The Edit Interface window displays Note If only X0 and X1 interfaces are displayed in the Interfaces list click the Sh...

Page 36: ...n on the top right of the SonicOS management interface 2 Choose PortShield Interface Wizard and click Next 3 Select from the following 4 WAN LAN or WAN LAN DMZ and click Next to continue This will pro...

Page 37: ...page 2 Click one or more interfaces in the PortShield interface and then click the Configure button 3 Select Enabled from the Port Enable drop down menu 4 Select the port with which you wish to group...

Page 38: ...icWALL security appliance To create an access rule 1 On the Firewall Access Rules page in the matrix view select two zones that will be bridged by this new rule 2 On the Access Rules page click Add Th...

Page 39: ...lay the Add Service window or Add Service Group window Select the source of the traffic affected by the access rule from the Source drop down list Selecting Create New Network displays the Add Address...

Page 40: ...nd Schedule in SonicOS Enhanced Once you define an Address Object it becomes available for use wherever applicable throughout the SonicOS management interface For example consider an internal Web serv...

Page 41: ...onfigured by default on the SonicWALL security appliance To add an Address Object 1 Navigate to the Network Address Objects page 2 Below the Address Objects table click Add 3 In the Add Address Object...

Page 42: ...s multiple internal servers from the WAN IP address of the SonicWALL security appliance The more granular the NAT Policy the more precedence it takes Before configuring NAT Policies you must create al...

Page 43: ...orm the following steps 1 Navigate to the Network NAT Policies page Click Add The Add NAT Policy dialog box displays 2 For Original Source select Any 3 For Translated Source select Original 4 For Orig...

Page 44: ...pliances These deployments are designed as modular concepts to help in deploying your SonicWALL as a comprehensive security solution SonicPoints for Wireless Access page 34 Public Server on DMZ page 4...

Page 45: ...gning an Interface to the Wireless Zone page 39 Connecting the SonicPoint page 40 SonicWALL SonicPoints are wireless access points specially engineered to work with SonicWALL security appliances Befor...

Page 46: ...s Local Network LAN wired local client computers and servers Wireless WLAN using a SonicPoint to deliver wireless to local client computers and devices Internet WAN worldwide public and private networ...

Page 47: ...icPoint provisioned Select the Country Code for where the SonicPoints are operating 2 In the 802 11g Radio tab Select Enable Radio Optionally select a schedule for the radio to be enabled from the dro...

Page 48: ...of the 802 11a radio bands The SonicPoint has two separate radios built in Therefore it can send and receive on both the 802 11a and 802 11g bands at the same time The settings in the 802 11a Radio a...

Page 49: ...the Wireless tab In the Wireless Settings section select Only allow traffic generated by a SonicPoint to allow only traffic from SonicWALL SonicPoints to enter the WLAN Zone interface This provides ma...

Page 50: ...ne that you created from the Zone drop down list Additional fields are displayed 3 Enter the IP address and subnet mask of the Zone in the IP Address and Subnet Mask fields 4 In the SonicPoint Limit f...

Page 51: ...Points button The SonicWALL appliance downloads a SonicPoint image from the SonicWALL back end server 3 Follow the instructions in the SonicPoint wizard Be sure to select the same authentication type...

Page 52: ...s and servers Wireless WLAN wireless local client computers and devices DMZ wired resources available to public Internet such as Web servers and Mail servers Internet WAN worldwide public and private...

Page 53: ...d that is easy to remember such as My Web Server This name is for your reference and does not necessarily need to be a domain or address 5 Enter the Private IP Address of your server This is the IP ad...

Page 54: ...he IP assignment 4 Enter an IP Address for the interface This IP address must be in the same subnet as your Web server s local IP address Tip Since we used 192 168 168 123 in the example on page 42 us...

Page 55: ...series appliances for redundant High Availability HA networking This section contains the following subsections About High Availability page 46 Initial HA Setup page 46 HA License Synchronization Over...

Page 56: ...gle LAN zone and High Availability HA zone and linked to the LAN and WAN segments with a hub or switch Typical zone assignments in this deployment are as follows Local Network LAN linked to wired loca...

Page 57: ...of HA on the Primary SonicWALL security appliance perform the following setup 1 On the back panel of the Backup SonicWALL security appliance locate the serial number and write the number down You need...

Page 58: ...ation is used during HA so that the Backup appliance can maintain the same level of network protection provided before the failover To enable HA you can use the SonicOS UI to configure your two applia...

Page 59: ...s the secondary backup unit 6 Select the group from the Product Group drop down list The product group setting specifies the MySonicWALL users who can upgrade or modify the appliance 7 Click Register...

Page 60: ...lity Settings page 2 Select the Enable High Availability checkbox 3 Under SonicWALL Address Settings type in the serial number for the Backup SonicWALL appliance You can find the serial number on the...

Page 61: ...probes before SonicOS Enhanced concludes that the network critical path is unavailable or the probe target is unreachable This is used in logical monitoring The default is 3 and the allowed range is 3...

Page 62: ...used for multiple purposes As independent management addresses for each unit only on X0 and X1 interfaces To allow synchronization of licenses between the Idle unit and the SonicWALL licensing server...

Page 63: ...any of the other interfaces repeat the above steps 10 When finished with all High Availability configuration click Accept All settings will be synchronized to the Idle unit automatically Synchronizin...

Page 64: ...upper right hand corner Now power the Primary SonicWALL back on wait a few minutes then log back into the management interface If the Backup SonicWALL is active you can use the shared IP address to lo...

Page 65: ...ternet service providers connected through X1 and a second open port X3 in this case DMZ optional wired resources available to public Internet such as Web servers and Mail servers Wireless WLAN wirele...

Page 66: ...53 the SonicWALL security appliance is acquiring its secondary WAN address dynamically from ISP 2 using DHCP Any interface added to the WAN zone by default creates a NAT policy allowing internal LAN...

Page 67: ...because it does not address most failure scenarios for example routing issues with your ISP or an upstream router that is no longer passing traffic If the WAN interface is connected to a hub or switch...

Page 68: ...n fact it may not be able to pass traffic to and from the public Internet at all To perform reliable link monitoring you can choose ICMP or TCP as monitoring method and can specify up to two targets f...

Page 69: ...n the Port field 10 If there is a NAT device between the two devices sending and receiving TCP probes the Any TCP SYN to Port checkbox must be selected and the same port number must be configured here...

Page 70: ...ning options for the SonicWALL TZ 210 series appliances Customer Support page 60 Knowledge Portal page 60 Onboard Help page 61 SonicWALL Live Product Demos page 61 User Forums page 62 Training page 63...

Page 71: ...eds from our innovative implementation services to traditional statement of work based services For further information visit http www sonicwall com us support contact html Knowledge Portal The Knowle...

Page 72: ...xes SonicWALL Live Product Demos The SonicWALL Live Demo Site provides free test drives of SonicWALL security products and services through interactive live product installations Unified Threat Manage...

Page 73: ...y Manager topics Continuous Data Protection topics Email Security topics Firewall topics Network Anti Virus topics Security Services and Content Filtering topics SonicWALL GMS and Viewpoint topics Son...

Page 74: ...need to enhance their knowledge and maximize their investment in SonicWALL Products and Security Applications SonicWALL Training provides the following resources for its customers E Training Instruct...

Page 75: ...Radio Frequency Monitoring Single Sign On SSL Control Virtual Access Points SonicWALL GMS 5 0 Administrator s Guide SonicWALL GVC 4 0 Administrator s Guide SonicWALL ViewPoint 5 0 Administrator s Guid...

Page 76: ...tegrated Solutions Guide The Official Guide to SonicWALL s market leading wireless networking and security devices This 512 page book is available in hardcopy Order the book directly from Elsevier Pub...

Page 77: ...Page 66 SonicWALL Secure Wireless Network Integrated Solutions Guide TZ_210_GSG book Page 66 Thursday November 13 2008 7 41 PM...

Page 78: ...n in German for the SonicWALL TZ 210 Appliance page 69 FCC Part 15 Class B Notice for the SonicWALL TZ 210 Appliance page 70 Safety and Regulatory Information for the SonicWALL TZ 210 Wireless Applian...

Page 79: ...ate consideration of equipment nameplate ratings must be used when addressing this concern Lithium Battery Warning The Lithium Battery used in the SonicWALL security appliance may not be replaced by t...

Page 80: ...in der Internet Security Appliance von SonicWALL verwendete Lithiumbatterie darf nicht vom Benutzer ausgetauscht werden Zum Austauschen der Batterie muss die SonicWALL in ein von SonicWALL autorisiert...

Page 81: ...n the equipment and the re ceiver Connect the equipment into an outlet on a circuit different from the receiver connection Consult SonicWALL for assistance Complies with EN55022 Class B and CISPR22 Cl...

Page 82: ...meplate ratings must be used when addressing this concern Lithium Battery Warning The Lithium Battery used in the SonicWALL security appliance may not be replaced by the user Return the SonicWALL secu...

Page 83: ...s zur Lithiumbatterie Die in der Internet Security Appliance von SonicWALL verwendete Lithiumbatterie darf nicht vom Benutzer ausgetauscht werden Zum Austauschen der Batterie muss die SonicWALL in ein...

Page 84: ...ican Authorized Channels SonicWALL declares that APL20 065 contains FCC ID QWU 06C and APL20 064 contains FCC ID QWU 06D and when sold in US or Canada is limited to CH1 Ch11 by specified firmware cont...

Page 85: ...Ar o SonicWALL deklar ka APL20 065 APL20 064 atbilst Direkt vas 1999 5 EK b tiskaj m pras b m un citiem ar to saist tajiem noteikumiem iuo SonicWALL deklaruoja kad is APL20 065 APL20 064 atitinka esmi...

Page 86: ...of the material purchased with all backup copies can be sold given or loaned to another person Under the law copying includes translating into another language or format Specifications and descriptio...

Page 87: ...Page 76 Notes Notes TZ_210_GSG book Page 76 Thursday November 13 2008 7 41 PM...

Page 88: ...d or registered trademarks of their respective companies Specifications and descriptions subject to change without notice SonicWALL Inc 1143 Borregas Avenue T 1 408 745 9600 www sonicwall com Sunnyval...

Reviews: