background image

54 


Connection to central heating radiators and sanitary water combined 
with solar panel 


Figure 35 – Connection to central heating radiators and sanitary water combined with solar panel 


Example:  electrical  connection  of  a  thermostat  (ambient  air 
monitoring) of a differential thermostat connected to the deposit and 
three-way valve to a relay box 


Figure 36 – electrical connection of a thermostat (ambient air monitoring) of a differential 

thermostat connected to the deposit and three-way valve to a relay box 


Summary of Contents for Douro 12kW

Page 1: ...Pellets Stove Instruction Manual Model Douro 12kW Read these instructions carefully before installing using and servicing the unit This instruction manual is provided with the product Mod 868 B ...

Page 2: ...cluded in this manual All local regulations including but not limited to national and European standards must be observed when installing operating and servicing the unit For assistance please contact your unit s supplier or installer You must have the wood pellet stove serial number located on the identification plate on unit s back panel and on the sticker on the plastic cover of this manual rea...

Page 3: ...ing the Free Standing Pellet Fire 17 9 Display 19 9 1 Control and Display Panel 19 9 2 Display Information Summary 19 9 2 1 Selecting the Manual or Automatic Mode 19 9 2 2 Water temperature 20 9 2 3 Date and Time 21 9 2 4 Timer 23 9 2 5 Sleep this menu is displayed only while the unit is operating 26 9 2 6 Info 27 9 2 7 Settings Menu 30 9 2 8 Technical Menu 33 10 Start up 34 10 1 Stop 34 10 2 Turn...

Page 4: ...ation List 46 15 Maintenance Plan and Log 48 16 Maintenance Guide Label 52 17 Installation Diagrams 53 18 Electrical Diagram of the Free Standing Fire Unit 57 19 Life Cycle of a Free Standing Fire Unit 61 20 Warranty 61 20 1 Model specific conditions 61 20 2 Warranty General Conditions 61 21 Annexes 69 21 1 Flow chart 69 21 2 Statement of Performance 72 ...

Page 5: ... specified precautions warnings and operating procedures are not followed Units manufactured by Solzaima are easy to operate and special attention was given to their components in order to protect users and installers against accidental damages The units must only be installed by an authorised engineer who should supply the client with a relevant statement of conformity and who shall be liable for...

Page 6: ...sical sensory or mental capabilities nor by those lacking experience and knowledge unless under direct supervision or instruction Do not touch the boiler when barefoot nor when any part of your body is wet or humid Do not tamper with safety or adjustment features without the manufacturer s authorization Do not cover or reduce the size of the vents at the installation area The pellet run boiler req...

Page 7: ...or is power operated disconnecting the plug would prevent the extraction of combustion fumes Your unit must be disconnected from the mains for servicing Before doing this the unit must be totally cooled down if operating before Never touch the interior of the boiler without first disconnecting it from the power mains The maximum water temperature set point temperature that the user can set for the...

Page 8: ...mum fuel consumption 2 76 kg h Rated electrical current 100 W Electric power at start up 10 min 406 W Rated voltage 230 R Frequency 50 Hz Thermal yield at rated thermal power 94 3 Thermal yield at reduced thermal power 96 35 Max fume temperature 93 16 ºC Min fume temperature 63 76 ºC CO emissions at rated thermal power 0 016 CO emissions at reduced thermal power 0 027 Combustion gas mass flow 10 2...

Page 9: ...nformation was obtained during product homologation tests conducted by independent laboratories accredited for pellet unit testing Front Back Side Top Figure 2 Dimensions of Douro 12kW Figure 3 Hydraulic connections ...

Page 10: ...the outgoing fume extraction duct of the building e g chimney See location diagrams sections 5 1 to 4 3 The tube used for combustion air inlet from the outside if installed must be straight no bends and have a maximum length of 60cm horizontally Connect the 230VAC power cable to a grounded socket The hot air outlet side of the unit must be installed facing the area to be heated 5 1 Installation Re...

Page 11: ...e regulations Important notice An inspection T with an airtight lid must be attached to the outlet of the unit s exhaust pipe to allow for the regular inspection of the system or discharge of heavy dust and condensates As illustrated in figure 5 the exhaustion path must have inspection slots along the duct to facilitate the performance of periodic cleaning and maintenance operations Under normal o...

Page 12: ... Free Standing Pellet Fire when no chimney is present must be performed as illustrated in Figure 6 by directing an exhaustion pipe with a minimum diameter of 80mm through the ceiling opening to the outside and over the roof Properly attached double walled stainless steel insulated pipes must be used to avoid condensation A T tube must be installed at the base of the pipe to allow periodic inspecti...

Page 13: ...12 a b ...

Page 14: ...necessary that they include a fume exhaust duct to adequately extract combustion gases Fume duct material The tubing must consist of 0 5mm thick rigid stainless steel with fitting bindings to attach the different sections and accessories Insulation The fume ducts must be double walled and insulated to make sure the fumes do not cool down going outwards which could cause an inadequate circulation a...

Page 15: ...ction pipe should measure up to 60cm long horizontally and run straight without bends If the house is equipped with a air exhaust system e g kitchen extractor fan a top ventilation section must be installed suitable to accommodate the different air exhaust systems existing in the household The installation of the unit on locations near kitchen exhaust fans or fume extractors may prevent the unit f...

Page 16: ...re check the unit to make sure that the flue pipes are clean and unblocked 6 Hydraulic Installation Chapter 16 installation diagrams includes diagrams illustrating the range of possible connections that may be used in the installation of a central heating system with or without the feature of heating water for domestic use The pellet run boiler comes equipped with a circulating pump an expansion t...

Page 17: ...g fluid in order to avoid freezing at the absolute minimum expected temperature 6 1 Operating mode for radiator Buffer tank IMPORTANT The boiler is programmed to work directly for radiators in case you want to install the boiler with a buffer or AQS tank we recommend changing the temperature OFF of the circulation pump by placing the same temperature as the deposit or 1 C higher than this temperat...

Page 18: ...ical properties of the pellets namely calibre friction density and chemical composition may vary within specific tolerances and across manufacturers Please note that this may cause changes to the feeding process and consequently the need for different doses more or less pellet quantity Consequently it may be necessary to adjust the pellets quantity according to its quality even if the pellets are ...

Page 19: ...nt occurs at approximately 300ºC for 30 minutes Please make sure the room where the unit is installed has adequate air circulation otherwise the unit will not work properly For this reason it is important to check if there are any other air consuming heating appliances present in the room e g gas units braziers extractors etc these should not be used simultaneously with the unit This Free Standing...

Page 20: ...0 5ºC 16 03 OFF ON OFF OF F OF F O F F O F F OK OF F OF F MENU OFF OFF MODE OFF OFF ESC OFF OFF O FF O FF MAN AUT OF F OF F 20 5ºC 16 03 OFF a Key to toggle between manual and automatic mode and exit menus esc b Key to access menus and confirmation key ok c Key to start stop the unit and reset error messages d Key to scroll menus to the left to increase and reduce the fan flow and increase or redu...

Page 21: ...he key The key allows the user to set the fan speed between 1 5 or to automatic operation Manu mode In this mode the unit will operate at the speed selected using the key ranging between 1 minimum operating power and 5 maximum operating power 9 2 2 Water temperature Press the Menu key twice to set the water temperature Temp Agua Water Temp appears on the display Press Set to see the T Aquecimento ...

Page 22: ...To set the year press set The display starts to flash Press the or key to select the desired year and then ok to confirm Press esc to return to the Data Date menu then press to scroll to the next menu The Mês Month menu is displayed Month To set the month press set The display starts to flash Press the or key to select the desired month and then ok to confirm Press the key to scroll to Dia do mês ...

Page 23: ...c 30 Set Dia Num Day of the week To set the day of the week press set The display starts to flash Press the or key to select the desired day and then ok to confirm Press the key to scroll to the Time Hour menu ON OFF OF F OK OFF MENU OFF MODE OFF ESC OFF MAN AUT OFF esc 2a Set Dia Time To set the time press set the display starts to flash Press the or key to select the desired time and then press ...

Page 24: ... menu is displayed The timer may only be activated after setting the configurations as shown in the following paragraph To activate the Timer mode press Set the display starts to flash Press the or key to select On or Off and then Ok to confirm Press the key to scroll to the Carga Perfil Profile Load menu There are 10 weekly programmes available on the Timer see item 17 in the annexes The selected...

Page 25: ...t s programmer lets you choose from 6 different programmes for each day of the week To set up programmes P1 to P6 select the desired programme using the and keys and press set to select The P1 Habilitação P1 Activation menu appears ON OFF OF F OK OFF MENU OFF MODE OFF ESC OFF MAN AUT OFF esc Set Prog 1 Press Set again and when the display starts to flash press the or keys to select On or Off Press...

Page 26: ...to the P1 Temp P1 Air Temp menu ON OFF OF F OK OFF MENU OFF MODE OFF ESC OFF MAN AUT OFF esc 20 15 Set P1 H Stop To set the set point temperature for Programme P1 press Set The display starts to flash Press the or key to select the desired temperature followed by Ok to confirm Press the key to go to the P1 Temp Água P1 Water Temp menu ON OFF OF F OK OFF MENU OFF MODE OFF ESC OFF MAN AUT OFF esc 18...

Page 27: ...ber to enable them on the Habilitações Activation menu There can only be one enabled profile in the Timer either weekly or daily they do not operate simultaneously 9 2 5 Sleep this menu is displayed only while the unit is operating The Sleep menu allows you to setup the time you want the unit to turn off ON OFF OF F OK OFF MENU OFF MODE OFF ESC OFF MAN AUT OFF esc OFF Set SLEEP Press set The displ...

Page 28: ...e code Security firmware Press the key to scroll to the Código Display Display Code menu ON OFF OF F OK OFF MENU OFF MODE OFF ESC OFF MAN AUT OFF esc 520420 ódigo Seguranç Software code Display firmware Press the key to scroll to the Código de Parâmetros Parameter Code menu ON OFF OF F OK OFF MENU OFF MODE OFF ESC OFF MAN AUT OFF esc 500308 Código Display Parameter code Press the key to scroll to ...

Page 29: ...u shows the number of operating hours the unit has registered since its last servicing ON OFF OF F OK OFF MENU OFF MODE OFF ESC OFF MAN AUT OFF esc 144 oras de Serviç The number of hours at which the next servicing should take place This menu shows the phase status of the free standing fire Fume extractor operating speed rotation per minute ...

Page 30: ...F MENU OFF MODE OFF ESC OFF MAN AUT OFF esc 49 rpm Expulsor Fumos Theoretical pellet consumption Fume temperature ON OFF OF F OK OFF MENU OFF MODE OFF ESC OFF MAN AUT OFF esc 18ºC emperatura Fum Worm drive rotation On time ...

Page 31: ...reset period of time Shutdown delay time factory setting 20 minutes Once the preset time is elapsed the unit shuts down At the start of the Shutdown phase another timer for a different preset period of time is triggered Start up delay time factory setting 20 minutes that will make the unit enter the activation phase when the thermostat closes contact NC Start up delay time Delay time On The delay ...

Page 32: ...mote control This feature enables and disables the remote control when the user wants to operate the unit s thermostat remotely Press Set and use the and keys to select the On or Off mode Press Ok to confirm Press the key to go to the Unidade de temperatura Temperature units menu ON OFF OF F OK OFF MENU OFF MODE OFF ESC OFF MAN AUT OFF esc On Set Controle Remoto Note Some TV remote controls share ...

Page 33: ...it must be multiplied by 1 5 or 3 3 to obtain the correct percentage Press ok to confirm Press the key to go to the Ar Air menu Air This feature allows the user to increase 33 or decrease by 15 the rotation speed of the fume extractor during the start up and power process Press set The display starts to flash Press the or key to increase or decrease from 10 to 10 as required Each unit must be mult...

Page 34: ...mpeza Cleaning menu Cleaning This feature allows you to clean the burning basket manually Press set the ok option appears Press ok to start the cleaning procedure the Habilitada Enabled message is displayed To stop press ok Press the key to go to the Técnico Technical menu The technical menu is not available to the end user 9 2 8 Technical Menu This feature allows the user to adjust the unit s dif...

Page 35: ...sistor This process may take 5 to 10 minutes depending on whether the worm screw used to push through the pellets has been previously filled with fuel or is empty Once the ignition phase is completed the message On appears on the display The heating power can be adjusted at any time by pressing the power selection button for approximately 1 second You can select from the five pre set power levels ...

Page 36: ...ssible damage or missing elements should be reported before proceeding with the installation This manual describes how to install the casings for the Stove To install the casings the installer must have available Figure 13 Material required to install the casings with the free standing fire IMPORTANT NOTICE Before installing the casings it is required that the unit is turned off unplugged from the...

Page 37: ...e slots identified in Figures 16 a and b The screw placed in the salamander must be removed and tightened after placing the side cover as shown in Figure 16 c a b c Figure 16 covers Douro 12kW 11 2 Pellet Reservoir Lid To access the pellet reservoir remove the lid on the top of the unit Figure 17 ...

Page 38: ... pellet reservoir 3 Turn on the unit and replace the lid 12 Installation and operation using remote command chrono thermostat not included with the boilers The pellet run boilers are mass produced with a command display Alternatively the units can be operated using a generic remote command unit chrono thermostat Note the remote command unit normally comes accompanied by a manual An interface must ...

Page 39: ...e user of the start closed contact NC and stop open contact NO the boiler If connecting into the thermostat This will only change the power of the machine between minimum output open contact NO and maximum power closed contact NC Note the external command as a rule comes with a manual In the case of wireless remote control is necessary to connect the two wires as shown in the following figure ...

Page 40: ...igure Figure 21 Wired remote command connection 12 1 Instructions for remote control assembly 1 Turn off the equipment at the main power switch and remove the right hand side of the pellet run boiler 2 Remove the unit s terminals phase F and neutral N a 3 Rivet the terminals of the 220V wire supplying power the transmitter Colour codes CN grey N black C brown A blue ...

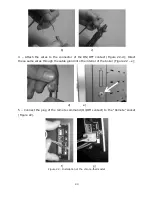
Page 41: ...F contact Figure 22 d Direct these same wires through the cable gland into the interior of the boiler Figure 22 e d e 5 Connect the plug of the remote command On Off contact to the Remote socket Figure 22 f g Figure 22 Installation of the chrono thermostat ...

Page 42: ...leaning operation must be performed after burning approximately 66lbs 30kg of pellets Note However before cleaning the power of the unit must be turned off and the unit should be allowed to cold off to prevent any accident Figure 23 Maintenance instruction label Figure 24 Cleaning burning basket 13 2 Weekly Maintenance Remove the burning basket and the ash basket and vacuum both The interior of th...

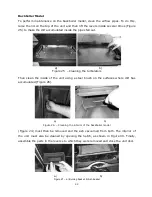
Page 43: ...g the turbulators Then clean the inside of the unit using a steel brush on the surfaces where dirt has accumulated Figure 26 a b Figure 26 Cleaning the interior of the backboiler model Figure 24 must then be removed and the ash vacuumed from both The interior of the unit must also be cleaned by opening the hatch as shown in Figure 38 Finally assemble the parts in the reverse to which they were rem...

Page 44: ...he side lids of the combustion chamber To clean the interior of the unit remove the lid and vacuum the ashes Using a 20 25mm wide 80cm long steel brush thoroughly clean the fume ducts figure 28 Figure 28 Cleaning Vacuum the interior If you noticed that the fume extraction is not effective we recommend cleaning the interior of the extractor with a vacuum cleaner as shown in figure 29 a e b Regardle...

Page 45: ...nd 51 d Then pull the turbulators up Figure 51 e A vacuum cleaner must be used to clean this area Figure 51 f and the interior of the pipes can be cleaned with a steel brush The turbulators that are removed must also be cleaned with a steel brush To reinstall the turbulators execute in reverse the above procedure shown in the figures a b c d e f Figura 30 Cleaning of gas passageways and turbulator...

Page 46: ...etal parts of the unit as this may cause oxidation The rope gasket is fixed with glue so any contact with water or any other liquids must be avoided Figure 31 Incorrect cleaning of the glass a b Figure 32 Cleaning the glass a moisten a soft cloth with liquid b clean the glass using the cloth WARNING The maintenance task frequency depends on the quality of the pellets Note See the warning label and...

Page 47: ...0 C backboiler model the fan is not working or is working at a low power level increase the level to the maximum if the problem persists call for assistance Insufficient extraction Excess pellets Pressure switch alarm A05 The door is open lack of draught or extractor fault for 120 sec close the door and clear the error message on the faulty pressure regulator obstruction of the exhaust pipe or fau...

Page 48: ...dure following the instruction on the Technical Manual Once this procedure is completed the hour meter may be reset to clear the waning message This message does not impact the normal operation of the unit It is simply a warning Important notice The errors can be reset only when the error information is flashing on the display To reset the error press the Mode button once while displaying the erro...

Page 49: ...e are specific maintenance tasks that must be performed by authorised technicians only Please contact the person responsible for installing the unit To make sure the warranty remains valid the maintenance operations performed on this unit must comply with the frequency requirement specified in the manual and the service technician must fill and sign the maintenance log Client data Name Address Tel...

Page 50: ...49 ...

Page 51: ...50 ...

Page 52: ...51 ...

Page 53: ...l is attached from factory to the unit s pellet lid in the Portuguese language Attached to the manual you will find other language versions of the sticker labels Spanish English French and Italian If necessary remove the Portuguese language label and replace it with the label in your country s language ...

Page 54: ...eating radiators Note The chrono thermostat should have 1 to 2 C of hysterisis Hydro independiente On water temperature controlled regulation Modulating pump On Water sensing inhibition On Alternative hydro shutdown On Pump On 50 C Pump Off 50 C We can set change according to the customer s discretion to another temperature 1 1 ...

Page 55: ...y water combined with solar panel Example electrical connection of a thermostat ambient air monitoring of a differential thermostat connected to the deposit and three way valve to a relay box Figure 36 electrical connection of a thermostat ambient air monitoring of a differential thermostat connected to the deposit and three way valve to a relay box ...

Page 56: ...gulation put the boiler in manual mode and power nivle to 5 Modulating pump On Water sensing inhibition On Alternative hydro shutdown On Pump On 50 C Pump Off same or thermostat temperature 1 C below the temperature differential thermostat When using the generator with differential thermostat the machine must be connected in the CONNECTION Remote Calculation deposits of inertia the boilers for pel...

Page 57: ...56 Figure 38 Connecting underfloor heating in conjunction with another boiler support and sanitary water combined with solar panel Simbology Figure 39 Simbology ...

Page 58: ...57 18 Electrical Diagram of the Free Standing Fire Unit Figure 40 Electrical diagram ...

Page 59: ...een LED and four yellow LEDs Figure 42 User interface When the pump is operating the LED 1 is green 4 yellow LEDs indicate the current performance of the pump as shown in the following table Figure 43 LED activo Performance LED Green 0 Standby LED Green 1 LED yellow 0 25 LED Green 2 LED yellow 25 50 LED Green 3 LED yellow 50 75 LED Green 4 LED yellow 75 100 Table 4 Performance of the pump ...

Page 60: ...s the button once If you need to change the pump performance you must press the button for 2 seconds see Figure 45 after this action the LEDs start blinking then you must press the button until the desired setting see Table 5 after 10 seconds the display automatically switches to the view of performance with alteration saved Figure 46 Pump settings Altura manométrica máxima m Configuración 2 4 3 5...

Page 61: ...the same time the yellow LED indicates the alarm with higher priority the priority sequence is defined on table as follows Display Priority Alarm action LED 1 red LED 5 yellow 1 Rotor is blocked Wait or deblock the shaft LED 1 red LED 4 yellow 2 Supply voltage too low Control the supply voltage LED 1 red LED 3 yellow 3 Electrical error Control the supply voltage or replace the pump Table 6 Alarms ...

Page 62: ...facturer This is mandatory before the unit reaches 100 service hours The final user is responsible for any expenses related to the start up service 20 2 Warranty General Conditions 1 Company name of the Manufacturer SOLZAIMA S A www solzaima pt apoio cliente solzaima pt Address Rua dos Outarelos nº 111 3750 362 Belazaima do Chão Águeda Portugal This document does not constitute a voluntary warrant...

Page 63: ...ioned above is not exceeded the Buyer must denounce in writing to SOLZAIMA S A the Product s non compliance within the following deadline 3 2 1 Within 60 sixty days from the date the non compliance was detected in case the Product is applied to domestic use 3 2 2 Within 30 thirty days from the date the non compliance was detected in case the Product is applied to professional use 3 3 During the Wa...

Page 64: ... a protection box properly ventilated 3 6 The units cannot be installed in locations with chemicals agents in the atmosphere in saline or high humidity environments The combination of these agents with oxygen air may cause the quick corrosion of the combustion chamber to In these environments it is recommended that the units are protected with proper anticorrosion products specially between period...

Page 65: ...ging from such valve 3 10 To prevent damages to the equipment and attached pipes due to galvanic corrosion we recommend using dielectric separators to connect the equipment to the metallic pipes since the applied materials may have components that enhance this type of corrosion The Product s Warranty does not include damages caused by failure to use the dielectric separators mentioned above 3 11 T...

Page 66: ...components and battery replacement 4 2 Components in direct contact with fire namely vermiculite brackets deflecting or protection plates vermiculite rope gaskets burners ash drawers wood collectors smoke dampers ash grates that will wear in compliance with its handling conditions Paint degradation as well as corrosion caused by paint degradation due to fuel overload open drawer usage or excessive...

Page 67: ...ors rodents birds spiders etc atmospheric and or geological phenomena earthquakes storms frost lightning rain etc humidity aggressive environments e g Proximity to the sea or river as well as failures resulting from excessive water pressure inadequate electric connections voltage with variations 10 higher than the nominal value of 230V inadequate circuit pressure or supply acts of vandalism urban ...

Page 68: ...ydraulic and electronic components of the equipment and the installation When the installation does not allow for the immediate and safe access to the equipment the additional costs regarding access and safety will be paid by the Buyer The cost of disassembling and assembling boxes of plasterboards or masonry walls isolation or other elements such as chimneys and hydraulic connections preventing f...

Page 69: ...ZAIMA S A s responsibility Without prejudice to the relevant legal provisions SOLZAIMA S A s responsibility regarding the warranty is limited to the dispositions of the warranty conditions 7 Price list for services executed outside the scope of the warranty The interventions executed outside the scope of the warranty are subject to the current price list 8 Administrative Expenses For invoices rela...

Page 70: ...69 21 Annexes 21 1 Flow chart Lighting ...

Page 71: ...70 ...

Page 72: ...71 Disabling ...

Page 73: ... marca registrada y la dirección de contacto de lo fabricante Name registered trade name and contact address of the manufacturer Nom marque déposée et l adresse de contact du fabricant Nome denominazione commerciale registrata e Indirizzo del costruttore SOLZAIMA SA RUA DOS OUTARELOS Nº111 3750 362 BELAZAIMA DO CHÃO ÁGUEDA PORTUGAL 5 Sistema de avaliação e verificação da regularidade do desempenho...

Page 74: ...low Flux thermique réduit Flusso termico ridotto CO 0 06 Libertação de substâncias perigosas Emisión de sustâncias peligrosas Release of dangerous substances Dégagement de substances Rilascio di sostanze pericolose OK De acordo com relatório de ensaio De acuerdo com informe de la prueba According to the test report Selons le rapport d essai Secondo i rapporto di prova K18782016T1 De acordo com o A...

Page 75: ...s According to the requirements Selons les exigences Secondo i requisiti 6 1 6 4 6 10 EN14785 Potência térmica reduzida Potencia térmica reducida Reduced Thermic output Puissance thérmique réduite Potenza térmica ridotta OK 5 3 KW De acordo com os requisitos De acuerdo con los requisitos According to the requirements Selons les exigences Secondo i requisiti 6 1 6 4 6 10 EN14785 Rendimento energéti...

Page 76: ... indiqué dans les points 1 et 2 est compatible avec les performances declares au point 9 Cette declaration de performance est établie sous la seule responsabilité du fabricant identifié dans le point 4 Le prestazioni dei prodotti indicati ai punti 1 e 2 è conforme alla prestazione dichiarata al punto 9 Questa dichiarazione di prestazione è rilasciata sotto l esclusiva responsabilità del fabbricant...

Reviews: