


.
PRELIMINARY: To balance your KADET LT-25, all of the parts and components must be installed in their correct positions
on the model. The battery pack and receiver must be installed in their correct locations; the propeller, spinner, and muffler
must be installed on the engine; the fuel tank and fuel lines must be installed and connected; and every other piece of
essential equipment must be installed, ready for flight.
ALWAYS BALANCE THE KADET LT-25 WITH THE FUEL TANK
EMPTY!
148.
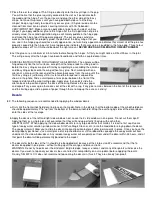
Attach the wing to the fuselage with twelve #67 rubber bands (at least 6 per side).
BALANCE POINT = 30%, or 3-1/2"
Aft of The Leading Edge of the Wing
149.
Familiarize yourself with the balance point shown on fuselage side view plan.
Using a ruler, measure back 3-1/2" from the leading edge of the wing and make a pencil mark at this point, on the bottom
surface of the wing next to the fuselage. Make the same mark on the other side of the fuselage. Next place a fingertip on
each pencil mark and lift the airplane up in the air. No part of the model should be touching anything except your fingertips!
If the KADET LT-25 will sit on your fingertips in a LEVEL ATTITUDE, then it is PROPERLY BALANCED and ready to fly.
If the airplane sits on your fingertips in a NOSE DOWN ATTITUDE, then it is NOSE HEAVY!
You will have to add weight to the rear of the airplane to get it to balance. NOTE: Before adding additional weight to the tail
of your model, try simply moving the battery pack to a further aft location. The battery pack is relatively heavy and
therefore makes a good balancing tool. You might try switching places between the battery and receiver; or move the
battery right in front of the servos; or in extreme situations, move it behind the servos. If you can’t get your model balanced
simply by re-locating the battery pack, then you will have to glue lead weights into the tail end of the fuselage.
If the airplane sits on your fingertips with the TAIL DOWN, it is TAIL HEAVY! DO NOT ATTEMPT TO FLY IT!
A tail heavy model is very dangerous and will most likely crash!! Lead weight will have to be added to the nose of the
model to bring it into balance. The weights can be glued to the inside of the fuselage "cheeks" in front of the firewall; or
inside the fuselage alongside the fuel tank. There are also "spinner weights" available for tail heavy models. Wherever you
put the balancing weight, make sure it cannot be lost in flight!
Pre-Flight Checkout
Be certain to range check your radio equipment according to the manufacturer’s instructions before attempting to fly.
A lot of problems can be avoided if your new engine has been "broken in" on a test stand per the manufacturer’s
instructions before you attempt to fly.
Double check the alignment and movement of all the controls one more time! Make sure the control surfaces move in the
proper direction when you move the sticks. You’d be amazed to know how many models have been destroyed on takeoff
with one of the controls reversed. If you’re in this hobby for very long, you will see it happen. Don’t let it happen to you! It’s
a good idea to get into the habit of checking for proper control response every time you get ready to fly.
Adjust all of your pushrod linkages so that the control surfaces are in their neutral position when the transmitter sticks and
trim levers are centered. When you get to the flying field, don’t be surprised is the elevator and rudder are suddenly
misaligned after you had them perfect at home. Temperature and humidity changes can cause nylon pushrods, like those
on the KADET LT-25’s elevator and rudder, to shrink or expand slightly. If they are just slightly out of neutral, use the trim
levers on the transmitter to neutralize them before flying.
Adjust your pushrod linkages as necessary to provide the prescribed amount of control surface travel. Make sure all of the
R/C Links are securely snapped shut.
ALWAYS USE AT LEAST TWELVE #67 RUBBER BANDS TO HOLD THE WING ON THE KADET LT-25.
RECOMMENDED CONTROL SURFACE TRAVEL
ELEVATOR
9/16" up, 9/16" down
RUDDER
1" left, 1" right
AILERONS
3/8" up, 3/8" down