


.
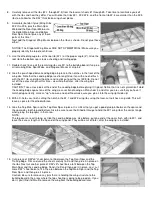
28. Familiarize yourself with the pre-bent Aileron Torque Rods w/Brass Bearings. Note that there is a Left and a Right Torque
Rod. Study their positions on the full size plans to help you identify which one is Left and which is Right. Notice that when
the Torque Rods are in position in the wing, the threaded end of the Torque Rod will come out the bottom of the wing and
the shorter unthreaded end will face back into the aileron.
Also notice that the threaded portions of the Torque Rods should lean back
slightly towards the rear of the airplane when the ailerons are in neutral position.
That rearward lean provides the Kadet LT-25 with a small amount of "differential"
movement in the ailerons (more up than down), which makes for smoother
turning.
29.
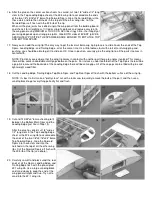
Use a small amount of Thick CA to glue the Brass Bearing portion of the Left
Aileron Torque Rod into the groove in the front of the Left Center Section Trailing
Edge piece. GLUE ONLY THE BRASS BEARING, NOT THE WIRE PORTION OF
THE TORQUE ROD! The wire portion of the Torque Rod must be completely free
to rotate inside the Brass Bearing. Now glue the Right Aileron Torque Rod into the
groove in the front of the Right Center Section Trailing Edge.
IMPORTANT: Be sure to keep all glue at least 1/8" away from the ends of the
Brass Bearings to minimize any chance of glue seeping inside the bearing and
causing a bind in the movement of the Torque Rod.
30.
Apply a bead of Slow CA to the leading edges of the Left Center Section Trailing
Edge piece. Keep the glue on the balsa, do not get any glue on the Torque Rod or
the Brass Bearing! Hold the Center Section Trailing Edge assembly in position on
the trailing edge of the wing. Use a straight edge to confirm that the bottom
surface of the part is flush with the bottom surface of the wing. Let dry.
Repeat this step for the Right Center Section Trailing Edge piece on the back of
the wing, also gluing it to the Left Center Trailing Edge at the same time. When
the glue has cured, check to verify that both Aileron Toque Rods will pivot freely. If
they don’t, you must find the problem and correct it now before proceeding!
31.
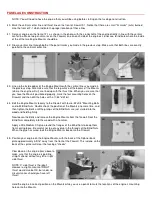
Locate the two pre-shaped balsa wood Ailerons. Using a 3/32" dia. drill bit, drill a
hole 5/8" deep in one end of each aileron to accept the Aileron Torque Rod wire.
The location of the hole must be centered on the Leading edge of the aileron, and
it should be 1-3/8" from the end of the aileron. The path of the hole must travel
straight into the core of the aileron, centered equal distance from both sides.
32.
Use a modeling knife to cut a (3/32" wide x 3/32" deep) groove in the leading edge
of the aileron to accept the Aileron Torque Rod wire. The groove should go from
the 3/32" hole to the root end of the aileron. Trial fit the aileron over the end of the
Torque Rod wire to check the fit.
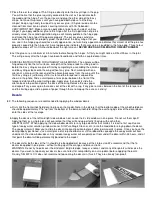
33.
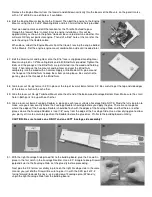
Tape the aileron into neutral position, with the root end in perfect alignment with
the fixed Center Section Trailing Edge pieces.
34.
Pin a piece of scrap balsa to the bottom surfaces of both the aileron and the wing,
out near the wing tip, to hold this end of the aileron securely in neutral position.