


.
FUSELAGE CONSTRUCTION
NOTE: You will need to have the engine that you will be using before starting on the fuselage construction.
40.
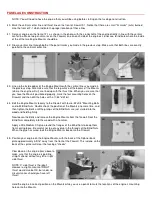
Mark the vertical center line and thrust line on the front of firewall F-1. Notice that there are small "tic marks" (cuts) burned
iinto the front of F-1 which indicate the proper locations of these lines.
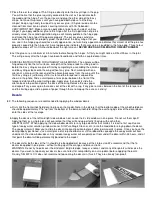
41.
Set your engine on the front of F-1 as shown in the photo, with the crankshaft of the engine directly in line with the vertical
center line. Make two pencil marks on the Firewall, one on each side of the engine’s crankcase, to indicate where the inside
of the of the two Engine Mounts should be.
42.
Draw a vertical line through both of the pencil marks you made in the previous step. Make sure that both lines are exactly
parallel to the vertical center line.
43.
Line up the inside edges of the Engine Mounts with the vertical lines you made in
the previous step. Also make sure that the top suface of the beams of the Mounts
(where the engine will sit) are lined up with the thrust line. When you are sure that
you have the Mounts positioned properly, mark the four mounting holes on the
Firewall, and then drill the holes with a 11/64" drill bit.
44.
Bolt the Engine Mounts loosely to the Firewall with four 6-32 x3/4" Mounting Bolts
and 6-32 Blind Nuts. Double check the position of the Mounts one more time, and
then tighten the Bolts until the prongs of the Blind Nuts are just started into the
wood and holding firmly.
Now loosen the Bolts and remove the Engine Mounts from the firewall. Seat the
Blind Nuts completely into the wood with a hammer.
Apply a little Medium CA glue around the flanges of the Blind Nuts to keep them
from coming loose. Be careful not to get any glue in the threads of the Blind Nuts.
When the glue has cured, bolt the Engine Mounts back onto the Firewall.
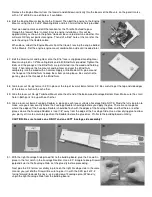
45.
Position your engine on the Engine Mounts, with the back of the Spinner back
plate approximately 3-5/16" away from the front of the Firewall. This is done so the
back of the spinner will clear the fuselage "cheeks".
View down on the engine from above to
make sure that the engine is pointing
straight ahead, without any left or right
side thrust.
NOTE: 0° side thrust is the ideal!
However a slight amount of RIGHT
thrust would also be OK, but under no
circumstances should you have left
thrust!
Hold the engine in correct position on the Mounts while you use a pencil to mark the locations of the engine’s mounting
holes onto the Mounts.