


.
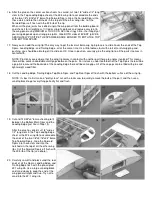
7. Place three or four drops of Thin CA glue directly onto the Easy Hinge in the gap.
You will notice that the glue is quickly wicked into the slot as it penetrates both
the wood and the hinge. Turn the part over and glue the other side of the Easy
Hinge. Continue this process until you have glued both sides of all the Easy
Hinges! Keep a rag handy to wipe off any excess glue. (CA glue residue can be
cleaned from most iron-on plastic covering materials with CA Debonder).
VERY IMPORTANT: Make only one application of glue to each side of an Easy
Hinge! If you apply additional glue to the hinge after the first application of glue is
already cured, the second application of glue will merely puddle in the hinge gap
and make the hinge too stiff to operate properly. The excess glue could also
weaken the hinge! When properly glued, the portion of the Easy Hinge that you
can see in the hinge gap should have a dry appearance, not wet. A dry appearance indicates that almost all of the glue has
properly soaked into the hinge slot. A wet appearance indicates that excess glue is puddled in the hinge gap. Three to four
good size drops of Thin CA should be about the right amount.
NEVER USE CA ACCELERATOR ON EASY HINGES!
8.
Let the glue cure a minimum of 3-5 minutes before flexing the hinges. At first you might notice a little stiffness in the joint.
This will go away after the hinges have been flexed back and forth a couple dozen times.
9.
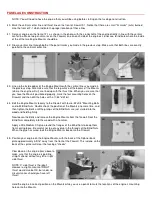
SPECIAL INSTRUCTIONS FOR HINGING THE AILERONS - The ailerons will be
hinged exactly like the tail surfaces, except that the torque rods must be glued in
before the Easy Hinges are glued. Start by completely re-assembling the ailerons
and Easy Hinges back onto the wing without any glue. Next, working with one
aileron at a time, pull the root end of the aileron back away from the wing until the
first Easy Hinge is just barely still in its slot and the torque rod is exposed as
shown in the photo. Slide a small piece of wax paper between the front of the
torque rod slot and the wing trailing edge. Apply glue, then quickly slide the
aileron back into position against the back of the wing.Remove the wax paper
and wipe off any excess glue that oozes out of the slot with a rag. If any glue remains between the front of the torque rod
and the trailing edge, slide a piece of paper through there to mop up the excess. Let dry!
Decals
82.
The following sequence is recommended for applying the window decals.
a.
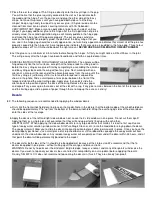
First stick the front windshield decal in place on the model. Note in the picture that the bottom edge of the windshield decal
should be approximately 7/16" up from the bottom of the balsa windshield. Wrap the overhanging sides of the decal down
onto the sides of the fuselage.
b.
Apply the decals of the left and right side windows next. Leave the 3 side windows in one piece. Do not cut them apart!
Applying them as a single piece will guarentee that they will end up perfectly lined up with each other.
HELPFUL HINT - When applying the side window decals (or any large decal for that matter) it is best to first squirt some
type of soapy water solution (window cleaner, SIG Pure Magic Cleaner, etc.) onto the model before laying down the decal.
The soapy water will allow you to slide the decal into exact position before it sticks permanently in place. Once you have the
decal properly positioned, use a small piece of scrap sheet balsa or stiff cardboard to squeegee the soapy water out from
underneath the side window decal. Any residual soapy water will evaporate out from under the decal within 24 hours, and at
that point the decal will be permamently bonded to the model.
c.
The decals for both sides of the fin should also be applied wet because of their large size. We recommend that the fin
decals be applied in one piece - without cutting apart the orange and blue sections.
WARNING: Do not try to paint over the kit decals! Butyrate dope, lacquer, enamel, and many other paints will dissolve the
decals. If you wish to top coat your decals, be sure to test for compatibility on a scrap decal before applying the paint.
Frankly, SIG MFG. CO. does not recommend top coating the decals in this kit. They are already fuel-proof!