


.
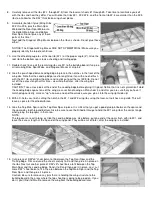
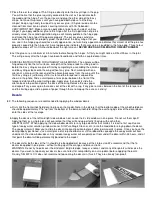
Cut the .027 x 6’ steel cable provided into two equal length pieces. Attach
one end of each cable to each end of the plywood Tiller Bar as shown in this
photo. First pass the end of the wire through the hole in the end of the Tiller
Bar. Loop approximately 1" of the end of the wire back to lay alongside the
rest of the wire. Slide a 3/32"o.d. x 1/2" Aluminum Tube over both wires and
smash the tube tightly to crimp both wires securely together.
Glue the Tiller Bar assembly in place in the Fuselage. Feed the cables
through the Fuselage formers and out through the nylon exit tubes in the
bottom of the Fuselage. Tape the loose ends of the cables to the bottom of
the fuselage so they won’t be in the way while you do the rest of the
covering.
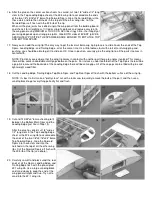
Finish Covering The Fuselage
Next cover the top rear of the fuselage with one piece of material. Run the sides of the covering down over the corners
about 1/8" onto the sides of the fuselage. Trim the front and rear ends of the top covering flush with the ends of the
Fuselage Top Rear. Cut open the holes where the rudder pushrod and Fin leading edge go through.
Using the fuselage plan as a guide cut the angle on the Fuselage side rear covering. Seal it as you did before with
overlapping 1/8" over the top and bottom. Repeat this step for the other Fuselage rear side.
Cut the angle on the front Fuselage right and left sides covering and seal them to the Fuselage Front. Overlap all seams
1/8" onto other covering material or onto the pre-painted areas. At the engine compartment, try to work the covering
around the first corner of every edge, and then trim off the excess covering flush with the inside corners. Do the same for
the wing saddle area. Do not apply any covering on the Stab Mount, where the Stabilizer will be glued on! When you’ve
finished, cut the holes in the fuselage sides for the wing dowels.
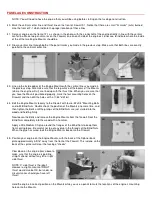
Cover the windshield with a single piece of covering. Run the sides of the
covering down over the corners 1/8" onto the sides of the fuselage. Tuck and iron
the front and rear edges of the covering around the ends of the windshield.
Cover The Hatch
There are so many corners and edges, that it takes some time to get all of the
Hatch covered. And because the Hatch will be directly exposed to a lot of engine
exhaust, it is very important to get it all covered. Do not leave any exposed wood!
Start by applying an overside piece of covering to the top of the hatch. Then turn
it over and cut out the corners of the excess covering to make it easier to wrap
and seal the covering around the edges. Continue wrapping and sealing the
covering around the edges and onto the bottom.
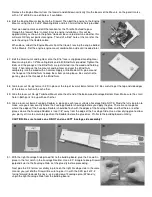
Cover The Wing
Begin by covering the ends of the Center Section Trailing Edge with scrap
covering. Run the covering around onto the top and bottom. Slit the covering to
lay down smoothly around the torque rods.
Next cover the bottom of one panel with one piece of covering material. Like all
open structures, you should seal the covering down all along the outside edges of
the structure first. (Do not shrink the center of the covering tight at this time). At
the root of the wing panel, seal the covering down about 1/4" past the center joint.
Cut a hole in the covering to allow the aileron torque rod to stick through. Also,
it’s not necessary to cover over the Aileron Servo Mount - merely cover up to it.
At the back of the wing panel, slit the excess covering at the end of the Center
Section Trailing Edge, then run it around the corner and seal it onto the back of
the Trailing Edge. Trim off flush with the top rear corner of the Trailing edge.