


.
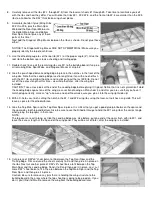
52. Pin the left Fuselage Side down to the
building board. Join the right and left
Fuselage Sides together by gluing
formers F-1 and F-2 into the notches in
the left Fuselage Side.
Again use a small 90° triangle to keep
the formers perpendicular to the
fuselage side.
Let dry.
53.
Fit the laser-cut balsa Fuselage Bottom Rear between the two Fuselage Sides,
using masking tape to hold it in place. DO NOT GLUE AT THIS TIME!
54.
Identify the laser-cut balsa formers F-3, F-4, F-5, and F-6, and carefully match
them up with their respective cross-section drawings on the full-size fuselage
plan (Plate 1). Make sure that you have all the pre-cut holes in the formers
properly oriented. Then mark each former as to its correct top and front side with
a pencil.
NOTE: IF THIS STEP IS NOT DONE CORRECTLY, THE ELEVATOR AND
RUDDER PUSHRODS WILL NOT INSTALL PROPERLY LATER.
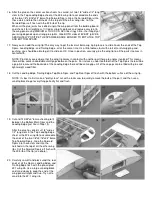
55.
Carefully install formers F-3, F-4, F-5, and F-6 in the fuselage, making sure that
you have the front of the formers facing the front of the fuselage (towards the
nose). Do not glue in at this time!
56.
Fit the laser-cut balsa Fuselage Top Rear and the laser-cut balsa Stab Mount
between the two Fuselage Sides, using masking tape to hold them in place. DO
NOT GLUE AT THIS TIME! Make sure the rudder exit slot in the Fuselage Top
Rear is on the right side of the fuselage.
Double check to see that the entire fuselage structure is in correct alignment.
Make sure that the entire structure is straight and square and that all the parts
are taped tightly together before proceeding.
57.
Now you can start gluing the fuselage parts together! Use MEDIUM CA glue, and
start with small patches of glue in the corners, checking the fuselage alignment
as you go. Keep applying glue until the complete inside of the fuselage has been
gone over once. Now go back and glue all of the joints on both sides. Leave the
tape in place until all the glue has cured completely.
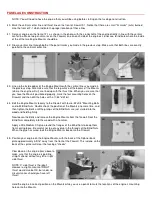
58.
Turn the fuselage assembly upside down on the workbench and glue the laser-cut plywood Landing Gear Mount inplace.
Glue it to all the surrounding parts, the doublers and the bottom of former F-2. Don’t be stingy with the glue or you may find
yourself picking up the landing gear as a separate piece after a hard landing.
59.
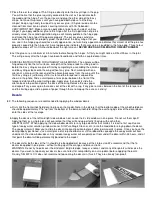
Cut four 7/8" long pieces of 1/2" balsa
triangular stock from the 12" long piece
provided. Glue these four pieces inside
the fuselage to reinforce the Landing
Gear Mount installation (see full-size
plan). Note: You will need to cut
notches in the triangle stock that goes
behind former F-2 to clear the blind nuts
in the Landing Gear Mount.
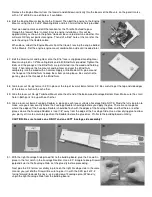
60.
Glue the laser-cut balsa Fuselage Bottom Front in place with MEDIUM CA. Be sure to glue the joint between Fuselage
Bottom Front and the Landing Gear Mount. Glue in the laser-cut balsa Nose Bottom.