


.
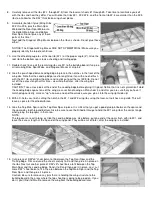
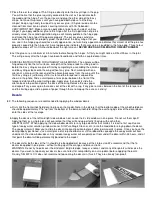
21. Look closely at rib W-1 and you’ll see that a cutout for the aileron servo has been partially pre-cut in the rib - it’s a large
inverted "U" shape, located aft of the main spars. Also notice that the vertical legs of the cutout stop short of the bottom of
the rib. In this step, you will complete the aileron servo cutout in the W-1 rib. First lay the wing panel flat on the building
board and use a modeling knife to cut straight down through the last of the rib on both vertical legs. Stop cutting when you
get to the bottom wing sheet. Carefully break out the portion of the rib inside the cutout area.
Now repeat Steps 1 through 21 to build the other wing panel.
Joining The Wing Panels
22.
Trial fit the two wing panels with the 1/8" laser-cut plywood dihedral brace installed between the main spars. Be certain that
the dihedral brace is not preventing the panels from making solid contact with each other at the center. If necessary, trim or
sand the brace for a snug fit. The 3° dihedral per wing panel will automatically be built-in by the dihedral brace. If you want
to check the angle, place the wing on the table so that one side sits flat, and the other is raised. The bottom of the raised
wing tip should be about 3" above the surface of the table. A variation of up to 1/4" either way is acceptable and will not
affect flight performance. The most important point to have a tight joint at the wing center with no gaps.
23.
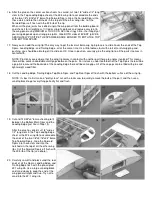
Use epoxy (either SIG 5-MINUTE or SLOW-CURE) to join the two wing panels.
Apply glue generously to the end ribs and the dihedral brace. Work some glue into
the slot in each wing root. Carefully slide the wing halves into place and hold in
place with pins and tape. Wipe away any excess epoxy that oozes from the center
joint with a paper towel or a rag dampened with isopropyl alcohol. Before the glue
cures, make sure that the leading and trailing edges of both panels are perfectly
aligned and that there is no built-in twist. Let cure.
Aileron Installation
24.
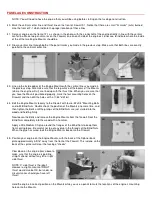
Locate the two pre-shaped balsa Center Section Trailing Edge pieces. Mark one Left Bottom and one Right Bottom.
25.
On the Left Bottom Center Section Trailing Edge piece, draw a box 1/4" wide x 1/2" deep, exactly 7/16" from the end, as
shown here. Continue the lines down the front of the piece, until you reach the bottom of the pre-cut groove in the front.
26.
Using a razor saw, carefully cut along
the side lines of the box, stopping when
the blade is deep enough to reach
across to both end lines.
27.
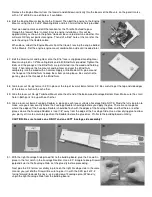
Use a modeling knife to "chip" the wood
out between the saw cuts until you have
notch the full depth of the box you drew
originally.
Repeat steps 25 through 27 to make the Right Bottom Center Section Trailing Edge a mirror image of the left one.