


Damage to the drive if the re-cooling unit is incorrectly mounted and installed
The transmission of mechanical vibration may, for instance, cause cracks in the piping or other
mechanical damage.
If the re-cooling unit is screwed to the drive this may be damaged.
● Install the re-cooling unit on its own and not connected to the drive.
5.2
Tools required
You require the following tools for mounting and installation:
● Wrench or socket wrench, width across the flats 10, 13, 16/17, 18/19
● Allen key, size 8
● Torque wrench up to 50 Nm
● Screwdriver, size 2
● Torx T20 and T30 screwdrivers
5.3
Preparations
5.3.1
Remove the rear panel
To mount and connect the drive, the rear panel at the side where the transport units are bolted
together must be removed.
To do this, release the screws at the rear panel. Remove the rear panel. Put the fastening
screws for the rear panel in a safe place.
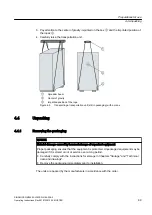
5.3.2
Mounting the side panels
WARNING
Electric shock as the side panels were not attached
Voltages of over 1000 V are present when this equipment is operational. When touched, this
can result in death or serious injury.
Make sure that the side panels are installed on the left and right outer ends of the drive.
Installation
5.3 Preparations
SINAMICS GM150 6SL3835-2LN44-2AA0
76
Operating Instructions Rev.201910281250 MUSTER
Summary of Contents for Sinamics GM150 6SL3835-2LN44-2AA0
Page 2: ...28 10 2019 12 50 V32 00 ...
Page 232: ...Index SINAMICS GM150 6SL3835 2LN44 2AA0 232 Operating Instructions Rev 201910281250 MUSTER ...
Page 233: ......
Page 236: ......
Page 238: ......


