5-44
2
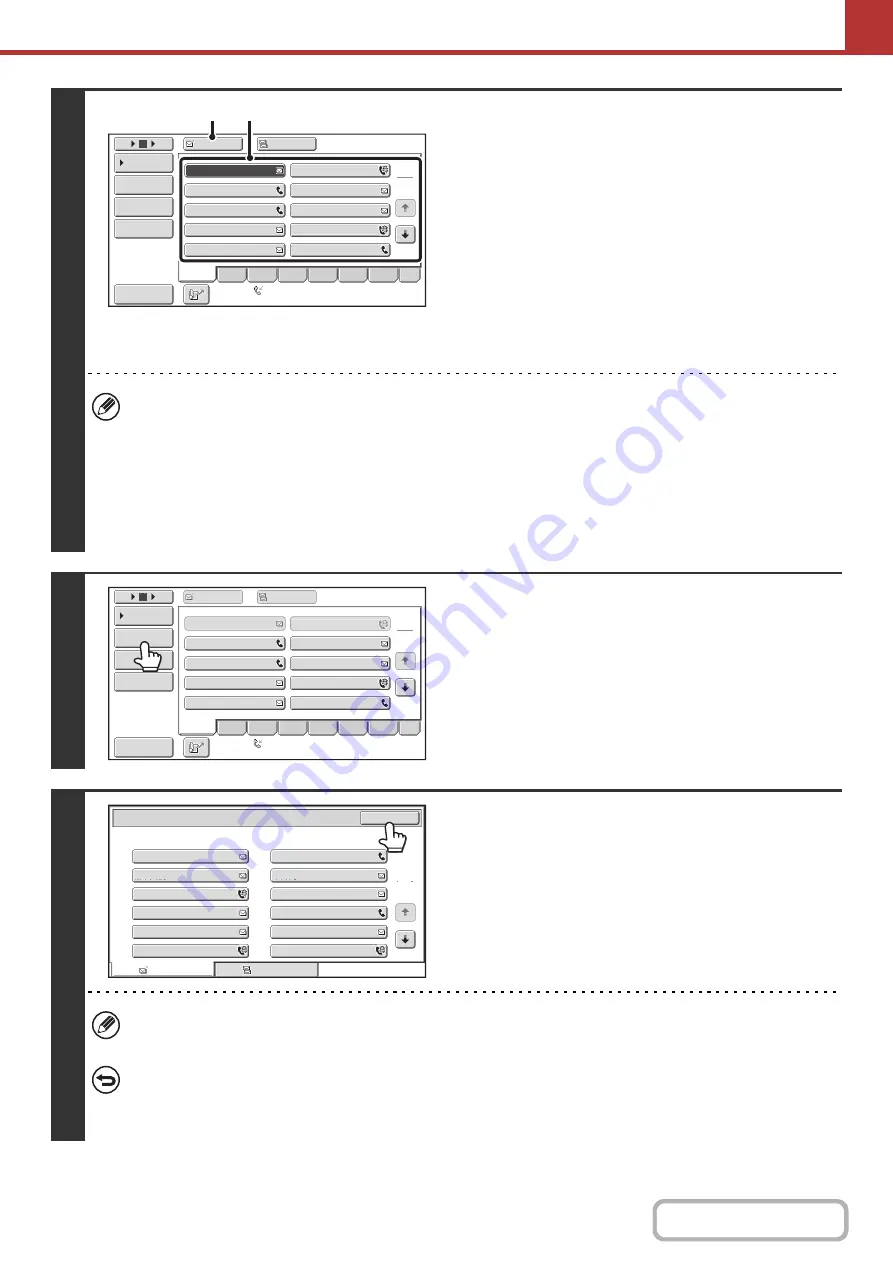
Specify the destination.
(1) Touch the [Address Book] key in the base
screen.
For the [Address Book] key, see "
" (page
5-9).
(2) Touch the one-touch key of the desired
destination.
(3) Touch the [To] key.
The destination is specified.
(4) Repeat steps (2) and (3) until all
destinations are selected.
• To add Cc or Bcc recipients, select a recipient and touch the [Cc] key or the [Bcc] key.
• If "Must Input Next Address Key at Broadcast Setting" is enabled in the system settings (administrator), touch the
[Next Address] key before specifying the next destination.
• One-touch keys that cannot be used for broadcast transmission are grayed out to prevent selection.
• If a Scan to FTP (Hyperlink) address is specified in a broadcast transmission, hyperlink e-mail transmission will not
take place.
• If you frequently use broadcasting to send images to the same group of destinations, it is convenient to store those
destinations in a group key.
3
Touch the [Address Review] key.
4
Check the destinations and then touch
the [OK] key.
If the transmission includes Cc or Bcc destinations, touch the [Cc] tab or the [Bcc] tab to check those destinations.
To cancel a specified destination...
Touch the one-touch key of the destination that you wish to cancel. A message will appear to confirm the deletion.
Touch the [Yes] key.
☞
CHECKING AND DELETING THE SELECTED DESTINATIONS
(page 5-19)
AAA AAA
To
Cc
III III
GGG GGG
EEE EEE
CCC CCC
HHH HHH
FFF FFF
DDD DDD
BBB BBB
1
2
5
15
10
Global
Address Search
Address Entry
Sort Address
Address Re
v
iew
Condition
Settings
JJJ JJJ
ABCD
Fre
q
.
EFGH
IJKL
MNOP
QRSTU
VWXYZ
etc.
Auto Reception
Fax Memory
:
100
%
(3)
(2)
AAA
AAA
BBB
BBB
To
Cc
1
2
5
15
10
Global
Address
Search
Address
Entry
Sort
Address
Address
Re
v
iew
Condition
Settings
III
III
GGG
GGG
EEE
EEE
CCC
CCC
JJJ
JJJ
HHH
HHH
DDD
DDD
FFF
FFF
ABCD
Fre
q
.
EFGH
IJKL
MNOP
QRSTU
VWXYZ
etc.
Auto
Reception
Fax
Memory
:
100
%
To
001
003
005
007
009
011
002
004
006
008
010
012
Cc
1
2
Address Re
v
iew
OK
AAA AAA
KKK KKK
MMM MMM
OOO OOO
QQQ QQQ
SSS SSS
BBB BBB
LLL LLL
NNN NNN
PPP PPP
RRR RRR
TTT TTT
Summary of Contents for DX-C311 - Color - All-in-One
Page 4: ...Reduce copy mistakes Print one set of copies for proofing ...
Page 6: ...Make a copy on this type of paper Envelopes and other special media Transparency film ...
Page 11: ...Conserve Print on both sides of the paper Print multiple pages on one side of the paper ...
Page 35: ...Organize my files Delete a file Delete all files Periodically delete files Change the folder ...
Page 214: ...3 18 PRINTER Contents 4 Click the Print button Printing begins ...


