background image

ProLogic L66 

Operation Instructions 


18 


After the code has been disabled, it can be re-enabled at a later time, following the same process by 
selecting “Enable User”. 
 

Step1:  Press the Menu/OK button. 
 
Step 2:  Using the 

 and 

, scroll to the System Menu and Press Menu/OK. 

 
Step 3:  The display will prompt you to enter a valid code.  Enter either the Super Code (ID00) or 
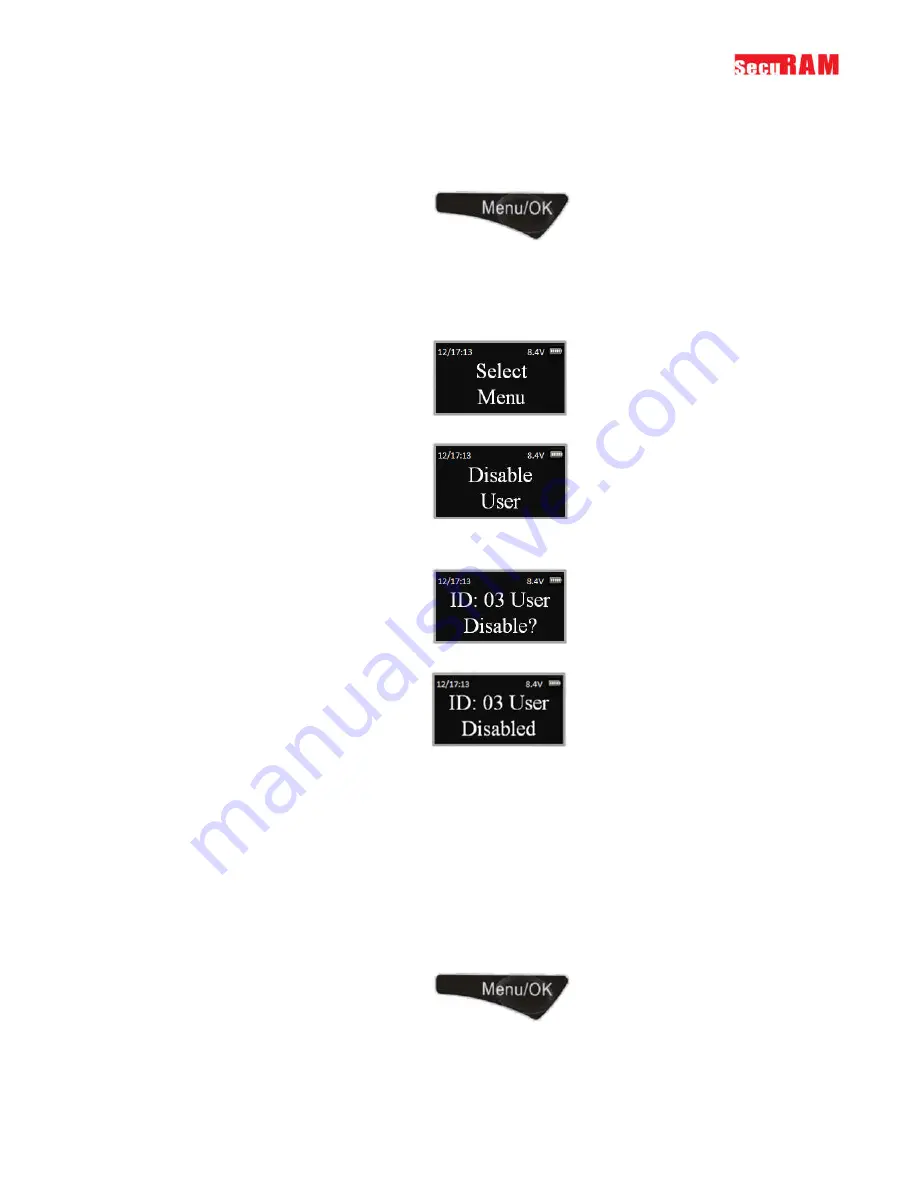
the Manager Code (ID01).  The “Select Menu” message will be displayed as follows: 


Step 4:  Scroll 

 and 

 to the menu selection “Disable User” and Press OK 


Step 5:  The system will ask which User to disable.  Scroll 

 and 

to the desired USER ID and 

press OK. 


Step 6:  The system will verify the User has been disabled. 


5.6 Obfuscate Code Entry


This feature would be used in order to obfuscate the code as it is entered on the LCD screen.  
In normal operation, as the user enters the code, the digit of the code pressed is visible on the LCD until 
the next digit is entered.  The subsequent digit turns to an “*”.  
With the Obfuscate Code Entry feature, every digit that is entered is displayed as an “*” immediately 
upon entry, so that your code is always obscured from view on the LCD. 
 
To Obfuscate Code Entry, follow this procedure: 
 

Step1:  Press the Menu/OK button. 
 
Step 2:  Using the 

 and 

, scroll to the System Menu and Press Menu/OK. 


Summary of Contents for ProLogic L66

Page 1: ...rs 5 5 Disable Enable User 5 6 Obfuscate Code Entry 5 7 Set ID01 to Master 5 8 Renew Code Period 6 0 System Identification 6 1 System Info 7 0 Time Delay 7 1 Set Cancel Time Delay 7 2 Set Duress Time Delay 7 3 Setting Time Delay Override Users 8 0 Audit Trail Functionality 8 1 Show Audit Trail 8 2 Uploading Audit Trail 9 0 Manager Mode 9 1 Enable Manager Mode 9 2 Disable Manager Mode 10 0 Single o...

Page 2: ...lt with Status Sensor Part EL 0601 S DeadBolt Part EL 0701 SpringBolt Part EL 0801 Note The ProLogic L66 can control up to 4 locks when used in conjunction with the Expansion Box Part CB11 1T4 If setting up a multi lock system please refer to Section 11 2 Multi Lock Systems 1 2 Pairing the EntryPad and the Lock SecuRam safe lock systems can operate in two different modes depending upon the type of...

Page 3: ...e ID00 is 111111 Manager Code ID01 is 123456 Upon entry of a valid code the lock will open If the lock does not open and the LCD screen displays the message Fail to Link with Lock repeat the reset procedure Be sure to hold down the reset button through steps 5 7 If you have difficulty resetting the lock please call SecuRam Tech Support at 805 988 8088 or email info securamsys com 1 3 Lock and Entr...

Page 4: ...ry compartment See Fig 1 Carefully tuck the excess lock cable into the cavity on the back of the EntryPad and install the EntryPad on the shoulder bolts See Fig 2 Be careful not to crimp or damage the lock cable upon EntryPad installation 1 4 2 Installing the Battery SureLock Battery Compartment removable battery compartment Locate the SureLock Battery Compartment at the 5 o clock position of the ...

Page 5: ...he code length and number of Users is a global setting and applies to all safe lock operators There are 3 options available as follows Code Length 6 digits 10 total codes available This is the default mode and meets the UL requirement Code Length 8 digits 30 total codes available This mode also meets the UL requirement Code Length 6 digits 30 total codes available This mode does not meet the UL re...

Page 6: ...the Mechanical Reset procedure outlined in 15 4 Mechanical Reset The code length will now be 6 digits and the total available users will be 10 The Super Code ID00 will now be 1 1 1 1 1 1 The Manager Code ID01 will now be 1 2 3 4 5 6 2 2 PW L 8 Users 30 NOTE This operation must be performed with the safe door open and with access to the back of the lock as a mechanical reset must be performed durin...

Page 7: ...e ID00 will now be 1 1 1 1 1 1 0 0 The Manager Code ID01 will now be 1 2 3 4 5 6 0 0 The Default Recovery Code will be 9 9 9 9 9 9 0 0 The Default Encryption Code will be 6 8 5 1 9 8 0 0 2 3 PW L 6 Users 30 NOTE This operation must be performed with the safe door open and with access to the back of the lock as a mechanical reset must be performed during this programming sequence Step1 Press the Me...

Page 8: ...RTANT The LCD will advise if a reset is required to finalize the programming If required follow the Mechanical Reset procedure outlined in 15 4 Mechanical Reset The code length will now be 6 digits and the total available users will be 30 The Super Code ID00 will now be 1 1 1 1 1 1 The Manager Code ID01 will now be 1 2 3 4 5 6 3 0 Lock Operation Upon initial power up the LCD screen starts a commun...

Page 9: ... 1 1 1 Manager Code ID01 1 2 3 4 5 6 Step 1 Enter a valid code for example ID00 The display will read ID00 Verified And the Lock will open The display will read The lock will relock after 6 seconds Note Time to relock is hard coded and cannot be changed 3 2 Opening Lock with Time Delay Programmed When Time Delay has been programmed the user must enter a valid code Note Users are defined as ID03 ID...

Page 10: ...pen the lock Step 5 Enter a valid Code to open the lock 3 3 Opening the Lock Under Duress The ProLogic L66 has a Duress Feature which allows a User or Admin to open the lock and send a silent Duress signal indicating that you are in danger By default the duress function is active and cannot be disabled In Order to send a signal the system must have a CB10 junction box installed and must be connect...

Page 11: ...ed For example ID03 will display ID03 Verified The display will then read Enter 2nd User Code For example using ID04 for 2nd code will read ID04 Verified The lock will open and relock in 6 seconds 3 5 Opening the Lock with a Multi Lock System The ProLogic L66 can operate up to 4 locks To Open a Lock with a Multi Lock System Step 1 Enter a valid code The display will read IDXX Verified Step 2 The s...

Page 12: ... date and time will flash when it is available to be set Use the and to scroll to the correct value and Press OK to move to the next element 4 2 Show Clock Time Step1 Press the Menu OK button Step 2 Using the and scroll to the System Menu and press OK Step 3 The display will prompt you to enter a valid code Enter either the Super Code ID00 or the Manager Code ID01 The Select Menu message will be d...

Page 13: ...The display will prompt you to enter a valid code Enter either the Super Code ID00 or the Manager Code ID01 The Select Menu message will be displayed as follows Step 4 Scroll to the menu selection Daylight Savings TM and Press OK Step 5 Press the button to turn Daylight Savings Time Management on To turn it off press the button Step 6 Starting Month The system will now request the month in which D...

Page 14: ...ng Time The system will now request the Time on the first day of the week Sunday at which Daylight Savings Time is to end The default is North American DST Time 2 2 00am To change Press the and to set the Week and press OK Therefore to set to the North American DST just select Y on the first display screen and then accept the defaults for all other settings by pressing OK 5 0 Code Management The P...

Page 15: ...displayed as follows Step 4 Scroll to the menu selection Enroll New User and Press OK Step 5 The next available ID position is displayed To select this ID Press OK or to select a different ID position Press to desired ID and press OK Step 6 Now enter a 6 digit code Step 7 Repeat new code Step 8 System will verify that code has been saved The new code is now enrolled and available to be used to ope...

Page 16: ...of IDXX to be changed Step 6 Enter the new 6 digit code Step 7 Repeat the new code The New Code has now been saved and is available for use 5 3 Delete One User Step1 Press the Menu OK button Step 2 Using the and scroll to the System Menu and Press Menu OK Step 3 The display will prompt you to enter a valid code Enter either the Super Code ID00 or the Manager Code ID01 The Select Menu message will ...

Page 17: ...nu and Press Menu OK Step 3 The display will prompt you to enter a valid code Enter either the Super Code ID00 or the Manager Code ID01 The Select Menu message will be displayed as follows Step 4 Scroll UP to the menu selection Delete All Users and Press OK Step 5 The system will request a Confirmation Press OK The system will verify that all User Codes have been deleted The only remaining code wi...

Page 18: ...k which User to disable Scroll and to the desired USER ID and press OK Step 6 The system will verify the User has been disabled 5 6 Obfuscate Code Entry This feature would be used in order to obfuscate the code as it is entered on the LCD screen In normal operation as the user enters the code the digit of the code pressed is visible on the LCD until the next digit is entered The subsequent digit t...

Page 19: ...rarchy within the Manager ID01 Supervisor ID02 code permissions When Set ID01 to Master is enabled ID02 cannot Delete ID01 ID02 cannot Disable ID01 ID02 Manager function are removed from the System Menu ID02 can ONLY o Enroll New User o Delete One User o Enable User o Disable User ID02 will no longer be a Dual Mode Override and will abide by Dual Mode rules whereby ID02 must enter his code in conj...

Page 20: ...lue to 10 for example then after 10 weeks the User will be prompted to change his code to a new code Step1 Press the Menu OK button Step 2 Using the and scroll to the System Menu and Press Menu OK Step 3 The display will prompt you to enter a valid code Enter either the Super Code ID00 or the Manager Code ID01 The Select Menu message will be displayed as follows Step 4 Scroll UP to the menu select...

Page 21: ...system follow this process System Info Step1 Press the Menu OK button Step 2 Using the and scroll to the System Info and Press OK The system will display Information about the system including the model number of the ProLogic EntryPad This menu selection can be accessed within the root menu as well as within the Administrative menu 7 0 Time Delay Time Delay is a feature used to deter burglary Prov...

Page 22: ...he preset length of time allowed to enter a valid code after Time Delay has expired Press the and to select the Time Window value desired Step 7 Press OK 7 2 Set Duress Time Delay The Duress Time Delay function allows you to set a different Time Delay value when a Duress code is entered Step1 Press the Menu OK button Step 2 Using the and scroll to the System Menu and Press OK Step 3 The display wi...

Page 23: ...feature you can unassign ID02 as a TDO User and assign TDO permission to a different User The maximum number of TDO Users is 3 Step1 Press the Menu OK button Step 2 Using the and scroll to the System Menu and Press OK Step 3 The display will prompt you to enter a valid code Enter either the Super Code ID00 or the Manager Code ID01 The Select Menu message will be displayed as follows Step 4 Scroll ...

Page 24: ...per Code ID00 or the Manager Code ID01 The Select Menu message will be displayed as follows Step 4 Scroll to the menu selection System Menu and Press OK Step 5 Enter manager code Step 6 Scroll to Show Audit Trail The Audit Trail will be displayed on the LCD as shown below You can scroll through the audit events by pressing the and 8 2 Uploading the Audit Trail The ProLogic L66 has the ability to w...

Page 25: ...e audit trail 9 0 Manager Mode Manager Mode is a function that allows you to toggle off on User Codes by the entry of the Manager Code ID01 or ID02 This allows you to disable all the user codes Manager Mode is used when you want to have the Users have the ability to open the safe during certain periods of time perhaps when the store is open And then at other times the Users would not be able to op...

Page 26: ...n Enable Manager and Press OK Manager Mode is now enabled In this Mode ID01 Code cannot open the safe and is used to toggle on off all User codes ID01 still has all its programming functions ID02 Code cannot open the safe and is used to toggle on off all User codes ID02 managerial programming functions have been disabled 9 2 Disable Manager Mode This menu selection allows you to set the Manager Mo...

Page 27: ...l Control Mode Single Control Mode One valid code will open the safe lock system Dual Control Mode Two valid codes must be entered to open the safe lock system The ProLogic L66 comes pre programmed in Single Control Mode 10 1 Enable Dual Mode Step1 Press the Menu OK button Step 2 Using the and scroll to the System Menu and Press OK Step 3 The display will prompt you to enter a valid code Enter eit...

Page 28: ...ser Code from ID00 to ID15 Group A must be entered with a second code from ID16 ID30 Group B in order to open the safe lock Also Manager Codes are no longer Dual Mode Override Codes You can set this number to any number from 1 15 by using the and buttons If you set the number to 04 any user code from ID05 ID30 Group B must be entered in conjunction with ID01 ID02 ID03 or ID04 group A to open the l...

Page 29: ...this timetable no users can enter their code to open the safe lock system 11 1 Set Timer The menu selection allows you to immediately lock down the safe lock system Step1 Press the Menu OK button Step 2 Using the and scroll to the System Menu and Press OK Step 3 The display will prompt you to enter a valid code Enter either the Super Code ID00 or the Manager Code ID01 The Select Menu message will ...

Page 30: ...be opened You can change between Time Table 1 and Time Table 2 by using the and arrows The same buttons can be used to change the profile from enabled to disabled Understanding the Time Table Profile settings Y Yes means profile is enabled and safe can be accessed according to the Time Table during the time period specified in the daily settings N No means profile disabled and therefore there is n...

Page 31: ...is enabled and the daily setting for Sunday is set to Y 08 00 17 00 then Time Table 2 will allow users to open the safe from 8 00 AM to 5 00 PM The system looks first to the Time Tables to see if they are enabled and then if enabled the system looks to the enabled opening times as scheduled in the daily settings to determine if the lock should be opened Setting two opening periods per day As an ex...

Page 32: ...the and scroll to the System Menu and Press OK Step 3 The display will prompt you to enter a valid code Enter either the Super Code ID00 or the Manager Code ID01 The Select Menu message will be displayed as follows Step 4 Scroll to the menu selection Set Holidays and Press OK You will be prompted to enter the dates for which TimeLock will be applicable 11 4 See Timer This menu selection allows you...

Page 33: ...e will be displayed as follows Step 4 Scroll to the menu selection Max Door Open Time and Press OK Step 5 You will be prompted to enter the maximum length of time the door can be opened after which the LCD will report an alert indicating that the door opening has exceeded the allowable time limits the lock will sound with an audible beep Note In order to turn off this feature Enter 00 12 2 Configu...

Page 34: ...ystem will prompt you to enter the Manufacturing Setup Code Enter 975246 PW L 6 Users 10 or PW L 6 Users 30 or 97524600 PW L 8 Users 30 and press OK Step 6 Press the and to specify the number of lock to be controlled and press OK 12 4 Authorize Locks In this programming step you can specify or authorize which Users will have to each of the locks Step1 Press the Menu OK button Step 2 Using the and ...

Page 35: ...f users is authorized to open Lock 1 but it does not have access to Locks 2 3 or 4 An O means that Lock can be Opened while an X means the lock is not authorized to be opened Step 8 In order to authorize access to these individual locks press the corresponding number on the EntryPad to toggle O or X o Press 1 to toggle access for lock 1 o Press 2 to toggle access for lock 2 o Press 3 to toggle acc...

Page 36: ... entering his her own code plus 1 number or minus 1 number for the last digit the safe will open but it will send a silent alarm or Duress signal through the alarm panel to the monitoring center 13 1 Duress Setup and wiring configuration In order for Duress to operate the ProLogic must be connected to a CB10 A or CB10 B The EntryPad and lock body are connected through the junction box Also connect...

Page 37: ...e lock wirelessly in a number of different ways depending upon your security requirements i Download audit trails at the safe location using SecuRam s Wireless Link For more information please refer to the Wireless Link Operation Guide ii Download audit trails using Securam s Wireless Station Management For more information please refer to the Wireless Station Management Software iii Upload progra...

Page 38: ...he EntryPad specify the desired Device ID number for this EntryPad using a four digit number format from 0010 9999 and press OK 14 2 Set Host ID Next we will set the Host ID This is the number of the Host device that the ProLogic L66 will be permitted to communicate with Step1 Press the Menu OK button Step 2 Using the and scroll to the System Menu and Press OK Step 3 The display will prompt you to...

Page 39: ... will be displayed as follows Step 4 Scroll UP to the menu selection Wireless Connection and Press OK The Audit events will transmit wirelessly to the connected Host Device and associated software You will see a progress report on the LCD as the data is transferred 15 0 Data Management The ProLogic L66 can receive and send data using its built in wireless transmitter receiver As a security measure...

Page 40: ...oLogic L66 can back up its programming parameters to SecuRam s Parameters Management software Step1 Press the Menu OK button Step 2 Using the and scroll to the System Menu and Press OK Step 3 The display will prompt you to enter a valid code Enter either the Super Code ID00 or the Manager Code ID01 The Select Menu message will be displayed as follows Step 4 Scroll to the menu selection Backup Data...

Page 41: ...o be reset to factory default settings using a very unique secure method Each system has a default recovery code The default recovery code is 999999 PW L 6 Users 10 or PW L 6 Users 30 or 99999900 PW L 8 Users 30 this code can be changed as necessary refer to the Recovery Code Set selection Upon entry of the recovery code the LCD screen displays an alpha numeric code This code cannot be used to ope...

Page 42: ...y will prompt you to enter a valid code Enter either the Super Code ID00 or the Manager Code ID01 The Select Menu message will be displayed as follows Step 4 Scroll UP to the menu selection Recovery Code Set and Press OK Step 5 You will be prompted to enter the existing Recovery Code Press OK Step 6 The LCD screen will display a Key Code Record this number and call an authorized SecuRam Recovery C...

Page 43: ...required in a number of circumstances such as All Managerial User Codes have been lost or forgotten The system is unresponsive to commands and may need to be reset Step1 Press the Menu OK button Step 2 Using the and scroll to the Recover System Menu and Press OK Step 3 The display will prompt you to enter the Recovery Code Enter the existing Recovery Code The default recovery Code is 999999 PW L 6...

Page 44: ...123456 PW L 6 Users 10 or PW L 6 Users 30 or 12345600 PW L 8 Users 30 Time Delay if programmed previously remains active 16 3 Disable Recover In some jurisdictions the Recovery feature is prohibited Australian Government You have the option to disable the recovery feature if desired Step1 Press the Menu OK button Step 2 Using the and scroll to the System Menu and Press OK Step 3 The display will p...

Page 45: ... with any SecuRam safe lock body Note The pairing of the StrikeBolt and the ProLogic L66 EntryPad is not UL listed If the lock body that you are pairing the ProLogic L66 with has been paired previously with an analog system for example the SafeLogic Basic or any other SafeLogic Series EntryPad or was set at the factory in the default Analog mode the following Mechanical Reset procedure must be fol...

Page 46: ... the reset process 17 0 Testing The ProLogic L66 has 2 onboard system tests 1 Cycle Testing 2 Hardware Testing This is a very unique feature to SecuRam safe lock systems As the access system on a fortified steel box the safe it is imperative that safe locks can provide solid performance SecuRam offers this unique menu selection that allows you to test the lock system performance through actual Cyc...

Page 47: ...menu is accessible by entering a valid code The menu selections in the sub menu change depending upon the level of the code entered Super Code ID00 and Manager Codes ID01 and 02 have access to the all programming menus User Codes have limited menu selections ProLogic L66 Menu Root Menu Select Menu System Menu System Info Show Clock Time Recovery Code Set Recover System Encryption Key Set Sub Menu ...

Page 48: ...Dual Mode Disable User Enable User Delete One User Enroll New User Super Code Menu item only Note regarding UL certification The audit features duress features peripheral devices and accessories software features wireless functionality remote functionality and other additional features have not been evaluated by UL as these functions are beyond the scope of the UL certification program ...

Reviews: