background image

64  

  Sanako Lab 90 User Guide 


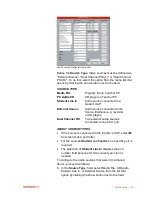
9.  You can now edit the 

Source Name

. This step is, 

however, optional. Giving the source a commonly known 
name could help the user in recognizing the source when 
there is more than one external source. The edited name 
is displayed in the Source List in the graphical user 
interface of Lab 90. 

10. In the 

Port Number

: field, select a port number to which 

the source is connected. The Student Line In source type 
doesn‟t require a port number. 

11. Proceed similarly with other audio sources. 

12. In the 

Video Source

 field, select 

Video Source

 that is 

used with the appropriate source type. 

13. Browse for the drive that was mapped in the configuration 

of the teacher PC (see 

Error! Reference source not 

found.

 in Configuring the Teacher PC earlier in the Setup 

section of this guide). To browse for the drive, click the 

Browse drive

 button. 

14. To close this panel and keep the changes, click 

OK

. To 

close the panel and discard the changes, click 

Cancel

Set video sources below.  

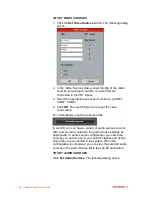
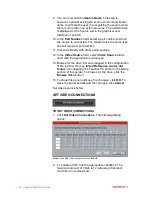
SET VIDEO CONNECTIONS 


TO SET VIDEO CONNECTIONS 

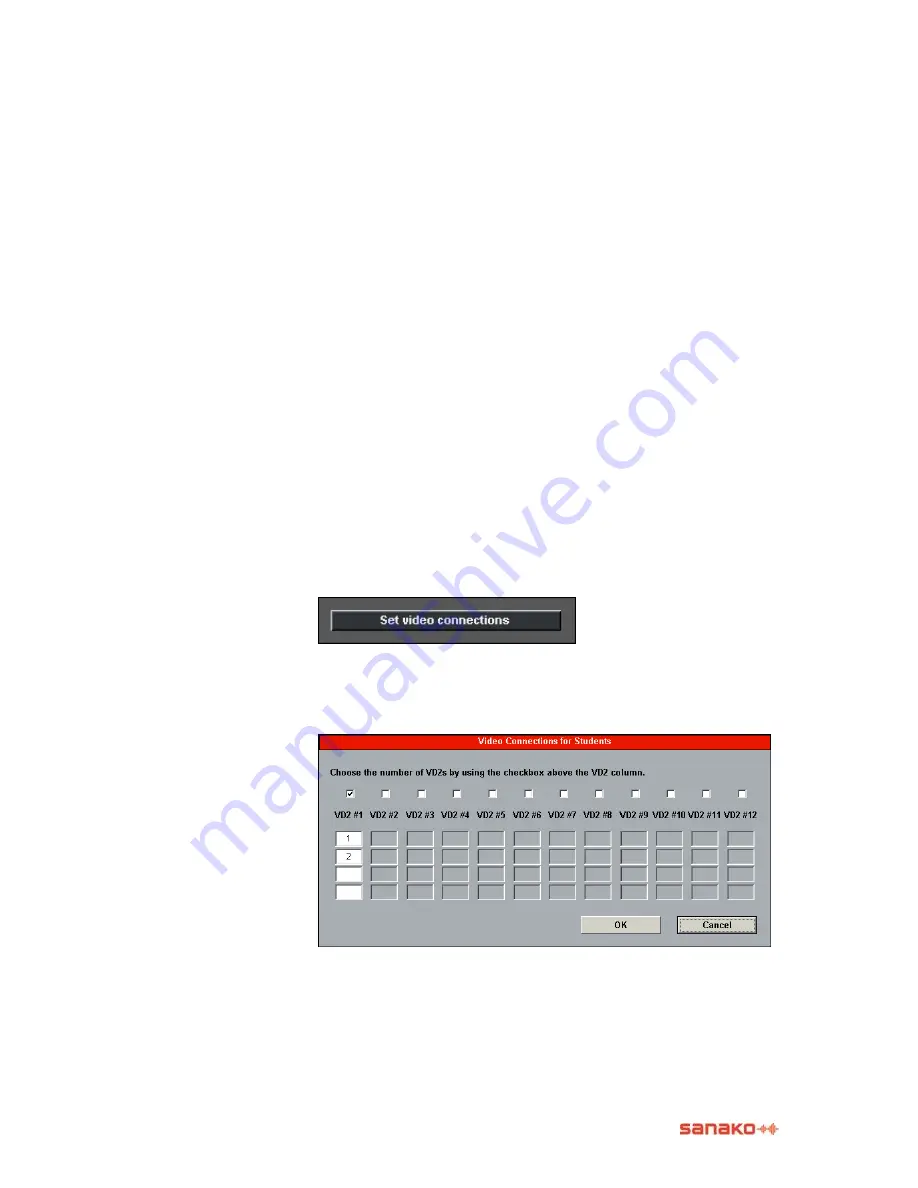
1.  Click 

Set Video Connections

. The following dialog 

opens. 


Dialog for setting video connections for students 

2.  To enable a VD2, tick the appropriate checkbox. The 

maximum amount of VD2s is 12, allowing 48 student 
monitors in one classroom. 

Summary of Contents for Lab 90

Page 1: ...Sanako Lab 90 USER GUIDE ...

Page 2: ...nternet intranets and or other networks other content distribution systems pay audio or audio on demand applications and the like or on physical media compact discs digital versatile discs semiconductor chips hard drives memory cards and the like An independent license for such use is required For details please visit http mp3licensing com Warning This is a class A product In a domestic environmen...

Page 3: ...r s Graphical User Interface GUI 6 Components of the Lab 90 main window 6 Toolbar 6 Class view 8 Session Screen 8 Tooltips 9 Session Status Bar 9 User Audio Panel 11 Keys on the User Audio Panel 11 LCD display 12 Symbols on the Lab 90 LCD 12 Clicking on a student icon 14 Student icons 14 Getting Started 17 Starting Lab 90 17 To start Lab 90 17 Lab 90 main window 17 Lab 90 main menu 18 New Session ...

Page 4: ...g with Group Discussion 40 Quiz 43 Proceeding with Quiz 43 Lab 90 Setup 48 Lab 90 installation 48 Hardware installation 48 Lab 90 components 48 Lab 90 connection overview 51 Dual Channel Program Source Interface 52 SCU 52 Software installation 53 Minimum requirements 53 Installing the Lab 90 program 53 Teacher PC configuration 54 To complete the configuration 55 Teacher PC sound card mixer setting...

Page 5: ...Contents iii ...

Page 6: ......

Page 7: ...uction center and its components The Getting Started section describes the basic functionality of the teacher s Graphical User Interface GUI In the latter part of this guide you will learn how to facilitate your work and increase the possibilities to both teach and learn by using the different SANAKO Lab 90 features The Activity Procedures section explains all the different SANAKO Lab 90 activitie...

Page 8: ......

Page 9: ...teacher computer THE ESSENTIALS OF SANAKO LAB 90 When your teaching tool is SANAKO Lab 90 you can divide your class into sessions for which you can then initiate different learning activities A session can also cover the whole class SESSIONS The session based thinking of the SANAKO Lab 90 program means that you can initiate different activities for the students to proceed with and use different ma...

Page 10: ... the teacher PC s monitor The SANAKO Lab 90 GUI is the teacher workspace that displays the classroom layout On the GUI with a few mouse clicks you create sessions where your students proceed with different activities AUDIO SOURCE INTERFACE The Audio Source Interface allows the connection of any external source through its input jack These sources can be connected to the students SYSTEM CONNECTION ...

Page 11: ...med activities Listening Comprehension Phone Conversation Pair Discussion Group Discussion Quiz Pre programmed activities are exercises that you assign to your students in SANAKO Lab 90 sessions Based on the activity you select the Session Screen guides you through the balance of the activity procedure For information on how to proceed with the different activities see the descriptions in Activity...

Page 12: ...dicated in the illustration above TOOLBAR The Lab 90 toolbar is the horizontal bar on the upper part of the main window On the toolbar you can create sessions gain access to the Lab 90 main menu and online help and comment via All Call with all the students in the class LAB 90 MAIN MENU Click the Menu button to open a drop down menu where you can select to view Lab 90 components version numbers vi...

Page 13: ...r To minimize the window click this button Clicking on the name of the program on the taskbar again restores the window Close the main window Click the button to close the window and exit Lab 90 MOVING THE LAB 90 GRAPHICAL USER INTERFACE Note that the Lab 90 GUI is movable When you point either side of the Lab 90 window or the Lab 90 logo in the upper left corner the cursor turns into a four heade...

Page 14: ... the student is in listen or speak mode The different student icons are described in chapter Student icons later in this section SESSION SCREEN A session is a teaching situation for which you select participants and an activity they are to perform The Lab 90 Session Screen is the part of the GUI where you proceed with the session In the Session Screen you will select students an activity and an au...

Page 15: ...ntrols are on the panel If you have created more than one session the tabs of the hidden panel views are dimmed on the Session Screen You can easily switch between Session Screen views by just clicking on a session tab You can also click on a Session Status Bar see the following chapter Session Status Bar For a more detailed description on Lab 90 sessions see chapter New Session in the next sectio...

Page 16: ...s either waiting started or paused Waiting Session is not yet proceeding with an activity Started An activity is initiated for the session Paused Session s activity procedure is paused SOURCE Displays the audio source selected for the session for example CD Audio DURATION Displays the total time spent on activity min sec LOCK MODE In SANAKO Lab 90 the students are always in locked mode they are ab...

Page 17: ... NUMBER To answer a Quiz question press one of the blinking number keys The LED indicator of the selected answer key is lit The LED indicators of the other answer keys continue blinking until the teacher ends the answering mode If the teacher indicates the correct answer the student can see on the audio panel s display whether his her answer was correct or incorrect In Phone Conversation press the...

Page 18: ... the volume bar Pressing both of the volume controls increase and decrease simultaneously resets the default volume value LCD DISPLAY The liquid crystal display LCD is the part on the User Audio Panel that shows the volume the status of the student player and the counter value min sec SYMBOLS ON THE LAB 90 LCD VOLUME The volume of the program The volume controls are always free for the student use...

Page 19: ...ncorrect QUIZ MODE A question mark is shown when the audio panel is in the Quiz mode This means that the number keys function now as numeric answer keys PHONE CONVERSATION The phone symbol appears when the audio panel is in the Phone Conversation mode This means that the students can now dial the number of a fellow student for example 09 by pressing the number keys The number appears on the displa...

Page 20: ...sion Call mode left clicking on the student means giving the student an answering turn In a session first pause or stop the activity Then call the session by clicking the Session Call button and click on the selected student s icon A speech bubble appears onto the icon to indicate that the students in the session can hear the answering student For more information about Session Call see Calls late...

Page 21: ...ion student The student is a member of a session The Session student is color coded according to the session he or she belongs to Student in monitor The student is being monitored Clicking on classroom breaks the connection to the active student s Student in listening mode Student hears you and the answering student Student in speak mode All students in the session hear the answering student Click...

Page 22: ...ntercom connection with you Student calling When students press the Call Teacher key on their audio panels a call symbol appears above their student icon to indicate that they are calling you In case several students call the teacher at the same time a number next to the call symbol displays the order of the calls After the teacher uses Intercom to talk to the students the numbers are updated acco...

Page 23: ...ick Lab 90 LAB 90 MAIN WINDOW This is the main window of the Lab 90 Graphical User Interface The main functionality of the Lab 90 program resides on the toolbar 1 and Session Screen 2 The arrows indicate how you will proceed with a Lab 90 class On the toolbar you create the class layout and initiate a session On the Session Screen you will then select the activity for the session and proceed with ...

Page 24: ...e options in the Properties window enable you to select the interface language and set the default session settings Lab 90 properties window TO SET THE DEFAULT SESSION SETTINGS To set the current session settings as the default option select Enable under Default Session and click Save Current The current settings are then used automatically when you start Lab 90 The saved settings include even ses...

Page 25: ...s window click OK To exit the window without saving your changes click Cancel RESET WINDOW POSITIONS To set the default position where the student monitoring windows will be opened left click a student icon and then drag the window to the desired position All student monitoring windows will then open in the same position until the Lab 90 application is closed You can reset the default position by ...

Page 26: ...nter the left mouse button pressed down over the student icons To select all the students that are not yet in a session 3 Click the All Remaining button REMOVING A STUDENT FROM A SESSION You can remove students from a session in the same way you select them for the session 1 Click the Add Remove button and then the icons of the students you want to select Or by dragging the mouse pointer over the ...

Page 27: ...distance connection within the call If the program source is used the student can hear the program only when they are calling each other The teacher can monitor and comment the pairs work PAIR DISCUSSION In pairs students develop their rhetorical skills through different oral exercises They can focus on using their own words instead of fixed structures and learn together at a speed they are comfor...

Page 28: ...onally you can select yourself or one of your students as the audio source for the session The part of the Session Screen where you select the audio source The variety of audio sources is set in the installation and it depends on the devices that are available in your class Possible Lab 90 audio sources are Media File PC Audio CD Student Teacher Line In external sources VCR DVD Cassette MP3 Player...

Page 29: ...on is automatically muted in the Windows mixer when an Audio CD is used as the program source STUDENT Selecting a student as the audio source for the activity means that the selected student s microphone opens and the student is the source for all the students in the session To select a student as a source proceed as follows Select the Student from the audio source list Click the Select Student bu...

Page 30: ...he students in the currently active session are viewing and hearing By switching from one session to another by clicking the session tab accordingly you can see and hear the video that the students of the corresponding session are seeing and hearing That is when you move from one session to another if the sessions have different video sources the video source on your workstation changes accordingl...

Page 31: ... one student s or several students work The intercom is an interactive connection between you and the student s the students hear your voice and are able to reply In the intercom connection your voice is mixed to the audio source This functionality is useful especially in pair or group discussion since you can join the pair or group s work at any point of the exercise In Pair or Group Discussion a...

Page 32: ... red highlighted On the Air sign is lit 4 To disconnect click the Intercom button again whether in monitoring or Session Screen Alternatively you can click the Close button or anywhere on the class view These also close the panel INTERCOM AND MODEL STUDENT When a model student is chosen as the audio source for the session and you use the Intercom function all students in the session are able to he...

Page 33: ...art Automonitor button On the Session Screen opens a replication of the monitored student s audio panel The automatic monitoring starts To change the time interval for monitoring edit the number of seconds in the monitoring time field The audio panel view changes as the monitored student changes If you want to communicate to or with a student click the Intercom button In the intercom mode the conn...

Page 34: ...structions before initiating an activity Once the activity is initiated the source is muted during the call and the students can hear your voice STUDENT CALL If you want to talk to a student briefly call the student by pointing the student icon and pressing down the right mouse button The student hears you as long as the right mouse button is pressed down but is not able to reply During the Studen...

Page 35: ...MEMBERS FOR THE SESSION You can select members for the session by either mouse clicking to select an individual or by dragging the mouse over a number of student icons 2 Click on a student icon or drag the mouse over the student icons you want to include in a session 3 If you want to change your selection that is add or remove students click the Add Remove button and select again Note that you can...

Page 36: ...b 90 audio sources SESSION CONTROLS 6 To give instructions click the Session Call button The red highlighted On the Air sign appears in the upper right corner of the main window All the students in the session now hear your voice To break the connection click the button again 7 To initiate the activity click Start Initiating an activity means connecting the audio source to students ...

Page 37: ...button SELECTING A STUDENT TO ANSWER A QUESTION While proceeding with a Lab 90 activity you may want to ask the students questions to review the right answers for the exercises For example the students can indicate they want to answer a question by pressing the Call Teacher key on their audio panel The calling student s icon tells you that he or she wants to answer and you can give him or her the ...

Page 38: ...ech bubble appears on the answering student s icon Everybody in the session including you hears the answer To select another student just click on the icon of that student To mute the answering student click anywhere on the class view ...

Page 39: ...pause the activity Pausing the activity disconnects the students from the source and stops playing and you can rewind and forward wind the source as much as needed 3 To pause the activity click Pause The connection between the students and the source mutes and the playing pauses Remember to pause the source player also ASKING QUESTIONS You can now ask students questions on the heard material 4 To ...

Page 40: ...ty click Continue The source is connected to the students again and the playing goes on Start the source player again Alternatively you can continue asking questions For asking questions repeat steps 3 and 4 ENDING THE ACTIVITY 7 To end the activity click End The connection between the students and the source mutes and the playing stops Stop also the source in the device or player EXITING THE SESS...

Page 41: ...ir audio panel The line opens between the students and the phone conversation can begin In Phone Conversation students can see the other pair member s workstation number on the their audio panel s display 2 To initiate the activity click Start A phone symbol is lit on the audio panel s display to indicate that the students are free to dial User Audio Panel s display DIALING A NUMBER Students dial ...

Page 42: ...itoring features see Monitor and intercom and Automonitor GIVING INSTRUCTIONS WITHOUT BREAKING THE CONNECTION There are three options for communicating with students during the activity without disconnecting them from each other To talk to all the students in the lesson click Session Call For example if you want to tell the students to change pairs call the session to give instructions and the stu...

Page 43: ...e PROCEEDING WITH PAIR DISCUSSION PAIRING METHOD By default the selecting of the Pair Discussion activity forms pairs automatically so that the adjacent sitting students form a pair If you don t want to change the pairing method you can initiate the activity right away without having to pair the students However if you want the program to form pairs in random order or you yourself want to pair the...

Page 44: ...layed While your students are working in pairs you can observe their progress and make comments if appropriate You can choose to monitor students in random order or you can start the automonitoring feature which means that you monitor all the present session students one by one 2 To monitor a student click on a student icon A monitoring panel appears For more information about the monitoring featu...

Page 45: ... accordingly If you pair the students again manually after clicking the Manual button click on the icons of the students you want to form a pair 5 To start the activity for the new pairs click Continue or Start depending on whether the activity was paused or ended 6 To quit the session click Exit Session ...

Page 46: ...random order or you yourself want to group the students manually select the grouping method accordingly Panel for selecting the grouping method Before selecting the grouping method you can define the number of members you want to include in a group by entering the desired number in the Group Size field The minimum number of members in a group is 2 and the maximum the number of students in the sess...

Page 47: ...pears the group s name for example Group 1 Group 2 etc WHAT IF THE NUMBER OF STUDENTS DOESN T MATCH If one student was left over from the grouping he or she is included as an additional member in one of the groups If two or more students were left over the remaining students form a group with each other INITIATING AND MONITORING A GROUP DISCUSSION 1 To initiate the activity click Start The connect...

Page 48: ...on and select Private Conversation GROUPING THE STUDENTS AGAIN You can set up new groups when the activity is paused or ended 5 To pause or end the activity click Pause or End Remember to pause or stop also the source player 6 If you want to group the students again select a grouping method click the button accordingly If you group the students again manually after clicking the Manual button click...

Page 49: ... False Answers option if the questions should be answered True or False Select the Multiple choice option if the answers should be in numeric mode After selecting the option define the number of the answer choices max 8 by entering the number in the field accordingly For example entering the number 5 means that for each question there are five answer options STARTING THE QUIZ 2 To initiate the act...

Page 50: ... as the students give their answers On the class view on your GUI is displayed a block diagram on the distribution of the students answers Each student s answer appears also under his or her icon 4 To end the answering time click Stop The answer keys on the students audio panels are disabled and the LED indicators next to the keys switch off You can now either repeat the steps 2 3 and 4 to ask pla...

Page 51: ... 45 On the class view the correct answers are highlighted in pink 6 To ask the next question repeat step 2 Repeat steps from 2 to 5 until the end of the quiz QUIZ REPORTS 7 To end the quiz click End A quiz report appears ...

Page 52: ... the report window If you zoom the report in or out and print it out the font size of the print is changed accordingly VIEWING RESULTS FOR ALL OR BY STUDENT You can select whether you want to view and print a table of all the results or a list of the results according to individual students ADJUSTING THE REPORT VIEW The print sheet scales automatically on your screen to fit the whole report to the...

Page 53: ...s 47 REPORT WINDOW TOOLTIPS In the Quiz report window when you move the mouse pointer over a control button a tooltip text appears telling you what each button on the toolbar does 8 To quit the session click Exit Session ...

Page 54: ...update System Connection Unit SCU User Audio Panel UAP Teacher PC HARDWARE INSTALLATION LAB 90 COMPONENTS System Connection Unit 032 SCU032 6001020 connects User Audio Panels both teacher s and students with audio sources and the Teacher PC This model contains 32 ports for User Audio Panels System Connection Unit 064 SCU064 6001021 This model contains 64 ports for User Audio Panels ...

Page 55: ...the student table by making a hole in the table W x L 99 x 145mm and tightening the screw from under the table User Audio Panel UAP038 Desktop attached 6001038 The desktop model is fastened to the table with the help of a metallic plate that is screwed on top of the table In the bottom of the UAP there are edges that fit the plate and the panel is locked when it is slid vertically a few centimeter...

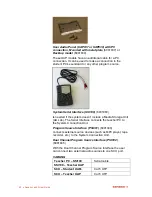
Page 56: ...f the system doesn t include a Media Storage Unit AA Lab The Serial Interface connects the teacher PC to the System Connection Unit Program Source Interface PSI001 6001040 connects external source devices such as MP3 player tape recorder etc to the System Connection Unit Dual Channel Program Source Interface PSI002 6001045 With the Dual Channel Program Source Interface the user can connect two ext...

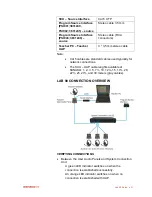
Page 57: ... Note Cat 5 cables are standard cables used typically for network connections The SCU UAP cable lenghts available at SANAKO 1 2 3 5 7 10 12 15 17 20 22 25 27 and 30 meters gray cables LAB 90 CONNECTION OVERVIEW VERIFYING CONNECTIONS Between the User Audio Panels and System Connection Unit A green LED indicator switches on when the connection is established successfully An orange LED indicator swit...

Page 58: ...he external source System Serial Interface Headsets Note The cable between the Source Interface and external source is not included DUAL CHANNEL PROGRAM SOURCE INTERFACE The Dual Channel Program Source Interface allows you to connect two external audio sources to a single SCU port DIAGRAM OF HARDWARE CONNECTIONS 1 The PSI is connected to the SCU with a standard Cat 5E LAN cable 2 The external sour...

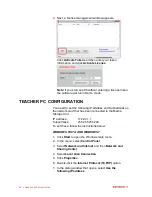
Page 59: ... encoder codec should be included CD ROM Mouse COM port LAN interface card 100Mbits s optional INSTALLING THE LAB 90 PROGRAM 1 Insert the Lab 90 DVD ROM into your computer s DVD ROM drive The installation wizard starts If not open Windows Explorer select the DVD ROM drive and double click the Setup exe file 2 Follow the instructions in the installation program 3 At the end of the installation sele...

Page 60: ...nd Subnetmask on the network card that has been connected to the Media Storage Unit IP address 172 24 1 1 Subnetmask 255 255 255 248 To set these follow the instructions below WINDOWS VISTA AND WINDOWS 7 1 Click Start to open the Windows main menu 2 In the menu select Control Panel 3 Select Network and Internet and then Network and Sharing Center 4 Select Local Area Connection 5 Click Properties 6...

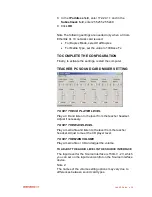
Page 61: ...ARD MIXER SETTING TO SET THE CD PLAYER LEVEL Play a CD and listen to the level from the teacher headset Adjust if necessary TO SET THE WAVE LEVEL Play a media file and listen to the level from the teacher headset Adjust to meet the CD player level TO SET THE MAIN VOLUME Play a media file or CD and adjust the volume TO ADJUST THE AUDIO LEVEL IN THE SOURCE INTERFACE The input level for the Source In...

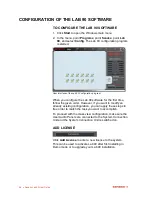
Page 62: ... software for the first time follow the given order However if you want to modify an already existing configuration you can apply these steps in free order to match the task you want to accomplish To proceed with the class view configuration make sure the User Audio Panels are connected to the System Connection Unit and the System Connection Unit is switched on ADD LICENSE Click Add License to ent...

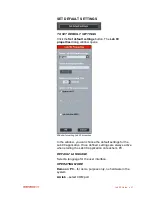
Page 63: ...r setting Lab 90 properties In the window you can choose the default settings for the Lab 90 application Once defined settings are always active when starting the Lab 90 application on teacher s PC DEFAULT LANGUAGE Select a language for the user interface OPERATING MODE Demo on PC for demo purpose only no hardware in the system AA lab select COM port ...

Page 64: ...cking the right mouse button opens a menu list From the list you can a select to view Workstation Info displays the workstation s port number and b select to remove the position You can also select several student icons at a time and align them as appropriate To align the icons do as follows With the left mouse button pressed down drag the mouse pointer over those students icons you want to align ...

Page 65: ...e connected audio panel appears the current workstation number You can now enter a new workstation number 10 To enter the number press the number keys in the audio panel The number is shown on the audio panel s display 11 If you want to edit the given number press the Clear key in the audio panel and enter the number again Note that for a one digit number is needed a leading zero for example 09 12...

Page 66: ...io Sources The following dialog opens Lab 90 source configuration window Define the Source Type Video sources must be defined as External Source Dual Channel PSI L or Dual Channel PSI R To do this select the option from the menu list that opens by clicking the arrow button next to the field SOURCE TYPE Media File Program file on Teacher PC PC Audio CD CD player on Teacher PC Student Line In Audio ...

Page 67: ...wn name could help the user in recognizing the source when there is more than one external source The edited name is displayed in the Source List in the graphical user interface of Lab 90 3 In the Port Number field select a port number to which the source is connected The Student Line In source type doesn t require a port number 4 Proceed similarly with other audio sources 5 In the Video Source fi...

Page 68: ...do is to set the video connections For a description see Set audio sources In Lab 90 you can have a variety of audio sources to work with and you can customize the audio source settings as appropriate In audio source configuration you name the sources you want to use in your Lab 90 classes and define where they are connected in the system When the configuration is completed you can view the select...

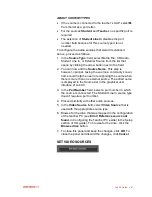
Page 69: ...ected to the Source Interface e g recorder or CD player Dual Channel PSI Two external audio sources connected to one SCU port ABOUT SOURCE TYPES If the source is connected to the teacher s UAP select M from the list as a port letter For the sources Student and Teacher no specific port is required The selection of Student Line In disables the port number field because for this source type it is not...

Page 70: ...field select Video Source that is used with the appropriate source type 13 Browse for the drive that was mapped in the configuration of the teacher PC see Error Reference source not found in Configuring the Teacher PC earlier in the Setup section of this guide To browse for the drive click the Browse drive button 14 To close this panel and keep the changes click OK To close the panel and discard t...

Page 71: ...BLESHOOTING IN THE SYSTEM CONNECTION UNIT THE GREEN LED IS BLINKING OR NOT AT ALL LIT The System Connection Unit is not switched on The User Audio Panel is defective Cable is faulty LCD OF THE USER AUDIO PANEL IS NOT ACTIVE Replug the connector between the System Connection Unit and User Audio Panel AUDIO CAN T BE HEARD Make sure Lab 90 is not in Demo mode CD AUDIO OR MEDIA FILE AUDIO CAN T BE HEA...

Page 72: ......

Page 73: ...ent AUDIO SOURCE In the Lab 90 sessions you can use various audio and video devices such as tape recorders video recorders CD players sound cards etc You can also choose digitized video and audio material AVI WAV MP3 as well as a student or yourself as the source AUTOMONITOR An easy way of monitoring all the present workstations is the automonitoring scanning mode where all the present workstation...

Page 74: ... the student recorder and the counter value min sec LED INDICATOR Light emitting diode LED is a light that is lit on the User Audio Panel to indicate active answer MANUAL In the Pair and Group Discussion activity a method to set up pairs or groups You can freely select the students you want to form a pair or group MEDIA FILE A media file is a digitized audio and or video file for example in WAV AV...

Page 75: ...ear the controls for the activity you select For example if you select the listening comprehension activity only those controls that are necessary to complete the listening comprehension activity appear SESSION STATUS BAR As you create sessions color coded status bars stack at the bottom of the Lab 90 window The Session Status Bar provides useful information about your sessions status You can see ...

Page 76: ...e lower part of the Lab 90 window between the class view and Session Status Bar a bar that guides you throughout your class The tooltip texts on the right hand side of the bar tell you what you can do in different parts of the Lab 90 window On the left hand side of the Status bar is displayed the teacher s name and class ID USER AUDIO PANEL Student s user interface By pressing the keys on this aud...

Page 77: ...ind workstations 58 operating mode 57 set audio sources 60 set default settings 57 set video connections 62 set video sources 61 Creating a session 29 D Default language 57 Dual Channel Program Source Interface 50 52 F Find workstations 58 G Graphical User Interface 4 6 moving 7 Group Discussion 21 40 GUI See Graphical User Interface H Hardware installation 48 Help 7 I Installation 48 configuratio...

Page 78: ...30 selecting members 29 session controls 30 Session Call 28 Session controls 30 Session Screen 8 session tabs 9 Session Status Bar 9 activity 10 duration 10 lock mode 10 source 10 Sessions 3 5 Set audio sources 60 Set video connections 62 Set video sources 61 Setup 48 Software installation 53 Software update 63 Starting Lab 90 17 Student Call 28 Student icons 14 Session student 15 Student basic 15...

Page 79: ...Index 73 ...

Reviews: