background image

mode.  

z

The Color Temperature item is only applicable if the Color Tone item is turned off.  

z

The Auto Wide option for the Size item is only available in TV mode. (Only applicable for 
monitors that support TV.)  


Picture PC: Displays the current state of MagicBright, contrast, brightness, color tone, red, green, 
blue, color temp, and size. You can control each item including Auto Adjustment by clicking it and 
changing the setting in the list view. 

z

This item is only available in PC mode (PC, BNC, DVI, MagicInfo).  

z

The Contrast and Brightness items are only applicable if MagicBright is in Custom mode.  

z

The Red, Green, and Blue items are only applicable if the Color Tone item is set to Custom.  

z

Color Temperature is only applicable if the Color Tone item is turned off.  

z

To perform Auto Adjustment, click the displayed button.  


Time: Configures the current time and displays the state of the on and off timers. You can control 
each item by clicking it and changing the setting in the list view.


PIP: Displays the external input and the size for the PIP. You can control each item including the 
position of the PIP, and Swap by clicking on it and changing the setting in the list view. 

z

The Position and Swap items are write-only. Their existing settings cannot be read. You 
have to set them directly when needed.  

z

Each item is only enabled if the Size item is set to a setting other than Off.  

z

You can turn the PIP on by setting the Size item to a setting other than Off.  


Sound: Displays the current state of the Sound Mode, Bass, Treble, Balance, SRS TSXT, and 
Sound Select. You can control each item by clicking on it and changing the setting in the list view. 

z

The Bass, Treble, and Balance items are only applicable if the Sound Mode item is set to 
Custom.  


Signal Balance: Displays the information for the Signal Balance On/Off, R Phase, G Phase, B 
Phase, Gain, and Sharpness. You can control each item by clicking on it and changing the setting 
in the list view. 

z

The R Phase, G Phase, B Phase, Gain, and Sharpness items are only applicable if the Signal 
Balance item is set to On.  


Maintenance: Displays the state of the Lamp Control, Screensaver, Screen Matrix Display, Screen 
Settings, and Safety Lock. You can control each item by clicking it and changing the setting in the 
list view. 

z

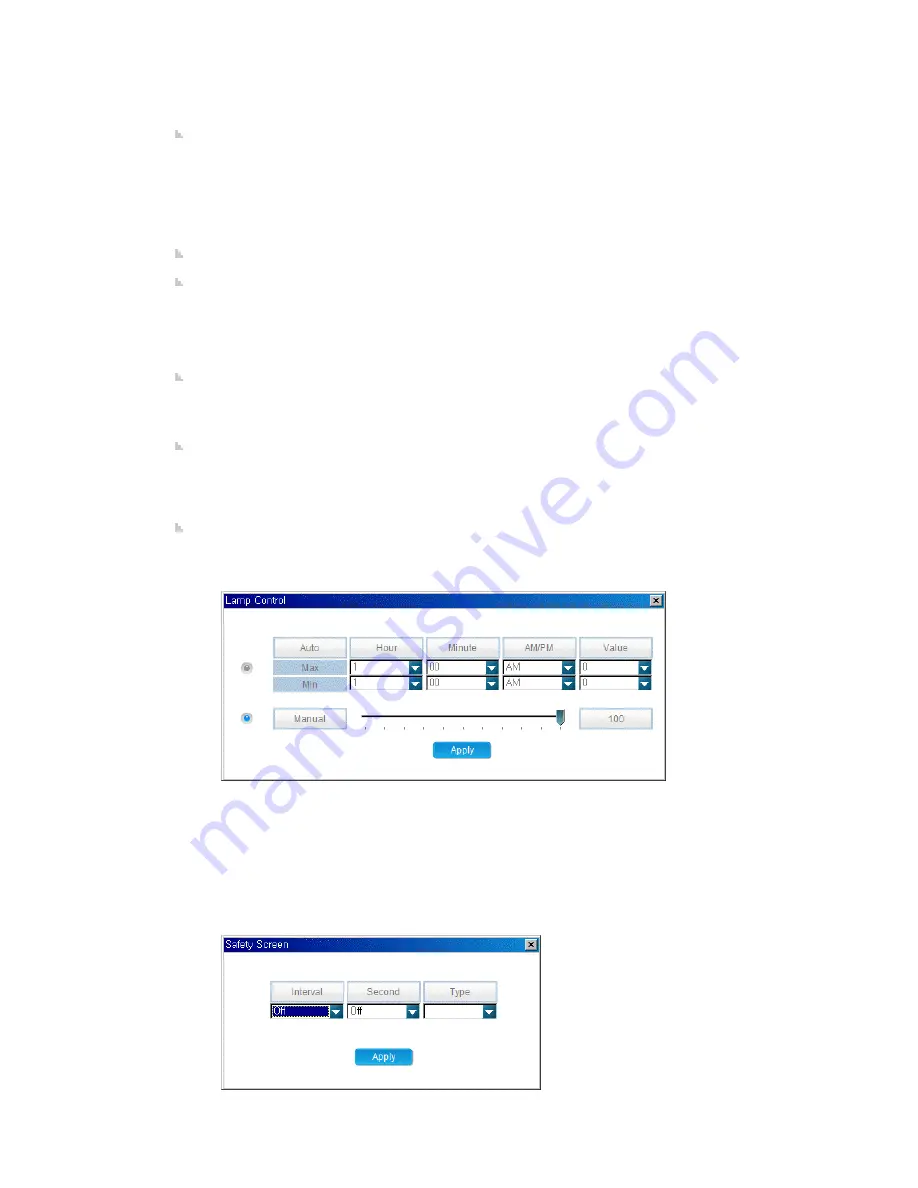
Lamp Control 


1) Automatic  
 
- Hour: Enter the hour to apply the lamp adjustment. (Maximum and minimum values) 
- Minute: Enter the minute to apply the lamp adjustment. (Maximum and minimum values) 
- AM/PM : Select AM or PM to apply the lamp adjustment. (Maximum and minimum values) 
- Value : Select the value to apply the lamp adjustment. (Maximum and minimum values) 
 
2) Manual - Select a value to apply to the lamp by moving the slider. 
 

z

Safety Screen 


1) Interval: Enter the time interval when the screensaver is activated. 
2) Second: Enter the duration the screensaver will run. 

Summary of Contents for SyncMaster 400CXN

Page 1: ...SyncMaster 400CXN 460CXN LCD Display User Manual ...

Page 2: ...ed for extended period of time set your computer to DPM If using screen saver set it to active screen mode The images here are for reference only and are not applicable in all cases or countries Shortcut to Anti Afterimage Instructions Do not use a damaged power cord or plug or a damaged or loose power outlet Otherwise this may result in electric shock or fire Do not touch the power plug with wet ...

Page 3: ...ed Service Center when installing your monitor in a location with heavy dust high or low temperatures high humidity and exposed to chemical substances and where it operates for 24 hours such as at airports train stations etc Failure to do so may cause serious damage to your monitor Ensure that at least two persons lift and move the product Otherwise it may be dropped and cause personal injury and ...

Page 4: ... performance Bend the outdoor antenna cable downwards at the location where it goes in so that rainwater does not flow in If rainwater enters the product it may result in electric shock or fire Install the antenna far away from any high voltage cables If the antenna touches or falls onto a high voltage cable it may result in electric shock or fire Ensure that the packaging vinyl is kept away from ...

Page 5: ...pecified cloth adding only a little water As the product may be scratched if there is any foreign material on the cloth make sure to shake it thoroughly before using it When cleaning the product do not spray water directly onto the main body of the product Ensure that water does not enter the product and that it is not wet Otherwise this may result in electric shock fire or a malfunction Others Th...

Page 6: ...m perature Do not place any containers containing water vases flowerpots med icines as well as any metal on the product If water or a foreign material enters the product disconnect the power cord and contact a Service Center This may result in a product malfunction electric shock or fire Do not use or keep combustible spray or flammable material near the product Otherwise this may result in an exp...

Page 7: ...hang onto the product or climb up onto the product The product may fall and cause personal injury or death If you do not use the product for a long period of time disconnect the power cord from the power outlet Otherwise this may result in overheating or fire due to dust and may result in fire due to electric shock or leakage Do not place any heavy items or toys or confectionery such as cookies et...

Page 8: ...herwise this may result in electric shock or fire Do not use a humidifier or kitchen table near the product Otherwise this may result in electric shock or fire When there is a gas leak do not touch the product or the power plug but ventilate immediately If a spark occurs it may cause an explosion or fire If the product has been turned on for a long time the display panel becomes hot Do not touch i...

Page 9: ...LCD Display If any items are missing contact your dealer Contact a local dealer to buy optional items Note This stand is not for the Floor Standing Type Unpacking LCD Display Manuals Quick Setup Guide Warranty Card Not available in all loca tions User s Guide Cables D Sub Cable Power Cord Others ...

Page 10: ... in all loca tions Cleaning Cloth HDD Cover Sold separately DVI Cable Wall Mount KIT LAN Cable Semi Stand KIT Note Cleaning Cloth is only provided for highly polished black products as a product feature Your LCD Display Front MENU button MENU Introduction ...

Page 11: ... Display at the time PC DVI AV HDMI MagicInfo TV D MENU Opens the on screen D MENU Power button Use this button for turning the LCD Display on and off Brightness Sensor The product s Brightness Sensor function automatically detects the surrounding brightness using a brightness sensor and adjusts its brightness accordingly Power indicator Shows PowerSaver mode by blinking green Note See PowerSaver ...

Page 12: ...DMI AUDIO IN PC DVI HDMI Audio Connection Terminal Input DVI PC HDMI IN HDMI Connect the HDMI terminal at the back of your LCD Display to the HDMI terminal of your dig ital output device using a HDMI cable DVI PC HDMI IN RGB PC Video Con nection Terminal Using a D Sub Cable 15 pin D Sub PC mode Analog PC DVI PC HDMI IN DVI PC Video Con nection Terminal Using a DVI Cable DVI D to DVI D DVI mode Dig...

Page 13: ...ble to the ANT IN port on the rear side of the LCD Display Make sure to use a TV antenna cable sold separately as the antenna cable RGB OUT LAN LAN Connection Terminal USB USB Connection Terminal Keyboard Mouse Mass Storage Device Com patible Note The number of LCD Displays that can be con nected to loopout may differ depending on the cables signal source etc With cables where there is no degradat...

Page 14: ...f the Kensington Lock may be dif ferent depending on its model Using the Anti Theft Kensington Lock 1 Insert the locking device into the Kensington slot on the LCD Display and turn it in the locking direction 2 Connect the Kensington Lock cable 3 Fix the Kensington Lock to a desk or a heavy stationary object Note See Connecting Cables for further information regarding cable connections Remote Cont...

Page 15: ...TTONS TTX MIX STILL AUTO S MODE MDC LOCK SOURCE ENTER PRE CH CH P D MENU GUIDE RETURN Up Down Left Right buttons EXIT SRS MagicInfo P MODE DUAL MTS PIP SWAP 1 POWER Turns the product On 2 Off Turns the product Off 3 Number Buttons Press to change the channel Introduction ...

Page 16: ...o freeze the screen Press it again to un freeze 14 AUTO AdjuststhescreendisplayautomaticallyinPC mode Bychanging the resolution in the control panel auto function is performed 15 S MODE When pressing this button the current mode is displayed at the bottom centre of the screen The LCD Display has a built in high fidelity stereo amplifier Then press the button again to circle through available preco...

Page 17: ...he image you are watching Then push button again to circle through available preconfigured modes Entertain Internet Text Custom 29 DUAL MTS DUAL STEREO MONO DUAL l DUAL ll and MONO NICAM MONO NICAM STEREO can be operated depending on the broadcasting type by using the DUAL button on the remote control while watching TV MTS You can select MTS Multichannel Television Stereo mode Audio Type MTS S_Mod...

Page 18: ...LCD Display Head Introduction ...

Page 19: ...mation Please contact your nearest SAMSUNG Distributor to place an order After your order is placed installation professionals will visit you and install the bracket At least 2 persons are needed in order to move the LCD Display SAMSUNG is not responsible for any product damage or any injury caused by installation at customer s discretion Introduction ...

Page 20: ... when the installation is done by the customer This product is for installing on cement walls The product may not stay in place when installed on plaster or wood Components Only use the components and accessories shipped with the product Wall Bracket 1 Hinge Left 1 Right 1 Plastic Hanger 4 Screw A 11 Screw B 4 Anchor 11 Wall Bracket Assembly Note There are two hinges left and right Use the correct...

Page 21: ...product is correct If the length is too short or long loosen all or some of the 4screws on the wall bracket to adjust the length A Length between the two locking holes 3 Check the installation diagram and mark the drill points on the wall Use the 5 0 mm bit to drill holes deeper than 35 mm Fix each anchor in the corresponding hole Match each of the brackets and hinge holes to the corresponding anc...

Page 22: ...e plastic hanger Notice Mount the product on the wall bracket and make sure it is properly fixed to the left and right plastic hangers Be careful when installing the product on the bracket as fingers can be caught in the holes Make sure the wall bracket is securely fixed to the wall or the product may not stay in place after installation 3 Tighten the 4 screws in step 2 plastic hanger screw B to t...

Page 23: ...e safety pin 3 to securely hold the product to the bracket A LCD Display B Wall Bracket C Wall Wall Bracket Angle Adjustment Adjust the bracket angle to 2 before installing it on the wall 1 Fix the product to the wall bracket 2 Hold the product at the top in the center and pull it forward direction of the arrow to adjust the angle Note You can adjust the bracket angle between 2 and 15 Introduction...

Page 24: ...Make sure to use the top center and not the leftor the right side of the product to adjust the angle Mechanical Layout 460CXn Mechanical Layout LCD Display Head Introduction ...

Page 25: ...mation Please contact your nearest SAMSUNG Distributor to place an order After your order is placed installation professionals will visit you and install the bracket At least 2 persons are needed in order to move the LCD Display SAMSUNG is not responsible for any product damage or any injury caused by installation at customer s discretion Introduction ...

Page 26: ... is done by the customer This product is for installing on cement walls The product may not stay in place when installed on plaster or wood Components Only use the components and accessories shipped with the product Wall Bracket 1 Hinge Left 1 Right 1 Plastic Hanger 4 Screw A 11 Screw B 4 Anchor 11 Wall Bracket Assembly Note There are two hinges left and right Use the correct one 1 Insert and tigh...

Page 27: ...the length is too short or long loosen all or some of the 4screws on the wall bracket to adjust the length A Length between the two locking holes 3 Check the installation diagram and mark the drill points on the wall Use the 5 0 mm bit to drill holes deeper than 35 mm Fix each anchor in the corresponding hole Match each of the brackets and hinge holes to the corresponding anchor holes and insert a...

Page 28: ...e plastic hanger Notice Mount the product on the wall bracket and make sure it is properly fixed to the left and right plastic hangers Be careful when installing the product on the bracket as fingers can be caught in the holes Make sure the wall bracket is securely fixed to the wall or the product may not stay in place after installation 3 Tighten the 4 screws in step 2 plastic hanger screw B to t...

Page 29: ...e safety pin 3 to securely hold the product to the bracket A LCD Display B Wall Bracket C Wall Wall Bracket Angle Adjustment Adjust the bracket angle to 2 before installing it on the wall 1 Fix the product to the wall bracket 2 Hold the product at the top in the center and pull it forward direction of the arrow to adjust the angle Note You can adjust the bracket angle between 2 and 15 Introduction...

Page 30: ...Make sure to use the top center and not the leftor the right side of the product to adjust the angle Introduction ...

Page 31: ...formation on connecting AV input devices refer to the User Controls under Adjusting Your LCD Display Connect the power cord for your LCD Display to the power port on the back of the LCD Display Trun on the power switch There are 2 ways to connect the D sub to your LCD Display Choose one of the following Using the D sub Analog connector on the video card Connect the D sub to the 15 pin RGB port on ...

Page 32: ... input devices such as DVD players VCR s or camcorders as well as your computer can be con nected to the LCD Display For detailed information on connecting AV input devices refer to the contents under Adjusting Your LCD Display Connecting TV Note You may view television programs on the LCD Display if it is connected to an antenna or CATV cable without installing any separate TV reception hardware ...

Page 33: ...ak signal causing poor reception Purchase and install a signal amplifier for better reception Connecting AV Devices 1 Connect the port of the DVD VCR DVD DTV Set Top Box to the R AUDIO L port of the LCD Display 2 Then start the DVD VCR or Camcorders with a DVD disc or tape inserted 3 Select AV using the SOURCE Note The LCD Display has AV connection terminals to connect AV input devices like DVDs V...

Page 34: ...own here are usually included with a Camcorder If not check your local electronics store If your camcorder is stereo you need to connect a set of two cables Connecting Using a HDMI Cable Note Input devices such as digital DVD are connected to the HDMI terminal of the LCD Display using the HDMI cable You cannot connect a PC to the HDMI terminal Connecting Using a DVI to HDMI Cable Note Connect the ...

Page 35: ...se electric shock Make sure to wire the earth lead in correctly before connecting the AC power When un wiring the earth lead make sure to disconnect the AC power in advance Note AV input devices such as DVD players VCR s or camcorders as well as your computer can be con nected to the LCD Display For detailed information on connecting AV input devices refer to the User Controls under Adjusting Your...

Page 36: ...er When un wiring the earth lead make sure to disconnect the AC power in advance Note AV input devices such as DVD players VCR s or camcorders as well as your computer can be con nected to the LCD Display For detailed information on connecting AV input devices refer to the User Controls under Adjusting Your LCD Display Note You can connect USB devices such as a mouse or keyboard Connections ...

Page 37: ...rating system you have Prepare a blank disk and download the driver program file at the Internet web site shown here Internet web site http www samsung com Worldwide Installing the Monitor Driver Automatic 1 Insert CD into the CD ROM drive 2 Click Windows 3 Choose your monitor model in the model list then click the OK button 4 If you can see following message window then click the Continue Anyway ...

Page 38: ...ert your Manual CD into your CD ROM drive 2 Click Start and Control Panel Then double click on Appearance and Personalization 3 Click Personalization and then Display Settings 4 Click Advanced Settings 5 Click Properties in the Monitor tab If the Properties button is deactivated it means the configuration for your monitor is completed The monitor can be used as is If the message Windows needs is d...

Page 39: ...posted on Samsung Monitor homepage 6 Click Update Driver in the Driver tab 7 Check the Browse my computer for driver software checkbox and click Let me pick from a list of device drivers on my computer 8 Click Have Disk and select the folder for example D Drive where the driver setup file is located and click OK Using the Software ...

Page 40: ...l that matches your monitor from the list of monitor models on the screen and click Next 10 Click Close Close OK OK on the following screens displayed in sequence Microsoft Windows XP Operating System Using the Software ...

Page 41: ... Click Display icon and choose the Settings tab then click Advanced 4 Click the Properties button on the Monitor tab and select Driver tab 5 Click Update Driver and select Install from a list or then click Next button 6 Select Don t search I will then click Next and then click Have disk Using the Software ...

Page 42: ...lowing message window then click the Continue Anyway button Then click OK button Note This monitor driver is under certifying MS logo and this installation doesn t damage your system The certified driver will be posted on Samsung Monitor homepage http www samsung com 9 Click the Close button then click OK button continually Using the Software ...

Page 43: ...on is active click the Properties button then follow next steps continually 5 Click Driver and then click on Update Driver then click on the Next button 6 Choose Display a list of the known drivers for this device so that I can choose a specific driver then click Next and then click Have disk 7 Click the Browse button then choose A D Driver 8 Click the Open button then click OK button 9 Choose you...

Page 44: ...r clicking Test If the screen is not normal change to a different mode lower mode of resolution colors or frequency Note If there is no Mode at All Display Modes select the level of resolution and vertical frequency by referring to the Preset Timing Modes in the user guide Linux Operating System To execute X Window you need to make the X86Config file which is a type of system setting file 1 Press ...

Page 45: ...le 3 When the Install Shield Wizard window appears click Next 4 Select I agree to the terms of the license agreement to accept the terms of use 5 You are required to log in to the MagicInfo Pro Server program Please enter the password to login The password cannot be changed when you are logged in Using the Software ...

Page 46: ...6 Choose a folder to install the MagicInfo Pro program 7 Click Install Using the Software ...

Page 47: ...8 The Setup Status window appears 9 It is recommended restarting the system for the normal operation of the MagicInfo Pro Server program Click Finish Using the Software ...

Page 48: ...cutable icon appears on your desktop 11 Double click the icon to start the program System Requirements CPU RAM Ethernet OS Application Minimum P1 8 256M 100M 1G Windows XP Windows 2000 Serv ice Pack 4 WMP 9 or later Recommen ded P3 0Ghz 512M Using the Software ...

Page 49: ...C a standard of serial communication is used for the communication between a PC and a display Therefore a serial cable should be connected between the serial port on a PC and the serial port on a display Main Screen Click Start Program Samsung MDC System to start the program Select a set to see the volume of the selected set within the slider ...

Page 50: ...ng for the PC Serial Port can change The original value is COM1 5 Click Select all or Clear to select or clear all displays 6 Use Grid to view brief information on selected display 7 Select a display from Display Selection 8 Use Control Tools to control displays Note The remote control Enable Disable function operates whether or not the power is On Off and this applies to all displays connected to...

Page 51: ...n the Port Selection Menu 3 If the exact port name that is connected to the LCD Display using a serial cable is not selected communication will be unavailable 4 The selected port is stored in the program and used for the next program as well Power Control 1 Click Power Control of the main icons and the Power Control screen appears ...

Page 52: ...sary to Power Control 1 Power Status 2 Input 3 Image Size 4 On Timer 5 Off Timer 2 Use the Select All button or Check Box to choose a display to control Power Control allows controlling some of the functions of the selected display 1 Power On Off ...

Page 53: ...electing one set at a time turn on the Mute function for the selected set The Mute function is disabled automatically when you adjust the volume level The values return to the default settings when you undo the selections or choose Select All The Power Control feature is available for all displays The Volume Control and Mute features are available only for the displays whose power status is ON Inp...

Page 54: ...ideo Changes the Input Source of the selected display to S Video 8 Component Changes the Input Source of the selected display to Component 9 MagicInfo The Input source of MagicInfo works only on MagicInfo model 10 HDMI Changes the Input Source of the selected display to HDMI 11 Channel Channel arrow appears when the Input Source is TV TV Source can be selected only in products with TV and controll...

Page 55: ...hen you click Image Size the PC Source tab first appear The Image Size Control button controls Image Size available for PC BNC DVI 6 Video Source Click the Video Source tab to control Image Size for respective Input Source The Input source of MagicInfo works only on MagicInfo model The Input source of TV works only on TV model Image Size Control is available only for the displays for which power s...

Page 56: ... source 3 Switch Image Size of the selected display randomly Note Auto Wide Zoom1 and Zoom2 are not available for selection when the input signal type for Component and DVI HDCP is 720p or 1080i The Auto Wide mode is available only for TV AV and S Video The Input source of MagicInfo works only on MagicInfo model The Input source of TV works only on TV model The Image Size Control feature is availa...

Page 57: ...ff Time Setup of the selected display 4 Shows the On Time settings 5 Shows the Off Time settings The Input source of MagicInfo works only on MagicInfo model The Input source of TV works only on TV model Time Control is available only for the displays for which the power status is ON At On Time Setup TV Source functions only for TV Model At On Time Setup MagicInfo Source functions only for MagicInf...

Page 58: ...Small 5 Double 1 Turns on the PIP of the selected display and changes the size to Double 1 6 Double 2 Turns on the PIP of the selected display and changes the size to Double 2 7 Double 3 Picture By Picture Turns on the PBP of the selected display and changes the size to Double 3 The Input source of MagicInfo works only on MagicInfo model The Input source of TV works only on TV model PIP Size can b...

Page 59: ...AV 6 S Video Changes the source of the PIP of the selected display to S Video 7 Component Changes the source of the PIP of the selected display to Component 8 HDMI Changes the source of the PIP of the selected display to HDMI Note Some of the PIP Sources may not be available for selection depending on the input source type of the Main Screen The Input source of MagicInfo works only on MagicInfo mo...

Page 60: ...ay 4 Sharpness Adjusts Sharpness of the selected display 5 Color Adjusts Color of the selected display 6 Tint Adjusts Tint of the selected display Available only for NT 7 Color Tone Adjusts the Color Tone for the selected display 8 Color Temp Adjusts the Color Temp for the selected display 9 Brightness Sensor Adjusts the Brightness Sensor for the selected display 10 Dynamic Contrast Adjusts the Dy...

Page 61: ...ness Adjusts Brightness for the selected display 4 Red Adjusts red Color of the selected display Available only for NT 5 Green Adjusts green Color of the selected display Available only for NT 6 Blue Adjusts blue Color of the selected display Available only for NT 7 Color Tone Adjusts the Color Tone for the selected display 8 Color Temp Adjusts the Color Temp for the selected display 9 Brightness ...

Page 62: ...ode to CUSTOM 1 Audio Controls audio settings for all input sources 2 Bass Adjusts Bass of the selected display 3 Treble Adjusts Treble of the selected display 4 Balance Adjusts Balance of the selected display 5 SRS TS XT SRS TS XT Sound ON OFF of the selected display 6 Sound Select Select either Main or Sub when PIP is On The Input source of MagicInfo works only on MagicInfo model The Input sourc...

Page 63: ...tion Adjusts Position of the selected display 5 Auto Adjustment Self Adjust to the incoming PC signal The Input source of MagicInfo works only on MagicInfo model The Input source of TV works only on TV model Settings Control is available only for the displays for which the power status is ON Maintenance Lamp Control 1 Click on the Maintenance icon in the Main Icon column to display the Maintenance...

Page 64: ...mp Control 3 Manual Lamp Control Allows you to adjust the backlight of the selected display regardless of the time The Auto Lamp Control automatically turns off if you adjust using the Manual Lamp Control The Maintenance Control feature is available only for the displays whose power status is ON The Input source of MagicInfo works only on MagicInfo model The Input source of TV works only on TV mod...

Page 65: ...ixel Bar and Eraser by Screen Type The Input source of MagicInfo works only on MagicInfo model The Input source of TV works only on TV model Setting Second you can set to 1 2 3 4 5 for Scroll Type and to 10 20 30 40 50 for Pixel Bar and Eraser Type The Maintenance Control feature is available only for the displays whose power status is ON Maintenance Video Wall 1 Click on the Maintenance icon in t...

Page 66: ...by pressing a number in the selected mode z The MDC program supplied by Samsung supports up to 5x5 LCD Displayes 3 On Off Turns on off the Video Wall function of the selected display 4 Format The format can be selected to see a divided screen z Full z Natural You may not operate this function in MagicInfo The Input source of TV works only on TV model The Maintenance Control function is available o...

Page 67: ...me is showing Apply current time to synchronize the display clocks 5 The remote may not function properly when you turn off the remote Function disconnect the RS 232C cable or exit the program in an Irregular manner Rerun the program and turn the remote function again to Restore normal functions Note This program may malfunction due to problems in communication circuits or interference from electr...

Page 68: ...server is MagicInfo Pro only the monitors whose server name is MagicInfo Pro can receive schedules from it If a monitor cannot find a server whose name is the same as the server name configured in it it waits until a server with that name appears However if Auto Connection is enabled the monitor attempts to connect to other servers and connects to the first server that responds Major Functions of ...

Page 69: ...s allow you to control view the status of and diagnose monitors 7 VNC The VNC function allows you to connect to a monitor remotely and view the status of and control and diagnose it 8 Update and PXE The Update function allows you to easily update the programs on the monitor The PXE allows you to recover the operating system image for a monitor ...

Page 70: ...o Pro runs select Log In from the File menu 3 Enter the user name and password and click OK If you log in for the first time select Administrator as enter the user name and the password you set when installing the program For information on how to install MagicInfo Pro refer to Installing MagicInfo Pro Using the Software Connecting a Monitor to a Server Setting Up a Server 1 Click Option from the ...

Page 71: ... make sure to select Direct connection using an IP address in the Value field of the Network Connection item as the connection method When setting up the monitor make sure to use the same settings Setting up the Monitor 1 Set the source of the monitor to MagicInfo Pro and then enter the IP address and server name using the Setup menu or the Network Connection item They must be the same as the IP a...

Page 72: ...the server File Sub Menus Registering a Library 1 Select Library from the File menu to open the Library View 2 Select a photo file music file movie file document or Flash file etc on the server 3 Right click on the selected file and select Send To Library from the displayed menu to register it to the library ...

Page 73: ...click either Photo Movie Flash Web Text or Source from the displayed menu 3 When the mouse pointer changes to the crosshair icon drag it to the Edit View to set the area for the file to be displayed 4 When an area is set tree items are added to the Tree View in the same order as shown under the Background item The added tree items differ depending on the file type selected in step 2 You can select...

Page 74: ...2 Select the monitors to which the schedule is to be registered in the Tree View at the left The Operating Mode of the selected monitors must be set to Schedule if they can display the schedule registered on the server 3 Click a date and time in the Edit View at the right to select the date and time when the schedule is to be performed Right click the Edit View and select Add from the displayed me...

Page 75: ... to open the Message View 2 Select the checkbox next to the monitors for which you want to register a message 3 Configure the settings for the message in the List View at the bottom right The text you enter here will be displayed on the selected monitors 4 To display the message on the selected monitors click the Send Message icon in the toolbar under the menu bar To hide the message which will be...

Page 76: ......

Page 77: ...sword you enter when installing MagicInfo Pro becomes the password of the Administrator account by default Log Out z Once you are logged onto the server you can log out If you log out from the server all created views are closed and if there are any unsaved changes a new window is displayed so that you can save them Change Password z Changes the password of the currently logged in account User Acc...

Page 78: ...ols Menu Synchronize z Synchronizes the library files of the main server with the files of the content server Option z Changes the server settings For more information refer to the Options section Library ...

Page 79: ...d the files that you can register to a library are displayed in the list view in the right pane Displays all the folders which are created in the libraries in a tree view Function If you select a folder its subfolders and a list of library files are displayed in the list view in the right pane Hot Key z F2 key Renames the selected folder z Delete key Deletes the selected folder its subfolder s and...

Page 80: ...view Function If you select a folder its subfolders and a list of content servers are displayed in the list view in the right pane Hot Key z F2 key Renames the selected folder z Delete key Deletes selected folder its sub folder s and all the files under the selected folder and its subfolder Drag Drop z Contents Server If you drag and drop the content servers onto a content server folder in the tre...

Page 81: ...tion is not supported for folders Context Menu z Open If you click Open for a folder you are moved to that folder If you click Open for a file the file is run z Send To Library If you click Send To Library for the selected files they are registered to the library Displays the subfolders and files under the selected folder Function Double Click z Double click to move to the upper folder z Double cl...

Page 82: ...o the selected location However this menu item is deactivated when the folder selected in the tree view is a Library or Office folder z Rename Renames the selected folder However this menu item is deactivated when a library or office folder is selected in the tree view This menu item is not supported for library files z Delete Deletes the selected folders and library files However this menu item i...

Page 83: ... rename a file z Delete key Deletes the selected folders subfolders and library files z Ctrl X keys Cuts the selected library files to the clipboard so that you can paste them to other location However this hot key is not supported for folders z Ctrl V keys Pastes the library files cut to the clipboard to the selected location However you cannot paste them when a library or office folder is select...

Page 84: ...rted for a screen file z Delete Deletes the selected screen files and folders However if the selection includes which refers to a higher level folder this menu item is deactivated z Cut Cuts the selected screen files to the clipboard so that you can paste them to another location However this menu item is deactivated when a folder is selected z Delete Deletes the selected screen files and folders ...

Page 85: ...by the user for the selected screen You can edit them z New Folder This is only activated when neither a folder nor a file is selected If you select this menu item a new folder is created in the selected location Hot Key z F2 key Renames the selected folder However you cannot rename a file z Delete key Deletes the selected folders subfolders and screen files z Ctrl X keys Cuts the selected screen ...

Page 86: ...y created content server Server Name The name of the newly created content server Comments Comments about the newly created content server z New Folder This is only activated when neither a folder nor a file is selected If you select this menu item a new folder is created in the selected location z Cut Cuts the selected content servers to the clipboard so that you can paste them to another locatio...

Page 87: ...ected content servers to the clipboard so that you can paste them to another location However this hot key is not supported for folders z Ctrl V keys Pastes the content servers cut to the clipboard to the selected location Content Server Status z This icon is displayed when the content server is connected z This icon is displayed when the content server is sychronizing z This icon is displayed whe...

Page 88: ...Hot Key z Ctrl C Copies the selected message to the clipboard so that you can paste it to another location ...

Page 89: ... changes a new window is displayed so that you can save them Save Save As z Saves the changes in the current screen file or as a new screen file Close z Closes the screen view you are working with If there are any unsaved changes a new window is displayed so that you can save them Log In z You must log in to the server before you can use any one of its functions You can log in to the server to per...

Page 90: ...nd dropping it into the Screen Edit window More than one Source Area cannot be played at the same time Therefore if the playing time of a source area overlaps the source area whose playing time ends later is played You can add areas for photo movie Flash web text and source Order z Changes the order of the currently selected area The source area is always at the topmost position Bring to Front Sen...

Page 91: ...ted in accordance with the order of the areas created in the Edit View You can check the area currently selected in the Edit View using the Tree View If you select a property of an area the detailed property information is displayed in the List View Context Menu ...

Page 92: ...sic function allows you to set the background music The Effect function allows you to set the effect used when the background changes z New Initializes the screen view you are currently working with If there are any unsaved changes a new window is displayed so that you can save them z Open Opens a screen file If there are any unsaved changes a new window is displayed so that you can save them z Sa...

Page 93: ... Screen Type Sets the type of background Color Photo File Office File Source List If Office File or Source List is selected you cannot create another area Color Selects the color to use when the background type is set to Color Photo File Selects the photo file when the background type is set to Photo File Aspect Ratio Selects the aspect ratio for the photo file when the background type is set to P...

Page 94: ...d To use an office file you must install the corresponding viewing program on your product You can select only one office file Source List Selects the source when the background type is set to Source List You can select only one source Photo File Office File Music File Changes the detailed properties and transfer mode for the selected file of each type z Transfer Mode Changes the mode in which the...

Page 95: ...reated Effect Effect Selects the type of effect to be applied when the background is created z None No effect is used z Slide The background is created while it is moving z Block The background is created with blocks z Fade In The background fades in when it is created Effect Speed Adjusts the speed of an effect being created Effect Direction Sets the direction when the Slide effect is selected Ef...

Page 96: ... photo is displayed The Effect function allows you to set an effect for when the background changes The following section describes the detailed options used with the Photo function Area Name Changes the area name You cannot use a name already used for another area name Lock Position Locks the position of the area Left Top Width Height Changes the position and size of the area The area positions m...

Page 97: ...o file is tiled continuously across the entire background Time Interval Sets the slide show time between selected photo files Background Type Sets the background type Color Picture File for the Photo area Color Selects the color when the background type for the Photo area is set to Color Transparency Selects the degree of transparency when the background type for the Photo area is set to Color If ...

Page 98: ...s when the background type for the Photo area is set to Picture File Sound Turns the background sound for the Photo area on or off Music File Selects a music file for the background in the Photo area Volume Controls the volume for the background music in the Photo area Repeat A music file can be played repeatedly When set to Repeat the music file is played repeatedly while the background for the P...

Page 99: ... music when the movie is displayed The Effect function allows you to set an effect for when the background changes z Effect Selects the type of effect to be applied when the Photo area is created None No effect is used Slide The Photo area is created while it is moving Block The Photo area is created with blocks Fade In The Photo Area fades in when it is created z Effect Speed Adjusts the speed of...

Page 100: ...han the background playing time Screen Movie File Selects the movie file to be played in the Movie area Aspect Ratio Selects the aspect ratio for the movie file to be played in the Movie area z Full The movie file is enlarged or reduced to fit the entire background z Original The movie file is displayed at the original size z Auto The movie file is enlarged or reduced to fit the entire background ...

Page 101: ...re File Only one picture file can be selected in the Movie area Picture Aspect Ratio Selects the aspect ratio for the photo file to be played in the Movie area when the background type of the Movie area is set to Picture File z Full The photo file is enlarged or reduced to fit the entire background z Original The photo file is displayed at the original size z Auto The photo file is enlarged or red...

Page 102: ... Adds and deletes a file and changes the playing order Effect z Effect Selects the type of effect to be applied when the Movie area is created None No effect is used Slide The Movie area is created while it is moving Block The Movie area is created with blocks Fade In The Movie area fades in when it is created z Effect Speed Adjusts the speed of an effect being created z Effect Direction Sets the ...

Page 103: ...nction allows you to set the effect for when the background changes If no flash player is installed on the PC where the server is installed the operation may not be normal Make sure to install a flash player Area Name Changes the area name You cannot use a name already used for another area name Lock Position Locks the position of the area Left Top Width Height Changes the position and size of the...

Page 104: ...put using the mouse in the Flash area Background Type Sets the background type Color Picture File for the Flash area Color Selects the color when the background type for the Flash area is set to Color Transparency Selects the degree of transparency when the background type for the Flash area is set to Color If the Transparency is set to a value under 100 the area which is placed beneath the presen...

Page 105: ...lash area is set to Picture File Sound Turns the background sound for the Flash area on or off Music File Selects a music file for the background in the Flash area Volume Controls the volume of the background music in the Flash area Repeat A music file can be played repeatedly When set to Repeat the music file is played repeatedly while the background for the Flash area is created Flash File Pictu...

Page 106: ...ground image and music when the web page is displayed The Effect function allows you to set the effect for when the background changes z Effect Selects the type of effect to be applied when the Flash area is created None No effect is used Slide The Flash area is created while it is moving Block The Flash area is created with blocks Fade In The Flash area fades in when it is created z Effect Speed ...

Page 107: ...me Duration Sets the playing time in seconds It cannot be longer than the background playing time Screen Website Sets a web page to display in the Web area Only one URL can be selected in the Web Area Refresh Sets the refresh time for the URL displayed in the Web area Input Enable You can input using the mouse in the Web area Offset Left Top Right Bottom Moves the position of the web page in the W...

Page 108: ... when the background type of the Web area is set to Picture File z Full The photo file is enlarged or reduced to fit the entire background z Original The photo file is displayed at the original size z Auto The photo file is enlarged or reduced to fit the entire background and keeps the original aspect ratio z Tile The photo file is tiled continuously across the entire background Picture Time Inter...

Page 109: ...own Adds and deletes a file and changes the playing order Effect z Effect Selects the type of effect to be applied when the Web area is created None No effect is used Slide The Web area is created while it is moving Block The Web area is created with blocks Fade In The Web area fades in when it is created z Effect Speed Adjusts the speed of an effect being created z Effect Direction Sets the direc...

Page 110: ...d The Effect function allows you to set the effect used when the background changes The following section describes the detailed options used with the Text function Area Name Changes the area name You cannot use a name already used for another area name Lock Position Locks the position of the area Left Top Width Height Changes the position and size of the area The area positions must be within the...

Page 111: ... the Text area Font Font Size Italic Bold Underline Strikeout Font Color Sets the formatting for the text in the Text area The font type shows the font of the computer where the server is operating The same font should be installed in the monitor so that the monitor can display the same font Align Horizontal Vertical Aligns the text in the Text area Background Type Sets the background type Color f...

Page 112: ...on or off Music File Selects a music file for the background in the Text area Volume Controls the volume of the background music in the text area Repeat A music file can be played repeatedly When set to Repeat the music file is played repeatedly while the background for the Text area is created Music File Changes the detailed properties and the transfer mode for the selected file of each type z Tr...

Page 113: ...t area fades in when it is created z Effect Speed Adjusts the speed of an effect being created z Effect Direction Sets the direction when the Slide effect is selected z Effect Size Sets the size of the blocks when the Block effect is selected More than one Source Area cannot be played at the same time Therefore if the playing time of a source area overlaps the source area whose playing time ends l...

Page 114: ... the source to be played in the Source area Sound Turns the sound for the source you want to play in the Source area on or off TV DTV When selecting TV from the TV External Input list you can select either Analog TV or Digital TV When selecting Digital TV you can enter both the main and sub channels using the channel option 460TXn Only General Broadcasting Cable Broadcasting You can select general...

Page 115: ... size using your mouse z Preview Area Previews the current state of the selected area More than one Source Area cannot be played at the same time Therefore if the playing time of a source area overlaps the source area whose playing time ends later is played You can add areas for photo movie Flash web text and source The source area is always at the topmost position Bring to Front Send to Back Brin...

Page 116: ...any one of its functions You can log in to the server to perform a server program The password you enter when installing MagicInfo Pro becomes the password of the Administrator account by default Log Out z Once you are logged into the server you can log out If you log out from the server all created views are closed and if there are any unsaved changes a new window is displayed so that you can sav...

Page 117: ... the Publish View They are created in the folder named after the monitor name which is used as the local publishing directory If you copy all the files and subfolders under the folder created in the name of the monitor to the root of a USB memory device and connect it to the USB port of your computer the schedules are performed automatically without connecting to the network You can set and change...

Page 118: ...ciently manage the monitors by creating network groups You can move a networked monitor by dragging and dropping it into a group Network z The server is connected to the monitor in Player mode z The server is connected to the monitor in Scheduler mode z The server is connected to the monitor in an unknown mode z The server is not connected to the monitor or the monitor is a local monitor ...

Page 119: ...to the server Power On Turns the selected monitor on or off If the server and the monitor are on a private network the Power On function cannot be operated on that monitor However if there is content server operating on the same subnet the Power On function can be used Remote Access Allows you to remotely control a monitor connected to the server via VNC The Remote Access function can degrade the ...

Page 120: ...etes the selected monitor EPG View You can edit the schedule by selecting the monitor and time to schedule and register screens You can move a registered screen by dragging dropping it and changing the registered time by double clicking it EPG You can change the screen times using your mouse and by the minimum unit on the time axis You can change the detailed times in the list view If you select a...

Page 121: ... pastes it after selecting a monitor and time by clicking in the EPG window Auto Size Changes the currently selected screen in accordance with the time of the background set when editing automatically Time Combo Box Changes the unit of the time axis to be currently displayed 1 5 10 30 60 120 Min List View Sets the detailed items for the selected screen by double clicking on the screen or by clicki...

Page 122: ...all the screens within the specified publishing period This is the total size of the files whose play mode is set to Download in all screens However for a local monitor the size of the files whose play mode is set to Stream is included too Free Space Indicates the size of the files the monitor can download while publishing If the total publishing size is larger than the free size publishing cannot...

Page 123: ...e password you enter when installing MagicInfo Pro becomes the password of the Administrator account by default Log Out z Once you are logged onto the server you can log out If you log out from the server all created views are closed and if there are any unsaved changes a new window is displayed so that you can save them Change Password z Changes the password of the currently logged in account Use...

Page 124: ... z Refreshes the value of each client for the currently selected remote control item Option z Changes the server settings For more information refer to the Options section Remote Management Tree View List View Combo View ...

Page 125: ...al TV or Analog TV at the MDC source If you select Digital TV in the MDC Source screen and change the channel a red part is displayed in the Channel Selection screen so that you can change the sub channel too 460TXn Only z Channel Type Selection You can select general or cable broadcasting 460TXn Only z Channel Selection You can select the channel for the selected TV 460TXn Only TV General broadca...

Page 126: ...s Select whether to use the turn on time PIP Displays the PIP information You can control it in the list view Sound Displays the current sound state You can control it in the list view Signal Balance Displays the current signal balance state You can control it in the list view Maintenance Displays the Lamp Control Safety Screen Video Wall VideoWall Format and Safety Lock state You can control them...

Page 127: ...n control them by using the context menu and clicking each detailed function In addition you can update the current state using Refresh from the Tool menu and in the toolbar MDC Displays the items for which remote management is required from among the OSD menus of each client monitor in a tree view If you select an item the current state of the selected item is displayed and you can control it in ...

Page 128: ...h item is only enabled if the Size item is set to a setting other than Off z You can turn the PIP on by setting the Size item to a setting other than Off Sound Displays the current state of the Sound Mode Bass Treble Balance SRS TSXT and Sound Select You can control each item by clicking on it and changing the setting in the list view z The Bass Treble and Balance items are only applicable if the ...

Page 129: ...ure Context Menu Power On Off This item is only enabled when a monitor name is selected and used to turn the client monitor on or off Copy Copies the settings of the selected item z If you select a monitor name and click Copy all the items displayed in the list are copied z If you select an item and click Copy only the item is copied z If the setting is not yet displayed or the item has no setting...

Page 130: ...Address Type IP Address Subnet Mask Default Gateway Preferred DNS Server Altermate DNS Server You can change the settings by double clicking the monitor name or using the Edit item from the context menu Network Adapter Displays the network adapter for the selected client Mac Address Displays the MAC address of the selected client Select an IP address type IP Address Enter the IP address Subnet mas...

Page 131: ...artup Automatic update Use password lock and Content server You can change the settings by double clicking the monitor name or using the Edit item from the context menu 1 Startup Select the program to be performed when the client starts 2 Automatic update Select how to perform automatic updates 3 Use password lock Select whether to use the password lock 4 Content Server Select whether to use the c...

Page 132: ...creen resolution item of Windows cannot be copied Paste Pastes the copied setting to the monitor z Only available if the copied item is the same as the currently selected item z Only available if the client is turned on Paste All Pastes the copied settings to all monitors displayed in the list z Only available if the copied item is the same as the currently selected item z Only applied to clients ...

Page 133: ...ntly working with If there are any unsaved changes a new window is displayed so that you can save them Log In z You must log in to the server before you can use any one of its functions You can log in to the server to perform a server program The password you enter when installing MagicInfo Pro becomes the password of the Administrator account by default Log Out z Once you are logged into the serv...

Page 134: ...cels the previously performed command or performs the canceled command again You can change the maximum number of commands that you can undo using the Option menu Send Stop z Checks the edited message data in a tree view and sends or stops them to the selected monitor Option z SChanges the server settings Refer to the Option tab for more information Message ...

Page 135: ...of the message flow on the monitor None Right to Left Left to Right Top to Bottom Bottom to Top Text Speed Sets the speed of the message flow on the monitor Step Sets the interval at which the message flows on the monitor Font Font Size Italic Bold Underline Strikeout Font Color Sets the font formatting for the message to be displayed on the monitor The font type shows the font of the computer whe...

Page 136: ...s Server Troubleshooting Option Option General Network Connection Selects the connection method between the server and the monitor The server and monitor can be connected to each other only if the same connection method is used z Automatic connection The monitor automatically connects a server on the same network ...

Page 137: ...ets the maximum number of virtual local monitors that can be created for publishing the schedule locally Maximum number of network groups Sets the maximum number of network groups that can be created to manage the networked monitors Maximum number of Alarm Infos Specify the number of warning messages that can be stored which notify the user of client errors If more than the specifed number of erro...

Page 138: ...hedules to multiple monitors one by one Screen Default Resolution Adds deletes and sets the default resolution for a newly created screen z New Adds a new resolution that can be used in a screen It is added to the list of background resolutions for the screen z Delete Deletes a created resolution It is removed from the list of background resolutions for the screen z Set Sets the selected resolutio...

Page 139: ...her it is registered as the content server Name The name of the content server configured by the MagicInfo Pro Server Connection Server IP Enter the IP address of the MagicInfo Pro Server you want to connect to Click the Connect button The client tries to connect to the MagicInfo Pro Server at the specified Server IP address If the MagicInfo Pro Server accepts the connection the client is successf...

Page 140: ...ommand Displays the EWF state which will be applied at the next boot up EWF command z Disable and restart Disables and restarts the EWF The EWF state is actually disabled at the next boot up z Enable and restart Enables and restarts the EWF The EWF state is actually enabled at the next boot up z Commit Saves the changes in the Enable state Password Manages passwords for existing MagicInfo Pro Veri...

Page 141: ...p Connection Tab Schedule server z Server Connection Settings The client automatically connects to the server When a connection is disconnected the client connects to another server automatically The client connects to the server manually Enter the IP address of the server Content server z Up to two 2 content servers can be configured z Enter the IP address of the server Name z Setting Name ...

Page 142: ...te network the client cannot connect to it Therefore the schedule server must be installed with a public IP address on a network 2 Content server z Connect content servers Select this option when you want to use separate schedule and content servers If you select this option all the content files are downloaded or streamed from the specified content server and the schedule server performs only the...

Page 143: ...me Checks the update version at the specified time every day and updates the client if necessary z Check and update whenever the program starts Checks the update version whenever the program starts and updates the client if necessary Screen Tab Logo screen the main screen of the Signage Scheduler program z Background Sets the background color z File Sets the logo screen A flash photo and movie fil...

Page 144: ...ce can be set 3 Local schedule z Sets the options required when you perform a schedule using a USB device instead of the network Copy and Play from a removable disk Copies the schedule that exists on a USB device to the schedule folder and then plays the copied schedule You can remove the USB device after copying it Play directly from a removable disk Plays the schedule that exists on a USB device...

Page 145: ...the network state When publishing is not performed successfully z Check whether the checkbox next to the monitor to which you want to publish to is selected z Check whether the monitor to which you want to publish to is connected to the server z Check whether the Operating Mode of the monitor to which you want to publish to is set to Scheduler z Check whether the monitor has sufficient free disk s...

Page 146: ... file you want to preview is corrupt and whether it actually exists z You cannot preview an office file or a source Removing the Program You can remove MagicInfo Pro using Add Remove Programs in Windows or using the menu created when installing the program Follow these steps to remove MagicInfo Pro 1 Click Start and then point to Settings and click Control Panel 2 For Windows XP click Start and cl...

Page 147: ...오 1 시스템 트레이에서 시작 메뉴로 이동하고 설정 을 선택한 다음 메뉴에서 제어판 을 선택합니다 2 Windows XP의 경우 시작 메뉴에서 제어판 을 선택합니다 3 제어판에서 프로그램 추가 제거 아이콘을 엽니다 4 추가 제거 창에서 아래로 스크롤한 다음 MagicInfo Pro를 클릭하여 강조 표시합니다 5 변경 제거 를 클릭하여 제거합니다 6 예 를 클릭하여 MagicInfo Pro의 제거를 시작합니다 7 설치 제거가 완료되었다는 대화 상자가 나타날 때까지 기다립니다 RDP 를 이용한 프로그램 Update를 하려면 다음 단계를 수행하십시오 1 ALT F12 로 바탕화면으로 진입 합니다 2 원격 연결 RDP 하기 위해서는 아래의 ID와 PW를 사용하세요 윈도우 로그온 시 ID Administrator 윈...

Page 148: ... Use to select PC DVI or other external input sources connected to the LCD Display Use to select the screen of your choice 1 PC 2 DVI 3 AV 4 HDMI 5 MagicInfo 6 TV Note The direct button on the remote control is the SOURCE button For PC and DVI this is deactivated if the cable is disconnected Edit Name MENU ENTER Input Edit Name ...

Page 149: ...icBright ENTER MagicBright is a feature providing the optimum viewing environment depending on the contents of the image you are watching Currently four different modes are available Entertain Internet Text and Custom Each mode has its own pre configured brightness value You can easily select one of the four settings by simply pressing the MagicBright control button Not available in Dynamic Contra...

Page 150: ...s the case adjust the brightness and contrast by using the OSD menu Custom By using the on screen menus the contrast and brightness can be changed to your personal preference MENU ENTER Picture ENTER Custom Not available in Dynamic Contrast mode of On Note By adjusting the picture using the Custom function MagicBright will change to Custom mode Contrast MENU ENTER Picture ENTER Custom ENTER Contra...

Page 151: ...or Custom the Color Temp function is disabled If you set the Color Tone to Off the Color Control function is disabled Color Control Adjusts individual Red Green Blue color balance MENU ENTER Picture ENTER Color Control Not available in Dynamic Contrast mode of On Note If you adjust the picture by using the Color Control function Color Tone will turn to the Custom mode Red MENU ENTER Picture ENTER ...

Page 152: ...e of On Note This function is only enabled if the Color Tone is set to Off Image Lock Image Lock is used to fine tune and get the best image by removing noise that creates unstable images with jitters and shakiness If satisfactory results are not obtained using the Fine adjustment use the Coarse adjustment and then use Fine again Available in PC mode only MENU ENTER Picture ENTER Image Lock Coarse...

Page 153: ...tion ENTER Adjusts the screen location horizontally V Position MENU ENTER Picture ENTER Image Lock ENTER V Position ENTER Adjusts the screen location vertically Auto Adjustment MENU ENTER Picture ENTER Auto Adjustment The values of Fine Coarse Position are adjusted automatically By changing the resolution in the control panel the auto function is performed Available in PC mode only Note The direct...

Page 154: ...ignal Control 1 R Gain MENU ENTER Picture ENTER Signal Bal ance ENTER Signal Control ENTER R Gain ENTER ENTER 2 G Gain MENU ENTER Picture ENTER Signal Bal ance ENTER Signal Control ENTER G Gain ENTER ENTER 3 B Gain MENU ENTER Picture ENTER Signal Bal ance ENTER Signal Control ENTER B Gain ENTER ENTER 4 R Offset MENU ENTER Picture ENTER Signal Bal ance ENTER Signal Control ENTER R Offset ENTER Adju...

Page 155: ... Offset ENTER ENTER 6 B Offset MENU ENTER Picture ENTER Signal Bal ance ENTER Signal Control ENTER B Offset ENTER ENTER Size MENU ENTER Picture ENTER Size ENTER The Size can be switched 1 16 9 2 4 3 Dynamic Contrast MENU ENTER Picture ENTER Dynamic Contrast ENTER Adjusting the LCD Display ...

Page 156: ...four automatic picture settings Dynamic Standard Movie and Cus tom that are preset at the factory Dynamic Standard Movie or Custom can be activated Not available in Dynamic Contrast mode of On 1 Dynamic 2 Standard 3 Movie 4 Custom Note The direct button on the remote control is the P MODE button Custom By using the on screen menus the contrast and brightness can be changed to your personal prefere...

Page 157: ...ture ENTER Custom ENTER Brightness ENTER Adjusts the Brightness Sharpness MENU ENTER Picture ENTER Custom ENTER Sharp ness ENTER Adjusts the picture Sharpness Color MENU ENTER Picture ENTER Custom ENTER Color ENTER Adjusts the picture Color Tint MENU ENTER Picture ENTER Custom ENTER Tint ENTER Adds a natural tone to the display Adjusting the LCD Display ...

Page 158: ... Normal 5 Warm1 6 Warm2 Note If you set the Color Tone to Cool2 Cool1 Normal Warm1 or Warm2 the Color Temp function is disabled Color Temp MENU ENTER Picture ENTER Color Temp ENTER Color temp is a measure of the warmth of the image colors Not available in Dynamic Contrast mode of On Note This function is only enabled if the Color Tone is set to Off Size MENU ENTER Picture ENTER Size Adjusting the ...

Page 159: ... not available HDMI The Just Scan are available in HDMI Digital NR Digital Noise Reduction MENU ENTER Picture ENTER Digital NR ENTER Turns the Digital Noise Reduction feature Off On The Digital Noise Reduction feature allows you to enjoy clearer and crisper images 1 Off 2 On Film Mode MENU ENTER Picture ENTER Film Mode Adjusting the LCD Display ...

Page 160: ...ENTER Dynamic Contrast ENTER Dynamic Contrast automatically detects the distribution of the visual signal and adjusts to create an optimum contrast 1 Off 2 On Brightness Sensor MENU ENTER Picture ENTER Brightness Sensor ENTER Brightness Sensor is to automatically detect distribution of inputted visual signal and adjust to create optimum brightness Adjusting the LCD Display ...

Page 161: ...ettings 2 Music Selects Music when watching music videos or concerts 3 Movie Selects Movie when viewing movies 4 Speech Selects Speech when watching a show that is mostly dialogue i e news 5 Custom Selects Custom if you want to adjust the settings according to your personal preferences Custom The sound settings can be adjusted to suit your personal preferences MENU ENTER Sound ENTER Custom Adjusti...

Page 162: ...s low frequency audio Treble MENU ENTER Sound ENTER Custom ENTER Treble ENTER Emphasizes high frequency audio Balance MENU ENTER Sound ENTER Custom ENTER Bal ance ENTER Allows you to Adjusts the sound balance between the left and right speakers Auto Volume MENU ENTER Sound ENTER Auto Volume ENTER Reduces the difference in volume control between broadcasters 1 Off 2 On Adjusting the LCD Display ...

Page 163: ...g virtual surround sound experience through any two speaker playback system including internal television speakers It is fully compatible with all multichannel formats 1 Off 2 On Note The direct button on the remote control is the SRS button Setup Available Modes PC DVI AV HDMI MagicInfo TV Language MENU ENTER Setup ENTER Language ENTER You can choose one of 11 languages Adjusting the LCD Display ...

Page 164: ... 4 time settings Clock Set Sleep Timer On Timer and Off Timer MENU ENTER Setup ENTER Time Clock Set MENU ENTER Setup ENTER Time ENTER Clock Set ENTER Current Time Setting Sleep Timer MENU ENTER Setup ENTER Time ENTER Sleep Timer ENTER Turns the LCD Display off automatically at certain times 1 Off 2 30 3 60 4 90 5 120 Adjusting the LCD Display ...

Page 165: ...e mode and the volume level at the time the LCD Display turns on automatically Off Timer MENU ENTER Setup ENTER Time ENTER Off Timer ENTER Turns the LCD Display off automatically at a preset time Menu Transparency MENU ENTER Setup ENTER Menu Transparency ENTER Change the transparency of the background of the OSD Adjusting the LCD Display ...

Page 166: ...his feature adjusts the power consumption of the unit in order to save energy 1 Off 2 On Note If you want to reduce the standby power consumption set Energy Saving to On However when Energy Saving is On you cannot use the remote Power On function of the MDC and the WOL Wake On LAN function of MagicInfo HDMI Black Level MENU ENTER Setup ENTER HDMI Black Level Adjusting the LCD Display ...

Page 167: ... of video screens connected together so that each screen shows a part of the whole picture or where the same picture is repeated on each screen When the Video Wall is on you can adjust the Video Wall screen setting MENU ENTER Setup ENTER Video Wall Note When Video Wall is running the Auto Adjustment Image Lock and Size functions are not available Video Wall does not operate in MagicInfo mode Video...

Page 168: ...without any margins 2 Natural Displays a natural image with the original aspect ratio intact Horizontal MENU ENTER Setup ENTER Video Wall ENTER Horizontal ENTER Sets how many parts the screen should be divided horizontally Five adjustment levels 1 2 3 4 and 5 Vertical MENU ENTER Setup ENTER Video Wall ENTER Vertical Adjusting the LCD Display ...

Page 169: ... selected mode Safety Screen The Safety Screen function is used to prevent afterimages that may appear when a still picture is displayed on the screen over a long time The Screen Scroll function scrolls the screen for the specified period of time This function is not available when the power is turned off MENU ENTER Setup ENTER Safety Screen Pixel Shift Pixel Shift MENU ENTER Setup ENTER Safety Sc...

Page 170: ...0 1 2 3 and 4 Vertical Line MENU ENTER Setup ENTER Safety Screen ENTER Pixel Shift ENTER Vertical Line ENTER Sets how many pixels the screen moves vertically Five adjustment levels 0 1 2 3 and 4 Time MENU ENTER Setup ENTER Safety Screen ENTER Pixel Shift ENTER Time ENTER Set the time interval for performing the horizontal or vertical movement respectively Adjusting the LCD Display ...

Page 171: ... erase any residual image the operation will be performed for the set period of time and then automatically finish 1 Off 2 On Mode MENU ENTER Setup ENTER Safety Screen ENTER Timer ENTER Mode ENTER You can change the Safety Screen Type 1 Scroll 2 Bar 3 Eraser Period MENU ENTER Setup ENTER Safety Screen ENTER Timer ENTER Period ENTER Adjusting the LCD Display ...

Page 172: ...etup ENTER Safety Screen ENTER Scroll This function prevents after images on the screen by moving all the pixels on the PDP according to a pattern Use this function when there are remaining after images or symbols on the screen especially when you displayed a still image on the screen for a long time Bar MENU ENTER Setup ENTER Safety Screen ENTER Bar This function prevents after images on the scre...

Page 173: ...puter to 1024 x 768 60Hz 1280 x 768 60Hz 1360 x 768 60Hz or 1366 x768 60Hz by using this function Resolution Select you can have the picture displayed on the screen in the specified resolution Note Available in PC mode only 1 Off 2 1024 X 768 3 1280 X 768 4 1360 x 768 5 1366 X 768 Note Selecting the menu is only allowed when the graphics resolution is set to 1024 x 768 60Hz 1280 x 768 60Hz 1360 x ...

Page 174: ...ENTER Side Gray ENTER Select the brightness of the grey for the screen background 1 Off 2 Light 3 Dark Reset Reverts the product settings to factory defaults The Reset function is only available when PC DVI is being used MENU ENTER Setup ENTER Reset Image Reset MENU ENTER Setup ENTER Reset ENTER Image Reset ENTER Adjusting the LCD Display ...

Page 175: ...ol MENU ENTER Setup ENTER Lamp Control ENTER Adjusts the inverter lamp in order to reduce energy consumption Note This function does not operate when Dynamic Contrast is set to On in PC DVI AV HDMI TV modes Multi Control Available Modes PC DVI AV HDMI MagicInfo TV Multi Control Assigns an individual ID to the SET MENU ENTER Multi Control ENTER Adjusting the LCD Display ...

Page 176: ...splay Otherwise the program MagicInfo may stop If you do unplug the cable restart the system Do not unplug the LAN cable used by an USB device ex video display Otherwise the program MagicInfo may stop To access other sources press the SOURCE button in MagicInfo The preset password for the LCD Display is 000000 The server program s Power On option works only if the LCD Display s power is completely...

Page 177: ...d For pivoted LCD Displays a screen resolution of up to 720 480 SD is supported for movies For drive D EWF is not applied When the contents of Setup have been changed when EWF is in the Enable state to save the changes in the disk you must Commit them By selecting Disable Enable or Commit the system is restarted Photo The JPEG BMP file format are supported Auto Automatically fits the image to the ...

Page 178: ...Slide Show Displays the properties of the original file as they are Interval Controls the time intervals between image files for a slide show 5 Sec 10 Sec 20 Sec 30 Sec 60 Sec Adjusting the LCD Display ...

Page 179: ...Rotation Displays an image file by turning it clockwise by 90 degrees Zoom Displays a reduced picture Adjusting the LCD Display ...

Page 180: ...Close Closes the image control Menu Music The MP3 file format is supported Movie The MPEG1 WMV file format are supported Adjusting the LCD Display ...

Page 181: ...Play Plays a movie file Full Size Plays a movie file in full screen Adjusting the LCD Display ...

Page 182: ...e displayed Note Install the proper viewer freeware program to see the MS Office Word Excel Power Point or PDF doucuments Internet Connects to the Internet Setup Sets various functions in MagicInfo mode A password must be entered to access Setup mode Adjusting the LCD Display ...

Page 183: ...Schedule View Displays a schedule TCP IP Changes the TCP IP settings Adjusting the LCD Display ...

Page 184: ...ssword should be between 6 and 12 characters in numeric format You should enter a password between 6 and 12 characters in numeric format If you enter the wrong password three times the setup configuration is reset and a warning message appears from the server Adjusting the LCD Display ...

Page 185: ...evious settings of Setup mode File Local You can delete or copy files on both local and removable disks Play Option You can set the repeat play and screen settings Repeat Determines the repeat option for playing movies and music None Select No Repeat to play a movie or tune in the list only once Adjusting the LCD Display ...

Page 186: ... Disable Disables EWF to allow saved data to be changed data on the protected disk drive C When switching from the Enable to the Disable state you can select Commit Enable Enables EWF to prevent saved data to be changed on the protected disk drive C Commit Commit the changed data to the protected disk drive C when EWF is in the Ena ble state Commit is not available when EWF is in the Disable state...

Page 187: ...ion to see the full image without any cutoff when HDMI 720p 1080i 1080p or DTV 1080i signals are input Sound Multi Track Options Preferred Language D MENU Sound ENTER ENTER Multi Track Options ENTER Preferred Language ENTER You can select the audio language 1 English 2 Spanish 3 French Note This is only activated if Antenna is set to Air Multi Track Sound D MENU Sound ENTER ENTER Multi Track Optio...

Page 188: ...y a foreign language trans lation Available in Analog TV Mode Only Note This is only activated if Antenna is set to Cable Channel Antenna D MENU Channel ENTER ENTER Antenna ENTER You can select a normal or wired channel If ANT IN are connected select the antenna input you want If the antenna input is not selected properly noise may appear on the screen 1 Air 2 Cable Auto Program D MENU Channel ENT...

Page 189: ...Channel ENTER The Clear Scrambled Channel function is used to filter out scrambled channels after Auto Pro gram is completed It removes the scrambled channels from the list by tuning the digital cable channels This process may take up to 20 30 minutes Available in DTV Mode Only Channel List D MENU Channel ENTER ENTER Channel List You can manage the channels 1 All You can display a list of all chan...

Page 190: ... The Add menu only appears for deleted channels A channel marked with the mark means the channel has been set as a Favorite The Delete from Favorite menu only appears for channels with the mark 2 Added All selected channels will be shown on Added menu To use the Channel List function first run Auto Program D MENU Channel ENTER ENTER Channel List ENTER Added Press the or button to select a channel ...

Page 191: ...e labeled channels Then press the ENTER button Press the or button to select Favorite then press the ENTER button The symbol will be highlighted and the channel will be set as a Favorite To cancel your Favorite channel selection press the ENTER button until the symbol is no longer high lighted Note Only memorized channels can be set as favorite channels All favorite channels will be shown in the F...

Page 192: ...ne Tune ENTER Due to weak signals or an incorrect antenna configuration some of the channels may not be tuned correctly Available in Analog TV Mode Only When Fine Tune is enabled the symbol appears next to the number at the top Signal Strength D MENU Channel ENTER ENTER Signal Strength Unlike analog channels which can vary in reception quality from snowy to clear digital HDTV channels have either ...

Page 193: ... Continue to adjust the antenna until you find the best position with the strongest signal Available in DTV Mode Only Setup Plug Play D MENU Setup ENTER ENTER Plug Play ENTER ENTER ENTER ENTER You can manage the entire configuration Language D MENU Setup ENTER Language ENTER ENTER You can choose one of 3 languages The language chosen affects only the language of the OSD V Chip V Chip Lock D MENU S...

Page 194: ...D MENU Setup ENTER ENTER V Chip 0 9 ENTER TV Parental Guidelines ENTER MPAA Rating D MENU Setup ENTER ENTER V Chip 0 9 ENTER MPAA Rating ENTER Canadian English D MENU Setup ENTER ENTER V Chip 0 9 ENTER Canadian English Adjusting the LCD Display ...

Page 195: ...able U S rating menu is deactivated Parental restriction information is automatically downloaded while watching DTV channels It may take several seconds The Downloadable U S Rating menu is available for use after information is downloaded from the broadcasting station However depending on the information from the broadcasting station it may not be available for use Change PIN D MENU Setup ENTER EN...

Page 196: ...mary language that must be in sync with the sound preferably matched to a specific frame CC2 The Special Non Synchronous Use Captions This channel carries data that is intended to augment information carried in the program CC3 Secondary Synchronous Caption Service Alternate program related caption data typically second language captions CC4 Special Non Synchronous Use Captions Similar to CC2 Text1...

Page 197: ...e only when Service1 Service6 can be selected in Caption Mode Service1 Service6 in digital caption mode may not be available depending on the broadcast Size D MENU Setup ENTER ENTER Caption ENTER Digital Caption Options ENTER Size ENTER Default Small Standard Large Font Style D MENU Setup ENTER ENTER Caption ENTER Digital Caption Options ENTER Font Style ENTER Default Style0 Style1 Style2 Style3 S...

Page 198: ...tion ENTER Digital Caption Options ENTER Background Color ENTER Default White Black Red Green Blue Yellow Magenta Cyan Foreground Opacity D MENU Setup ENTER ENTER Caption ENTER Digital Caption Options ENTER Foreground Opacity ENTER Default Transparent Translucent Solid Flashing Background Opacity D MENU Setup ENTER ENTER Caption ENTER Digital Caption Options ENTER Background Opac ity Adjusting the...

Page 199: ...olid Flashing Return to Default D MENU Setup ENTER ENTER Caption ENTER Digital Caption Options ENTER Return to De fault SW Upgrade D MENU Setup ENTER ENTER ENTER SW Up grade ENTER USB Use to upgrade the software USB Adjusting the LCD Display ...

Page 200: ...econnect the video cable then turn on both your computer and the LCD Display If your LCD Display screen remains blank after using the previous procedure check your video con troller and computer system your LCD Display is functioning properly Warning Messages You can even view the screen at a resolution of 1360 1920 x 768 1080 However you will receive the following message for a minute You can cho...

Page 201: ... the computer beeps more than 3 times when booting If it does request an a service for the main board of the computer 3 If you installed a new video card or if you assembled the PC check if you installed the Adaptor video 4 Check if the scanning ratio of the video screen is set to between 50 Hz 85 Hz Do not exceed 60Hz when using the maximum resolution 5 If you have problems in installing the Adap...

Page 202: ...y connected and the LCD Display is on Refer to the Connecting a Computer Q Check Signal Cable message A Ensure that the signal cable is firmly connected to the PC or video sources Refer to the Connecting a Computer A Ensure that the PC or video sources are turned on Q Not Optimum Mode message A Check the maximum resolution and the frequency of the video Adaptor A Compare these values with the data...

Page 203: ...nu Q The color white is poor A Adjust color using Custom under OSD Color Adjustment menu Q The power Indicator blinks A The LCD Display is currently saving the changes made in the settings to the OSD memory Q The screen is blank and the power indicator light blinks every 0 5 or 1 seconds A The LCD Display is using its power management system A Press any key on the keyboard Q The screen is blank an...

Page 204: ... into a bootable disk using a USB bootable disk creation tool For example the HP USB Disk Storage Format Tool A 2 Copies the OS ghost image and executables to your USB disk A 3 Enter the BIOS menu of your set by pressing the F2 key in the BIOS logo screen Then enable the USB Boot First option by selecting that option and pressing the Enter key in the Boot menu A 4 Switch your set on while your USB...

Page 205: ...Note that some of the codecs can be incompatible Q What are the benefits of digital broadcasting A Digital TV broadcasting generates less noise and provides clearer visuals and sound than analog TV broadcasting does As services develop you can also enjoy various information services because various kinds of data besides video and audio can be sent A For example while watching a sports game you can...

Page 206: ...V is designed so that digital broadcasting signals are received via both indoor and outdoor antennas A If signal reception is very good in your environment you can watch digital broadcasts with your existing indoor antenna If not it is better to install an outdoor UHF antenna Q How do I connect an antenna for an apartment or tenement house A Consult the superintendent s office or broadcasting faci...

Page 207: ...x 1080 60 Hz RB Input Signal Terminated RGB Analog DVI Digital Visual Interface Compliant Digital RGB 0 7 Vp p 5 Separate H V sync Composite SOG TTL level V high 2 0 V V low 0 8 V Maximum Pixel Clock 165MHz Analog Digital Power Supply AC 100 240 V 10 50 60 Hz 3 Hz Signal Cable 15pin to 15pin D sub cable Detachable DVI D to DVI D connector Detachable Dimensions W x H x D Weight 971 0 x 582 0 x 119 ...

Page 208: ... is not from bad quality and you can use it without any problems For example the number of TFT LCD sub pixels contained in this product are 3 133 440 Note Design and specifications are subject to change without prior notice Class B Equipment Information Communication equipment for residential use This product complies with the Electromagnetic Compatibility Directives for residential use and can be...

Page 209: ...he PowerSaver system operates with a VESA DPM compliant video card installed in your computer Use the software utility installed on your computer to set up this feature PowerSaver State Normal Operation Power saving mode Power off Power Button Power off Power Switch Power Indicator On Blinking On Off Power Consump tion 251 W Less than5 W Less than5 W 0 W Preset Timing Modes If the signal transferr...

Page 210: ...00 VESA 1360 x 768 47 712 60 015 85 500 VESA 1600 x 1200 75 000 60 000 162 000 VESA 1920 x 1080 66 587 59 934 138 500 Horizontal Frequency The time to scan one line connecting the right edge to the left edge of the screen horizontally is called the Horizontal Cycle and the inverse number of the Horizontal Cycle is called the Horizontal Frequency Unit kHz Vertical Frequency Like a fluorescent lamp ...

Page 211: ... 9 inch Without Stand 1102 0 x 719 0 x 311 0 mm 43 4 x 28 3 x 12 2 inch 27 0 Kg 59 5 lbs With Stand With protection glass option 32 0 kg 70 5 lbs VESA Mounting Interface 600 x 400 mm Environmental considerations Operating Temperature 50 F 104 F 10 C 40 C Humidity 10 80 non condensing Storage Temperature 4 F 113 F 20 C 45 C Humidity 5 95 non condensing Plug and Play Capability This LCD Display can ...

Page 212: ...lass B equipment emits less electromagnetic waves than Class A equipment MagicInfo Client Item Specification Remarks LAN 1 Gbps USB Keyboard Mouse Mass Stor age Device Compatible USB removable storage can be supported Contents Photo Supported File Format BMP JPEG 2274x1704 or less Music Supported File Format MP3 Sound bandwidth 50 Hz to 15 kHz Movie MPEG1 WMV Max 1280 x 720 30 fps File MS Office W...

Page 213: ...reset Timing Modes the screen will be adjusted automatically However if the signal differs the screen may go blank while the power LED is on Refer to the video card manual and adjusts the screen as follows Display Mode Horizontal Frequency kHz Vertical Fre quency Hz Pixel Clock MHz Sync Polarity H V IBM 640 x 350 31 469 70 086 25 175 IBM 640 x 480 31 469 59 940 25 175 IBM 720 x 400 31 469 70 087 2...

Page 214: ...can one line connecting the right edge to the left edge of the screen horizontally is called the Horizontal Cycle and the inverse number of the Horizontal Cycle is called the Horizontal Frequency Unit kHz Vertical Frequency Like a fluorescent lamp the screen has to repeat the same image many times per second to display an image to the user The frequency of this repetition is called the Vertical Fr...

Page 215: ...If you are not satisfied with the picture quality you can get better quality of picture by performing the Auto Adjustment function in display screen that is appeared as window termination button is pressed If there s still noise after the automatic adjustment use the Fine Coarse adjustment function When viewing a fixed screen for an extended period of time a residual image or blur riness may appea...

Page 216: ... hours in use Set the LCD Display to power off with the PC Display Properties Power Scheme Use a Screen saver if possible Screen saver in one color or a moving image is recom mended Change the Color Information periodically Note Use Two different colors Rotate the Color Information with 2 different colors every 30 minutes Information ...

Page 217: ...lay Moving image together with Logo periodically Cycle Display moving image together with Logo for 60 seconds after 4 hours in use The best way to protect your LCD Display from Image retention is to turn Power off or set your PC or System to operate a Screen Saver program when you are not using it Also Warranty service will be limited based on instruction guide Apply the Screen Scroll function on ...

Page 218: ... 1 Time Period 10 50 second Recommend 50 Apply the Screen Bar function Symptom Horizontal Vertical Bar with Black Color move up and down Select method Instruction Guide OSD Menu Set Up Safety Screen Bar Time Interval 1 10 hours Recommend 1 Time Period 10 50 second Recommend 50 Note Please check CD s User Guide at OSD Function some model s will not available Apply the Screen Erasing function on Pro...

Page 219: ...truction Guide OSD Menu Set Up Safety Screen Eraser Time Interval 1 10 hours Recommend 1 Time Period 10 50 second Recommend 50 Note Please check CD s User Guide at OSD Function some model s will not available Information ...

Page 220: ...n EL SALVADOR 800 6225 http www samsung com latin GUATEMALA 1 800 299 0013 http www samsung com latin HONDURAS 800 7919267 JAMAICA 1 800 234 7267 http www samsung com latin NICARAGUA 00 1800 5077267 PANAMA 800 7267 http www samsung com latin PUERTO RICO 1 800 682 3180 http www samsung com latin REP DOMINICA 1 800 751 2676 http www samsung com latin TRINIDAD TO BAGO 1 800 SAMSUNG 726 7864 http www ...

Page 221: ...ww samsung ee LATVIA 800 7267 http www samsung com lv LITHUANIA 8 800 77777 http www samsung lt KAZAKHSTAN 8 10 800 500 55 500 http www samsung kz KYRGYZSTAN 00 800 500 55 500 RUSSIA 8 800 555 55 55 http www samsung ru TADJIKISTAN 8 10 800 500 55 500 UKRAINE 8 800 502 0000 http www samsung com UZBEKISTAN 8 10 800 500 55 500 http www samsung uz Asia Pacific AUSTRALIA 1300 362 603 http www samsung c...

Page 222: ...nes of the screen from the top to the bot tom sequentially is called the Non Interlace method while show ing odd lines and then even lines in turn is called the Interlace method The Non Interlace method is used for the majority of LCD Displays to ensure a clear image The Interlace method is the same as that used in TVs Plug Play This is a function that provides the best quality screen for the user...

Page 223: ...es from artificial satellite technology that amplifies weak signals even in poor reception areas for sharper images English Caption Caption Set ting A kind of language selection feature that provides English subti tles caption or character information services from broadcasting services ex AFKN or video tapes marked CC and which are especially useful for studying English Multiplex Broadcasting Thi...

Page 224: ...terial resources Household users should contact either the retailer where they purchased this product or their local government of fice for details of where and how they can take this item for environmentally safe recycling Business users should contact their supplier and check the terms and conditions of the purchase contract This prod uct should not be mixed with other commercial wastes for disp...

Page 225: ...Appendix ...

Reviews: