background image

12-1

The SHR Watch is powerful and reliable remote surveillance software, which provides

a remote monitoring function for video images in real time from either a single site or

multiple sites.  In addition, when events are detected at a remote site, the SHR Watch

displays the event information, and allows users to access the remote site directly to

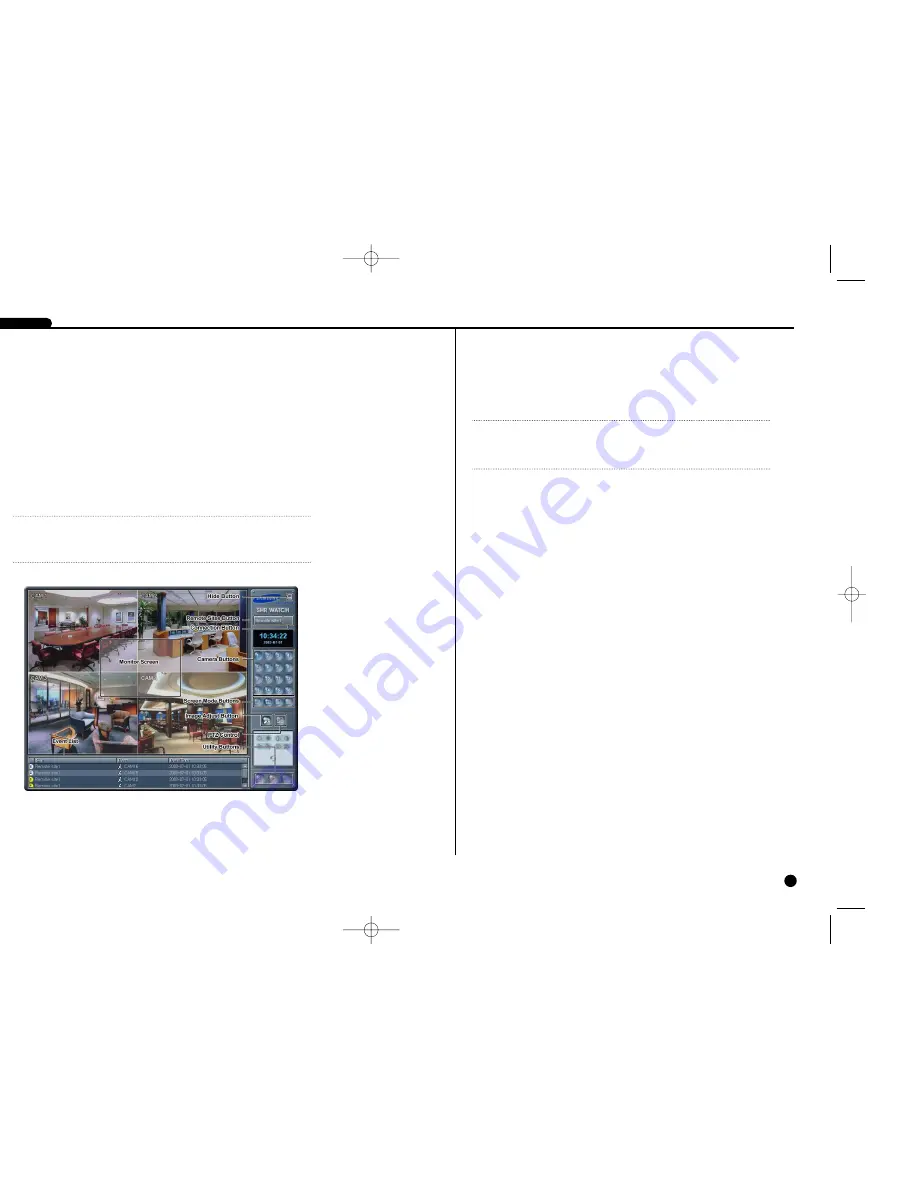
search the image associated with the event.  The GUI of the SHR Watch is shown

below and the description of each GUI area follows.

12-2

SHR SMART VIEWER

1

Description

NOTE

NOTE

When used at remote sites, some DVR models will only transmit images while
recording video.

NOTE

NOTE

Displays Playback on the screen while the remote DVR is in the playback mode
(Simplex mode), and No Video when the remote DVR has no video input.

Monitor Screen : Displays images from selected cameras.

Hide Button : Minimizes the SHR Watch window.

Remote Sites Button : Selects the remote site to connect.

Connection Button : Enables remote site connection.

Camera Buttons : Selects cameras to be viewed.

Screen Mode Buttons : Allows selection of single view, quad, 3x3 or 4x4.

Image Adjust Button : Allows adjustment of viewed images (contrast, brightness, 

saturation, and hue).

PTZ Control : Controls pan, tilt and zoom of the camera at the remote site.

Utility Buttons : Enables various SHR Watch utility programs.

Event List : Displays the event logs of a remote DVR.

 SHR-4040P/ENG-2  7/24/03 10:26 AM  Page 12-1

Summary of Contents for SHR-4040P

Page 1: ......

Page 2: ...tall in accordance with the manufacturer s instructions 8 Do not install near any heat sources such as radiators heat registers or other apparatus including amplifiers that produce heat 9 Do not defeat the safety purpose of the polarized or grounding type plus A polarized plug has two blades with one wider than the other A grounding type plug has two blades and a third grounding prong The wide bla...

Page 3: ... Basic Screen 3 Viewing Menu IV Menu Composition 1 Setting Date Time Screen 2 Setting Channel 3 Setting Recording 4 Setting Alarm Input Motion Detection 5 Setting Alarm Output Buzzer 6 Setting SYSTEM SETUP 7 Setting MONITORING 8 Setting SERIAL PORT 9 Setting NETWORK V Recording 1 Basic Recording 2 Pausing 3 Locking VI Search Replay 1 Viewing Search Menu 2 Search by Date Time 3 Searching EVENT 4 Ba...

Page 4: ...y loss caused by the device You shall ask the shop that you bought the device for expert advice in advance if you want to open the system case to touch inside for function upgrade or repair or if you have some inquiries for use or detect some troubles with the device BEFORE START Smart View Contents IX Overview 1 In This Manual 2 Overview 3 SHR Smart Viewer Features 4 Product Information X Install...

Page 5: ......

Page 6: ...e Full Screen Display 4 Split Display Sequence Display Event Monitoring Display Remote monitoring and control through Network LAN Remote monitoring control callback through Network LAN GE RECORDER 1Introduction Digital Video Recorder SHR 4040 applies the MPEG 4 video image compression method to each channel and the ADPCM compression method for video data and audio data respectively which are captu...

Page 7: ...DISPLAY Mode Performs the TELE function by pressing the PTZ Shows EVENT SEARCH Cancels the preset ALARM function to set up a new ALARM function Performs the WIDE function by pressing the PTZ Indicates the Search method Performs the PRESET setup function by pressing the PTZ Displays the system setup menu or enters an upper menu Performs the VIEW setup function by pressing the PTZ Changes or edits t...

Page 8: ...ort BNC Style Connector Forwarding a video signal to other video device Composite Video Signal Input Port BNC Style Connector S VHS Video Signal Output Port Audio Signal Input Output Port RCA Jack Serial Port for Remote Control External MODEM PTZ control Network Connection Port Video Input Port THROUGH Port Video Output Port S VHS Port Audio Input Output Port RS 232 Port LAN Port 5 6 7 1 2 3 4 No ...

Page 9: ... to install another HDD 1 2 3 4 PTZ ENTER SET Note Note The above contents are subject to change to improve the product capacity or func tion without prior notice Caution Caution Do not 1 Leave it outdoor 2 Let any liquid in it 3 Impose excessive impact or force 4 Pull the output plug excessively 5 Disassemble it on your own 6 Stay out of the rated input output range 7 Use other power cord than re...

Page 10: ...ges inside the product during work Keep loosened screws or parts well Missing screws or parts may result in breakdown or malfunction of the product Extra HDD Addition Procedure 1 Loosen 5 screws on both sides and 1 screw in the back of the product to detach the cover DIGITAL VIEDO RECODER SHR 4040P MODE 1 2 3 4 PTZ FREEZE TELE WIDE PRESET VIEW REC ALARM PANIC SEARCH REC LOCK MENU ZOOM ENTER SET NE...

Page 11: ... tighten screws firmly 7 Check if the BRACKET HDD has been fixed in the product rigidly and connect the power supply cable and signal transmission cable IDE CABLE to the HDD 8 Check if all connectors and cables are in good condition then close the cover 9 Tighten cover fixing screws 5 points on both sides and 1 point in the back You can install 2 HDDS to a BRACKET HDD as shown in the figure 5 Tigh...

Page 12: ......

Page 13: ... external device as an video signal input camera audio signal input microphone and video audio signal output monitor It can be also connected to such external device as an alarm at user s request It can be connected to a PC through serial communication or LAN 2Connecting PC VIDEO IN THROUGH AV OUT AUDIO IN ALARM IN 1 ALARM IN 2 ALARM IN 3 ALARM IN 4 GND ALARM RESET IN GND ALARM OUT 1 ALARM OUT 2 G...

Page 14: ......

Page 15: ... will be displayed when power is on without HDD installed THERE ARE NO INSTALLED MASTER HDD PRESS OK BUTTON TO SHUTDOWN OK CANCEL The following message will be displayed if you miss to install the Master HDD THE MASTER HDD MUST BE PARTITIONED IF YOU PRESS YES THE SYSTEM WILL PARTITION THE MASTER HDD YES NO The following message will be displayed if the Master HDD is not partitioned WAIT WHILE THE ...

Page 16: ...er will be off If you set VIDEO LOSS BUZZER to OFF in ALARM OUT BUZZER SETUP menu the buzzer will sound by no means When HDD is Bad The mark will appear on the top left corner in case of abnormal HDD opera tion 2003 07 01 00 00 00 CAM 1 CAM 2 CAM 3 CAM 4 2003 07 01 00 00 00 CAM 1 CAM 2 CAM 3 CAM 4 DO YOU WANT SHUTDOWN YES NO SYSTEM IS HALTED Caution Caution After you turn the system power off put ...

Page 17: ...00 00 II CAM 1 CAM 2 CAM 3 CAM 4 Indicates the current date and time setup value in the system in the LIVE mode Indicates the date and time of recorded data in the replay mode Indicates the system is in the recording mode Otherwise it does not appear Indicates the system is in the alarm recording mode Indicates Video Loss condition Indicates the current channel is in audio recording mode Indicates...

Page 18: ...DISPLAY MODE SETUP CHANNEL SETUP RECORD MODE SETUP ALARM IN MOTION DETECTION SETUP ALARM OUT BUZZER SETUP SYSTEM SETUP MONITORING SETUP SERIAL PORT SETUP NETWORK SETUP MOVE SELECT MENU EXIT CLOCK DISPLAY MODE SETUP DATE 2003 07 01 TIME 12 00 00 DATE DISPLAY TYPE YYYY MM DD TIME DISPLAY TYPE 24 HOURS DATE TIME DISPLAY ON STATUS DISPLAY ON LANGUAGE ENGLISH MOVE SELECT MENU EXIT Reference Reference T...

Page 19: ...ETECTION SETUP ALARM OUT BUZZER SETUP CLOCK DISPLAY MODE SETUP DATE 2003 07 01 TIME 09 34 12 DATE DISPLAY TYPE YYYY MM DD TIME DISPLAY TYPE 24 HOURS DATE TIME DISPLAY ON STATUS DISPLAY ON LANGUAGE ENGLISH MOVE SELECT MENU EXIT CHANNEL SETUP CH CAMERA AUDIO TITLE 1 ON ON CAM1 2 ON ON CAM2 3 ON ON CAM3 4 ON ON CAM4 AUDIO RECORD OFF AUDIO OUT ON MOVE SELECT MENU EXIT RECORD MODE SETUP RECORD PLAYBACK...

Page 20: ...N 3 SEC MOVE SELECT MENU EXIT SERIAL PORT SETUP USAGE REMOTE CONTROL BAUD RATE 9600 PARITY NONE DATA BIT 8 STOP BIT 1 UNIT ID 0 MOVE SELECT MENU EXIT SERIAL PORT SETUP USAGE PTZ BAUD RATE 9600 PARITY NONE DATA BIT 8 STOP BIT 1 CH ID MODEL 1 0 NONE 2 0 NONE 3 0 NONE 4 0 NONE MOVE SELECT MENU EXIT NETWORK SETUP IP ADDRESS 192 168 1 129 GATEWAY 192 168 1 254 SUBNET MASK 255 255 255 0 TRANSFER RATE 12...

Page 21: ......

Page 22: ...ll restart automatically Please wait CHANGING TIME INTO THE PAST CAUSES DELETION OF THE ORIGINAL DATA CORRE SPONDING TO OVERLAPPING TIME PROCEED YES NO DATE DISPLAY TYPE There are 3 types of date display You may choose one at your convenience YYYY MM DD DD MM YYYY MM DD YYYY TIME DISPLAY TYPE There are 2 types of time display 24 HOURS 12HOURS am pm DATE TIME DISPLAY If you want to display the date...

Page 23: ... a second in this mode SIMPLEX DUPLEX DISK END MODE If you set it to STOP the system will stop recording when the HDD is full If you set it to CONTINUE the system will overwrite the previous data from the oldest part during recording CONTINUE STOP DISK END BUZZER At the time of setting up STOP in the DISK END MODE DISK END BUZZER determines whether the buzzer sounds or not when the HDD is full If ...

Page 24: ...s up the recording rate during recording by ALARM MOTION 25 0 12 5 8 33 6 25 5 00 2 50 1 00 0 50 Reference Reference The following table shows how long it takes to fill up 120GB HDD and 480GB HDD for each field rate The recording time for each field rate may vary a little with the signal type Recording Video Image Quality Very High 18KB High 7KB Standard 5KB Low 3KB 120GB 480GB 120GB 480GB 120GB 4...

Page 25: ... it determines whether the buzzer sounds or not Depending on it is set to ON or OFF the buzzer will sound or not ON OFF GE RECORDER 4Alarm Input Motion Detection Setup Here comes the initial setup status of the ALARM RECORD SETUP menu ALARM IN It is set to OFF during no alarm input It is set to N C Normally Close and N O Normally Open when the alarm input is Active High and Active Low respectively...

Page 26: ...ed for the above password by all means ON OFF SYSTEM DISK INFORMATION If you click SYSTEM DISK INFORMATION the following window will pop up Displays the basic system condition 1 VERSION Displays the current S W version 2 DISK REMAIN Displays free HDD space at the moment 3 RECORDED FROM The first recorded time of a file TO The last recorded time of a file Caution Caution You shall always input the ...

Page 27: ...NIC Function On PANIC END PANIC Function Off TIME CHANGE New System Time LOAD DEFAULT Initialized Setup Value SYS UPGRADE Upgraded System Program DISK FULL HDD Full RECOVER PF Automatic Rebooting after Abnormal System Off VIDEO LOSS Video Loss BANK CLEAR Erased HDD Data BANK BAD BAD Sector in HDD NOT RESPOND Poor Main Function due to System Trouble CALL FAIL Poor Network Connection CB FAIL Poor Ca...

Page 28: ...ive mode 0 sec 3 sec 5 sec 10 sec 20 sec 30 sec EVENT MONITORING It sets the function to show the channel where an event Alarm or Motion occurs in full screen If it is set to ON the channel where an event Alarm or Motion occurs will be displayed in full screen ON OFF MONITORING DURATION It sets the duration of EVENT MONITORING ON 3 sec 5 sec 10 sec 20 sec 30 sec MONITORING SETUP AUTO SEQUENCE CAME...

Page 29: ...The available camera types at this moment are as follows SCC 641P SCC 643P SCC 421P SCC 931TP SCC 4304P SCC 4201P SCC 4203P SCC 4301P If you select External Modem the following message will be displayed in the screen If you select PTZ the following screen will pop up If you click YES the Externel Modem setup screen will be displayed and LAN will be disconnected LAN WILL BE DISCONNECTED FOR USING E...

Page 30: ...zed with remote monitor ing and image search during SHR S W connection CALLBACK IP ADDRESS Sets up the IP address of the server generally the PC with RAS installed to to bring the event information CALLBACK EVENT Sets up the event type to be forwarded to the Callback Server NONE A IN M D ALL Caution Caution The password set above is a network password unlike the DVR set password Caution Caution On...

Page 31: ......

Page 32: ...t the system to start recording in the ALARM IN MOTION DETECTION SETUP menu upon detecting any movement in the channel or area preset in the menu Once recording starts the following screen pops up REC General Recording General items will be set up at NORMAL RECORD SETUP in the RECORD MODE SETUP menu If you press the RECORD button recording will start with the following message to indicate recordin...

Page 33: ...recording However the system will continue recording upon receiving normal input video sig nals In addition the system will not start recording without any video signal trans mission from the input port Reference Reference Pressing the menu button can not pause recording only to display the menu screen Basic Recording Press the PANIC button to pause panic recording Then the PANIC button light goes...

Page 34: ......

Page 35: ......

Page 36: ...er the sub menu Now type in the data search condition or select a recorded data list to replay data that you want to Search Condition Input List Item Selection You may type in and select a data search condition in the DATE TIME SEARCH menu The above procedure is as same as in the general menu Entering Upper Menu or Terminating Search Replay If you wish to enter the upper menu or terminate search p...

Page 37: ...listed in a page you may select a list no in the No column with the LEFT or RIGHT button to see the data by pages Reference Reference Access to the search menu will be denied as far as the user stays in the menu You shall escape from the menu first to access the search menu LIST ALL TEXT notifies you of EVENT LOG DATA update LIST ALL appears in the following cases In case an additional event occur...

Page 38: ...07 01 00 00 01 CAM 1 CAM 2 CAM 3 CAM 4 2003 07 01 00 00 01 II 2003 07 01 00 00 01 II NO RECORDED DATA RECORDING WILL BE STOPPED DURING PLAYBACK IN SIMPLEX MODE CONTINUE YES NO PLAYBACK OPERATION IS NOT AVAILABLE DURING RECORD LOCK STATUS IN SIMPLEX MODE Reference Reference The system can perform replay in a live screen or PLAYBACK STILL condition As replay is not available though you press PLAY bu...

Page 39: ......

Page 40: ......

Page 41: ...dBm 600Ω Audio Output RCA Jack 1 CH 6 dBm 600Ω Video Compression Method MPEG 4 Audio Compression Method ADPCM 24 Kbps Image Resolution LIVE 672 x 272 PLAYBACK 336 x 272 Recording Screen Quality Very High High Standard Low Recording Field Rate 25 0 50 Fields sec Alarm Recording Time 3 5 10 20 30 sec 1 2 3 5 10 min Remote Control RS 232C LAN Operation Temp 0 C 40 C Preservation Temp 20 C 60 C Operat...

Page 42: ......

Page 43: ...as microphone and system audio signal input port and con nection between monitor audio signal input port and sys tem audio signal output port Audio signal output device output Cable Camera output port because the system proceeds with recording without input signal connection Disk space from DISK REMAIN in the SYSTEM SETUP menu If you wish to carry on recording at this point you shall set DISK END ...

Page 44: ... does not begin recording However if the system was in recording mode before power was out the system will con tinue recording upon power recovery Once disconnected with the input video signal the system stops recording But the system will continue recording upon recovery of signal input You shall reboot the system while you hold on the FACTORY RESET in the back after system shut down Then all the...

Page 45: ......

Page 46: ......

Page 47: ...ideo recorder DVR 2Overview 9 2 The SHR Smart Viewer consists of SHR Admin Administration SHR Watch and SHR Search programs SHR Admin Main administration program SHR Watch Remote surveillance program SHR Search Remote search program Each program may be selected from the Windows task bar or the 3 button Program GUI RT VIEWER 2 7 24 03 10 26 AM Page 9 1 ...

Page 48: ...tion from remote sites Remote monitoring of live camera images Time lapse and event search of recorded images Remote software upgrades and system programming 4Product Information 9 4 Product Components User s Manual This Document Installation CD System Requirements Operating System Microsoft Windows 98 Microsoft Windows ME Microsoft Windows 2000 or Microsoft Windows XP CPU Intel Pentium III Celero...

Page 49: ......

Page 50: ... SHR Smart Viewer software has been already installed on your computer you should uninstall the older version first NOTE NOTE Under the Start menu in Windows go to Settings and then to Control Panel Double click the Power Options to evoke the Management Properties dialog box Select Never for the Turn off monitor and the Turn off hard disks options RT VIEWER 2 7 24 03 10 26 AM Page 10 1 ...

Page 51: ...one of the other programs using the 3 button GUI click the right button when the cursor is on top of the main displayed GUI The following 3 button toolbox is shown Each icon represents SHR Admin SHR Watch and SHR Search as shown from the left To exit and close the SHR Smart Viewer program click the RT VIEWER 5 Make certain Yes restart the computer now and then click Finish to allow the sys tem to ...

Page 52: ......

Page 53: ...d in the SHR Admin Status Window Displays the status of the remote DVR currently connected event detection alarm out system check record period and version information Local Setup Button Allows programming the SHR Admin Batch Job Setup Button Allows programming the batch job Emergency Event Buttons Includes Watch and Search program buttons Local Viewer Log Button Displays the log information of th...

Page 54: ... up to eight digits or alphabetic characters Display Option Set up the display acceleration None Not using the display acceleration Normal Using the display acceleration DirectX Full Using the display acceleration DirectX Video Memory NOTE NOTE The image cannot be displayed properly depending on the specification of your PC In this case lower the level of the display option NOTE NOTE Up to 32 char...

Page 55: ... the Add button to make a new reference group The Add Group dialog box appears Enter a group name to register and then click the OK button Change Select the group or the site to change and click the Change button And then change the site information Remove Select the group or the site to remove and then click the Remove button NOTE NOTE The box beside User ID can be disabled depending the SHR Smar...

Page 56: ... Add button Then click the Setup now button to initiate the remote setup job for target remote sites Add Adds the selected site in Registered sites to Target sites Add all Adds all sites in Registered sites to Target sites Remove Removes the selected site from Target sites Remove all Removes all sites from Target sites Upgrade now Upgrades the software on the target remote site s Add Adds the sele...

Page 57: ...check and then set the desired date time To If this box is checked search until the last system log If you want to a spe cific ending date time remove a check and then set the desired date time Find Displays system log entries within preset period Save Saves the log information to the text file Print Prints the log information out Close Closes the Log dialog box From If this box is checked search ...

Page 58: ...log entries within the period are displayed in the list From If this box is checked search from the first emergency event log If you want to a specific starting date time remove a check and then set the desired date time To If this box is checked search until the last emergency event log If you want to a specific ending date time remove a check and then set the desired date time Find Displays emer...

Page 59: ...for motion detecting zone Caution Caution When using a modem for remote connection the current connection of the SHR Watch will be disconnected if you initiate the motion detecting zone setup After setting up the motion detection connect to the target site again From If this box is checked search from the first remote system log If you want to a specific starting date time remove a check and then ...

Page 60: ...og entries Save Saves the log information to text file Print Prints the log information out Close Closes the Log dialog box Status Window for Remote Site Event Displays the events detected by the internal motion detector or external sensor The status display of event detection will continue during the preset dwell time of the event driven recording The icons of each status are as follows Event Det...

Page 61: ......

Page 62: ...ecording video NOTE NOTE Displays Playback on the screen while the remote DVR is in the playback mode Simplex mode and No Video when the remote DVR has no video input Monitor Screen Displays images from selected cameras Hide Button Minimizes the SHR Watch window Remote Sites Button Selects the remote site to connect Connection Button Enables remote site connection Camera Buttons Selects cameras to...

Page 63: ...ection Buttons Selecting remote sites Click the Remote Sites button to display the list of Favorites and Remote sites available and select the site to connect And connect the site by clicking the Connection plug in button Connecting the site Click the Connection button to initiate the network connection to the selected remote site If the password has not been registered in the SHR Admin the follow...

Page 64: ... button to display the following Setup Watch dialog box Set up the Favorites and Auto Sequencing information RT VIEWER PTZ Control Pan Tilt Zoom Select the PTZ camera of the remote site and control pan tilt and zoom NOTE NOTE Only the administrator can adjust the image from a remote site NOTE NOTE This function may not be supported depending on the specification of the remote DVR NOTE NOTE The Aut...

Page 65: ...ation Add Adds a new Favorite Change Changes the name of a selected Favorite Remove Removes a selected Favorite NOTE NOTE The Favorites list is not valid with modem connections Add Adds the selected site in Registered site to Target site Add all Adds all sites in Registered site to Target site Remove Removes the selected site from Target site Remove all Removes all sites from Target site Sequence ...

Page 66: ......

Page 67: ...ically selected when the SHR search function is executed again To search for and play back recorded images the user should first select a remote site to access Click the Remote Sites button to display the list registered in SHR Admin and then click the Connect button to connect to the selected site Release select a second time the button to disconnect from the current con nection 2Time Lapse Searc...

Page 68: ...f this box is checked search from the first recorded data If you want to a specific starting date time remove a check and then set the desired date time To If this box is checked search until the last recorded data If you want to a specific search ending date time remove a check and then set the desired date time Alarm In Motion Video Loss Select target channel s of each event triggered device Sea...

Page 69: ... data If you want to a specific starting date time remove a check and then set the desired date time To If this box is checked search until the last recorded data If you want to a specific search ending date time remove a check and then set the desired date time Camera Event Select target camera channel s associated with each event and select event option s Set up the search criteria for the event...

Page 70: ...on The SHR Search provides multi screen playback function The available multi screen formats are single screen quad 3x3 and 4x4 Image Enhancement Allows enhancements to be made to played back images NOTE NOTE The speed of fast forward is dependent on the network bandwidth and the number of images per second If the SHR Smart Viewer is connected to the remote site with the dial up connection PSTN th...

Page 71: ...e Save Range If you want to save all recorded data by the event you select in event list place a check in the All Data Of Selected Event box This check box is visible in the Event mode only Click the Start button and then set the file name and the video compression codec Save As Image Saves the current image in a bitmap or JPEG file format Save As MiniBank Saves any video clip of recorded data in ...

Page 72: ......

Page 73: ......

Page 74: ...ncelled the encryption check The Current Image Information window displays information about the current image Camera Title displays the camera name of the current image and Time displays the date and time the image was recorded The Image Search Slide Bar displays the current playback position The user can move to another image clicking the mouse and dragging along the slide bar The Playback Funct...

Page 75: ......

Reviews: