background image

5

.2   

<Copying>

Copying originals

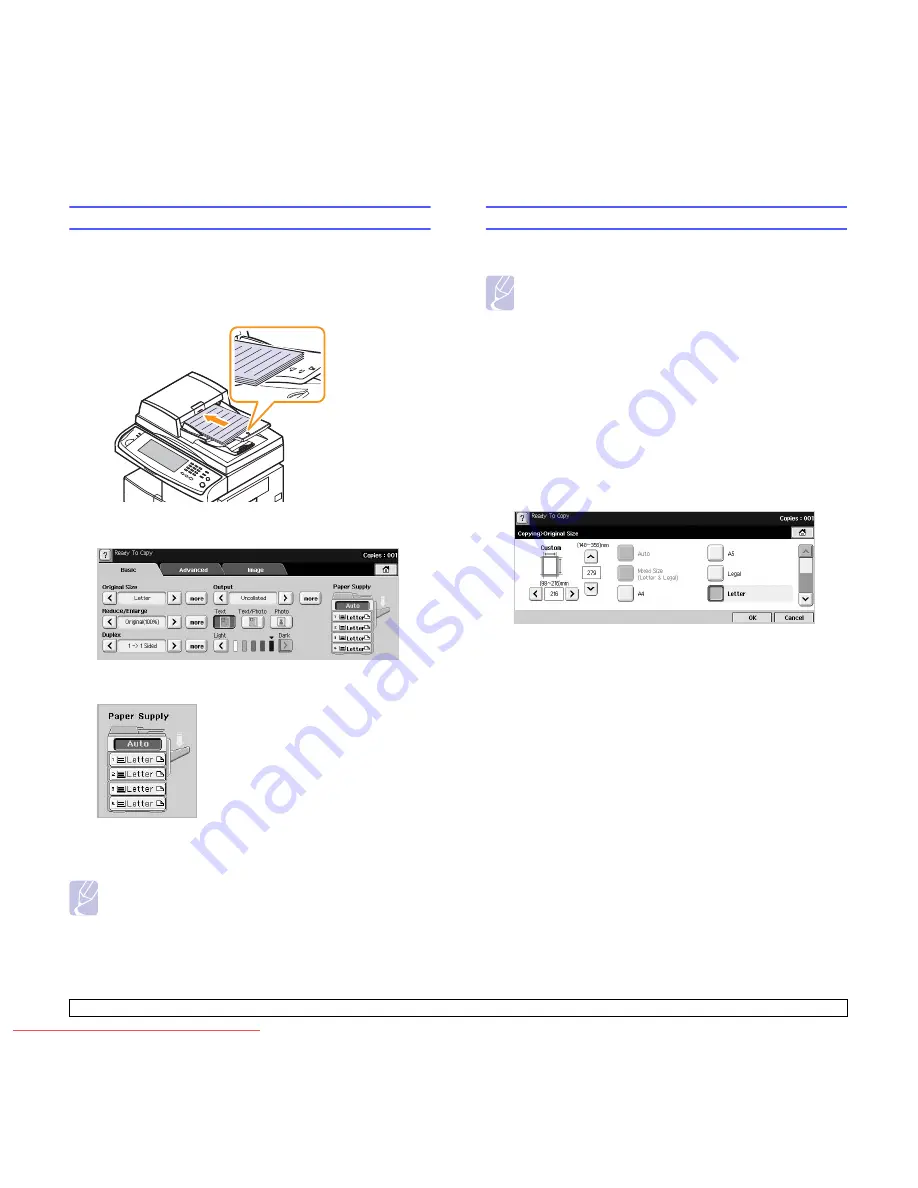
This is the normal and usual procedure for copying your originals.

1

Press 

Copy

 from the 

Main

 screen.

2

Place originals, face up, in the DADF, or you can use the scanner 
glass with a single original document face down.

3

Adjust the settings for each copy such as 

Original Size

Reduce/

Enlarge

Duplex

 and more. (Page 5.2, Page 5.3) 

4

Select the tray by pressing the appropriate tray on screen.

5

Enter the number of copies using the number keypad, if necessary.

6

Press 

Start

 on the control panel to begin copying.

Note

To cancel the current copy job, press 

Stop

 on the control panel. 

Or you can delete the current and pending job using 

Job Status


on the control panel. Select the job you want to cancel and 
press 

Delete

.

Changing the settings for each copy

On the 

Basic

 tab of the 

Copy

 screen, you can select copy features 

before starting to copy.

Note

The 

Basic

 tab setting is only for each copy. That means that the 

setting does not apply to the next copy job. After finishing the 
current copy job, the machine automatically restores the default 
settings after certain time. Or the machine resume to default 
setting when you press the 

Clear All

 button on the control panel 

or when you press other menu such as fax or else except the 

Job Status

 screen. 

The default copy setting can be changed in 

Admin Setting

(Page 9.2)

Changing the size of originals

Press the 

Basic

 tab > 

Original Size

, then use left/right arrows to set the 

original size. 

Press 

more

 to see the detail values.

Custom

: Selects the scanning area of the original. Press the 

cardinal point arrows to set the size. 

Auto

: Automatically detects the size of originals, but this option 

supports only when originals are Legal, Letter, or A5 sized. If the 
originals is mixed-sized, then the machine detects the largest 
original size and select the largest-sized paper in the tray.

Mixed Size (Letter & Legal)

: Allows for the use of both of Letter 

and Legal sized papers together, and the machine uses the 
proper-sized paper from several trays. For example, if the originals 
are total 3 pages, 1st page is the letter-sized paper, 2nd page is 
the legal-sized paper, and 3rd page is the letter-sized paper, then 
the machine prints the output first letter, legal, and letter in order 
from several trays. 

• Other preset values: Allows user to easily select commonly used 

values.

Downloaded From ManualsPrinter.com Manuals

Summary of Contents for SCX-6x45 Series

Page 1: ...Downloaded From ManualsPrinter com Manuals ...

Page 2: ...cs Co Ltd Samsung and Samsung logo are trademarks of Samsung Electronics Co Ltd PCL and PCL 6 are trademarks of Hewlett Packard company Microsoft Windows and Windows NT are either registered trademarks of Microsoft Corporation PostScript 3 is a trademark of Adobe System Inc UFST and MicroType are registered trademarks of Monotype Imaging Inc TrueType LaserWriter and Macintosh are trademarks of App...

Page 3: ... samsung com latin HONDURAS 800 7919267 www samsung com latin HONG KONG 3698 4698 www samsung com hk HUNGARY 06 80 SAMSUNG 726 7864 www samsung com hu INDIA 3030 8282 1800 110011 1 800 3000 8282 www samsung com in INDONESIA 0800 112 8888 www samsung com id ITALIA 800 SAMSUNG 726 7864 www samsung com it JAMAICA 1 800 234 7267 www samsung com latin JAPAN 0120 327 527 www samsung com jp LATVIA 8000 7...

Page 4: ...SAMSUNG 726 7864 www samsung com latin TURKEY 444 77 11 www samsung com tr U A E 800 SAMSUNG 726 7864 8000 4726 www samsung com ae U K 0845 SAMSUNG 726 7864 www samsung com uk U S A 1 800 SAMSUNG 726 7864 www samsung com us UKRAINE 8 800 502 0000 www samsung ua UZBEKISTAN 8 10 800 500 55 500 www samsung com kz_ru VENEZUELA 0 800 100 5303 www samsung com latin VIETNAM 1 800 588 889 www samsung com ...

Page 5: ...re overview Supplied software 2 1 Printer driver features 2 2 System requirements 2 2 3 Getting Started Setting up the hardware 3 1 Setting up the network 3 1 Supported operating systems 3 2 Configuring network protocol via the machine 3 2 Installing the software 3 2 Machine s basic settings 3 3 Setting the authentication password 3 3 Setting the date and time 3 4 Changing the display language 3 4...

Page 6: ...ures 5 4 ID card copying 5 4 2 up or 4 up copying N up 5 4 Poster copying 5 5 Clone copying 5 5 Book copying 5 5 Booklet copying 5 6 Cover copying 5 6 Transparency copying 5 6 Erasing edges 5 7 Erasing background images 5 7 Shifting margins 5 7 6 Faxing Optional Preparing to fax 6 1 Understanding the Fax screen 6 1 Basic tab 6 1 Advanced tab 6 1 Image tab 6 2 Sending a fax 6 2 Setting the fax head...

Page 7: ... other destination by a fax 6 11 Forwarding a received fax to other destination by a fax 6 11 Forwarding a sent fax to other destination by an email 6 11 Forwarding a received fax to other destination by an email 6 11 7 Scanning Understanding the Scan screen 7 1 Basic tab 7 1 Advanced tab 7 2 Image tab 7 2 Output tab 7 2 Scanning originals and sending through email Scan to Email 7 3 Sending a scan...

Page 8: ...e drum reorder notification 10 1 Checking Stored Documents 10 2 Cleaning your machine 10 2 Cleaning the outside 10 2 Cleaning the inside 10 2 Cleaning the transfer unit 10 2 Cleaning the scan unit 10 2 Maintaining the cartridge 10 3 Replacing the toner cartridge 10 3 Replacing the drum cartridge 10 4 Maintenance Parts 10 6 Managing your machine from the website 10 6 11 Troubleshooting Clearing doc...

Page 9: ...3 12 Ordering supplies and accessories Toner cartridge 12 1 Drum cartridge 12 1 Accessories 12 1 How to purchase 12 2 13 Installing accessories Precautions to take when installing accessories 13 1 Installing a memory DIMM 13 1 Activating the added memory in the PS printer properties 13 2 Replacing the Stapler 13 2 Enabling Fax feature after installing the fax option kit 13 3 14 Specifications Gene...

Page 10: ...xample means press Copy from the Main screen press the Advanced tab and then press Clone Copy Copy the Advanced tab Clone Copy Page 1 1 Used to guide users to the reference page for the additional detailed information Page 1 1 Finding more information You can find information for setting up and using your machine from the following resources either as a print out or onscreen Quick Install Guide Pr...

Page 11: ...rvice technician when repair work is required Opening or removing covers may expose you to dangerous voltages or other risks Incorrect reassembly could cause electric shock when the unit is subsequently used 14 Unplug the machine from the telephone jack PC and AC wall outlet and refer servicing to qualified service personnel under the following conditions When any part of the power cord plug or co...

Page 12: ...arate this from other types of wastes and recycle it responsibly to promote the sustainable reuse of material resources Household users should contact either the retailer where they purchased this product or their local government office for details of where and how they can take this item for environmentally safe recycling Business users should contact their supplier and check the terms and condi...

Page 13: ... of all Ringer Equivalence Numbers of the equipment on your telephone line should be less than five in order to assure proper service from the telephone company In some cases a sum of five may not be usable on your line If any of your telephone equipment is not operating properly you should immediately remove it from your telephone line as it may cause harm to the telephone network WARNING FCC Reg...

Page 14: ...s machine is fitted with a standard BS 1363 13 amp plug and has a 13 amp fuse When you change or examine the fuse you must re fit the correct 13 amp fuse You then need to replace the fuse cover If you have lost the fuse cover do not use the plug until you have another fuse cover Please contact the people from you purchased the machine The 13 amp plug is the most widely used type in the UK and shou...

Page 15: ...vi Downloaded From ManualsPrinter com Manuals ...

Page 16: ...d Zoran the Zoran logo IPS PS3 and OneImage are trademarks of Zoran Corporation 136 PS3 fonts Contains UFST and MicroType from Monotype Imaging Inc Print in various environments Copy originals in several formats Scan the originals and send it right away Set a specific time to transmit a Fax Optional You can print multiple pages on one single sheet of paper to save paper You can use preprinted form...

Page 17: ... document width guides 12 stand 3 DADF document input tray 13 output support 4 DADF document output tray 14 CCD Lockb b CCD Charge Coupled Device Lock It is the hardware which enables the scan job It is also used to hold the CCD module to prevent any damage when you move the machine 5 scanner lid 15 multi purpose tray extension 6 control panel 16 multi purpose tray paper width guides 7 side cover ...

Page 18: ...isher Stacker Stapler 7 network port 2 finisher output tray Stacker Stapler 8 dummy for FDI Foreign Device Interface 3 finisher cover Stacker Stapler 9 15 pin Finisher connection Stacker Stapler 4 extension telephone socket EXT 10 power switch 5 telephone line socket LINE 11 power receptacle 6 USB port Downloaded From ManualsPrinter com Manuals ...

Page 19: ...n 10 Power Saver Sends the machine into the power saver mode Page 3 4 4 Status Shows the status of your machine Page 1 6 11 Interrupt Stops a job in process to do an urgent copy job 5 Display screen Displays the current machine status and prompts during an operation You can set menus easily using the touch screen 12 Clear All Reverts the current settings to the default values 6 number keypad Dials...

Page 20: ...progress and pending Completed Job tab Provides the list of completed jobs Active Notice tab Displays any error codes that have occurred No Gives the order of jobs The job in No 001 is currently in progress Job Name Shows job information like name and type Status Gives the current status of each job User Provides user name mainly computer name Job Type Displays details of the active job such as jo...

Page 21: ...d the machine is waiting the error to be cleared Check the display message When the problem is cleared the machine resumes The toner cartridge is low Order a new toner cartridge You can temporarily improve print quality by redistributing the toner Page 10 3 Menu map The control panel provides access to various menus to set up the machine or use the machine s functions These menus can be accessed b...

Page 22: ...Sheets Printed Sheets Black Printed Sheets 2 Sided Sheets Copied 2 Sided Sheets Black Copied 2 Sided Sheets Printed 2 Sided Sheets Black Printed 2 Sided Sheets Analog Fax Sheets Analog Fax 2 Sided Sheets Fax Image Received Analog Fax Images Sent Analog Fax Images Received Images Sent Network Scanning Images Sent Email Images Sent Maintenance Impressions Black Maintenance Impressions Admin Setting ...

Page 23: ...panying Windows based software for your multifunctional machine Network Scan This program allows you to scan a document on your machine and save it to a network connected computer Direct Printing Utility This program allows you to print PDF files directly Printer software CD Continue Linux PostScript Printer Description Use this driver to run your machine from a Linux computer and print documents ...

Page 24: ...uplexb b The machine with Duplex feature prints both side of a paper O O O O Secu Print O O X X Delay Print O O X X Spool Print O O X X Proof Print O O X X Stapler O O O O System requirements Before you begin ensure that your system meets the following requirements Windows Note For Windows NT 4 0 2000 XP 2003 users who have an administrator right can install the software Item Requirements Recommen...

Page 25: ...er Software Linux Kernel 2 4 or higher Glibc 2 2 or higher CUPS SANE Note It is necessary to claim swap partition of 300 MB or larger for working with large scanned images The Linux scanner driver supports the optical resolution at maximum Item Requirements Operating system Macintosh 10 3 10 4 RAM 128 MB Free disk space 200 MB Connection USB interface Network interface Downloaded From ManualsPrint...

Page 26: ...le A horizontal plane must be within 5 mm 0 02 inches both from front to rear and from right to left 2 Unpack the machine and check all the enclosed items 3 Remove the tape holding the machine tightly 4 Install both the toner cartridge and drum cartridge 5 Load paper Page 4 5 6 Make sure that all the cables are connected to the machine 7 Turn the machine on Note When you move the printer do not ti...

Page 27: ... The software includes drivers applications and other user friendly programs Note The following procedure is based on the Windows XP operating system The procedure and popup window which appears during the installation may differ depending on the operating system the printer feature or the interface in use See Software section 1 Make sure that the network setup for your machine is completed Page 3...

Page 28: ...nd a shared printer by clicking the Browse button Note If you are not sure of IP address contact your network administrator or print network information Page 10 1 If you cannot find your machine in network please turn off the firewall and click Update 6 After the installation is finished a window appears asking you to print a test page and to register yourself as a user of Samsung printers in orde...

Page 29: ... Press Admin Setting 3 When the login message appears enter password with number keypad and press OK Page 3 3 4 Press the General tab 5 Press the down arrow to switch the screen and press Language 6 Select the desired language 7 Press OK Setting job timeout When there is no input for a certain period of time the machine exits the current location You can set the amount of time the machine will wai...

Page 30: ...ghtness darkness for a copy job press Copy Darkness and adjust the brightness darkness 6 Press OK Understanding the keyboard You can enter alphabet characters numbers or special symbols using the keyboard on the touch screen This keyboard is specially arranged like a normal keyboard for better usability for the user Touch the input area where you need to enter characters and the keyboard pops up o...

Page 31: ...0 sheets of 75 g m2 20 lb paper for one job When you use the DADF Do not load paper smaller than 174 W x 128 L mm or larger than 218 W x 356 L mm Do not attempt to load the following types of paper carbon paper or carbon backed paper coated paper onion skin or thin paper wrinkled or creased paper curled or rolled paper torn paper Remove all staples and paper clips before loading Make sure any glue...

Page 32: ...rformance and the output quality When you choose print materials consider the following The type size and weight of the print media for your machine are described later in this section Desired outcome The print media you choose should be appropriate for your project Brightness Some print media are whiter than others and produce sharper more vibrant images Surface smoothness The smoothness of the p...

Page 33: ... 84 inches 75 to 90 g m2 20 to 24 lb 50 sheets of 75 g m2 20 lb paper for the tray 10 sheets of 75 g m2 20 lb in the multi purpose tray Envelope Monarch 98 4 x 190 5 mm 3 88 x 7 5 inches Envelope No 10 105 x 241 mm 4 12 x 9 5 inches Envelope DL 110 x 220 mm 4 33 x 8 66 inches Envelope C5 162 x 229 mm 6 38 x 9 02 inches Envelope C6 114 x 162 mm 4 48 x 6 37 inches Transparency Letter A4 Oficio Refer...

Page 34: ... A4 Legal Folio Oficio Executive ISO B5 A5 tray 1 optional tray multi purpose tray Single side printing All sizes supported by the machine tray 1 optional tray multi purpose tray Duplex printinga a 75 to 90 g m2 20 24 lb only Letter A4 Legal Folio Oficio JIS B5 ISO B5 Executive A5 Statement tray 1 optional tray multi purpose tray Fax modeb b Only the optional fax kit is installed Letter A4 Legal t...

Page 35: ...ugh the machine more than once The adhesive backing is designed for only a single pass through the machine Do not use labels that are separating from the backing sheet or are wrinkled bubbled or otherwise damaged Card stock or custom sized materials Do not print on media smaller than 98 mm wide or 148 mm long In the software application set margins at least 6 4 mm away from the edges of the materi...

Page 36: ...roblems with paper feed turn the paper around Note that print quality is not guaranteed 1 2 1 paper length guide 2 paper width guide 2 After inserting paper into the tray while pinching the paper width guide as shown move it toward the stack of paper until it lightly touches the side of the stack Do not press the guide too tightly to the edge of the paper the guide may bend the paper In the multi ...

Page 37: ...pe and size for the multi purpose tray See page 4 8 for copying and faxing or the Software section for PC printing Note The settings made from the printer driver override the settings on the control panel 6 After printing fold the multi purpose tray extension and close the multi purpose tray Note Depending on the media type you are using keep the following loading guidelines Envelopes Flap side do...

Page 38: ...any curl on postcards envelopes and labels before loading them into the multi purpose tray Setting the paper size and type After loading paper in the paper tray you need to set the paper size and type These settings will apply to Copy and Fax modes For PC printing you need to select the paper size and type in the application program you use on your PC See Software section 1 Press Machine Setup on ...

Page 39: ...Dark Adjusts the brightness level to make a copy that is easier to read when the original contains faint markings and dark images Page 5 4 Paper Supply Selects the paper supply tray Advanced tab ID Copy Prints 2 sided originals on one sheet of paper This feature is helpful for copying a small sized item such as a business card Page 5 4 N Up Prints 2 or 4 original images reduced to fit onto one she...

Page 40: ...rtain time Or the machine resume to default setting when you press the Clear All button on the control panel or when you press other menu such as fax or else except the Job Status screen The default copy setting can be changed in Admin Setting Page 9 2 Changing the size of originals Press the Basic tab Original Size then use left right arrows to set the original size Press more to see the detail v...

Page 41: ...iginals and prints them on both sides of the paper 1 2 Sided Rotate Side 2 Scans one side of the originals and prints on both sides of the paper but the information on the back side of the print out is rotated 180 2 1 Sided Scans both sides of the originals and prints each of one on a separate sheet 2 2 Sided Scans both sides of the original and prints on both sides of the paper This function prod...

Page 42: ...of the original This feature is helpful for copying a small sized item such as a business card 1 Place a single original face down on the scanner glass Page 4 1 Note The original must be placed on the scanner glass to use this feature 2 Press Copy from the Main screen 3 Press the Advanced tab ID Copy 4 Press Start on the control panel Then the machine starts scanning the front side 5 Turn the orig...

Page 43: ...ol panel to begin copying Note Your original is divided into 9 portions Each portion is scanned and printed one by one in the following order Clone copying The machine prints multiple original images on a single page The number of images is automatically determined by the original image and the paper size 1 Place a single original face down on the scanner glass Page 4 1 Note The original must be p...

Page 44: ...a single original face down on the scanner glass Page 4 1 2 Press Copy from the Main screen 3 Press the Advanced tab Covers Note Once you have set the Paper Supply option to Auto you cannot use this feature 4 Press On to use this feature and select detailed settings for each option Position Selects whether the cover will be placed at the front back or both Cover Sheet Selects whether the cover wil...

Page 45: ... copying originals containing color in the background as in newspapers or catalogs 1 Load the originals face up in the DADF Or place a single original face down on the scanner glass 2 Press Copy from the Main screen 3 Press the Image tab Erase Background 4 Press On to activate this feature 5 Press OK 6 Press Start on the control panel to begin copying Shifting margins You can secure a room for bin...

Page 46: ... the Fax screen To use the fax feature press Fax on the Main screen If the screen displays an other menu press to go to the Main screen Note If the optional fax feature is not installed the fax icon will not appear on the Main screen Basic tab Fax number input area Shows the recipient s fax number using the number keypad on the control panel If you configured the phone book press Individual or Gro...

Page 47: ...r fax number on any fax you send 1 Press Machine Setup on the control panel 2 Press Admin Setting When the login message pops up enter password and press OK Page 3 3 3 Press the Setup tab Fax Setup Terminal ID 4 Touch the input area to enter the machine name and your fax number 5 Press OK Sending a fax 1 Press Fax from the Main screen 2 Place the originals face up in the DADF 3 Adjust the document...

Page 48: ...Machine Setup on the control panel 2 Select Admin Setting When the login message pops up then enter password and press OK Page 3 3 3 Press the Setup tab Fax Setup 4 Press Redial 5 Select Redial Time Interval and Redial Attempts 6 Press OK Redialing the last number 1 Press Fax from the Main screen 2 Adjust the document settings in the Image tab 3 Place the originals face up into the DADF 4 Press th...

Page 49: ...ption mode Answering Machine Fax Is for when an answering machine attached to your machine Your machine answers an incoming call and the caller can leave a message on the answering machine If the fax machine senses a fax tone on the line the machine automatically switches to Fax mode to receive the fax 5 Press OK Note When the memory is full the machine can no longer receive any incoming fax Secur...

Page 50: ... Output Option Duplex 4 Select appropriate option Off Prints only one side of the paper Long Edge Prints both sides of the paper however the binding will be the long edge Short Edge Prints both sides of the paper however the binding will be the short edge 5 Press OK Receiving faxes in memory Since your machine is a multi tasking device it can receive faxes while you are making copies or printing I...

Page 51: ...e only applies when you send a fax using On Hook Dial on the control panel Press Fax the Image tab Color Mode Select option and OK Mono Transmits a fax in black and white Color Transmits a fax in color Note Color Mode faxes are only supported when faxes are sent manually Page 6 3 Setting up a fax phonebook Use this feature to store destination names fax numbers and transmission settings in your ma...

Page 52: ...rked computer using SyncThru Web Service 1 Open the web browser in your computer 2 Enter IP address of your machine then SyncThru Web Service shows Example http 123 123 123 123 3 Press Machine Settings Fax Setup Fax Phone Book 4 Select Speed Dial Individual Note Fax numbers are already stored in Speed Dial Individual can be used when selecting 5 Press Add 6 Enter Index Name and Phone Number Index ...

Page 53: ...eleting the polling document 1 Press Fax from the Main screen 2 Press the Advanced tab Polling Print or Delete 3 Enter Passcode 4 Press OK Polling a remote fax This option allows you to retrieve poll a fax which is stored in the remote machine 1 Press Fax from the Main screen 2 Press the Advanced tab Polling Poll from Remote Note Your can use Delay Poll From Remote to poll the fax at a specific ti...

Page 54: ...ilbox such as storing deleting printing receiving 12 Set Notification option to On if you want to be notified when a fax is received into Mailbox 13 Press OK Storing originals in Mailbox Since you created the mailbox you can store originals in it 1 Press Fax from the Main screen 2 Place the originals face up in the DADF Or you can use the scanner glass with a single original document faced down 3 ...

Page 55: ... be stored in machine s memory and the machine will start to send fax in toll save time 1 Press Machine Setup on the control panel 2 Press Admin Setting When the login message pops up enter password and press OK Page 3 3 3 Press the Setup tab Fax Setup 4 Press down arrow on the right side 5 Press Toll Save 6 Press On 7 Press Start Time and set the start date and time with left right arrows 8 Press...

Page 56: ... on the control panel 2 Press Admin Setting When the login message pops up enter password and press OK Page 3 3 3 Press the Setup tab Fax Setup 4 Press down arrow on the right side 5 Press Fax Forward Settings Forward to Fax Setting Receive Forward 6 Press Forward and enter a fax number using the keypad on the control panel If you want the machine to print the report after forwarding a fax set the...

Page 57: ... Understanding the Scan screen Scanning originals and sending through email Scan to Email Scanning originals and sending via Samsung Network Scan Manager NetScan Scanning originals and sending via SMB FTP Scan to Server Changing the scan feature settings Understanding the Scan screen To use the scanning feature press Scan on the Main screen If the screen displays an other menu press to go to the M...

Page 58: ... FTP Sends the scanned file to FTP Press FTP for that option No Index number which you entered in SyncThru Web Service Page 7 5 Server Alias name which you entered in SyncThru Web Service Page 7 5 Duplex Selects whether the machine scans on one side of the paper 1 Sided both sides of the paper 2 Sided or both sides of paper but back is rotated 180 degrees 2 Sided Rotate Side 2 Resolution Selects t...

Page 59: ...age 7 4 Subject Title of email Message Enters the text which will be as the contents of the email The maximum size is 1KB Note To delete previously entered contents press Remove All 6 Set the scan quality by Duplex and Resolution Duplex Sets this option for originals that are printed on one side only or on both sides Resolution Sets the scanning resolution by pressing left right arrows 7 Press the...

Page 60: ...k Apply Note The LDAP server administrator must store the email address data The method of storing is varies depending on the server and the operating systems Entering email addresses by the address book Once you have stored the frequently used addresses into the address book you can simply enter email addresses 1 Press Local or Global from the Basic tab of Scan to Email The search window shows 2 ...

Page 61: ...nge the scanner properties of your machine and the scan settings from the Samsung Network Scan Manager window Click Properties and set the options in each tab Scanning and sending via NetScan 1 Make sure that your machine and the computer are connected to a network and Samsung Network Scan Manager is running on the computer 2 Place the originals face up in the DADF Or you can place a single origin...

Page 62: ...you can place a single original document face down on the scanner glass 4 Adjust the document settings in the Image tab 5 Select Duplex and Resolution in the Basic tab 6 Press Scan to Server to show the SMB server list you entered in the SyncThru Web Service 7 Select the destination SMB server Note You can select up to five destinations using both of SMB or FTP servers 8 Press Start on the control...

Page 63: ...dpi File Format Scan to Email 100 200 300 400 600 PDF Single Page TIFF Multi Page TIFF JPEG NetScan 100 200 300 PDF TIFF JPEG Scan to Server 100 200 300 400 600 PDF Single Page TIFF Multi Page TIFF JPEG Original Type You can set the original document type in order to enhance the quality of a document being scanned Press Scan Scan to Email Or Scan to Server the Image tab Original Type Select the ap...

Page 64: ...y Note When you set Color Mode to Mono the Quality option is grayed out File Format You can select the file format before you proceed with the scanning job Press Scan Scan to Email Or Scan to Server the Output tab File Format PDF Scans originals in PDF format Single Page TIFF Scans originals in TIFF Tagged Image File Format but several originals are scanned as one file Multi Page TIFF Scans the or...

Page 65: ...nting see Software section Canceling a print job If the print job is waiting in a print queue or print spooler such as the printer group in Windows delete the job as follows 1 Click the Windows Start menu 2 For Windows 98 Me NT 4 0 2000 select Settings and then Printers For Windows XP 2003 select Printers and Faxes 3 Double click the Samsung SCX 6x45 Series PCL 6 icon Or Samsung SCX 6x45 Series PS...

Page 66: ...plies Life tab Displays the remainders or the usage count of the machine supplies Use up down arrows to switch screens Machine Info tab Displays the detailed information about the machine and some options allows for validating your machine Page 9 1 Back Returns to the previous screen Admin Setting screen Gives you access to detailed machine settings Note When you press Admin Setting a login messag...

Page 67: ...ion on service center and purchasing point Date Time You can set the date and time Page 3 4 Default Settings Default Window Set the first window that will appear on the display screen after turning on the machine or waking up from the Low Power Mode to Sleep Mode For example if you select Fax as a default window the first window will be the Basic tab of the Fax feature In case you want to show ID ...

Page 68: ...the staples or continue the job If you set Within Job Offsetting to On the output paper is placed and sorted by printout sets Contention Management This feature lets you to select the priority between copy jobs and print jobs Priority Set the priority by numbering the job The machine starts from the least to the highest number in order First In First Out The machine does an asked job in order Opti...

Page 69: ... used by the answering machine Page 6 4 Contact your local telephone company for Dial Type setting information Auto Answer Delay You can specify the number of times the machine rings before answering an incoming call Receive Header Use this option to automatically print the page number date and time of fax reception at the bottom of each page Secure Receive You may need to prevent your received fa...

Page 70: ...ving a fax Toll Save Set the machine to send a fax in the toll save time for saving Page 6 10 Send Batch The machine asks you whether you want to add the documents to the reserved delay fax if the fax number you have dialed is same as the delay fax number Page 6 10 Fax Forward Settings You can forward a sent or received fax to other destination by a fax or an email Page 6 11 a Private Automatic Br...

Page 71: ...e When you want to add the optional features for this machine you have to install the optional kit and then set the machine to enable and activate those features Follow the next steps to enable those features 1 Press Machine Setup on the control panel 2 Press Admin Setting When the login message pops up then enter password and press OK 3 Press the Setup tab Optional Service Authentication Mode Con...

Page 72: ... days the machine will be used After setting up dates or number of pages the machine will send a fax to the service representatives informing the machine has used over set date or did print job more than set pages Service Number Enter the fax numbers for the service representatives Option Description Printing a report You can print a report on the machine s configuration or font list etcetera 1 Pr...

Page 73: ...ption On It you select Off the machine stores the logs but does not print Option Description Note You can also print machine s status information and browse status with SyncThru Web Service Open the web browser on your networked computer and type the IP address of your machine When SyncThru Web Service opens click Information Print information Report Continue E mail Confirmation Report The report ...

Page 74: ...r and type the machine s IP address When SyncThru Web Service is opened click Information Print information Monitoring the supplies life If you want to view the supply life indicators follow the next step 1 Press Machine Setup on the control panel 2 Press Machine Status 3 Scroll down to browse the entire supplies list view the percentage remaining Finding the serial number If you want to check you...

Page 75: ...print and scan quality problems occur Caution Cleaning the machine cabinet with cleaning materials that contain large amounts of alcohol solvent or other strong substances can discolor or damage the cabinet Cleaning the outside Clean the machine cabinet with a soft lint free cloth You can dampen the cloth slightly with water but be careful not to let any water drip onto or into the machine Cleanin...

Page 76: ... jobs require Average yield for a new toner cartridge is 20 000 standard pages in accordance with the ISO IEC 19752 standard Average yield for the original toner cartridge supplied with the machine is 20 000 standard pages The actual number may also be different depending on the print density of the pages you print on and the number of pages may be affected by operating environment printing interv...

Page 77: ...chine 8 Slide the new toner cartridge in until it locks in place 9 Turn the cartridge locking lever toward the left until you hear a click 10 Close the front cover then the side cover Replacing the drum cartridge Expected cartridge life The useful life of the drum cartridge is approximately 60 000 pages The screen displays Drum Warning when the drum is near the end of life Approximately 6 000 more...

Page 78: ...r cartridge must be removed to replace the drum cartridge 5 Pull the used drum cartridge out 6 Remove the new drum cartridge from its bag 7 Open the carefully pull the seal tape out of the cartridge 8 Thoroughly shake the drum cartridge side to side five or six times Note If toner gets on your clothing wipe it off with a dry cloth and wash clothing in cold water Hot water sets toner into fabric Do...

Page 79: ...ou bought the machine The warranty does not cover the replacement of the maintenance parts after their lifespan Managing your machine from the website If you have connected your machine to a network and set up TCP IP network parameters correctly you can manage the machine via Samsung s SyncThru Web Service an embedded web server Use SyncThru Web Service to View the device information and check its...

Page 80: ...nd slowly Note To prevent document jams use the scanner glass for thick thin or mixed paper type originals 1 Remove any remaining pages from the DADF 2 Open the DADF cover 3 Gently remove the jammed paper from the DADF Note If you see no paper in this area refer to Roller misfeed Page 11 2 4 Close the DADF cover Then reload the pages you removed if any in the DADF Misfeed of exiting paper 1 Remove...

Page 81: ...ea Check Tray 3 Feed Area Check Tray 4 Feed Area In the paper feed area optional tray Page 11 3 Jam at Fuser In the fuser area or around the toner cartridge Page 11 5 Registration Jam In the paper exit area Page 11 6 1 scanner lid 1 Caution To avoid tearing the paper pull the jammed paper out gently and slowly Follow the instructions in the following sections to clear the jam In the tray 1 1 Pull ...

Page 82: ...in the direction shown 5 Close the side cover and insert the paper tray Lower the rear part of the Tray to align the rear edge with the corresponding slot of the machine then insert it completely In the optional tray Note This part explains the method of removing the jammed paper in the optional tray 2 Please refer to the next method for other optional trays since the method is same as the tray 2 ...

Page 83: ... jammed paper or if there is any resistance when removing the paper stop pulling and continue on step 5 4 Open the outer cover in tray 2 5 Open the inner cover of tray 2 6 Pull the jammed paper out in the direction shown To avoid tearing the paper pull it out gently and slowly 7 Close the two covers Downloaded From ManualsPrinter com Manuals ...

Page 84: ...2 Open and close the side cover Printing automatically resumes In the fuser area or around the toner cartridge Note The fuser area is hot Take care when removing paper from the machine 1 Open the side cover 2 Remove the jammed paper in the direction shown 3 Close the side cover Downloaded From ManualsPrinter com Manuals ...

Page 85: ... Printing automatically resumes In the duplex unit area If the duplex unit is not inserted correctly paper jam may occur Make sure that the duplex unit is inserted correctly 1 Open the side cover 2 Release the guide to pull the jammed paper easily 3 Remove the jammed paper 4 Close the side cover Downloaded From ManualsPrinter com Manuals ...

Page 86: ...r 1c up 3 Remove the jammed paper 4 Slide in the stacker until you hear the sound click 5 Close the stacker front cover Finisher Jam 1 Finisher Duplex Jam 1 Open the stacker front cover 2 Pull the stacker lever 1a down If necessary pull the stacker lever 1b down as well 3 Remove the jammed paper Downloaded From ManualsPrinter com Manuals ...

Page 87: ...tated 90 degrees See the Software section Understanding display messages Messages appear on the Smart Panel program window or on the control panel display to indicate machine status or errors Refer to the tables below to understand the messages meaning to correct the problem if necessary Messages and their explanations are listed in alphabetical order Note When you call for service it is very conv...

Page 88: ...cover and remove the jammed original Page 11 1 Message Meaning Suggested solutions DHCP server error An Auto IP address has been established DHCP server does not work The machine is working with the setting IP by auto IP setting function Set the network setting again or assign a new static IP address DHCP server error An Auto IP is not working The DHCP server does not work and the auto IP setting ...

Page 89: ...r Low Error Fuser unit error Message Meaning Suggested solutions GUI to MCB Communications Fault A communication error has occurred Turn the machine off and turn it on again If the problem persists please call for service Install Developer Drum Cartridge The drum cartridge is not installed or the CRUM Consumer Replaceable Unit Monitor in the cartridge is not connected Install the drum cartridge If...

Page 90: ...does not work properly Turn the machine off and turn it on again If the problem persists please call for service Message Meaning Suggested solutions Non Genuine Drum Replace Drum The drum cartridge installed is not a genuine cartridge This message appears when you selected Continue at Non Genuine Drum Replace Drum prompt Install the Samsung genuine drum cartridge Non Genuine Drum Replace Drum1 The...

Page 91: ...nsor Open the DADF cover and remove jammed original Page 11 1 Message Meaning Suggested solutions SMPS Fan failure There is a problem with the SMPS Switch Mode Power Supply Fan Unplug the power cord and plug it back in If the problem still persists please call for service Stacker Fault Stacker unit is not operating Remove paper from the output tray finisher If this error message shows on the scree...

Page 92: ...recommended solutions Follow the suggested solutions until the problem is corrected If the problem persists please call for service Touch screen problem Paper feeding problems Condition Suggested solutions The touch screen does not show anything Adjust the screen by the brightness dial Page 1 4 Turn the machine off and turn it on again If the problem persists please call for service Condition Sugg...

Page 93: ... printer in your Windows Check the machine for the following The side cover is not closed Close the side cover Paper is jammed Clear the paper jam Page 11 2 No paper is loaded Load paper Page 4 5 The toner cartridge or the drum cartridge is not installed Install the toner cartridge or the drum cartridge If a system error occurs contact your service representative The connection cable between the c...

Page 94: ...onnect the printer cable and reconnect Try a print job that you have already printed successfully If possible attach the cable and the machine to another computer and try a print job that you know works Finally try a new printer cable The wrong printer driver was selected Check the application s printer selection menu to ensure that your machine is selected The software application is malfunctioni...

Page 95: ... paper may be defective Try reprinting the job The moisture content of the paper is uneven or the paper has moist spots on its surface Try a different brand of paper Page 4 3 The paper lot is bad The manufacturing processes can cause some areas to reject toner Try a different kind or brand of paper If these steps do not correct the problem contact a service representative White Spots White spots a...

Page 96: ...rinter properties Misformed characters If characters are improperly formed and producing hollow images the paper stock may be too slick Try different paper Page 4 3 If characters are improperly formed and producing a wavy effect the scanner unit may need service Contact a service representative Condition Suggested solutions Page skew Ensure that the paper is loaded properly Check the paper type an...

Page 97: ... Settings Utility or the Printer Tab in printer driver s properties Refer to the Software section for detail Condition Suggested solutions Copying problems Condition Suggested solutions Copies are too light or too dark Use Light and Dark arrows to darken or lighten the backgrounds of copies Smears lines marks or spots appears on copies If the defects are on the original press Light and Dark arrows...

Page 98: ...canner is busy receiving or printing data When the current job is completed try again Invalid handle Scanning has failed There may be a copying or printing job in progress Try your job again when that job is finished try your job again The selected port is currently being used Restart your computer and try again The printer cable may be improperly connected or the power may be off The scanner driv...

Page 99: ...heck your scan unit for marks and clean it Page 10 2 Common Windows problems Note Refer to Microsoft Windows 98 Me NT 4 0 2000 XP 2003 User s Guide that came with your PC for further information on Windows error messages The machine dials a number but the connection with the other fax machine fails The other fax machine may be turned off out of paper or cannot answer incoming calls Speak with the ...

Page 100: ... cups 1 1 21 has a problem with ipp Internet Printing Protocol printing The machine does not print Check if the printer driver is installed in your system Open the Unified Driver configuration tool and switch to the Printers tab in the Printers configuration window to look at the list of available printers Make sure that your machine is displayed on the list If not use the Add new printer wizard t...

Page 101: ...scan Check if a document is loaded into the machine Check if your machine is connected to the computer Make sure it is connected properly if an I O error is reported while scanning Check if the port is not busy Since functional components of MFP printer and scanner share the same I O interface port the situation of simultaneous access for different consumer applications to the same port is possibl...

Page 102: ...ns PDF file does not print correctly some parts are missing in the graphics text or illustrations Incompatibility between the PDF file and the Acrobat products Printing the PDF file as an image may enable the file to print Turn on Print As Image from the Acrobat printing options Note It will take longer to print when you print a PDF file as an image The document has printed but the print job has n...

Page 103: ...machine Accessory Description Part number Memory DIMM Extends your machine s memory capacity ML MEM140 256 MB Note This machine comes with 128 MB of on board memory and a 128 MB DIMM To expand the memory of your machine you must remove the existing DIMM and purchase a larger one Fax option kit This kit lets you use your machine as a fax machine Serial Typea SCX FAX100 Parallel Type SCX FAX101 Note...

Page 104: ...STP000 SmarThru WorkFlow Windows 2000 XP 2003 This feature lets you send additional information along with the scanned document to a specified network location SCX KIT11S FDI Foreign Device Interface kit This card is installed inside the machine to allow a third party device such as a coin operated device or a card reader Those devices allow the pay for print service on your machine SCX KIT10F a C...

Page 105: ...ving any internal accessories discharge static electricity from your body by touching something metal such as the metal back plate on any device plugged into a grounded power source If you walk round before finishing the installation repeat this procedure to discharge any static electricity again Installing a memory DIMM Your machine has a dual in line memory module DIMM slot Use this DIMM slot to...

Page 106: ...re section 2 Click the Windows Start menu 3 For Windows 98 Me NT 4 0 2000 select Settings and then Printers For Windows XP 2003 select Printers and Faxes 4 Select the Samsung SCX 6x45 Series PS printer 5 Click the right mouse button on the machine icon and select Properties 6 For Windows 98 Me select Device Options For Windows NT 4 0 2000 XP 2003 select Device Settings 7 Select the amount of memor...

Page 107: ...r cover Enabling Fax feature after installing the fax option kit After installing the Fax kit you have to set up the machine in order to use this function 1 Press Machine Setup on the control panel 2 Press Admin Setting 3 When the login message appears enter password with number keypad and press OK Page 3 3 4 Press the Setup tab Optional Service 5 Press Analog Fax 6 Set the option to Enable 7 Pres...

Page 108: ...rum cartridge yieldd Approx 60 000 pages Memory 256 MB max 384 MB External dimension W x D x H 637 4 x 489 x 616mm without optional trays 25 x 19 25 x 24 25 inches Weight 44 5 Kg including consumables Package weight Paper 5 4 Kg Plastic 1 2 Kg Duty cycle Monthly print volume Up to 200 000 pages a For details about paper input capacity see page 4 3 b Sound Pressure Level ISO 7779 c Average cartridg...

Page 109: ...int up to 600 x 600 text text photo photo Zoom rate Scanner glass 25 to 400 DADF 25 to 200 Multiple copies 1 to 999 pages Scanner specifications Item Description Compatibility TWAIN standard WIA standard Scanning method DADF and Flat bed Color CCD Charge Coupled Device module Resolution Optical 600 x 600 dpi mono and color Enhanced 4 800 x 4 800 dpi Effective scanning length Scanner glass 348 mm D...

Page 110: ...ed Up to 3 seconds pagea a Standard resolution MMR JBIG Maximum modem speed Phase C by ITU T No 1 chart Memory Tx ECM Maximum document length Scanner glass 356 mm Duplex automatic document glass 356 mm Resolution Standard 203 x 98 dpi Fine 203 x 196 dpi Super Fine 300 x 300 dpi 406 x 392 dpi 203 x 392 dpi Rxb only b Rx stands for receiving a fax Memory 16 MB Halftone 256 levels Auto dialer up to 2...

Page 111: ...ult settings 3 5 energy saver 9 3 language 9 2 loading paper 3 5 machine test 9 3 measurements 9 2 output option 9 3 setting a fax header 6 2 sound 9 3 supplies management 9 3 system timeout 9 2 tray management 9 3 tray setting 3 5 display screen 1 4 driver feature 2 2 help i installation 3 2 drum cartridge 1 2 drum reorder notification 10 1 duplex copying 5 3 faxing 6 5 scanning 7 6 E email addre...

Page 112: ...e status 9 1 Machine Status 1 7 Macintosh problems 11 23 requirements 2 3 Mailbox creating Mailbox 6 9 deleting the data of the Mailbox 6 9 Mailbox List 6 9 Mailbox No 6 8 Mailbox Passcode 6 8 polling 6 8 printing a Mailbox 6 9 sending to remote Mailbox 6 9 storing the originals 6 9 Maintenance 10 1 drum cartridge 10 4 maintenance parts 10 6 toner cartridge 10 3 memory DIMM installing 13 1 orderin...

Page 113: ... i scan preset 7 8 Scan to Email 7 3 confirmation 9 8 Scan to Server 7 5 confirmation 9 8 scanned file format 7 8 scanner lid 1 2 scanning color mode 7 7 darkness 7 8 enabling the scan kit option 9 6 erasing background 7 8 file format 7 8 original size 7 7 original type 7 7 printing an email report 10 1 quality 7 8 resolution 7 7 scan preset 7 8 sending it via email 7 3 sending it via FTP 7 5 send...

Page 114: ...Samsung Printer Software section Downloaded From ManualsPrinter com Manuals ...

Page 115: ...a Document 13 Printing to a file PRN 13 Printer Settings 14 Layout Tab 14 Paper Tab 15 Graphics Tab 16 Extras Tab 17 About Tab 17 Printer Tab 17 Using a Favorite Setting 18 Using Help 18 Chapter 3 ADVANCED PRINTING Printing Multiple Pages on One Sheet of Paper N Up Printing 19 Printing Posters 20 Printing Booklets 20 Printing on Both Sides of Paper 21 Printing a Reduced or Enlarged Document 21 Fit...

Page 116: ...ECT PRINTING UTILITY Overview Direct Printing Utility 25 Printing 25 From the Direct Printing Utility window 25 Using the shortcut icon 25 Using the right click menu 25 Chapter 6 SHARING THE PRINTER LOCALLY Setting Up a Host Computer 26 Setting Up a Client Computer 26 Chapter 7 SCANNING Scanning Using Samsung SmarThru Office 27 Using Samsung SmarThru Office 27 Uninstalling Samsung SmarThru Office ...

Page 117: ... Unified Driver Configurator 34 Opening the Unified Driver Configurator 34 Printers Configuration 34 Scanners Configuration 35 Ports Configuration 35 Configuring Printer Properties 36 Printing a Document 36 Printing from Applications 36 Printing Files 37 Scanning a Document 37 Using the Image Manager 38 Chapter 10 USING YOUR PRINTER WITH A MACINTOSH Installing Software 40 Printer driver 40 Scan dr...

Page 118: ...4 Printing Multiple Pages on One Sheet of Paper 43 Duplex Printing 44 Scanning 44 Downloaded From ManualsPrinter com Manuals ...

Page 119: ...such as a USB or parallel cable If your printer is attached to a network skip this step and go to Installing Software for Network Printing on page 8 You can install the printer software using the typical or custom method NOTE If the New Hardware Wizard window appears during the installation procedure click in the upper right corner of the box to close the window or click Cancel Typical Installatio...

Page 120: ... click No to reprint it 7 To register yourself as a user of Samsung Printers in order to receive information from Samsung select the checkbox and click Finish You are now sent to the Samsung web site Otherwise just click Finish NOTE After setup is complete if your printer driver doesn t work properly reinstall the printer driver See Reinstalling Printer Software on page 11 Custom Installation You ...

Page 121: ...on the printer and interface in use 6 Select the components to be installed and click Next NOTE You can change the desired installation folder by clicking Browse 7 After the installation is finished a window asking you to print a test page appears If you choose to print a test page select the checkbox and click Next Otherwise just click Next and skip to step 9 8 If the test page prints out correct...

Page 122: ...n window does not appear click Start and then Run Type X Setup exe replacing X with the letter which represents your drive and click OK 3 Click Next If necessary select a language from the drop down list 4 Select Typical installation for a network printer Click Next 5 The list of printers available on the network appears Select the printer you want to install from the list and then click Next If y...

Page 123: ...stallation window appears If the installation window does not appear click Start and then Run Type X Setup exe replacing X with the letter which represents your drive and click OK 3 Click Next If necessary select a language from the drop down list 4 Select Custom installation Click Next 5 The list of printers available on the network appears Select the printer you want to install from the list and...

Page 124: ...can also change the printer name set the printer to be shared on the network set the printer as the default printer and change the port name of each printer Click Next To install this software on a server select the Setting up this printer on a server checkbox 7 After the installation is finished a window appears asking you to print a test page and to register yourself as a user of Samsung Printer...

Page 125: ... will see a component list so that you can reinstall any item individually NOTE If your printer is not already connected to the computer the following window will appear After connecting the printer click Next If you don t want to connect the printer at this time click Next and No on the following screen Then the installation will start and a test page will not be printed at the end of the install...

Page 126: ...move and click Next You will see a component list so that you can remove any item individually 4 Select the components you want to remove and then click Next 5 When your computer asks you to confirm your selection click Yes The selected driver and all of its components are removed from your computer 6 After the software is removed click Finish Downloaded From ManualsPrinter com Manuals ...

Page 127: ...e using Refer to the User s Guide of your software application for the exact printing procedure 1 Open the document you want to print 2 Select Print from the File menu The Print window is displayed It may look slightly different depending on your application The basic print settings are selected within the Print window These settings include the number of copies and print range 3 Select your print...

Page 128: ... Guide or online help 1 Click the Windows Start button 2 Select Printers and Faxes 3 Select your printer driver icon 4 Right click on the printer driver icon and select Printing Preferences 5 Change the settings on each tab click OK Layout Tab The Layout tab provides options to adjust how the document appears on the printed page The Layout Options includes Multiple Pages per Side Poster Printing a...

Page 129: ...order Manual Tray or Multi Purpose Tray Tray n Type Set Type to correspond to the paper loaded in the tray from which you want to print This will let you get the best quality printout If not print quality may not be acheived as you want Cotton 20 lb to 24 lb 75 90 g m2 cotton paper such as Gilbert 25 and Gilbert 100 Plain Paper Normal plain paper Select this type if your printer is monochrome and ...

Page 130: ...driver tells the printer about how to image the text in your document Select the appropriate setting according to the status of your document This option may be available only in Windows 9x Me depending on your particular printer model Download as Outline When this option is selected the driver will download any TrueType fonts that are used in your document not already stored resident on your prin...

Page 131: ...ry resident fonts to print your document rather than downloading the fonts used in your document Because downloading fonts takes time selecting this option can speed up your printing time When using Printer fonts the printer will try to match the fonts used in your document to those stored in its memory If however you use fonts in your document that are very different from those resident in the pr...

Page 132: ... drop down list The printer is now set to print according to the Favorites setting you selected To delete a Favorites item select it from the list and click Delete You can also restore the printer driver s default settings by selecting Printer Default from the list Using Help Your printer has a help screen that can be activated by clicking the Help button in the printer properties window These hel...

Page 133: ...ges on One Sheet of Paper N Up Printing You can select the number of pages to print on a single sheet of paper To print more than one page per sheet the pages will be reduced in size and arranged in the order you specify You can print up to 16 pages on one sheet 1 To change the print settings from your software application access printer properties See Printing a Document on page 13 2 From the Lay...

Page 134: ...ing the sheets together 4 Click the Paper tab select the paper source size and type 5 Click OK and print the document You can complete the poster by pasting the sheets together 0 15 inches 0 15 inches Printing Booklets This printer feature allows you to print your document on both sides of the paper and arranges the pages so that the paper can be folded in half after printing to produce a booklet ...

Page 135: ...he printing job manually The printer prints every other page of the document first After printing the first side of your job the Printing Tip window appears Follow the on screen instructions to complete the printing job Long Edge Short Edge 2 5 3 2 5 3 2 5 3 2 5 3 Printing a Reduced or Enlarged Document You can change the size of a page s content to appear larger or smaller on the printed page 1 T...

Page 136: ...he preview window When the First Page Only box is checked the watermark prints on the first page only 4 Select watermark options You can select the font name style size or grayscale level from the Font Attributes section and set the angle of the watermark from the Message Angle section 5 Click Add to add a new watermark to the list 6 When you have finished editing click OK and start printing To st...

Page 137: ...ORLD BEST Using a Page Overlay After an overlay has been created it is ready to be printed with your document To print an overlay with a document 1 Create or open the document you want to print 2 To change the print settings from your software application access printer properties See Printing a Document on page 13 3 Click the Extras tab 4 Select the desired overlay from the Overlay drop down list...

Page 138: ...verride settings you specify in the printer driver Change all print settings available in the software application first and change any remaining settings using the printer driver The settings you change remain in effect only while you are using the current program To make your changes permanent make them in the Printers folder The following procedure is for Windows XP For other Windows OS refer t...

Page 139: ...tility From the Direct Printing Utility window 1 From the Start menu select Programs or All Programs Direct Printing Utility Direct Printing Utility Or double click the Direct Printing Utility shortcut icon on your desk top The Direct Printing Utility window opens 2 Select the printer you will use in the Select Printer section and click Browse 3 Select the PDF file you will print and click Open Th...

Page 140: ...t Computer 1 Start Windows 2 From the Start menu select Printers and Faxes 3 Double click your printer driver icon 4 From the Printer menu select Sharing 5 Check the Share this printer box 6 Fill in the Shared Name field and then click OK Setting Up a Client Computer 1 Right click the Windows Start button and select Explorer 2 Select My Network Places and then right click Search for Computers 3 Fi...

Page 141: ...ing scanned and bit depth settings Thus depending on your system and what you are scanning you may not be able to scan at certain resolutions especially using enhanced dpi Scanning Using Samsung SmarThru Office Samsung SmarThru Office is the accompanying software for your machine You can use SmarThru Office to scan images or documents from local or network scanners Using Samsung SmarThru Office Fo...

Page 142: ...ch has been set up with your e mail account Send by FTP To upload a document file to server while working within the SmarThru Office Send by Fax To send documents by Local or Network fax machine while working within the SmarThru Office 4 Click Scan on the tool bar of SmarThru Office window NOTES In Windows XP operating system you can use SmarThru Office launcher which is on the right end of taskba...

Page 143: ... Open the TWAIN window and set the scan options 5 Scan and save your scanned image NOTE You need to follow the program s instructions for acquiring an image Please refer to the user s guide of the application Scanning Using the WIA Driver Your machine also supports the Windows Image Acquisition WIA driver for scanning images WIA is one of the standard components provided by Microsoft Windows XP an...

Page 144: ...Panel icon on the Windows task bar and select your printer name The Smart Panel window and its contents shown in this Software User s Guide may differ depending on the printer in use Double click this icon The Smart Panel program displays the current status of the printer various information lets you change settings and the level of toner remaining in the toner cartridge s Toner Level You can view...

Page 145: ...the printer click the Apply button NOTES If you connect your printer to a network the SyncThru Web Service window appears instead of the Printer Settings Utility window Using Onscreen Help File For more information about Printer Settings Utility click Changing the Smart Panel Program Settings Right click the Smart Panel icon on the Windows task bar and select Options Select the settings you want f...

Page 146: ...flexible installation program You don t need to search for additional components that might be necessary for the Unified Linux Driver software all required packages will be carried onto your system and installed automatically this is possible on a wide set of the most popular Linux clones Installing the Unified Linux Driver Installing the Unified Linux Driver 1 Make sure that you connect your mach...

Page 147: ... field and enter the system password NOTE You must log in as a super user root to install the printer software If you are not a super user ask your system administrator 2 Insert the printer software CD ROM The CD ROM will automatically run If the CD ROM does not automatically run click the icon at the bottom of the desktop When the Terminal screen appears type in If the CD ROM is secondary master ...

Page 148: ...on window You can use the onscreen help by clicking Help 3 After changing the configurations click Exit to close the Unified Driver Configurator Printers Configuration button Scanners Configuration button Ports Configuration button Printers Configuration Printers configuration has the two tabs Printers and Classes Printers Tab You can see the current system s printer configuration by clicking on t...

Page 149: ...rts Between Printers and Scanners Your machine may be connected to a host computer via the parallel port or USB port Since the MFP device contains more than one device printer and scanner it is necessary to organize proper access of consumer applications to these devices via the single I O port The Samsung Unified Linux Driver package provides an appropriate port sharing mechanism that is used by ...

Page 150: ...t another printer driver By clicking Options you can set the default device options Jobs shows the list of print jobs Click Cancel job to cancel the selected job and select the Show completed jobs check box to see previous jobs on the job list Classes shows the class that your printer is in Click Add to Class to add your printer to a specific class or click Remove from Class to remove the printer ...

Page 151: ...t file 1 Type lpr file_name from the Linux shell command line and press Enter The LPR GUI window appears When you type only lpr and press Enter the Select file s to print window appears first Just select any files you want to print and click Open 2 In the LPR GUI window select your printer from the list and change the printer and print job properties For details about the properties window see pag...

Page 152: ...ut editing an image see page 38 Drag the pointer to set the image area to be scanned 10When you are finished click Save on the toolbar 11Select the file directory where you want to save the image and enter the file name 12Click Save Adding Job Type Settings You can save your scan option settings to retrieve for a later scanning To save a new Job Type setting 1 Change the options from the Scanner P...

Page 153: ... selected image area Zooms the image out Zooms the image in Allows you to scale the image size you can enter the size manually or set the rate to scale proportionally vertically or horizontally Allows you to rotate the image you can select the number of degrees from the drop down list Allows you to flip the image vertically or horizontally Allows you to adjust the brightness or contrast of the ima...

Page 154: ... Macintosh computer Printer driver Installing the printer driver 1 Connect your machine to the computer using the USB cable or the Ethernet cable 2 Turn on your computer and the machine 3 Insert the PostScript driver CD ROM which came with your machine into the CD ROM drive 4 Double click the Samsung_MFP on your Macintosh desktop 5 Double click the MAC_Printer folder 6 For Mac OS 10 3 or higher do...

Page 155: ...ble you use to connect the printer to your computer the network cable or the USB cable For a Network connected NOTE Some printers do not support a network interface Before connecting your printer make sure that your printer supports a network interface by referring to Printer Specifications in your Printer User s Guide Mac OS 10 3 or higher 1 Follow the instructions on Installing Software on page ...

Page 156: ... 5 Choose the number of copies you want and indicate which pages you want to print 6 Click Print when you finish setting the options Mac OS 10 3 Make sure that your printer is selected Changing Printer Settings You can use advanced printing features when using your printer From your Macintosh application select Print from the File menu The printer name which appears in the printer properties windo...

Page 157: ... vary depending on your printer model You can select the printing resolution The higher the setting the sharper the clarity of printed characters and graphics The higher setting also may increase the time it takes to print a document Mac OS 10 3 Printing Multiple Pages on One Sheet of Paper You can print more than one page on a single sheet of paper This feature provides a cost effective way to pr...

Page 158: ... the next copy will be printed on the front and back of one sheet In case of Uncollated copy the same page will be printed on the front and back of one sheet Therefore if you need multiple copies of a document and you want those copies on both sides of the paper you must print them one at a time as separate print jobs Mac OS 10 3 Scanning If you want to scan documents using other software you will...

Page 159: ...ing Macintosh 43 Windows 19 O orientation print 37 Windows 14 overlay create 23 delete 23 print 23 P Paper properties set 15 paper size set 15 print 37 paper source set 37 Windows 15 paper tray set copy 25 paper type set Macintosh 43 print 37 poster print 20 PostScript driver installing 24 print document 13 fit to page 21 from Macintosh 42 from Windows 13 N up Macintosh 43 Windows 19 overlay 23 po...

Page 160: ...indows 16 toner save 16 true type option 16 software install Macintosh 40 Windows 5 reinstall Windows 11 system requirements Macintosh 40 uninstall Windows 12 status monitor use 30 T toner save set 16 TWAIN scan 29 U uninstall software Windows 12 uninstalling MFP driver Linux 33 W watermark create 22 delete 22 edit 22 print 22 WIA scan 29 Downloaded From ManualsPrinter com Manuals ...

Page 161: ...Rev 3 00 Downloaded From ManualsPrinter com Manuals ...

Reviews: