background image

- Windows Printing System-

2-2

Start PCL Front Panel by double-clicking its icon in the Windows Printing System
Group window.

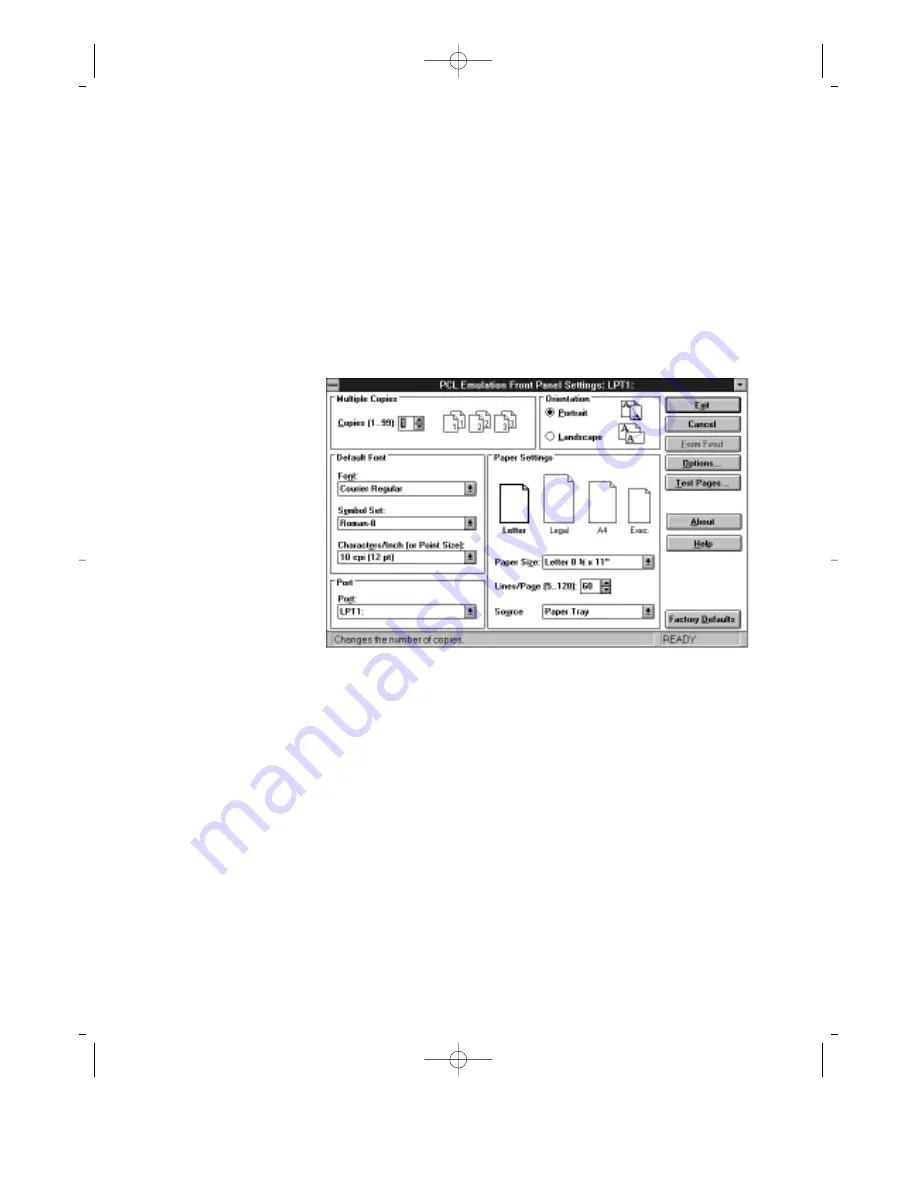
The screen below appears when you start up the PCL Front Panel application. Its
basic functions are:

F1, Help button, or ALT+H brings up a Help topic on the selected item in the
dialog box.

As noted in the specific information on each of the controls below, most of the 
dialog box controls do not affect the PCL interpreter's settings until the Send 
button is pressed.

ML-85G IB(SSA)  2/9/99 11:15 AM  Page wp2-2

Summary of Contents for ML-85G

Page 1: ... X X 1 L X X X 1 L X X X X 1 L X X 1 L 1 L 1 L 1 L hg hg hg L hf 1 hf Lhf 1hf L he 1 he Lhe 1he L h 1 h h Lh 1h h L g 1 g g Lg 1g g g L f 1 f f Lf 1f f L e 1 e e e e e e Le 1e e f f f f f f g g g g g g g h h h h h h h h h h hf hf hf hg hg hg hg f Operating Instructions ML 85G IB SSA 2 9 99 11 15 AM Page ope 1 ...

Page 2: ... for incidental or consequential damages in connection with the furnishing performance or use of this material PostScript is a registered trademark of Adobe Systems Inc Apple AppleTalk Local Talk LaserWriter and Macintosh are trademarks and or registered trademarks of Apple Computer Inc Helvetica Palatino and Times are registered trademarks of Linotype Corporation Centronics is a registered tradem...

Page 3: ...g antenna Increase the separation between the offending equipment and the receiver Connect the equipment into an outlet on a circuit different from that to which the receiver is connected Consult the dealer a radio TV technician or an Amateur Radio Operator for help Shielded interface cables and I O cords must be used for this equipment to comply with the relevant FCC regulations Changes or modifi...

Page 4: ...IS OPEN DO NOT OPEN THIS COVER VORSICHT UNSICHTBARE LASERSTRAHLUNG WENN ABDECKUNG GEÖFFNET NICHT DEM STRAHL AUSSETZEN CAUTION Avoid exposure to invisible laser radiation when the development unit is not installed ATTENTION RAYONNEMENT LASER INVISIBLE EN CAS D OUVERTURE EXPOSITION DANGEREUSE AU FAISCEAU ATTENZIONE RADIAZIONE LASER INVISIBLE IN CASO DI APERTURA EVITARE L ESPOSIZIONE AL FASCIO PRECAU...

Page 5: ...X g e J g 7 1 e N W R1 1 f H 3 J e 1 e B1 g e 7 g e e H 5 f eN 7Y e 5 e C5 g e g e e e Y f 0 4 e e Y e 0Y g e e g e KO e 6X f e f e e e g e e MI g e e 0R f e f e e e g O2 6K O2 0MgI4 6K O2 0M I4 6K O2 0M I4 6K W2 0M I4 6K O M I4 6K O2 0Y I4 6X W2 0M I K O M V4 6X O2 0Y I X W2 0M V K W M V4 6X W Y I X 7 Y V X J H W XeV X W 5 7 1e V 1 W Y L eN L W Y J 31 e 3 X 7 Y 75 N Le V X J H J He31fV X W 5 75 e...

Page 6: ...PRODUCT SAFETY We SAMSUNG ELECTRONICS CO LTD hereby declare that the ML 85G plus Laserprinter meets the intent of Directive 89 336 EEC for Electromagnetic Compatibility Compliance was demonstrated with the following specifications as listed in the official Journal of the European Communities EN 50081 Emissions EN 55022 Radiated Class B EN 55022 Conducted Class B EN 50082 Immunity IEC 801 2 Electro...

Page 7: ...er Cartridge 2 3 Power Cord 2 4 Paper Cassette 2 5 4 Testing the Connections 2 6 Front Control Panel 3 1 CHAPTER 3 Printing Documents 4 1 CHAPTER 4 1 Paper Cassette 4 1 Paper Sizes Supported 4 1 2 Loading the Paper Cassette 4 3 3 Manual Feed 4 4 Use the Manual Feed when 4 4 Setting Up the Software 4 4 Selecting the Correct Paper Path 4 4 Setting Up the Printer 4 5 Priority Feed Quick Manual Feed 4...

Page 8: ... the Printer 6 5 Solving Print Quality Problems 6 5 To use heavy Paper 6 6 1 Developer Cartridge 5 1 Replacing Developer Cartridge 5 1 2 Adjusting Print Density 5 2 Print Density 5 2 Toner Save 5 3 3 Cleaning the Printer 5 3 Print Media Specifications A 1 APPENDIX A Paper and Envelope Sizes Supported A 1 Paper Specifications A 1 Envelope Specifications A 2 Adhesive Label Specifications A 2 Printer...

Page 9: ...ndling Universal 150 sheet paper Paper Cassette holds various paper sizes Letter Executive A4 B5 and Legal Top output tray with 100 sheet capacity Manual feed slot Flat paper path for transparencies etc Custom media support for labels envelopes and post cards Computer Interfaces IEEE 1284 compatible parallel interface Nibble Byte and ECP In order to use the ECP feature an ECP Compliant cable shoul...

Page 10: ...f M B1 W Me M hf g e f C5 7Y gJ5 hf g LeJ f W2 6K U 6Xf7H O2 6K hf g 3 KO 5 f fB1 eB1e J5 f hf g V4 0Y f e e 7H hf h I40M g I4 K C5 3 C5e 0M hf V4 0Y V4 0Ye hf3L J L heV K O 1 he V46K M g h O20M hf I4 6Khf Hh h hfO2 0M 3 5 I4 6K e h h fO2 0M V Y I4 6K h h O2 0M I4 0M O W26KO2 eW26X K e W2 MS Y e7 B1 6X e U 6X e O2 6X N B1 O2 0M I X W X e I4 KC C5 3 C5 0Me O2 0M N1 7 1 e V40MI40Y V40Y O2 0M e O2 0M...

Page 11: ...box 3 Remove the outer packing material from the Developer Cartridge 4 Remove the printer from the box 5 Remove the outer packing material from the printer 6 Remove the tape on the front of the printer and slide out the Paper Cassette Check the package contents If any of the following items are missing or damaged contact your dealer or distributor Software diskettes Power cord Operator s Guide Ins...

Page 12: ...h W g W Lg 7 X f J 1 f W Lf W X e 7 1 e Le J 1e 7 e e e L J 1 7 3 N 5 H e e 3 e N 5e 3 He N 5 e 3 Y e V Hf N 5 f 3 Y f V Yg V Y g V4 0Yh I Mhe V4 Y he I4 0Yhf I4 0M hg I4 0M Remove the Developer Cartridge from the plastic bag Remove the plastic tape from the Developer Cartridge The tape may be much longer than expected and it may be necessary to withdraw the strip in two steps Draw the strip very ...

Page 13: ...does not have a power switch Don t be surprised It is intelligent enough to reduce power consumption when not used for period of time Just plug the power cord into a 3 wire grounded power socket and the printer will power on and some of the LEDs will be lit Power Cord STEP 2 Power Cord ML 85G IB SSA 2 9 99 11 15 AM Page 2 4 ...

Page 14: ...he guides 3 Load up to 150 sheets of paper Place the paper against the Rear Guide first then insert the paper under the Corner Tab After that press and release at point B several times to be sure the paper is seated properly 4 Rest the Cassette on the table top and slide it back into the printer To use other paper sizes see Chapter 4 Adjusting and loading the Paper Cassette Paper Cassette STEP 3 L...

Page 15: ...ce cable is not supplied with the printer If you do not have a cable purchase one separately from your supplier For best performance and guaranteed bi directional communication use a good quality shielded parallel cable with IEEE 1284 compatible pin configuration 4 ERROR MANUAL PAPER READY Front Control Panel O2 6K g O K O2 6K W2 7 0Y g g g g 3 5 g V4 H g I Me I4 h ML 85G IB SSA 2 9 99 11 15 AM Pa...

Page 16: ... Panel consists of four status LEDs The LEDs indicate printer status The Status Monitor utility displays more detailed information about the printer s status on your computer s screen Status LEDs Front Control Panel ERROR MANUAL PAPER READY ML 85G IB SSA 2 9 99 11 15 AM Page 3 1 ...

Page 17: ...line OFF The printer is offline LEDs READY ON The current paper source is the Manual Feed slot OFF The current paper source is the Cassette Tray MANUAL and READY ERROR MANUAL PAPER READY ERROR MANUAL PAPER READY ML 85G IB SSA 2 9 99 11 15 AM Page 3 2 ...

Page 18: ...rating Instructions 3 3 ON There is a paper jam with ERROR LED on ON The printer cover is open PAPER and ERROR ERROR ERROR MANUAL PAPER READY ERROR MANUAL PAPER READY ML 85G IB SSA 2 9 99 11 15 AM Page 3 3 ...

Page 19: ...ON The Paper Cassette is empty or missing PAPER ERROR MANUAL PAPER READY Operating Instructions 3 4 ML 85G IB SSA 2 9 99 11 15 AM Page 3 4 ...

Page 20: ...ality and to avoid paper jams or damage to the printer use only good quality photocopier grade paper See Appendix A for more detailed paper specifications Use the following steps to adjust the 3 paper size guides Side Guide Press down on the adjusting tab and adjust the Side Guide to the paper size Slide the guide until the hole of the selected paper size is positioned at the corresponding size Th...

Page 21: ...the 4 positions in the center Adjusting the Rear Guide Extension Guide Unless you use legal or folio size paper you don t need to adjust the Extension Guide If you use legal size paper perform the following adjustment procedure While pressing the 2 tabs at the rear center of the Paper Cassette pull the Extension Guide to the rear until the two buttons pop into the positioning holes Adjusting the E...

Page 22: ...paper face down with the top edge towards the front of the Paper Cassette 4 Secure the forward corner of the stack under the metal tab at the front of the Paper Cassette 5 Adjust the Side and Rear Guides to the corresponding size 6 Rest the Paper Cassette on the desktop and slide it back into the printer The green READY light will illuminate 2 Adjustable Cassette Corner Tab Side Guide Rear Guide E...

Page 23: ...ollowing steps 1 In your software s page setup or Remote Control Panel setup menu select Manual Feed mode 2 To prevent a paper jam select the correct paper size in your software For example do NOT select letter size paper in your software then try to feed legal paper into the Manual Feed slot 3 If printing envelopes insert face up with the bottom edge aligned against the left side of the Manual Fe...

Page 24: ... of the slot 4 If the machine begins to pull in the sheet allow it to go in or a jam may result If a jam occurs open the cover to remove the jammed paper close the cover and try again 5 Let the trailing end of the paper rest on the table Within the application send the job to the printer After a moment the printer prints the page 6 If necessary close the Exit Cover to use the face down paper path ...

Page 25: ...g multiple page letters 1 Fill the Paper Cassette with plain paper 2 Gently insert the top edge of a sheet of letterhead paper into the manual feed slot face up Align it against the left side of the slot until you feel resistance on the left corner 3 Allow the free end of the paper to rest on the table Send your job to the printer as if you were printing from the Cassette Do Not select Manual Feed...

Page 26: ...ge The Developer Cartridge may be the first item that will need to be replaced in the ML 85G plus printer Follow these steps Replacing Developer Cartridge 1 Press the Top Cover release button to open the Top Cover Remove the old Developer Cartridge Open the Top Cover Remove the new Developer Cartridge from its bag ML 85G IB SSA 2 9 99 11 15 AM Page 5 1 ...

Page 27: ...nd hold the Developer Cartridge in the center do not grasp the Developer Cartridge by the shutter wires and slide it into the printer Inserting the Developer Cartridge Close the Top Cover If it closes easily the Developer Cartridge is installed correctly Close the Top Cover Adjusting the Print Density The print density can be selected via the OPTIONS menu in the Printer Status window Three print d...

Page 28: ... h W Kh W g W Lg 7 X f J 1 f W Lf W X e 7 1 e Le J 1e 7 e e e L J 1 7 3 N 5 H e e 3 e N 5e 3 He N 5 e 3 Y e V Hf N 5 f 3 Y f V Yg V Y g V4 0Yh I Mhe V4 Y he I4 0Yhf I4 0M hg I4 0M If printed page appears contaminated follow the instructions below to clean the toner NOTE Windows 95 A Click the start button on the Windows Task Bar B Click on Programs C Click on Windows Printing System D Click on ML ...

Page 29: ...lex than those described here Clearing Paper Jams Removing the Paper Cassette while a job is printing Filling the cassette too full Not putting the corner of the paper stack under the metal tab in the Paper Cassette Using paper that is too coarse or too shiny Using damaged or used paper Storing paper incorrectly so that it curls or contains moisture What Causes Paper Jams Paper Path face up face d...

Page 30: ...close the Top Cover In many cases this will clear the jam by feeding the jammed paper out of the printer What to Do First Open the Top Cover Close the Top Cover If this doesn t solve the problem refer to the following steps ML 85G IB SSA 2 9 99 11 15 AM Page 6 2 ...

Page 31: ...l it toward the right to release it from the feed roller Then pull the paper straight out If the paper has gone completely into the printer see next page If the previous step clears the jam replace the Paper Cassette and Developer Cartridge then close the Top and Rear Covers The printer should return to the READY state If not check the top and rear areas of the printer Check the Paper Feed Path ML...

Page 32: ...o a service center If it is too difficult to remove the paper open the Rear Access Cover and pull the paper straight toward you Replace the Paper Cassette and Developer Cartridge then close the Top and Rear Covers The printer should return to the READY state If not try the following Check for more paper jammed in the printer Open and reclose the Top Cover or momentarily press the Front Panel butto...

Page 33: ...of the Printer Faded Print Faded print may be a faded area or a block of vertically aligned white streaks There are several conditions which can cause this to happen The Developer Cartridge may be getting low on toner Shake the Cartridge gently to redistribute the toner material or replace the Developer Cartridge The paper may not meet the media specifications See Appendix A for detailed specifica...

Page 34: ...with a weight of more than 42 lb 90g through the Manual Feed slot set the paper type to Thick Paper for best print quality Refer to the appropriate emulation addendum for detailed information To use heavy paper 6 6 ML 85G IB SSA 2 9 99 11 15 AM Page 6 6 ...

Page 35: ...second without deterioration Do not use paper with a colored coating added after the paper was produced Preprinted forms must be printed with non flammable heat resistant inks that do not melt vaporize or release hazardous emissions when subjected to the printer s approximately 392 F 200 C fusing temperature for 0 1 second Paper Specifications Medium Paper Paper Paper Paper Paper Envelope Designat...

Page 36: ...ess and must be coated for easy release of the top sheet The adhesives must be stable at the 392 F 200 C temperatures encountered for 0 1 second in the printer s fusing process and must not produce emissions that exceed exposure levels or threshold limits established by OSHA and other safety agencies Adhesives must not come into direct contact with any part of the printer Recycled paper OHP film o...

Page 37: ...Resolution 600 x 600 dpi dots per inch Printing Technology Microsoft WPS and PCL4 0 Standard Emulations On screen printer set up and status for Windows 3 x or Windows 95 Printer Status Display Controls Input 150 sheet Universal Cassette with 20lb 75g m2 paper Single sheet face up Manual Feed Output 100 sheets face down Single sheet face up Types Letter Legal Executive A4 B5 Envelope Paper Handling...

Page 38: ...t Current Printing 150 Watts average Sleep Under 28 Watts Power Consumption One piece integrated Developer Cartridge 5 000 pages per kit 5 density Toner Save mode to extend toner life Developer Cartridge Up to 25 seconds 25 C ambient temperature Warm Up Time Temperature 50 to 86 F 10 to 30 C Humidity 20 80 Operating Environment Temperature 32 F to 95 F 0 to 35 C Humidity 10 90 Storage and Moving E...

Page 39: ...367 x 176 mm Size W x D x H Parallel IEEE 1284 Nibble Byte ECP In order to use ECP feature an ECP compliant cable should be used Communication Interfaces This printer does not utilize internal memory In order to produce high quality 600 x 600 dpi resolution images the host PC must have at least 8Mb of RAM and 16Mb is recommended Memory ML 85G IB SSA 2 9 99 11 15 AM Page B 3 ...

Page 40: ...6X X X K 6X X X X X 1 L X X X 1 L X X X X 1 L X X 1 L 1 L 1 L 1 L hg hg hg L hf 1 hf Lhf 1hf L he 1 he Lhe 1he L h 1 h h Lh 1h h L g 1 g g Lg 1g g g L f 1 f f f f f f f f f f f g g g g g g g h h h h h h h h h h hf hf hf hg hg hg hg f Windows Printing System ML 85G IB SSA 2 9 99 11 15 AM Page B 4 ...

Page 41: ... 2 PCL Emulation Front Panel 2 1 1 Multiple Copies 2 3 2 Orientation 2 3 3 Default Font 2 3 4 Port Drop down menu 2 3 5 Paper Settings 2 4 6 Send Exit Button 2 5 7 Cancel Button 2 6 8 Form Feed Button 2 6 9 Options Button 2 6 10 Test Pages Button 2 7 11 About Button 2 8 12 Help Button 2 8 13 Factory Defaults Button 2 8 Windows Printing System ML 85G IB SSA 2 9 99 11 15 AM Page B 6 ...

Page 42: ...mage 3 7 4 Graphics Dialog Box 3 7 Changing the Printer Resolution 3 8 Adjusting Brightness and Contrast 3 8 Working with Grayscale Graphics 3 9 CHAPTER 4 Checking Print Job Status 4 1 1 A Window to Your Printer 4 1 Opening the Printer Status Window 4 3 When the Printer Status Window is an Icon 4 3 Pause Resume Force print job Delete and Test 4 4 Closing the Printer Status Window 4 5 Messages 4 6 ...

Page 43: ... 12 What s in the Print Manager Window 4 12 Opening the Printer Status Window from Print Manager 4 13 Displaying Messages 4 14 Assigning Print Manager Priority 4 14 Installing and Configuring a Printer 4 14 Windows Printing System ML 85G IB SSA 2 9 99 11 15 AM Page B 8 ...

Page 44: ...ML 85G IB SSA 2 9 99 11 15 AM Page B 9 ...

Page 45: ...erve is a registered trademark of CompuServe Inc Microsoft and MS DOS are registered trademarks and Windows is a trademark of Microsoft Corporation in the U S A and other countries TrueType is a registered trademark of Apple Computer Inc ML 85G IB SSA 2 9 99 11 15 AM Page B 10 ...

Page 46: ...me printing parameters such as the default alphabet font which the PCL drivers do not support via software HP printers rely on their Front Panel controls which the ML 85G plus does not have Therefore a stand alone Front Panel application is provided so you can select and send the appropriate commands to control these features Printer Help Selecting this icon launches the Printer Help file This is ...

Page 47: ...l Printer Setup Print Manager Selecting this icon Launches the Windows Print Manager The Installation program also makes a copy of the Windows Print Manager icon Readme Selecting this icon will explain the de installation procedure Uninstaller Clicking on this icon will uninstall the printer from your computer Windows Printing System 1 2 ML 85G IB SSA 2 9 99 11 15 AM Page wp1 2 ...

Page 48: ...ovides you with a means of determining that the printer and PCL are working properly Font Page provides a printout of all fonts supported by PCL This includes downloaded fonts Factory Default provides the equivalent of the PCL Menu Reset option on a LaserJet series II printer Front Panel All user selectable settings in PCL are returned to factory defaults Form Feed and Auto timer for a user select...

Page 49: ... up the PCL Front Panel application Its basic functions are F1 Help button or ALT H brings up a Help topic on the selected item in the dialog box As noted in the specific information on each of the controls below most of the dialog box controls do not affect the PCL interpreter s settings until the Send button is pressed ML 85G IB SSA 2 9 99 11 15 AM Page wp2 2 ...

Page 50: ...ubgrouping of the available alphabetic numeric and special characters in a font The PCLEFP supports the HP LaserJet series II internal fonts and symbol sets the Microsoft Z1a font symbol cartridge set and 19 International Standards Organization ISO symbol sets The fonts are listed in the Font Drop down menu in alphabetical order Point size maximum is 72 points per inch For PCL Emulation you can se...

Page 51: ...zes listed in the Paper Size Drop down menu do not have a corresponding paper size picture Name Drop down Menu Text Letter Letter 8 1 2 x 11 Legal Legal 8 1 2 x 14 A4 A4 210 x 297mm Exec Executive 7 1 4 x 10 1 2 Paper Size Drop down Menu The paper size displayed in this menu is the current default paper size All supported paper sizes are listed in this menu and can be accessed via keyboard or mous...

Page 52: ...terpreter not just the settings that changed Upon pressing this button the new settings are written to the WPS INI file This way the PCLEFP and the PCL interpreter will be in sync This button has two states and two corresponding names Exit and Send Exit This will be seen under two conditions If the PCLEFP does not have any status change the Send button appears when the application is opened After ...

Page 53: ...utton Pressing the Options button invokes the PCL Front Panel Options dialog box You can choose to set a time out value for the PCL interpreter and can select Auto Continue The PCL Front Panel Options dialog box allows you to enable a timer in the PCL This provides the ability to enable the timer and vary the amount of time that elapses before a time out Auto Form Feed Enabled Turning on the Auto ...

Page 54: ...page After the test page prints you are returned to the PCLEFP Test Page When this button is pressed a command is sent to the PCL interpreter causing a test page to print The dialog box closes after the Test Page button is pressed and you are returned to the PCL Front Panel Settings dialog box with the Test Page button highlighted Font Page When pressed the PCL interpreter prints one or more pages...

Page 55: ... Help Button This button brings up a context sensitive Help screen Factory Defaults Button The Factory Defaults button returns the PCLEFP settings to the LaserJet series II Factory Default settings Windows Printing System 2 8 11 12 13 ML 85G IB SSA 2 9 99 11 15 AM Page wp2 8 ...

Page 56: ...cs As you use these dialog boxes keep in mind that you can always get online Help by selecting the Help button Accessing the Printer Setup Dialog Boxes From WPS group window When using the WPS you will always start with the WPS group window From here you can access the Printer Setup dialog box by double clicking the Printer Setup icon From any Windows based Application 1 Open the application File ...

Page 57: ...ou always begin setting print options for the Windows Printing System in the Setup dialog box where you may Specify a number of copies and their arrangement Set image orientation Select the paper size Select the paper source Select the paper type Windows Printing System 2 3 2 The Setup dialog box also has four buttons used to set other print options enhance graphics learn more about your system an...

Page 58: ... Printing System not your application to set copies As another benefit you ll always get the exact number of copies you specify Many applications ignore the application setting and use only the copies set with the Windows Printing System If you specify three copies in the application Print dialog box and two copies in the Setup dialog box some applications use both numbers So these same settings t...

Page 59: ...dth Landscape wide is popular for spreadsheets envelopes transparencies and projects requiring a horizontal layout Paper Source The Paper Source box in the Setup dialog box shows a picture of the printer currently in use A message below the picture tells you whether the source holds the specified size of paper or if Manual Feed is specified which paper size to load Select a source from the Paper S...

Page 60: ... selected paper size does not match what is loaded in the Paper Cassette the text below the printer picture tells you If you ignore the message and don t change the paper size it will still print and the status window shows a warning message Thick Paper If you use thick paper with weight exceeding 42lb 90g OHP film or envelopes select Thick and insert the paper into the Manual Feed slot Fast Print...

Page 61: ...he end of the print job Both types of page also include information that can help you keep track of your print jobs and productivity For example the header page identifies your printer the title of your document the user the time printing began and the date If you re on a network this information can help you locate your print jobs and distinguish between revisions of the same document A trailer p...

Page 62: ...ge between 10 and 200 The Windows Printing System positions the top left corner of the scaled image where the top left corner of the full size page would start Graphics Dialog Box Settings in the Graphics dialog box control printer resolution as well as the overall appearance of any art included in the document To access the Graphics dialog box open the Windows Printing System Setup dialog box as ...

Page 63: ...ing They also affect colored text because the Windows Printing System converts colored text to shades of gray To change Brightness either type in a new value or drag its scroll control left or right to decrease darken or increase lighten the overall brightness Adjust Contrast in the same way Increasing Contrast simultaneously darkens the dark shades and lightens the light shades eventually elimina...

Page 64: ...r will not affect bitmaps which have no grayscale values Some applications have their own halftoning settings If so use the application s settings which will override those you specify with the Windows Printing System Solid Black and White Solid Black and White converts all shades of gray in the graphics to either black or white What becomes black or white depends on the Brightness setting grays l...

Page 65: ... longer than a Solid Black and White version of the same image but the image will contain more detail Diffuse Images Diffuse Images reproduces the most shades of gray from the original image Like Patterned Grays this halftoning method uses dots but behind the scenes processing by the Windows Printing System randomizes placement of the dots to make them more subtle Choose this option for high near ...

Page 66: ...plains new functions of the enhanced version of Print Manager included with the Windows Printing System While working in the Printer Status Window or with Print Manager remember that you can get online Help at any time by selecting commands from that window s Help menu or by pressing F1 A Window to Your Printer The Printer Status Window uses animated graphics to show exactly what is happening to t...

Page 67: ...m A progress bar that shows how what portion of the job has been printed A status bar displaying the current printer mode The Printer Status Window always shows the title bar menu bar toolbar and job information Whether it includes the graphic and progress and status bars depends on what you specify with the View menu This chapter describes and illustrates the Printer Status Window with all compon...

Page 68: ...s If you re not using Print Manager the Printer Status Window opens just after the Printing dialog box appears The Printer Status Window always re appears the way you last left it either full size or as an icon that indicates the general condition of the printer printing idle etc You can always restore the icon to full size or minimize the window to an icon When the Printer Status Window is an Ico...

Page 69: ...formation from an open application behind the Printer Status Window You may for example want to check Print Manager to see what other print jobs are in the print queue Even if you minimize the alert you won t be able to resume printing until you take the action specified in the full size window or on the Front Panel of the printer For details about alerts refer to Getting Messages later in this ch...

Page 70: ...ge on the printer Go to standby Go to ready Click on this button to get rid of excess toner in the development unit to produce a clean printout Closing the Printer Status Window If the Printer Status Window opens automatically for printing it closes when printing finishes Likewise if the window opened to show an alert it closes automatically after you correct the problem that triggered the alert T...

Page 71: ...nditions won t stop the print job but should be resolved in the near future An information message appears when Something happened inside the printer Paper Jam Cover Open etc Something about the printer has changed In both of these situations the Printer Status Window changes The i guides your eye to the job information box where a description of the condition replaces the estimated print times Th...

Page 72: ...ow you will resume normal printing If the window identifies a problem printing automatically resumes as soon as you fix the problem If the Windows Printing System has detected more than one condition at the same time it will display alerts in this order Check Printer Cable or Print Job Lost Engine Error Check Cover Clear Paper Jam After fixing the current problem you will see the next most importa...

Page 73: ... not take effect until the next print job Status Options Dialog Box The Status Options dialog box allows you to set options for displaying the Printer Status Window These options provide you with control over when to display the Window and what type of sounds if any to play Printer Options Dialog Box The Printer Options dialog box consists of Energy Saver feature and Toner Density settings Windows...

Page 74: ...s to change the voice messages to different sounds Refer to the following tables which list the spoken messages the event that triggers each sound and the sound s filename Information Messages Spoken message Even Sound filename Printing complete Last page finished pdone wav Printing paused Pause button pressed ppaused wav Printing resumed Printing resumed presume wav Printing started Printing star...

Page 75: ...job information However in the View menu you can select additional components to display in the Printer Status Window Printer Status Window showing only the progress bar Printer Status Window showing progress bar and printer picture Windows Printing System NOTE O2 6K O2 6Khg W2 6Xhf O K he W2 6X h W Kh W g W Lg 7 X f J 1 f W Lf W X e 7 1 e Le J 1e 7 e e e L J 1 7 3 N 5 H e e 3 e N 5e 3 He N 5 e 3 ...

Page 76: ...here while keeping an eye on the Printer Status Window Taking Advantage of Print manager When the Windows Print Manager is activated the application sends the document to Print Manager rather than to the printer Print Manager takes care of sending the document to the printer by temporarily storing it on the hard disk and adding it to the queue of print jobs waiting to print As a print job finishes...

Page 77: ...hout the intermediate step of handing it over to Print Manager However you won t be able to use your application or computer until all pages of the document finish printing What s in the Print Manager Window The Print Manager provided with the Windows Printing System is an enhanced version of the Print Manager included with Windows 3 1 and Windows for Workgroups 3 11 Though the enhanced Print Mana...

Page 78: ...Document menu Moves the selected print job Move Document back in back in the selected print queue the Document menu Opens the selected printer s View menu Printer Status Window Printer Status if available Opening the Printer Status Window from Print Manager When the Print Manager window lists a Windows Printing System printer or any printer that uses a queue processor you can open the Printer Stat...

Page 79: ...nings immediately Warnings Flash Print The window s title bar or icon flashes to get your Manager attention To see the message click the Print Manager Window window or double click the icon Ignore All Nothing changes on your screen Warnings 3 Click the OK button Assigning Print Manager Priority You determine how quickly your documents print by setting a priority level for Print Manager The higher ...

Page 80: ... can use Print Manager to install and configure other printers but only Windows Printing system printers For information about installing and configuring other printers open Print Manager s online Help by pressing the F1 key or by selecting a command from the Help menu Print Manager Help provides information about Print Manager only To get online Help for the Windows Printing System select Help fr...

Reviews: