background image

52 _ Troubleshooting

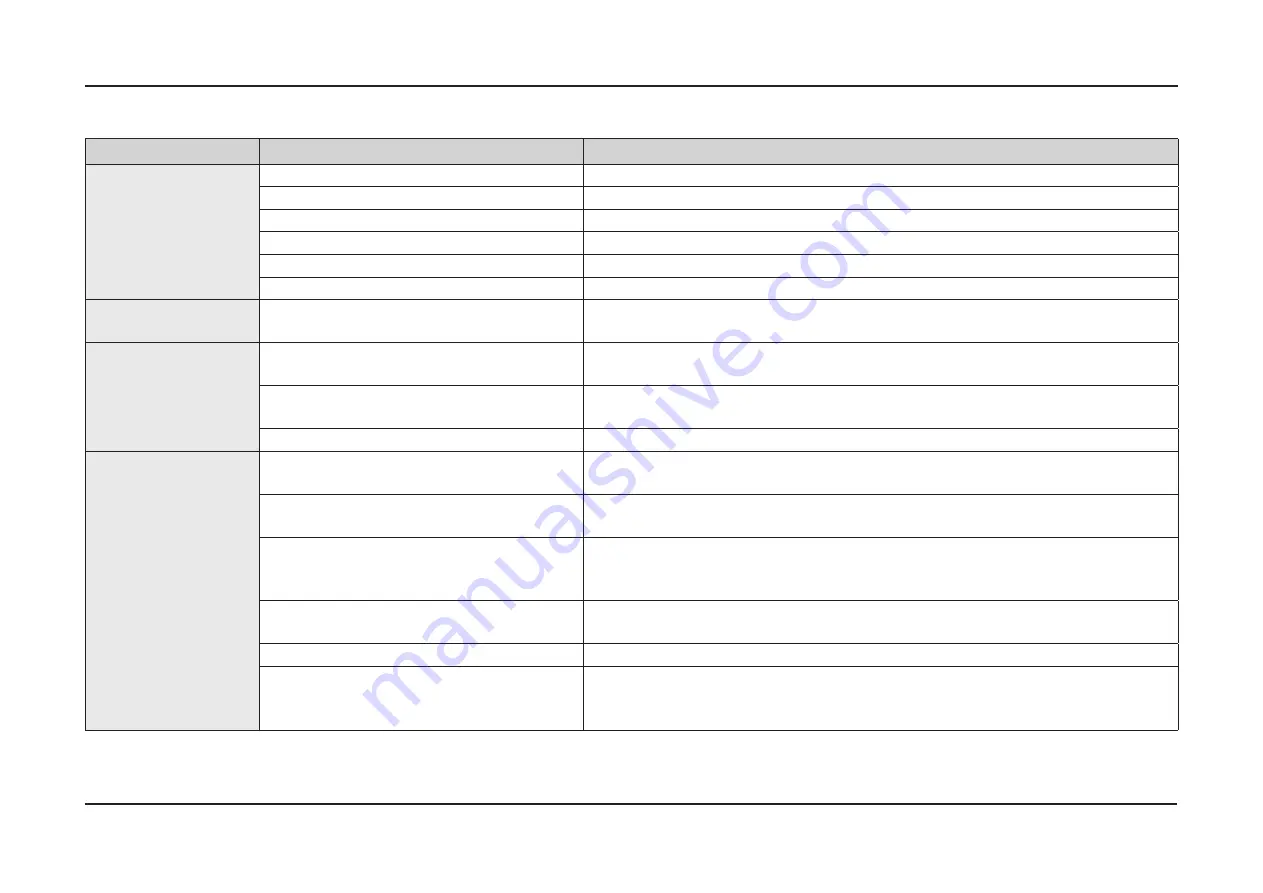
PROBLEM

POSSIBLE CAUSE

SOLUTION

Will not start.

The door is not closed completely.

Check that the door is latched and closed completely.

No cycle is selected.

Select a proper cycle.

The power cable is not connected.

Connect the power cable properly.

The water supply does not work.

Check that the water supply valve is open.

Control panel is locked.

Unlock the control lock, (See user manual.)

A circuit breaker is open.

Reset the circuit breaker.

It’s taking too long with 

an operation or cycle.

Cold water is being supplied.

Check that the water supply line is connected to a hot water supply. 
(Additional time is required to heat cold water.)

There are food particles 

remaining on dishes.

(Not cleaning properly.)

You selected an inappropriate cycle.

Select a cycle according to the number and
soil level of the dishes, as directed in this manual.

The water temperature is low.

Connect the water supply line to a hot water supply.
For best performance, the temperature of  the supplied water should be 120 ˚F (49 ˚C).

Low water pressure.

The water pressure should be between 20 and 120 psi  (140 - 830 kPa).

There are food

particles remaining

on dishes.

(Not cleaning properly.)

The water is too hard.

Use a commercial dishwasher cleaner.
Use high-quality, fresh detergent with rinse aid.

Dishwasher detergent was not used.

Use automatic dishwasher detergent.
We recommend a powder or gel type dishwasher detergent.

Detergent remains in the dispenser.

Make sure large items such as cookie sheets, cutting boards, or contaners, etc.
are not blocking the detergent dispenser and preventing it from opening properly.
Rearrange the dishes so they do not interfere with detergent dispenser operation.

There is no rinse aid.

Check the dispenser and add the rinse aid.
Use liquid type rinse aid.

A nozzle is clogged.

Clean the nozzle. 

The dishes are improperly loaded.
Too many dishes have been loaded.

Rearrange the dishes so they do not interfere with nozzle rotation and detergent dispenser operation.
Load only an appropriate number of dishes.
Load your dishes as recommended. (See page 16.)

Summary of Contents for DW80K5050US

Page 1: ...nual DISHWASHER Basic model DW80K5050US Model Name DW80M3021US Model Code DW80M3021US AC 1 Safety Instructions 2 Features and Specifications 3 Disassembly and Reassembly 4 Troubleshooting 5 PCB Diagra...

Page 2: ...Disassembly and Reassembly 9 3 1 Tools for Removal and Reassembly 9 3 2 Preparation for parts replacement 10 3 3 Removing The Upper Rack 10 4 Troubleshooting 34 4 1 Preparation 34 4 2 Service Inspecti...

Page 3: ...isconnect the circuit breaker or power cable before servicing Failure to do so may result in a risk of electric shock Do not allow consumers to connect several appliances to a single power outlet at t...

Page 4: ...tape is used instead of the connectors it may cause fire due to arcing Make sure to disconnect the PBA power terminals before starting the service Failing to do so may result in a high voltage electri...

Page 5: ...n using a sharp tool or object This may result in electric shock or damage to the product During Servicing When connecting a wiring harness make sure to seal it completely so no liquid can enter Make...

Page 6: ...icing Check the assembled status of the parts They must be the same as before servicing Check whether the product is level with the floor and secured to the cabinet and under the counter Vibrations ca...

Page 7: ...uto cycle determines the level of soil on the dishes and initiates the optimal cycle for cleaning Use this feature to save water energy and time Extremely quiet operation Efficient noise control techn...

Page 8: ...ype Tact operation Dimension W x D x H 23 7 8 x 24 3 4 x 33 7 8 in 605 x 627 x 860 mm Sales Point Flexible Style Inclined Rack System Height adjustable Upper Basket manual Upgraded Kitchen Pleasant ki...

Page 9: ...2 gallon 10 7 27 2L Normal Cycle Design Specifications Panel Control Silver Control Type Touch Frame Front STS Basket Handle X Function Specification Soil Detection Sensors O Drying method Air Vent dr...

Page 10: ...tall 2 screws for top mounting 2 screws for kick plate 2 screws for side wall DD98 01019A 1 Provided with the dishwasher User Manual DD81 02549A Install Guide DD81 02557A 90 Elbow 3 8 1 Sold separatel...

Page 11: ...d lay it on the floor Be careful of the drain hose when pulling out the unit WARNING Always turn off the electric power supply water supply before servicing any electrical component making ohmmeter ch...

Page 12: ...possible Use a protective mat or towel to prevent damage to the floor or having any of the remaining water spill on the floor All voltage checks should be made with a voltmeter having a full scale ra...

Page 13: ...Main PBA case under the door 2 Remove the two 2 screws of PBA case and pull out the PBA cover carefully 3 Remove all connectors on the PBA 4 Remove the three 2 screws on the PBA board 5 Pull out the P...

Page 14: ...s make sure to hold the tub front using your hand It can prevent closing door suddenly and harming you Caution Do not place the removed screws on the door inner They may fall into the sump assy 2 Remo...

Page 15: ...ws holding the tub front door outer and panel control in place Caution Do not place the removed screws on the tub front They may fall into the sump assy 2 Pull out the Door outer the Assy control pane...

Page 16: ...rotating it counterclockwise Use a jig If you have no jig use a tool such as a pair of long nose pliers Remove it carefully so that the part is not damaged 5 Remove the two 2 screws holding the cover...

Page 17: ...sembly and Reassembly _ 15 Part Figure Description Control Panel Preparation Disassemble the door outer 1 Remove the Door lock switch from Assy panel control 2 Remove the wire connectors from Panel co...

Page 18: ...16 _ Disassembly and Reassembly Part Figure Description Cap Dry Outlet Preparation Disassemble the door outer 1 Push it to the inside carefully...

Page 19: ...uter Refer the Door outer disassembly section to separate the Door outer 1 Disconnect the two 2 wire from the Dispenser 2 The dispenser is fixed to the tub front with many hooks Use several flat screw...

Page 20: ...pply line 1 Remove the cover PCB and pull out the case PCB without disconnecting wire connectors When remove the PCB lift up the two 2clasps under the base by using a flat tip screwdriver in a lever e...

Page 21: ...both sides in towards the unit Assy Rotor Preparation Remove the lower basket in the dishwasher Make sure to remove the water in each nozzle to block the wet The DW80F800 DW80F600 models nozzle is di...

Page 22: ...two brackets inside tub 2 Use a flat tip screwdriver to pry the tabs that are securing the bracket duct from the top and the middle of the tub Be careful not to let the screwdriver slip when prying t...

Page 23: ...connected to the Assy sump connectors drain pump screws 2 Remove the three 3 screws holders in Assy sump Pull out the holders using a pair of needle nose pliers At the same time press the tab at the...

Page 24: ...ews on Assy sump Except the two 2 screws holding the holder nozzle in the center of the sump Take off the filter mesh body cover sump holder nozzle L 2 Pull out the Assy cover sump slightly and hold a...

Page 25: ...e frame left Caution Make sure to wear gloves when removing it Be careful as the steel plate is sharp and may cut you 3 Remove cover brake by rotating counterclockwise Use a jig If you do not have a j...

Page 26: ...ly section to separate 1 Loosen the clamp left side in picture and release the hose from the Assy case brake 2 You can see the hose holder in the dishwasher backside 3 Push the two 2 hooks of the drai...

Page 27: ...ose connections Remove the upper lower baskets in the dishwasher Pull out the dishwasher carefully 1 Lay the dishwasher down on its back Release the hooks ecuring the base and shutter in place 2 Pull...

Page 28: ...emove the shutter 1 Turn the rear leg adjusting screw clockwise until the rear adjusting leg is fully extended 2 Remove the screw that is holding the case gear to the unit 3 The case gear is made up o...

Page 29: ...t the inlet valve wire connector 3 Release the hose clamp and disconnect hose Caution When removing the hose clamp take care to hold it tightly The clamp is under tension and if released it can become...

Page 30: ...Disassemble the shutter Refer to shutter disassembly section 1 Disconnect the wire terminal connected to the thermistor 2 Release the two 2 screws of thermistor 3 Pull out it carefully Inspect the O...

Page 31: ...to be released onto the floor Inspect the O ring seal around the drain pump If it is damaged in any way replace the O ring seal 2 Disconnect the two 2 drain pump connectors Turbidity Sensor Preparati...

Page 32: ...tion 2 Remove the four 4 screws holding the circulation motor and the sump in place and the one 1 screw for earth connection from main wire harness 3 Hold and pull out the circulation motor carefully...

Page 33: ...section 1 Remove the two 2 heater connectors 2 Remove a ground screw on the heater bracket 3 Loosen the nut between the heater terminals 10mm 4 Remove the heater by pulling it out of the sump assembly...

Page 34: ...1 Remove the eight 8 screws on the base plate both sides 2 Carefully lay the dishwasher down on its back 3 Remove the cover PCB and pull out the case PCB and disconnect the wire connectors 4 Disconnec...

Page 35: ...I Filter 1 Remove the two 2 screws on the frame R in Red circle 2 Remove the ground wire screw form the door hinge 3 Remove the Cover from the EMI Filter 4 Disconnect the two 2 wires from the EMI filt...

Page 36: ...for 3 minutes while water supply valve is OFF 20 seconds ON 5 seconds OFF The water supply pressure is low The water supply valve is closed The aqua stop is out of order The case brake fails to detec...

Page 37: ...or sub PBA is out of order The communications connection for the main PBA or sub PBA is not properly connected LC LC When the water leakage sensor data is equal to or less than 3V for 3 seconds Main r...

Page 38: ...working normally terminal connection Foreign substance in Filter Water faucet is OK Drain pump working normally Flow meter working normally Water inlet hose is OK Filter Aqua stop Pressure switch is...

Page 39: ...ive Please replace it Fixing or Replace the Heater assembly Fixing or Replace the Thermistor Check the drain hose installation condition In Heater operation step If pressure switch detect low level wa...

Page 40: ...p 6 If the Door remains open for more than 3 7 seconds after the Start Key is entered the Door Open inspection code dC dC1 will appear The machine will stop if the Door opens during operation and the...

Page 41: ...rnating motor operate the C Pump on LOW 10 seconds C Pump on HI 10 seconds For models with a Vane move the Vane back and forth once when operating the bottom For Vane operation alternations detect the...

Page 42: ...s after entering the Start Key If the Door is left open for 3 7 seconds after the Start Key is entered the Door Open check code dC dC1 will be displayed During manual mode operations if the relevant S...

Page 43: ...not recognized as having been performed if STEP 1 is re operated STEP 6 has been performed or Auto Mode has been enabled For models with vane the vane must move back and forth when the bottom alternat...

Page 44: ...e refer to the diagram below for the control times of the control components that run in this mode Applicable only to models that have the relevant running parts For the Water Tank water filling opera...

Page 45: ...spection codes are saved according to Dish Washer Inspection Mode Inspection Recall Mode 1 Each time Heavy Key is pressed while inspection code is on display the information about the condition which...

Page 46: ...n to On by default note About This Option This option is designed to increase the drying performance by default in case there are consumer complaints If Dry Sanitize option can be set to On by default...

Page 47: ...60 122 F 50 140 F 60 163 F 73 3 8 14 3 60 The numbers in parentheses in the Last Rinse column represent the temperature when you select Sanitize When you select the Auto or Normal cycle you can elimin...

Page 48: ...ormal 0 2 to 4 5V Measure the resistance between both ends of the thermistor Remove the connector before measuring DMT800 610 400 350 DW7933 DW80J3020 DW80K3021 Measure the voltage between number 2 an...

Page 49: ...black wire and the white wire of CN101 Normal AC 120V 4 Check the DC voltage of the Main PBA See Main PBA DC voltage Check Main PBA DC Voltage Check None Check the DC voltage of the Main PBA Measure t...

Page 50: ...reign material in the water passages Remove foreign material from the water passages The Cycle does not start None 1 Check the connections for the Door Sensing Switch Check the blue wire and the switc...

Page 51: ...dispenser Check whether there is detergent in the Dispenser 2 Check the connections for the Dispenser connector Reconnect the Dispenser connector 3 Check the resistance of the Dispenser Remove the co...

Page 52: ...ce of the Dry Fan Motor coil Remove the connector before measuring Normal Approx 150 Faulty Replace the Dry Fan Motor assy 4 Check the resistance of the Thermal Actuator Remove the connector before me...

Page 53: ...ed LED or Input Key Fail None 1 Check the connections for the Sub PBA connector Reconnect the Sub PBA connectors 2 Check the LED and Input Key 1 Push Hi Temp Wash Sanitize Power Key Normal All LED dis...

Page 54: ...upply For best performance the temperature of the supplied water should be 120 F 49 C Low water pressure The water pressure should be between 20 and 120 psi 140 830 kPa There are food particles remain...

Page 55: ...ll onto other items when unloading After finishing the cycle empty the lower rack first and then the upper rack This will prevent water dripping from the upper rack onto the dishes in the lower rack H...

Page 56: ...ate After placing the dishes into the racks rotate the nozzles by hand to check whether any of the dishes interfere with them Water won t pump out of the dishwasher The drain is clogged Contact a qual...

Page 57: ...ICOM 6 CN701 Connector for BLDC Fan for Dry 7 CN502 Connector for WIFI Communication 8 CN503 Sensing Connector refer to next page for details 9 CN505 Sensing Connector refer to next page for details 1...

Page 58: ...stributor Motor Relay 24 RY209 Dispenser Relay 25 SSR201 Water Valve Relay 26 SSR202 Lower Vane Forward Relay 27 SSR203 Lower Vane Backward Relay No Location Description 28 RY210 Dry Actuator Relay 29...

Page 59: ...7 SENSOR OPTION 2 8 5V 9 RINSEAID SHORTAGE SENSOR 10 GND CN505 1 OVERFLOW IN 2 GND 3 LEAKAGE IN 4 GND 5 WATER THERMISTOR 6 SNS 5V 7 SENSOR OPTION 1 8 SNS 5V 9 SNS 5V 10 SALT SHORTAGE SENSOR 11 GND 12...

Page 60: ...7 BLDC CN202 1 LOWER VANE FORWARD 2 NC 3 WATER VALVE 4 NC 5 DISPENSER 6 NC 7 DISTRIBUTOR MOTOR 8 NC 9 PUMPAC2 CN202 1 NC 2 NC 3 VALVE WATER TANK 4 NC 5 DRY FAN MOTORAC 6 NC 7 WATER SOFNER VALVE 8 NC 9...

Page 61: ...WN NTR COLORLESS WHT WHITE This Document can not be used without Samsung s authorization 0 1 3 51 66 6 0 7 5 0 0 86 68 3 1 68 1 3 1 3 1 3 1 3 1 3 1 3 7 5 5 7 3 0 1 5 7 3 6 7 225 785 7 29 5 2 7 50 6725...

Page 62: ...screws and nuts are fastened correctly Check whether they are fastened with the specified torque 5 Remove foreign material Check whether any foreign material such as soil wire scraps and screws are i...

Page 63: ...5 K 2016 M 2017 1 0 Basic 1 Exclusive 3 0 2 9 Super Premium 8 Premium 7 Superior 6 Best 5 Better 4 Best 18 only 3 Good 1 Value 9 Super Premium 7 Premium 5 Best 4 Best 2nd 3 Better 2 Good 9 Chef Collec...

Page 64: ...and rinse aids to the inside of the dishwasher when they are needed 8 Tub Assy An internal case made of stainless steel that makes up the basic framework of the dishwasher 9 Sump Assy The place insid...

Page 65: ...Eurpoe CIS Mideast africa gspn1 samsungcsportal com Asia gspn2 samsungcsportal com North Latin America gspn3 samsungcsportal com China china samsungportal com This Service Manual is a property of Sams...

Reviews: