background image

35

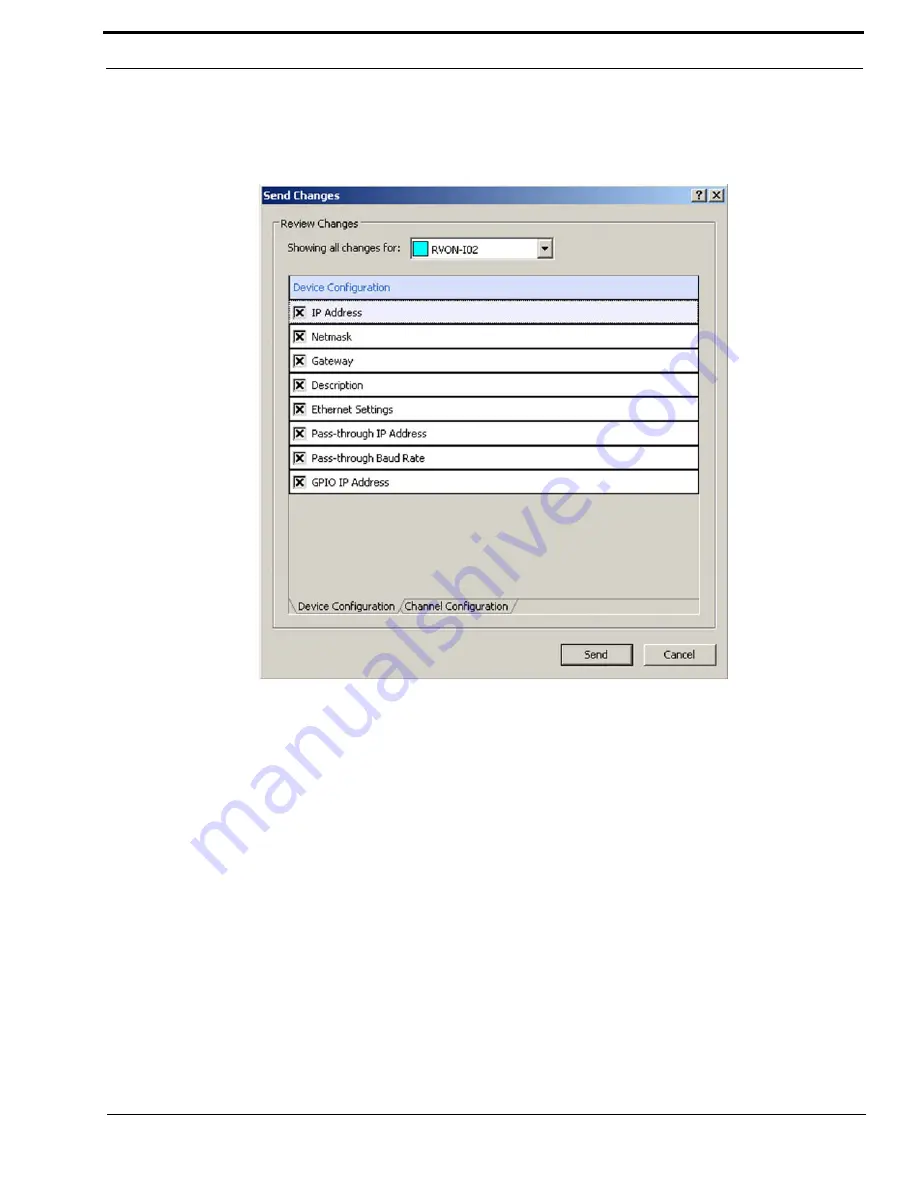
Send Changes

FIELD

DESCRIPTION

Showing all changes 
for: drop down list

The

 Showing all changes for: 

drop down list displays all the different RVON devices where 

changes have been made.

NOTE

: you can only view the changes made on one RVON device at a time. 

DEVICE CONFIGURATION OPTION CHECK BOXES

IP Address Check Box

Changes have been made to a Device IP Address

Select

 this check box to apply the changes made to the Device IP Address.

Clear

 this check box to cancel the change.

Description check box

Changes have been made to a Device Description

Select

 this check box to apply the changes made to the Device Description.

Clear

 this check box to cancel the change.

Summary of Contents for Digital Matrix Intercom RVON-8

Page 1: ...LIT000077 000 Rev A 12 2006 User Manual version 1 0 0...

Page 2: ......

Page 3: ...ugh and or GPI O Information 10 SNMP Information 13 System Information 14 Community Strings 14 Valid Hosts 14 Trap Targets 15 Authentication Information 15 Channel Configuration And Status 17 Channel...

Page 4: ...Authentication Table 61 How to Expand Collapse the Device Configuration Information Areas 62 How to Show Hide Channel Columns 62 How to Undo Redo and Abort Changes 64 How to change the IP Address Net...

Page 5: ...ware to older versions but requires these versions in order to automatically detect the devices and to view or modify the device configurations Getting Started with RVONedit Once you have updated the...

Page 6: ...done manually or automatically For information on how to add devices to RVONedit see How to Add Devices to RVONedit on page 44 Step 3 Using the Device Configuration section of the RVONedit screen conf...

Page 7: ...is split into three 3 main areas 1 Device Catalog Displays the RVON devices currently configured in your Intercom System 2 Device Configuration Displays the Device Status and Configuration options of...

Page 8: ...e When displaying All Devices RVONedit by default displays the RVON devices in order of how the devices were added to the application The Device Catalog section of the RVONedit screen can be configure...

Page 9: ...8 RVON 1 RVON I O RVON C NOTE Initially when RVONedit is installed the device catalog will be empty Remember to update your RVON firmware to the minimum requirements see page 3 before you Add Devices...

Page 10: ...vice Information is grouped into four 4 sections Device Information and Status Pass Through and or GPI O Support Information SNMP Information Authentication Information Use the Device Configuration an...

Page 11: ...displayed instead of the IP Address in the Device Catalog see Use Device Descriptions in the Device Catalog on page 55 IP Address The IP Internet Protocol Address for the RVON device Netmask The Netma...

Page 12: ...g configured and what mode it is running in if applicable Status Displays the current status of the RVON device and the current access rights of the user Sessions Displays the number of RVONedit sessi...

Page 13: ...was last received via Ethernet this address should match the Tx IP Address Unexpected Bytes Displays the number of unexpected bytes of data Unexpected Bytes are data that has come from any IP Address...

Page 14: ...ort mode each keypanel is associated to its corresponding GPI O For example if keypanel 1 is connected to GPI O 1 it is associated with the corresponding GPI O port When using All Keypanel Mode an add...

Page 15: ...NMP support and the preference to Hide SNMP Configuration is not enabled see How to Show Hide the SNMP Configuration Information on page 56 Using the Expand Collapse button you can collapse or expand...

Page 16: ...aracters providing read only access 1 In the Read Only field enter a password to allow read only access Read Write The password up to 64 characters providing read write access via SNMP 1 In the Read W...

Page 17: ...ents A Admin user can modify advanced configuration elements T Telnet user can connect to the device via Telnet D Download user can download new firmware to the device Warning It is possible to create...

Page 18: ...rs long Password Can be up to 40 characters long Access Rights Select the access for the user you are creating Recommendations For security purposes it is recommended you change the authentication tab...

Page 19: ...guration And Status Use the Channel Configuration and Status section to configure or view the channels for each RVON device Channel Configuration and Status is divided into five sections Channel Confi...

Page 20: ...column header For information on how to tear down channels see How to Tear Down a Channel on page 69 Channel Description Displays the channel description if applicable To change the description use t...

Page 21: ...ues for this field are as follows 10ms 20ms 30ms 40ms 60ms VAD State Displays whether VAD is enabled or disabled Select the checkbox to enable or clear the checkbox to disable VAD NOTE VAD voice activ...

Page 22: ...ost The Intercom System Engineer and the Network Administrator may want to work together in choosing the coding algorithm and packet size suitable for the size of the network so degradation of network...

Page 23: ...When this is displayed in red it is different from the configured audio packet value VAD State actual Displays the current VAD state When this is displayed in red it is different from the configured...

Page 24: ...ys how much audio is collected before playout begins Playout begins at half the Playout Buffer Size which is two 2 times the configured packet size This is a static system setting Average Playout Dela...

Page 25: ...s the number of DTMF dual tone multiple frequency relay packets transmitted and received DTMF relay packets are a bandwidth and quality saving feature within RVON products Silence Detection Packets Tx...

Page 26: ...thentication area of the Device Configuration and Status section For more information see How to Add Remove a User Profile To From the Authentication Table on page 61 NOTE By default RVONedit is shipp...

Page 27: ...Remember for this device check box to have RVONedit remember the user name or password for future logon attempts Clear the Remember for this device check box to disable this option Use as default for...

Page 28: ...lt Enter or clicking the preferences icon Password field Passwords can be up to 40 characters long 1 In the Password field enter a valid password Remember for this device check box The Remember for th...

Page 29: ...n RVONedit device with an IP Address 10 2 210 10 and a description slot 2 in the Device Catalog page 6 the description slot 2 will be seen instead of the IP Address Show All Devices check box This pre...

Page 30: ...on Hide SNMP configuration check box This preference allows you to hide the SNMP configuration area If you do not use the SNMP feature you can hide the configuration options in the Device Configuratio...

Page 31: ...erence allows you to make column width adjustments to the channel configuration grid Hide RVON 1 aux channel check box This preference allows you to hide the RVON 1 aux channela Because this channel i...

Page 32: ...ault it is set to C Telex RVONedit CATALOG Device Setup Files RVN field This preference allows you to set the file location where device setup files are stored By default it is set to C Telex RVONedit...

Page 33: ...hrough a list of IP Addresses Use the Search Tab to look through a list of all configured RVON devices When you highlight a device in the Available Devices list the device information auto populates t...

Page 34: ...nfigured the description is overwritten with the originally configured description Device Type drop down list Use the Device Type drop down list to select the type of RVON device for which you are loo...

Page 35: ...had changes made to them If no changes have been made then the grid item will not appear For example if you make changes to the IP Address on the RVON device but make no changes to the description th...

Page 36: ...een made to the Coding Profile Select this check box to apply the changes made to the Coding Profile Clear this check box to cancel the change VAD Threshold check box Changes have been made to the VAD...

Page 37: ...e RVON device at a time DEVICE CONFIGURATION OPTION CHECK BOXES IP Address Check Box Changes have been made to a Device IP Address Select this check box to apply the changes made to the Device IP Addr...

Page 38: ...d Rate Select this check box to apply the changes made to the Pass Through Baud Rate Clear this check box to cancel the change GPIO Mode check box Changes have been made to the GPIO Mode Select this c...

Page 39: ...ions Channel Description check box Select the Channel Description check box if you want to paste the Channel Description information to the new channel configuration Otherwise clear the check box to d...

Page 40: ...box if you want to paste the VAD Threshold information to the new channel configuration Otherwise clear the check box to do nothing Channel Input Gain check box Select the Channel Input Gain check bo...

Page 41: ...ou want to paste the Netmask information to the new device configuration Otherwise clear the check box to do nothing Gateway check box Select the Gateway check box if you want to paste the Gateway inf...

Page 42: ...leges before you can download firmware to RVON devices NOTE You can only download firmware for one type of RVON device at a time You can download to multiple similar RVON devices To Open the Firmware...

Page 43: ...pe drop down list Use the Select Device Type drop down list to select the RVON device for firmware upgrade 1 From the Select Device Type drop down list select the RVON device that you want to upgrade...

Page 44: ...e firmware for download If you have downloaded different versions of the firmware and downloaded them to other RVON devices then you will be able to use the drop down list to see the different version...

Page 45: ...43 CHAPTER 3 Application Tasks In this chapter you will find many setup and maintenance tasks that you may only perform once or perform on a daily basis...

Page 46: ...he following 1 Verify you are on the Search page of the Add Devices dialog 2 From the Available Devices list select the IP Address of the device you want to add to RVONedit NOTE You can add more than...

Page 47: ...following 1 Click the Add tab The Add dialog appears 2 Under Specify device add the IP Address of the device to which you want to connect Once you have entered the IP Address the Find button becomes...

Page 48: ...m the Select Devices to Download list select the devices to which you want to apply the firmware NOTE You can add more than one device at a time by doing the following To select a block of devices sel...

Page 49: ...of the RVON device download status bar Once the download is complete it may take a few minutes for the RVON devices to reboot themselves You can also watch as the device blocks dim and then re light...

Page 50: ...e to remember this user name for this device 4 Select the Use as default for all devices checkbox if you want this to be the default user profile for all devices in the catalog 5 In the Password field...

Page 51: ...e sent to the device To send changes to the device do the following 1 From the Changes menu select Send or click the Send Changes icon The Send Change screen appears 2 On the Send Changes screen revie...

Page 52: ...the Channel Configurations section select the channel column header of the channel you want to copy 3 From the Edit menu select Copy or click the copy icon The channel settings are copied NOTE You can...

Page 53: ...u want to copy the device settings 2 From the Edit menu select Copy or click the copy icon The Device Settings are copied NOTE You can also copy the settings by pressing Ctrl C on the keyboard 3 From...

Page 54: ...want to copy channel settings 2 From the Edit menu select Copy or click the copy icon The channel settings are copied NOTE You can also copy the settings by pressing Ctrl C on the keyboard 3 From the...

Page 55: ...These pages contain the following Device Catalog Configurations You can set how you see the devices in the catalog By Type or All Devices You can also enable using the Device Description instead of th...

Page 56: ...section creating more room in the application window There are several ways to Hide Show the Device Catalog Double click the divider bar From the View menu select Device Catalog When a check mark is b...

Page 57: ...n configure RVONedit to show device descriptions where available in the device catalog To enable device descriptions in the device catalog do the following 1 From the Edit menu select Preferences or c...

Page 58: ...the SNMP configuration area in the Device Configuration and Status section of the application To hide SNMP Configuration information do the following 1 From the Edit menu select Preferences or click t...

Page 59: ...choose to hide the Authentication table in the Device Configuration and Status section of the application To hide the authentication table do the following 1 From the Edit menu select Preferences or...

Page 60: ...vices automatically connect to RVONedit when selected This way you do not have to manually connect the device 1 From the Edit menu select Preferences or click the preferences icon The Preferences dial...

Page 61: ...ve or click the save icon By default RVONedit stores all files in the Setups folder under the RVONedit directory You may change this location by setting the default location For more information see H...

Page 62: ...ct Load or click the load icon The Load dialog appears 2 Navigate to the file you want to load 3 Click Open The file loads on top of the current configuration NOTE When a file is loaded the file overl...

Page 63: ...ea 2 Click Add The User Name field becomes active and the table line is highlighted in yellow 3 In the User Name field enter a user name for the new profile up to 40 characters long 4 Double click the...

Page 64: ...upper right corner of the section you want to close The section closes To Expand a section that has been collapsed do the following 1 In the Device Configuration section click the expand icon in the u...

Page 65: ...idden columns do the following 1 Right click the channel column header to open A context menu appears 2 Select Show Channel A context menu appears 3 Select the specific channel you want to open or sel...

Page 66: ...done There are no limits on the amount of times you can redo changes NOTE Every time an abort changes send changes or File Open Load Send is performed the redo history is cleared to 0 previous actions...

Page 67: ...ill be transmitted 4 Once finished Send or Save the channels to the device How to Setup the GPIO for an RVON I O NOTE The GPIO section will only display if the device has Pass Through or GPIO capabili...

Page 68: ...nt devices s IP Address You can also use the File Open dialog to navigate to a different location to select a different directory to open 2 Select the file you want to open in RVONedit and then click...

Page 69: ...ce in the catalog NOTE If you do not have the Auto connect the application when changing devices option enabled you may have to log on to each device when you switch devices For more information on ho...

Page 70: ...ed in viewing To hide individual rows in the Channel Configuration Grid do the following 1 Right click the row you want to hide A Hide specified row row menu item appears 2 Select the Hide specified r...

Page 71: ...o reset a channel without rebooting the entire device When a tear down is performed the device disconnects the audio channel and then reconnects the channel To tear down a channel do the following 1 I...

Page 72: ...ust have the Allow column width adjustments checkbox selected You can find this option on the Channels page of the Preferences Dialog Edit Preferences To set the column size do the following 1 Right c...

Page 73: ...fit the text in each column Auto fit all columns to fit window size The columns are adjusted to fit all columns within the Channel Configuration window Set all columns to this size After manually res...

Page 74: ...To change the default folder for RVONedit do the following 1 From the Edit menu select Preferences The Preferences dialog appears NOTE You can also click the preferences icon 2 Select Directories 3 I...

Page 75: ...ith the file parameters After a file has been opened you can view modify the configuration settings You can save the changes to the existing file or create a new setup file by performing a File Save Y...

Page 76: ...device with which you want to connect Notice the RVON device has a red X signifying that it is not connected 2 From the RVON menu select Connect The red X changes to a green If the device does not hav...

Page 77: ...evice without the required firmware 4 From the Device Type drop down list select the type of device it is for example RVON 8 5 Click Add The RVON device is added to the catalog but the RVON device is...

Page 78: ...Firmware File field enter the path to the firmware update or use the browse button 11 Select the Auto close after successful download check box if you want to close the Download Firmware screen immedi...

Page 79: ...77 NOTES NOTES...

Page 80: ......

Reviews: