background image


  65 


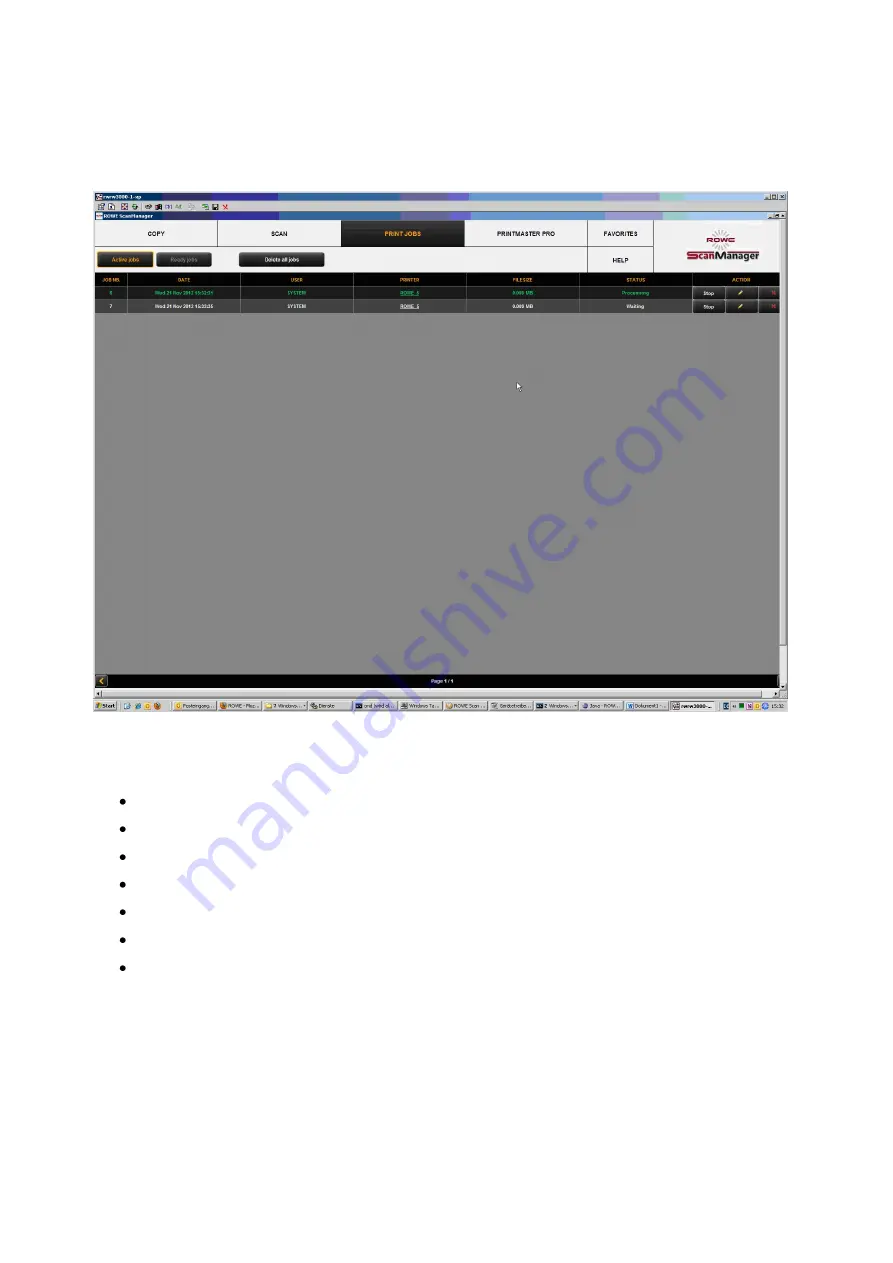
Figure 5.43: Job list 

Print  jobs  are  shown  in a table; each line presents one job. The information on the jobs 
given in the columns is 


Job number 


Date / time of order 


User initiating the job 


Name of printer 


Size of file to be printed 


Status (e.g. "Processing", "Waiting", etc.) 


Action keys for deleting, editing, and stopping jobs (see below) 


Summary of Contents for Scan 600-20

Page 1: ...R O T H WE B E R G m b H ROWE Scan 600 Series O P E RA T I N G M A N UA L RE V I SI O N 1 4...

Page 2: ...GmbH Company In case of non observance ROTH WEBER cannot accept any liability Other product and company names mentioned herein may be trademarks or trade names of the respective owner Copyright ROTH W...

Page 3: ...is manual and help you to familiarize quickly with the ROWE Scan 600 scanner Comments In the present manual the following types of comments are given Note You obtain information and useful tips which...

Page 4: ...r Connecting Scanner Switching ON Computer and Scanner 21 2 8 Continuing Installation 22 2 9 Establishing Connection to Scanner 23 2 10 Activating License Options 24 2 11 Calibration of Scanner 25 2 1...

Page 5: ...ile Settings 69 5 14 4 Job Settings 71 5 15 Configuration of ScanManager 74 5 16 ScanManager TOUCH 76 6 ROWE ConfigManager 79 6 1 Starting ROWE ConfigManager 80 6 2 Main View of ROWE ConfigManager 80...

Page 6: ...imits 118 7 7 2 1 Limit by User Groups 118 7 7 2 2 Limit by Cost Center Group 120 8 Maintenance of Scanner 121 8 1 Cleaning of Scanner 122 8 2 Replacing Glass Plate 122 9 Trouble Shooting 124 9 1 Malf...

Page 7: ...eries of the main functions of the ROWE Scan 600 series of the scope of supply and the options of the ROWE Scan 600 series of the software applications of the ROWE Scan 600 series This chapter shall p...

Page 8: ...rmware updates please contact our Service Department Phone 49 0 2743 9217 24 Fax 49 0 2743 2018 E mail vertrieb rowe de Optional equipment is available for ROWE Scan 600 By default ROWE Scan 600 scann...

Page 9: ...2 Maximum scan speed of ROWE Scan 600 series Supplied accessories CD Rom with 30 day trial version of ROWE ScanManager SE Operating Manual as PDF file Calibration chart Power cord USB cable USB 3 0 ty...

Page 10: ...ess exceeding 1 5 mm ROWE Scan 600 is also available with a height adjustment feature The maximum document thickness then is 30 mm Scan width up to 60 In order to be able to scan originals with a widt...

Page 11: ...Locking of scanner top on both sides Figure 1 1 ROWE Scan 600 Figure 1 2 shows the ROWE Scan 600 control panel It includes the following components 1 Start key 2 Stop key 3 Height adjustment key only...

Page 12: ...ent to remove or clean it Figure 1 3 shows the back as well as the side box of ROWE Scan 600 There you see the following connections and or switches 1 On Off switch 9 Mains connection 10 USB slot to c...

Page 13: ...o be notified in writing by a corresponding comment on the consignment note Otherwise payment of damages by the carrier is excluded In order to avoid damages to the device please do not place any tool...

Page 14: ...ler chip set may not be compatible with the high performance transfer mode of the ROWE Scan 600 We recommend to use hardware meeting these requirements A current list of compatible USB chip sets is av...

Page 15: ...llation the scanner must neither be connected to power supply nor PC Should you use mouse and keyboard on the scanner top place the cables in a way that they do not obstruct the paper outlet by using...

Page 16: ...1 4 on Page 14 2 2 Starting Software Installation In order to install the software you need the supplied CD Rom Switch the computer ON which is not yet connected to the scanner Put the CD Rom into th...

Page 17: ...Selecting Folder When selecting the folder Figure 2 4 a folder where to install the ROWE Scan 600 software is already suggested The shown figures have the following meaning 1 Destination folder Curre...

Page 18: ...ialog boxes pop up indicating that the appropriate drivers for the device are being installed During installation Windows points out that the drivers did not pass the so called Windows logo testing Fi...

Page 19: ...2 8 installation will be continued Figure 2 8 Homepage for installation of plug ins In the opening dialog box Figure 2 9 you are prompted to accept the license agreement Select Accept Figure 2 9 Licen...

Page 20: ...e USB cable Use the supplied USB cable If your computer has a USB 3 0 slot blue use the supplied USB 3 0 cable blue plug see Figure 2 12 If your computer has USB 2 0 slots only use the supplied USB 2...

Page 21: ...g boxes in Figures 18 to 21 are displayed Please select No not this time and click the Next button in Figure 2 14 Figure 2 14 Disable Windows update Afterwards select Install the software automaticall...

Page 22: ...he Setup Wizard now establishes the connection between scanner and computer automatically This process may take some time depending on the PC performance If you actuate the Cancel button during the co...

Page 23: ...license file by e mail you have to safe the attached key file on your PC first to be able to select it under 1 3 If you want to fit your ROWE Scan 600 with additional functions you can confirm the bu...

Page 24: ...inted side to the inside After completion of calibration the scanner is in working order and ready for use For this purpose read chapter Simple Scan and or Introduction to ROWE ScanManager Figure 2 21...

Page 25: ...f the USB slot on your computer is also compatible with USB 3 0 Otherwise use a USB 2 0 cable If problems occur when using a USB 3 0 connection with external USB data carriers check whether the proble...

Page 26: ...27 3 Switching Scanner ON OFF Operate the ROWE scanner at a supply voltage of 100 to 240 volts and a frequency of 50 60 Hz only...

Page 27: ...tion O to switch the device OFF Set the switch to position I to switch the device ON Figure 3 1 Position of ON OFF switch On the control panel of the scanner also see Figure 1 2 on Page 13 you see two...

Page 28: ...Material thickness up to 30 mm with height adjustment The height adjustment feature cannot be retrofitted For scanning thicker originals with the height adjustment feature please refer to Chapter 4 1...

Page 29: ...nner takes it in Select the requested color mode in ROWE ScanManager see Chapter 5 11 3 1 on Page 52 Select the requested scan format in ROWE ScanManager see Chapter 0 on Page 57 if applicable For the...

Page 30: ...nsports the original back to start position Start the scan as described in 4 1 Figure 4 4 Control panel The height adjustment feature can transport documents with a height of up to 300 mm and a weight...

Page 31: ...32 5 ROWE ScanManager ROWE ScanManager is the central software needed to operate the ROWE Scan 600 series The present chapter describes how to use the scanner efficiently by means of this software...

Page 32: ...a desktop computer with mouse and keyboard or with a touch screen For touch screen operation the specially optimized version ROWE ScanManager TOUCH is available while the other versions LT SE PRO are...

Page 33: ...amed ScanManager can be found on the desktop It is easiest to start ScanManager by double click on this icon Should you prefer operation by touch screen and have a ScanManager TOUCH license you have t...

Page 34: ...er to Chapter 5 10 Page 41 6 Overview to display complete scan refer to Chapter 5 7 Page 37 7 Toolbar with keys refer to Chapter 5 8 Page 38 5 4 Selection of Language Should ROWE ScanManager display i...

Page 35: ...Scan Select Scan if you want to scan originals and save them as image files For detailed information see Chapter 5 11 1 Page 44 Job list Select Job list if you want to monitor or control current prin...

Page 36: ...cludes the following components 1 Image display area Preview detailed view 2 Toolbar of viewer see Chapter 5 9 Page 40 3 Status bar Display of useful information on the depicted image resolution dimen...

Page 37: ...ys highlighted by a red frame 2 in the General Viewer Now you can grab this frame by means of the mouse and move it to another position to show another area in the Main Viewer If you want to display a...

Page 38: ...requested editing steps simply press action key 5 to start output on the basis of the selected settings Fast prescan A fast scan with reduced resolution is effected and shown in the viewer Afterwards...

Page 39: ...best If you want only the selected area to be displayed activate 5 6 Cut detail Similar to 4 but exactly the selected detail is displayed in the Viewer The detail is then enlarged in a way that either...

Page 40: ...if the scanned document is damaged resulting in a failure of the automatic width detection In this way you can prevent contents from getting lost without having to scan the document again and or selec...

Page 41: ...In doing so the orientation is defined automatically on the basis of the document edges 5 Manual correction of displacement Manual alignment of image by setting two reference points The reference poi...

Page 42: ...age into the editor tasks such as rotating mirroring and inverting are not considered However the steps effected in the editor are effected in the respective positions This function is available with...

Page 43: ...ine a standard format As an option you can also define the dimensions User defined For detailed information see 5 11 3 3 Storage location Here you define where to save the scanned documents Here you c...

Page 44: ...save the file on your local PC in a particular folder Press button 1 to select and or change the folder Figure 5 13 Target folder E Mail Press this button if you want to attach a file to an e mail and...

Page 45: ...external disk as storage location This function is only available if the operating system recognized a USB data carrier being connected By means of button 1 you can also select a subdirectory Figure 5...

Page 46: ...s If you do not want to use any numbering enter 0 Example You entered scan test in the field File name 1 selected TIF as file format 2 and entered 3 under Digits of number 5 In this case the following...

Page 47: ...Chapter 5 11 2 1 Page 49 For being able to use a printer you have to set it once Printer setup is described in Chapter 6 5 1 Page 83 Medium Roll Here you can define on which medium and or roll to prin...

Page 48: ...you can select the following folding options 1 Select folding program 2 Header position Here you can define in which quadrant there is a header if any If a folding program is activated the drawing is...

Page 49: ...the print is not reduced correspondingly but the protruding part is cut off 3 Label Selection of the label defined on the printer and to be printed on the document 4 Banner Here you can select the ban...

Page 50: ...shall be printed immediately As soon as you enable the set function 1 you are asked whether you want to print the documents in the set immediately If you press Yes the output is started immediately i...

Page 51: ...possible result Select Line if the original exclusively includes line structures and or homogenous areas e g CAD drawings Select Photo if the original includes complex structures and color gradients...

Page 52: ...effected A significantly higher speed is achieved thereby In the selected optical resolution the original is scanned perpendicular to the feed direction so that interpolation is effected in feed direc...

Page 53: ...der not to lose any information e g in color gradients But also in drawings with lines information which is very bright can get lost In case of doubt simply check the result in the Viewer 5 Sharpening...

Page 54: ...lar for originals with only a few colors e g CAD drawings it may be reasonable to reduce the color depth This can be achieved by selecting the option Indexed Color The color depth is then reduced from...

Page 55: ...56...

Page 56: ...format is portrait or landscape Fixed format On Off If the fixed format is activated On the length in feeding direction is considered in addition to the width when adjusting to the default format Othe...

Page 57: ...t By means of this option you can shift the reference point for the middle of the document to the left negative value or right positive value Figure 5 32 User defined format 5 11 3 4 Scaling Margins I...

Page 58: ...3 5 Info In the area Info useful status information is given The contents of the area Info can be selected in the ScanManager settings see 5 15 Figure 5 35 Area Info 5 12 Favorites ROWE ScanManager p...

Page 59: ...as favorite press the Save button Prior to this enter a name in the text field If a favorite with this name already exists you are asked whether to overwrite the latter 3 Edit favorites Here you can...

Page 60: ...ual favorite or pressing the corresponding numeral key on the device and by actuating the start key Printing a B W copy on a ROWE printer Printing a second color copy on an inkjet printer Issuing thre...

Page 61: ...r output configuration make all requested settings in the ScanManager Afterwards you have to add the respective settings as additional output configuration to an existing favorite In this respect it i...

Page 62: ...2 Another output configuration is added The new configuration includes the parameters currently set in the ScanManager Edit output configuration 3 Here you can subsequently change the settings for the...

Page 63: ...by clicking 2 Number of copies For output on a printer you can enter the number of copies in this text box before starting if more than one copy is needed Here the name of the printer is also shown F...

Page 64: ...ne presents one job The information on the jobs given in the columns is Job number Date time of order User initiating the job Name of printer Size of file to be printed Status e g Processing Waiting e...

Page 65: ...t it Figure 5 44 Edit print jobs Moreover the buttons above the table provide the following options 1 Active jobs Displays jobs which have not yet been processed 2 Ready jobs Displays jobs which have...

Page 66: ...dded to a print job see Chapter 5 14 2 2 File presets Here you can make the settings which shall apply to the file highlighted in list 1 see Chapter 5 14 3 3 Job settings The settings made here apply...

Page 67: ...highlighted in dark gray You can also open the preview by double click on the respective entry in the list For details on preview see Figure 5 48 4 Delete file s By means of this button you can remove...

Page 68: ...eral pages only By means of the arrow keys you can browse the pages of the document in the preview As an alternative you can also enter a page number in the text field and press the Enter key to move...

Page 69: ...ngs Copy Moreover the option Cropping allows to cut off any white margins automatically 5 Rotation orientation Here you can select whether a drawing shall be rotated for the output or whether it is a...

Page 70: ...71 5 14 4 Job Settings Figure 5 50 PrintMaster PRO Job settings...

Page 71: ...e order as if you printed the set several times individually one after another You can modify sorting so that first all copies of the 1st file then all copies of the 2nd file etc are output 3 Job name...

Page 72: ...lding machine Response to missing folding machine Standard Use standard response of respective printer where the folding machine is and or should be located Ignore The printer prints without folding 4...

Page 73: ...essing the button shown on the right which can be found on the left of the action keys in the lower section of ScanManager you can make several basic settings Access to the settings may be protected b...

Page 74: ...n the Scan to File mode creation of the output file is already started before completion of the scan process by starting a scan with the green button Start or in Batchscan mode so that throughput is i...

Page 75: ...ed settings for a preset are enabled only after the modified preset is loaded again Content Infobox Determine which files shall be displayed in the info box 5 16 ScanManager TOUCH ROWE Scan 600 scanne...

Page 76: ...able when using a touch screen a virtual keyboard is shown when an entry is required By means of the buttons you can enter the desired text and or figures by finger Every time a number needs to be ent...

Page 77: ...78 If you touch a text field with the finger where a text needs to be entered e g a file name a virtual keyboard is shown automatically Figure 5 56 Virtual keyboard...

Page 78: ...gManager provides all administrative functions for the scanners of the ROWE Scan 600 series Apart from configuring all basic settings printers can be set license upgrades can be loaded or the scanner...

Page 79: ...e PC and switched ON After installation of the software an icon named ConfigManager can be found on the desktop It is easiest to start ConfigManager by double click on this icon Figure 6 1 Desktop lin...

Page 80: ...ee 6 6 Update Here you can check whether a new version of the ROWE Scan 600 software is available see 6 7 Parameter Administration of general parameters see 6 8 Login Authentication access protection...

Page 81: ...he scanner Under Version you can see detailed information on the software version as well as firmware of the scanner Usually only the entry Software Release here 1 3 0 is important Figure 6 3 ConfigMa...

Page 82: ...4 If you are not logged in as administrator you are requested to do so as soon as you press one of the buttons see 6 9 6 5 1 Adding Printer If you want to add a printer press the button Add printer F...

Page 83: ...er just added is a color printer you are asked whether you want to perform a color calibration If yes click Start Profiling For the further steps please refer to Chapter 6 5 3 as from Figure 6 12 If y...

Page 84: ...s of the measured data and the reference data which compensates color errors as well as possible In order to optimize the color reproduction for a color printer you can also have a so called ICC profi...

Page 85: ...ptimization For this purpose another target which has been optimized for the gray scale reproduction is printed and scanned Simply follow the instructions on the screen Normally gray balance optimizat...

Page 86: ...IP address and or host name of the printer See whether a color profile is already available for a medium only for color printers Create a new color profile for a medium see 6 5 3 only for color printe...

Page 87: ...e most important settings refer to the printable area of inkjet printers and margins You should not make any modifications in this section unless problems occurred in this connection The effect of cha...

Page 88: ...ger then automatically opens the ROWE website using your Internet browser where you can order the requested upgrades But you can also contact the ROWE Support e g if you do not have any Internet conne...

Page 89: ...Parameters Under Parameter you can make some basic settings for scanner and software You can call the function Update only after logging in as an administrator see 6 9 Figure 6 18 ConfigManager Param...

Page 90: ...in the ScanManager settings see 5 15 Margin back front left right Here you can define additional global settings for the scan margins For negative values the corresponding margin is cut off for positi...

Page 91: ...istrator Password admin Figure 6 19 ConfigManager Login After successful login you can see at the top on the left under the functions that you are logged in as administrator Figure 6 20 ConfigManager...

Page 92: ...r in ScanManager gets lost and after loading the favorite it needs to be set again if a value deviating from the favorite shall be used Parameter not included in favorite After loading the favorite th...

Page 93: ...dard version in which all relevant data of a scanning printing and or folding operations are recorded and provided in a table in ROWE ConfigManager for evaluation see Chapter 7 2 The ROWE Cost Control...

Page 94: ...95...

Page 95: ...g components 1 Via this tab in the ConfigManager Cost Control can be opened 2 Menu Order report see 7 2 3 Menu User administration see 7 4 4 Men Cost center administration see 7 5 5 Menu Configuration...

Page 96: ...nly the order report is offered The latter is started automatically when opening the Cost Control menu Figure 7 2 Fields in order report Possible filter criteria Description User login If active the o...

Page 97: ...uate the button Location 3 and select the requested target folder on your computer Your own user folder is preset first In the text field File name 4 a name can be allocated to the CSV file to be crea...

Page 98: ...onsumption per job category is effected as follows 1 Limits allocated directly to a person have top priority 2 Afterwards limits allocated to a user group follow 3 Limits allocated to a cost center or...

Page 99: ...nd user groups Among others the present chapter describes the configuration of limits and discounts in detail Setting of limits for users user groups cost centers and cost center groups is effected id...

Page 100: ...a where you can create a user account opens In this menu various information on the user is entered The fields marked with an asterisk have to be completed E mail address Login Password The remaining...

Page 101: ...allocated by means of the button Add cost center4 Cost centers already allocated are listed in alphabetic order and can be removed by means of the button Delete cost center if required Figure 7 9 Add...

Page 102: ...Location and Description only serve ease of administration By means of the field Status an allocated limit can be suspended temporarily i e NO job category limits can be booked for this user group Fi...

Page 103: ...llocated user Figure 7 15 Job categories Define limit The field Current consumption gives information about the current situation and can be reset by means of the Reset button Figure 7 16 Reset curren...

Page 104: ...user limits If user groups have not yet been defined an empty list appears with the note that at least one user group needs to be defined 7 5 Menu Cost Center Administration This menu includes four a...

Page 105: ...shall be unique The fields Status and Available date serve to allow bookings on this cost center in ScanManager or not It is not possible to charge to inactive cost centers and cost centers with an ex...

Page 106: ...istration The field Name shall include a unique name for the cost center group The field Status defines whether job category limits can be used for this cost center group in ScanManager Figure 7 22 De...

Page 107: ...an empty list appears with the note that at least one cost center group needs to be established 7 6 Menu Config Setup In this menu the behavior of ScanManager with Cost Control Professional being acti...

Page 108: ...nManager relating to ROWE Cost Control Professional is defined Changes in this menu have to be confirmed by the Save button for being effective in ScanManager A note regarding the saving status is giv...

Page 109: ...110 Figure 7 25 Cost Control Settings...

Page 110: ...ot enabled the current Windows login name is used for recording 7 Prescan to protocol Define whether prescans shall be recorded too 8 Local server time Serves to display the date time column in the or...

Page 111: ...d and interpreted as required Three versions of job category can be entered Piece m and cm In general a square measure is recommended for scanning and printing while the quantity is interesting for fo...

Page 112: ...information of the previous three months and the information on the current month will be given in the order report The selection of years works in the same way so that the information on the current...

Page 113: ...s purpose a popup menu is displayed where you have to enter the administrator password 7 6 4 Export Import By means of the export import functions backups of existing data records can be established a...

Page 114: ...hed automatically in the selected directory so that the following files are available afterwards Sicherung_Auftragsreport sql Data of current month Sicherung_Auftragsreport_jobdb_201204 sql Sicherung_...

Page 115: ...or being able to change a data record you have to highlight a line in the corresponding list first This warning may appear if you try to delete or change an entry without having highlighted it before...

Page 116: ...1 3 Cost Center Query Figure 7 44 List cost centers Figure 7 45 User defined cost centers Depending on how the query for cost centers is set in the system different windows pop up After having selecte...

Page 117: ...se an existing limit Figure 7 49 No limit In order to be able to reset increase an existing limit of a job category early this warning is displayed Figure 7 50 Warning limit 10 7 7 2 Examples for Limi...

Page 118: ...this can be set under User limit All user related job category limits have the highest priority If a job category limit has been exceeded this user is blocked for this job category until further noti...

Page 119: ...s All jobs effected in ScanManager are then entered in the respective cost center group The advantage of this limitation is that only a few settings are required for the job category limit if some cos...

Page 120: ...121 8 Maintenance of Scanner The present chapter describes how to clean the scanner of ROWE Scan 600 series and how to replace wear parts...

Page 121: ...nd fuzz free cloth to rub the glass plate dry Make sure that the liquid does not penetrate under the glass plate and allow the area to dry completely It is absolutely necessary to switch the scanner O...

Page 122: ...glass plate Now swivel the glass plate to the front and remove it First place the new glass plate in the retaining clips of the lower support and push it down again Swivel the glass plate and let it...

Page 123: ...124 9 Trouble Shooting This chapter describes the actions to be taken if a problem occurs when using the scanner...

Page 124: ...on program directly from the CD Installation fails giving an error message Make sure that the minimum requirements are satisfied Among others you need administrator rights see Chapter 1 5 No connectio...

Page 125: ...fect Calibrate the scanner Afterwards establish a new color profile for the printer Make sure that the correct medium is used see Chapter 6 5 3 9 4 Problems with Automatic Width Detection If you have...

Page 126: ...If any replace the glass plate see Chapter 8 2 The image is not composed properly stitching offset over entire length of original Recalibrate the scanner Check the feed path for obstacles e g correct...

Page 127: ...order to be able to use all functions of the ROWE applications a Java Runtime Environment version 1 6 0 update 10 or higher has to be installed If it is not yet installed on your computer it will be...

Page 128: ...129...

Page 129: ...nnex includes safety notes to be read prior to commissioning of the scanner of series ROWE Scan 600 You obtain information on possible risks of personal injury and property damage regarding the device...

Page 130: ...ailures impairing safety have to be eliminated immediately The ROWE systems of the Scan 600 series shall exclusively be used as described in this Operating Manual Another use or use exceeding the abov...

Page 131: ...y steps onto the cord by mistake The components of the devices must not be installed nor removed using force B 3 4 Intended Use Never bypass any mechanical or electric disconnectors Do not remove any...

Page 132: ...nce and repair actions B 3 6 Take back of Devices at the End of Service Life WEEE The device delivered by ROTH WEBER GmbH is subject to the European Directive 2002 96 EC and the corresponding implemen...

Page 133: ...134 Figure 9 1 WEEE symbol...

Page 134: ...he ROWE products or need any technical support in case of problems with your ROWE device do not hesitate to contact our Service Department Phone 49 0 2743 9217 21 Fax 49 0 2743 2018 E mail service row...

Page 135: ...136 D About this System Copyright 2003 2012 ROTH WEBER GmbH All rights reserved...

Page 136: ...rs of the Common Unix Printing System CUPS http www cups org License Copyright The authors of the XmlRpc library http sourceforge net projects xmlrpcpp License Copyright The authors of the argyII colo...

Page 137: ...Connection establishment 23 Figure 2 20 License installation 24 Figure 2 21 Calibration of scanner 25 Figure 3 1 Position of ON OFF switch 28 Figure 3 2 Control panel 28 Figure 4 1 Desktop link ScanMa...

Page 138: ...rintMaster PRO File presets 69 Figure 5 50 PrintMaster PRO Job settings 71 Figure 5 51 Fallback 72 Figure 5 52 Info texts 73 Figure 5 53 ScanManager Global settings 74 Figure 5 54 ScanManager TOUCH 77...

Page 139: ...25 Cost Control Settings 110 Figure 7 26 Buttons menu Cost Control Job category administration 111 Figure 7 27 List of job categories 111 Figure 7 28 Edit job category administration 112 Figure 7 29...

Page 140: ...141...

Reviews: