4-2
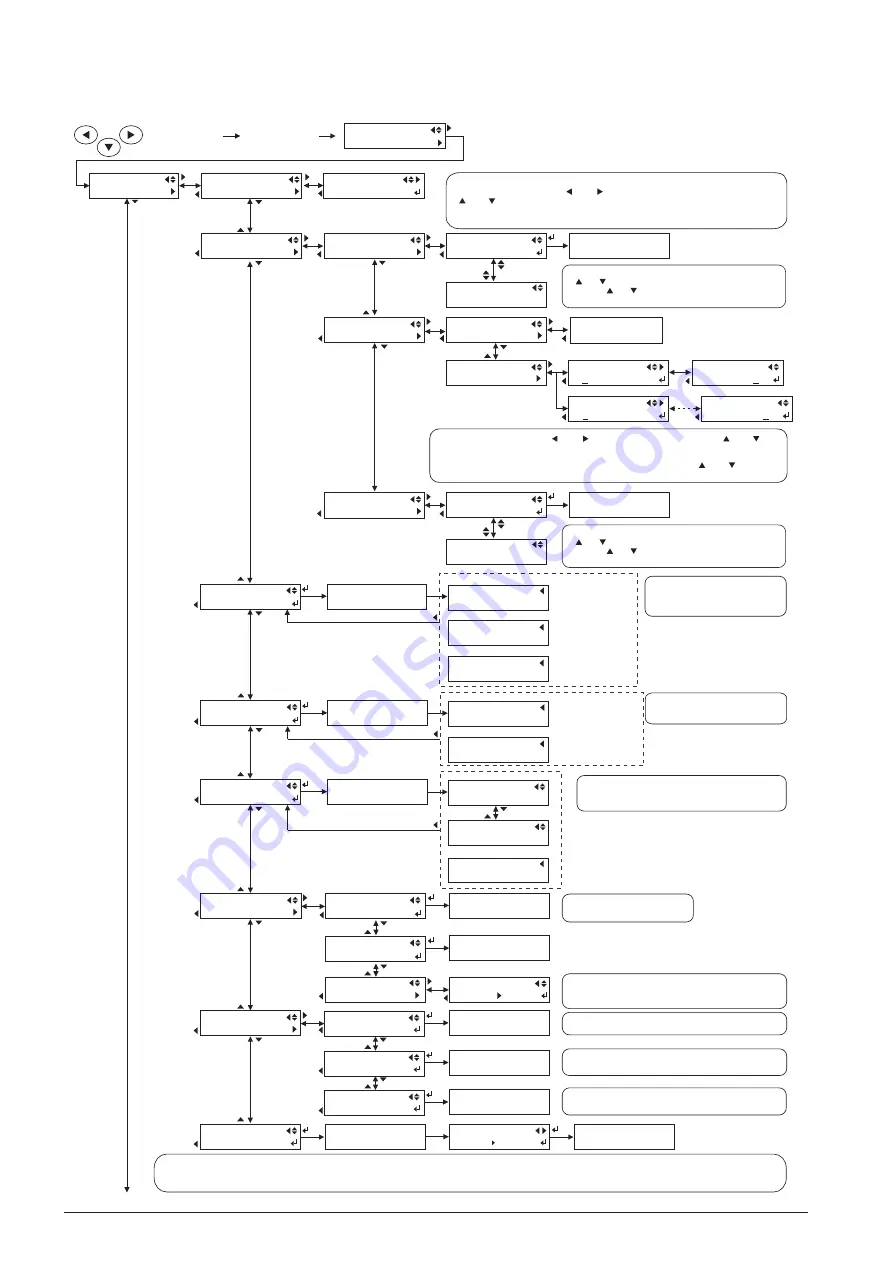
4-1 SERVICE MODE
This menu is used for entering the Head Rank for each head with 24 digit number and alphabet.
The digits can be changed with [ ] and [ ] keys and parameters can be changed with
[ ] and [ ] keys. The digit being changed is marked with an under bar.
Press [ENTER] key to save the settings. It beeps for alerting when the calculation for verification,
CHECK SUM, is not correct in order to avoid input error.
PRINT MENU
HEAD RANK
HEAD RANK
12345678 (1/3)
[ MENU ] key
SERVICE MENU
PRINT MENU
HEAD ADJUST
BI-DIR.DEFAULT
No.1 No.2
-15 -20
No.3 No.4
-15 -20
No.1 No.2
-15 -20
No.19 No.20
-15 -20
PRINT MENU
HEAD ADJUST
HEAD ADJUST
BIAS
BIAS
TEST PRINT
PERFORMING
BIAS
--- VIEW ---
BI-DIR.DEFAULT
SETTING
BI-DIR.DEFAULT
TEST PRINT
MENU
SERVICE MENU
Feeds media for visual check of the test pattern, by pressing
[ ] or [ ] keys while in [TEST PRINT] menu. Also by
pressing [ ] or [ ] keys again after feeding, media returns
to the original position.
PERFORMING
TEST PRINT
TEST PRINT
Dot pattern can be selected with [ ] and [ ] keys, and value can be selected with [ ] and [ ] keys.
[ENTER] key for saving the setting. The value being selected is marked with an under bar.
It returns to the former menu after setting.
Default:
(
0) It can be changed starting from the standard value (15) with [ ] and [ ] keys.
Range: 0 to +60dot (changeable by 0.5dot which is indicated as 1/2.
HEAD ADJUST
BIAS 2
BIAS 2
TEST PRINT
PERFORMING
BIAS
--- VIEW ---
Feeds media for visual check of the test pattern, by pressing
[ ] or [ ] keys while in [TEST PRINT] menu. Also by
pressing [ ] or [ ] keys again after feeding, media returns
to the original position.
TEST PRINT
* *
+ POWER ON
Ink type : PIGMENT
Ink type : MAX
PRINT MENU
CALIB.DEFAULT
CALIB.DEFAULT
TEST PRINT
CALIB.DEFAULT
SETTING
SETTING
+0.05% +0.10%
PRINT MENU
TEST PATTERN
TEST PATTERN
BI-DIR.
PRINT MENU
LINEAR ENCODER
NOW PROCESSING..
LINEAR ENCODER
SETUP COMPLETED
LINEAR ENCODER
SETUP FAILED
Normal (beeps 1 time)
Error (beeps 2 times)
This is for checking the installation and
operation of Linear Encoder and Scale.
Refer to [4-5 LINEAR ENCODER SETUP].
POS: 1361.00mm
PERFORMING
PERFORMING
PRINT MENU
LINEAR CALIB.
NOW PROCESSING..
LINEAR CALIB.
SETUP COMPLETED
LINEAR CALIB.
FAILED TO SETUP
TEST PATTERN
FILL
PERFORMING
TEST PATTERN
FLUSHING ADJ.
0.00mm -0.40mm
BI-DIR. CHECK
PERFORMING
PRINT MENU
FLUSHING ADJ.
NOW PROCESSING..
LINEAR CALIB.
0.18%
This menu is used for Calibration.
Refer to [4-10 CALIBRATION].
NOW PROCESSING..
TEST PRINT
TEST PRINT
TEST PRINT
TEST PRINT
Error is found on Linear
Encoder and Scale.
Normal (beeps 1 time)
Error (beeps 2 times)
This is for calibrating the cutting size in the scan direction
by calculating the expansion and contraction amount of the
Encoder Scale.
When it shows [ ], it means that it has never been setup and
it needs to be set. In this case, even if adjustment is unnecessary
by the test result, [0] must be set here.
This is for checking the Head Alignment in Bidirectional.
It prints on the entire print range with solid single color by each head.
Print mode is fixed at 720 dpi and 8 pass.
This print pattern is for checking a shifting error in Bidirectional and
also for confirming the mechanical tendency.
*****
LINEAR ENCODER
HEADBOARD FAILED
Error (beeps 2 times)
Error is found on Head
Board.
CALIB.DEFAULT
TEST PRINT2
PERFORMING
TEST PRINT
PRINT MENU
LINEAR CHECK
NOW PROCESSING..
LINEAR CHECK
COMPLETED
LINEAR CHECK
FAILED:1000.00mm
Normal (beeps 1 time)
Error (beeps 3 times)
This is for checking if there are dusts,
greases or scratches on Linear Encorder.
Dusts, greases or scratches
are found on Linear Scale.
This is for adjusting the flushing position. Set the head height to LOW. As entering the menu, the Head Carriage moves to the current flushing position.
With [left] and [right] keys, Move the Head Carriage to the position where the slot of the Carriage Cap Guide makes contact with the tip of the Backup Cap Base, and press [ENTER] key to save
the position. Or, start the adjustment from the leftmost position and press [ENTER] key to save the position where arm part of cap unit starts to move.
As [ENTER] key is pressed, the head is automatically capped and it backs out the menu. For backing out the menu without saving the position, press [MENU] key without pressing [ENTER] key.
Summary of Contents for VS-300
Page 49: ...2 4 MAIN BOARD_Arrangement Diagram Soldering Side ...
Page 60: ...2 15 SERVO BOARD_Arrangement Diagram Soldering Side ...
Page 65: ...2 20 2 4 CARRIAGE BOARD CARRIAGE BOARD_Arrangement Diagram Component Side ...
Page 68: ...2 23 2 5 SUB BOARD SUB BOARD_Arrangement Diagram Component Side ...


