grave, in the [Program Files] - [Dr.Engrave] - [samples] folder.
8.
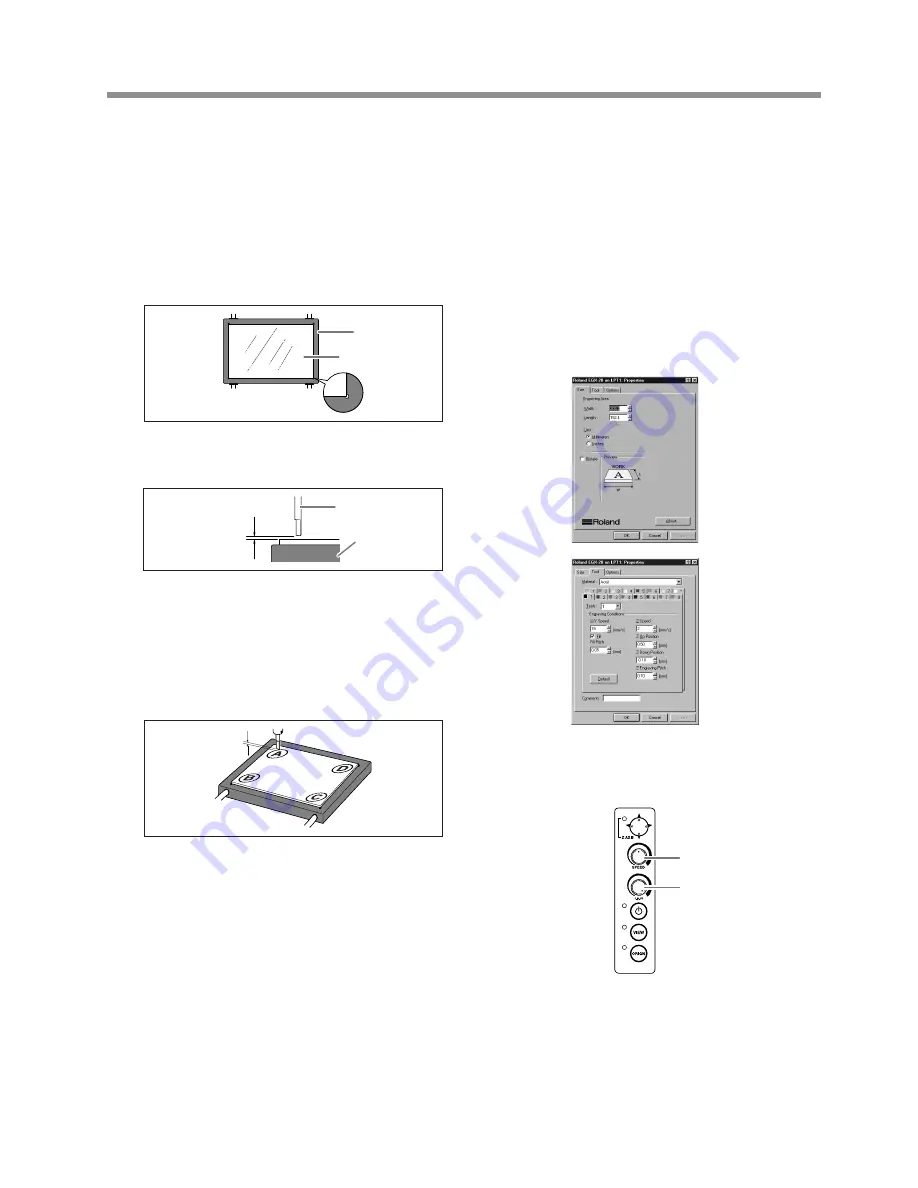
At the Dr. Engrave [File] menu, select [Print Setup],
then select [EGX-20]. Click [Properties].
9.
Make the settings for cutting parameters such as
[Engraving Area] and [Material] as follows, then click
[OK].
[Engraving Area]:
Width 203.2 mm (8 in.), length 152.4 mm (6 in.)
[Material]:
The composition of the attached panel ([Acrylic] or the like)
[Z Down Position]:
-1 mm
10.
Set the machine's Speed control at its central posi-
tion and the Spindle Speed control at the maximum
setting.
11.
At the Dr. Engrave [File] menu, select [Print], then
click [OK].
Surfacing starts.
1.
Follow the procedure in "4. Creating a Relief (3D
Cutting Mode)" to detach the depth regulator unit and
install the cutter (ZEC-A2320).
2.
Use the double-sided tape to attach the acrylic panel
to the table securely.
Align the corners of the panel with the holes at the four corners
of the table. Attach the panel securely so that it does not slip
or come loose.
3.
Lower the cutter to a height about 1 mm (0.04 in.) from
the surface of the panel.
4.
Move the cutter to each of the four corners of the panel
(A through D) to determine the corner where the clear-
ance is the smallest.
If this is difficult to determine, try slipping a stack of several
sheets of paper in the gap between the cutter and the panel. Use
the number of sheets of paper that can pass through the gap as
an indicator for determining the amount of clearance.
5.
Move the cutter to the corner that you determined in
step 4 to have the smallest clearance, and make the
setting for the height origin point at the surface of the
panel.
6.
Move the cutter all the way to the front left of the table
and make the setting for the origin point for the vertical
and horizontal dimensions at that location.
7.
Start the included Dr. Engrave program and open the
attached "sample1.ded" file.
The sample1.ded file is on the drive where you installed Dr. En-
Table
Acrylic panel
Speed control
Spindle
Speed control
About 1mm
(0.04 in)
Cutter
Acrylic panel
Clearance
41
5 More Advanced Operations
Summary of Contents for EGX-20
Page 51: ......


