46
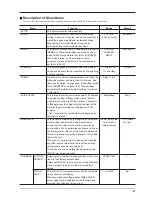
Key
Function
Range
Default
PRESET
This calls up user-set cutting conditions matched to the
Preset 1 to 8
–
tool and material in use.
FORCE
This sets the force for the blade during cutting.
20 to 350gf
50gf
Perform a cutting test and set the conditions to match
(10gf step)
the loaded material and the installed blade.
SPEED
This sets the speed for the blade during cutting.
1 to 85 cm/s
50 cm/s
Perform a cutting test and set the conditions to match
(1 cm/s step)
the loaded material and the installed blade.
CURSOR
These move the material and the carriage.
–
–
[
] [
] [
] [
]
When a menu is displayed, these change the menu
items and setting values.
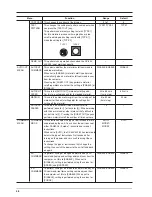
PAUSE
This pauses cutting. The PAUSE LED lights up while
–
–
operation is paused. Pressing this a second time
cancels the paused state. To quit cutting, hold down
[ENTER] for 0.5 seconds or longer.
This key is also effective when performing material
feed using the [AREA MOVE] menu.
MENU
This enters the menu mode.
–
–
In the menu mode, use the [
] and [
] keys to move
to the next menu, the [
] key to move to the setting
screen, and the [
] key to move to the previous
screen.
ENTER
This enables, runs, or stores the item shown on the
–
–
display.
ORIGIN
Holding down this key for 0.5 seconds or longer sets
–
–
the origin point at the present blade position (the blade
center).
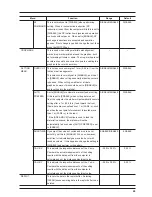
SHEET CUT
Holding down this key for 0.5 seconds or longer cuts
–
–
off the material at the present position of the separating
knife. Press this to sever an already-cut piece of
material from a roll of material. Severing cannot be
performed while cutting is in progress.
TEST CUT
Holding down this key for 0.5 seconds or longer
–
–
performs a cutting test at the present blade position.
For more information, see “4-3 Adjusting the Blade
Force and Cutting Speed.”
MENU + Power on
This sets the language for messages on the display.
/ ENGLISH/
ENGLISH
(LANGUAGE)
You can select from among seven languages:
PORTUG / ITALIANO/
Japanese, English, Portuguese, Italian, Spanish,
ESPAÑOL / FRANÇE/
French, and German.
Deutsch
Power on
This selects the type of material to use and enables the
ROLL/PIECE/
–
(SELECT SHEET)
setup state. For more information, see “5-2 Details of
F-EDGE/R-EDGE
the Origin-point Location and Cutting Area.”
7-3 List of Functions
Control-key Functions
This describes the functions of the control keys when pressed.
Summary of Contents for CX-300
Page 21: ...21 POWER ERROR LED goes out 4 Turn off the power ...
Page 63: ...63 MEMO ...
Page 64: ...R5 020403 ...

