22
www.rinnai.it
CLEANING AND USER’S MAINTENANCE
ATTENTION
: An annual maintenance should be made to preserve the boiler integrity and to keep
safety, efficiency and reliability unchanged. Refer to the instructions described in the maintenance
section of this manual and contact the Rinnai service.
Always keep the boiler clean.
Unplug the boiler and turn the main gas valve off before to
proceed with any cleaning or maintenance.
Clean the chassis and the remote controller using soft cloth only.
After maintenance (or cleaning), check to ensure that all the
components of the boiler are intact and connected in the correct
way. Exhaust gas leakage could be harmful for health or result in
death.
If the CH return filter or the DHW inlet filter are clogged up, it could decrease the performance of the boiler
and shorten its service life. The user should clean the two filters regularly to preserve a proper operation and
to prevent the appliance failure.
CLEANING THE CH RETURN FILTER
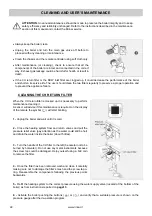
When the CH return filter is clocked up it is necessary to perform
maintenance cleaning it.
A sensor will advise if this maintenance is required: on the display
of the remote the symbol ( ) will start blinking.
1 -
Unplug the boiler and wait until it is cold.
2 -
Close the heating system flow and return valves and pull the
pressure relief valve (pay attention as the water could still be hot)
and drain the water inside the boiler (about 5 litres).
3 -
Turn the handle of the CH filter to the left (be careful not to be
burned by hot water). Do not use any metal instruments because
the screw top could be damaged. Help yourself using a 5c€ coin
to remove the filter.
4 -
Once the filter has been removed wash and clean it carefully
making sure not to damage the filter’s mesh and the screw tap o-
ring. Reassemble the components following the previous points
backwards.
5 -
Refill the heating system to the correct pressure using the water supply valve (located at the bottom of the
boiler) as from instructions reported on
page13
.
6 -
Activate the boiler pushing the buttons
( ) or ( ) and verify that a suitable pressure is shown on the
pressure gauge after the de-aeration program.
Summary of Contents for Mirai 24
Page 1: ......
Page 2: ...2 www rinnai it ...
Page 11: ...www rinnai it 11 MAIN COMPONENTS ...
Page 12: ...12 www rinnai it MAIN COMPONENTS ...
Page 30: ...30 www rinnai it MAIN COMPONENTS ...
Page 31: ...www rinnai it 31 GENERAL SCHEME AND OPERATION PRINCIPLES ...
Page 38: ...38 www rinnai it INSTALLATION Type C room sealed forced flue application ...
Page 55: ...www rinnai it 55 WIRING DIAGRAM ...
Page 56: ...56 www rinnai it DIAGNOSIS POINT ...
Page 57: ...www rinnai it 57 TECHNICAL DATA ...
Page 59: ...www rinnai it 59 COMBUSTION PARAMETERS ...
Page 61: ...www rinnai it 61 DATA PLATE ...
Page 62: ...62 www rinnai it CE CERTIFICATE ...
Page 63: ...www rinnai it 63 ...


