background image

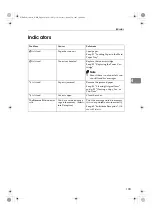
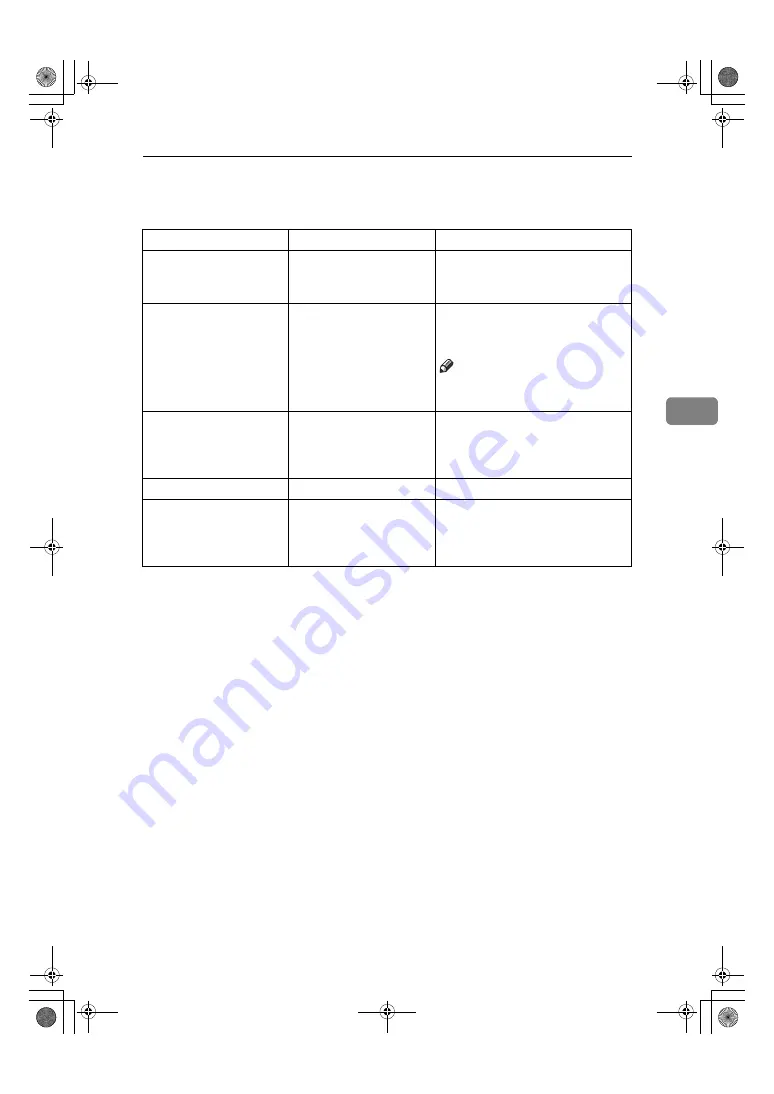
Indicators

103

4

Indicators

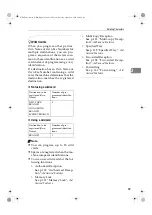
Problem

Causes

Solutions

B

 is lit red.

Paper has run out

Load paper. 

See p.91 “Loading Paper in the Main 
Paper Tray”.

D

 is lit red.

Toner is exhausted

Replace the toner cartridge.

See p.92 “Replacing the Toner Car-
tridge”.

Note

Even if there is no toner left, you 
can still send fax messages.

h

 is lit red.

Paper is jammed

Remove the jammed paper.

See p.98 “Clearing Original Jams” 
and p.99 “Clearing a Copy, Fax, or 
Print Jam”.

h

 is lit red.

Cover is open

Close the cover.

The 

Receive File

 indicator 

is lit.

You have received a mes-
sage into memory. (Substi-
tute Reception)

Print the message stored in memory 
if it is not printed out automatically.

See p.69 “Substitute Reception”, 

Ad-

vanced Features

.

StellaF26_combine_F-GB_FM_forPaper.book  Page 103  Tuesday, January 16, 2007  10:08 AM

Summary of Contents for 4430NF

Page 1: ...ckness 2 4 640000 mm Operating Instructions Basic Features Operating Instructions Basic Features Operating Instructions Basic Features For safe and correct use of this machine please be sure to read t...

Page 2: ...ions and interlock mechanisms have been designed to prevent any possible laser beam exposure to the operator The following marking is attached on the back of the product Two kinds of size notation are...

Page 3: ...on CD ROM 17 NIC FAX Unit CD ROM Manual 17 1 Getting Started Guide to Components 19 Front View 19 Side View 21 Control Panel 22 Reading the Display 25 Reading the Display and Using Keys 25 Standby Dis...

Page 4: ...bers Directly 47 Pause 48 Tone 48 Using Quick Dials 49 Using Speed Dials 50 Using Group Dials 51 When specifying a group with a Quick Dial 52 When specifying a group with the Group Key 52 Reception Mo...

Page 5: ...oubleshooting Loading Paper in the Main Paper Tray 91 Replacing the Toner Cartridge 92 Toner Cartridge Storage 95 Adjusting Volume 96 Clearing Original Jams 98 Clearing a Copy Fax or Print Jam 99 Erro...

Page 6: ...iv StellaF26_combine_F GB_FM_forPaper book Page iv Tuesday January 16 2007 10 08 AM...

Page 7: ...res to prevent many sheets of paper from being printed out if fax messages are received during the night or on holidays p 138 Energy Save Timer Advanced Features to block out unwanted messages p 118 A...

Page 8: ...d p 163 Personal Boxes Advanced Features to restrict access to the machine to specified us ers p 28 Restricted Access to monitor machine usage by user or depart ment p 28 Restricted Access and p 9 Use...

Page 9: ...lected eye contact with the laser beam may cause serious eye damage Safety precautions and interlock mechanisms have been designed to prevent any possible laser beam exposure to the operator R WARNING...

Page 10: ...n flame Disposal can take place at our authorized dealer Dispose of the used toner cartridge in accordance with the local regulations Keep the machine away from flammable liquids gases and aero sols A...

Page 11: ...machine Keep toner used or unused and toner cartridge out of reach of children For environmental reasons do not dispose of the machine or expended supply waste at household waste collection points Dis...

Page 12: ...chine failure Make sure the room where you are using the machine is well ventilated and spacious Good ventilation is especially important when the machine is used heavily Do not open toner cartridges...

Page 13: ...an result from heavy accumulation of dust inside this machine Consult your service representative for details about and charges for cleaning the machine s interior If you have to move the machine when...

Page 14: ...low the instructions and handle the machine as indicated The inside of the machine becomes very hot Do not touch the inside Doing so could result in a burn High temperature Be careful of hot parts whe...

Page 15: ...s treated correctly and help to reduce potential impacts on the environment and human health which could otherwise result from inappropriate handling Recy cling of products helps to conserve natural r...

Page 16: ...rogram encourages energy conservation by promoting energy efficient computers and other office equipment The program backs the development and dissemination of products that feature energy saving func...

Page 17: ...ergy Saver mode and take the appropriate ac tion 1 When options are not installed You can turn Energy Saver mode on or off with the User Parameters By default Energy Saver Standby is turned on The mac...

Page 18: ...ear Modes key and check that Ready is shown on the display Reception in Energy Saver mode In Energy Saver mode originals that have been stored in memory are still sent and the machine can still receiv...

Page 19: ...to form inside the machine This can result in patchy output In this case wait a while before reattempting copying or requesting a fax be sent again Important Make sure that 100 appears on the display...

Page 20: ...receives a A4 size document the A4 size image will be reduced to A5 size and printed on A5 paper For further information see p 79 When There Is No Paper of the Correct Size Advanced Features StellaF26...

Page 21: ...under this symbol Be sure to read the instructions all of which are described in the Safety Information section The statements above are notes for your safety Important If this instruction is not foll...

Page 22: ...s shown as L Portrait direction for paper in the paper tray is shown as K and landscape di rection for paper in the paper tray is shown as L Note represents originals or paper Reference For details ab...

Page 23: ...on the en vironment or language you use System requirements To run this CD ROM manual you need the following System Windows 95 Windows 98 Windows Me Windows NT 4 0 Win dows 2000 or Windows XP However...

Page 24: ...18 StellaF26_combine_F GB_FM_forPaper book Page 18 Tuesday January 16 2007 10 08 AM...

Page 25: ...e stacked here 5 Control panel Operate the machine using keys and watching the display on the control pan el 6 Front cover Open this cover when changing the toner cartridge and the photo conductor uni...

Page 26: ...when an error occurs Check the display and read the mes sage to identify the problem such as a paper jam or an open the cover 0Communicating Lights during fax transmission or re ception 12 Right cove...

Page 27: ...hours or longer all docu ments stored in memory are delet ed 3 Ventilation Hole Prevents overheating Do not obstruct the ventilation hole by placing an object near it If the machine overheats a mal fu...

Page 28: ...Press to answer Yes to a question dis played on the display 8 Job Information key Press to search for information about a specific job 9 Trans Option key Press to change the transmission option setti...

Page 29: ...Note Make sure the plate is flat against the control panel when you use Quick Dial keys 17 Stamp key Press this key to switch the Stamp func tion on See p 53 Stamp Advanced Fea tures 18 Original Type...

Page 30: ...he first digit See p 48 Pause Redial Press to redial one of the last ten numbers See p 44 Redial Advanced Features 24 Number keys Use to dial fax numbers or enter the number of copies 25 Start key Pre...

Page 31: ...y Display A Display for the machine status or currently selected function B Display for the messages Items which can be selected or specified Menu Display A Display for items which can be selected B P...

Page 32: ...ver Clear Modes key If you are in User Tools mode press the User Tools key or the Cancel key Communication Display While the machine is communicating the status is displayed Memory Transmission The de...

Page 33: ...e is not used for a fixed period the machine goes into Energy Saver Mode automatically Exiting Energy Saver Mode To exit Energy Saver mode manually In Energy Saver Standby mode press the Energy Saver...

Page 34: ...estricted Access display is shown Restricted Access Use this function to restrict access to the machine or monitor machine usage by user or department When turned on users must enter a previously assi...

Page 35: ...y B Turn on the power Turning Off the Power Important Make sure that 100 appears on the display before you turn off the power If the power is turned off for 12 hours or longer all docu ments stored in...

Page 36: ...Getting Started 30 1 StellaF26_combine_F GB_FM_forPaper book Page 30 Tuesday January 16 2007 10 08 AM...

Page 37: ...emory Important Make sure that 100 appears on the display before you turn off the power If the power is turned off for 12 hours or longer all docu ments stored in memory are delet ed As soon as the po...

Page 38: ...ear Modes key is pressed with the User Pa rameters switch 00 bit 6 See p 140 User Parameters Advanced Features You can set whether the Transmis sion mode returns to the default af ter each transmissio...

Page 39: ...nding an important origi nal we recommend that you ask the receiver about the size and ori entation of the paper used in their terminal Make sure that all ink correcting fluid etc has completely dried...

Page 40: ...d flatten it before you place it Reference For information about the sizes and number of originals that can be placed in the ADF see p 200 Acceptable Types of Originals Advanced Features A Adjust the...

Page 41: ...ginals such as OHP transparencies or translucent paper Originals with pencil writing on the back Note To avoid damage to important originals through mishaps such as paper jams we recommend that you pl...

Page 42: ...rs on the display Memory Transmis sion is disabled Use Immediate Transmission instead Note Maximum number of destinations per Memory Transmission 250 The maximum number of destina tions awaiting Memor...

Page 43: ...rameters switch 09 bit 6 See p 140 Us er Parameters Advanced Fea tures When one G3 line is set as the PSTN line Outside and the other as the PABX line Exten sion you need to choose which line you use...

Page 44: ...ter the other B Press the OK key C Remove the original Reference p 98 Clearing Original Jams During Transmission Use this procedure to cancel a trans mission after the original has been scanned Note I...

Page 45: ...ay reappears While Awaiting Transmission Use this procedure to cancel a trans mission after the original has been scanned Note If transmission finishes while you are carrying out this procedure it wil...

Page 46: ...keys or search using 0 or 1 If you are unable to find the file it has already been sent D Press the OK key E Press 0 or 1 to select Yes F Press the OK key The file is deleted and the standby display r...

Page 47: ...mediate Transmission cannot be used See p 136 Backup File Transmission Settings Advanced Features A Check that the Memory Trans mission indicator is not lit If it is lit press the Memory Trans key B P...

Page 48: ...ouldNotBe Made If it is not possible to make a connec tion with the number you specified because the line was busy or there was a line problem the machine redi als automatically When you want to remov...

Page 49: ...ing the original from the machine After Pressing the Start Key A Press the Clear Stop key and then remove the original Note If the transmission finishes while you are carrying out this proce dure it w...

Page 50: ...inals containing nor mal sized characters Detail 8 7 7 lines mm 200 200 dpi Select for originals containing small characters or when you re quire greater clarity This resolu tion is twice as fine as S...

Page 51: ...User Parameters switch 00 bit 5 4 See p 140 User Parameters Advanced Features A Press the Resolution key to switch between resolutions The indicators above the key show the current selection Note Whe...

Page 52: ...he mode for Halftone with the User Parameters switch 10 bit 7 See p 140 User Parame ters Advanced Features Changing Scan Settings When scanning multiple originals us ing the ADF you can set scan setti...

Page 53: ...press the Clear Stop key and enter again If you want to send this mes sage to more than one destina tion press the OK key and then enter the next destination C Press the Start key Limitations When Di...

Page 54: ...iles have been sent and their fax numbers are deleted from memory additional fax numbers can be dialed The display shows the percentage of free space in memory for storing documents Since fax numbers...

Page 55: ...the User Function key F1 to F10 in which Tone is pro grammed D Enter a code number for receiving a special service with the number keys Note The entered number will be sent by tonal signals Using Qui...

Page 56: ...Speed Dial key and a Speed Dial code 000 to 199 Preparation You must program the destina tion s fax number in a Speed Dial beforehand Additionally you can program a name for the destina tion in the Sp...

Page 57: ...ed When not programmed in a Quick Dial Use the User Function key Group Dial is assigned to F3 as a de fault If this setting is changed program the Group function in a User Function key F1 to F10 See p...

Page 58: ...ey and try again If you want to dial another des tination press the OK key and then dial another fax number D Press the Start key When specifying a group with the Group Key Note Group Dial is assigned...

Page 59: ...rogrammed the group name is also dis played If you want to specify another Group press the OK key and then repeat step C above If you make a mistake press the Clear Stop key The display will return to...

Page 60: ...ing call and then it starts receiving Selecting the Reception Mode Select the Reception Mode using the following procedure Note When the optional extra G3 inter face unit is installed only Auto Re cei...

Page 61: ...ourself and decide whether it is a fax or a telephone call The procedure for answering a call is as follows A Pick up the handset of the exter nal telephone and listen to the other end B If you hear a...

Page 62: ...Faxing 56 2 StellaF26_combine_F GB_FM_forPaper book Page 56 Tuesday January 16 2007 10 08 AM...

Page 63: ...be printed on the mes sage received by the other party Own Fax Number Required by inter national law This is your fax machine s phone number that must include country and area codes using up to 20 cha...

Page 64: ...key D Press 0 or 1 until 3 Setup is displayed E Press the OK key F Press 0 or 1 until 6 Fax Infor mation is displayed G Press the OK key Confirm that 1 Own Name is displayed H Press the OK key I Enter...

Page 65: ...steps K to N O Press the User Tools key The standby display reappears Editing A Press the User Tools key B Press 0 or 1 until 2 Fax Fea tures is displayed C Press the OK key D Press 0 or 1 until 3 Se...

Page 66: ...s displayed C Press the OK key D Press 0 or 1 until 3 Setup is displayed E Press the OK key F Press 0 or 1 until 6 Fax Infor mation is displayed G Press the OK key H Press 0 or 1 to select the item th...

Page 67: ...layed E Press the OK key F Press 2 2 2 2 G Press the OK key H Press 0 or 1 until 13 G3 Ana log Line is displayed Note The code for each function that appears on the display varies depending on the ins...

Page 68: ...is displayed Note The code for each function that appears on the display varies depending on the installed op tions I Press the OK key Confirm that 1 Own Fax No is displayed J Press the OK key The pro...

Page 69: ...or 1 until 13 G3 Ana log Line is displayed Note The code for each function that appears on the display varies depending on the installed op tions I Press the OK key Confirm that 1 Own Fax No is displa...

Page 70: ...s that the other par ty receives Important We recommend that you print the Quick Dial list and keep it when you program or change fax num bers See p 105 Reports Lists Advanced Features Note When a pro...

Page 71: ...layed Press 0 or 1 to se lect a Quick Dial that is not pro grammed and then press the OK key G Press the OK key H Enter a fax number with the number keys Note If you make a mistake press the Clear Sto...

Page 72: ...ber of parties located in other coun tries If this happens simply de lete the garbled characters using 0 or 1 and the Clear Stop keys and then enter the destina tion name K Press the OK key L Press 0...

Page 73: ...ck Dial key or search using 0 or 1 G Press the OK key If you do not edit the number pro ceed to step I H Press the Clear Stop key and then reenter the fax number with the number keys Note If you make...

Page 74: ...d L Press 0 or 1 to select either On or Off M Press the OK key N Press 0 or 1 to select Hdr 1 or Hdr 2 O Press the OK key If you want to edit another Quick Dial proceed to step E P Press the User Tool...

Page 75: ...plate that can be used to make labels for Quick Dial keys The template will have the des tination or Group names pro grammed in Quick Dial keys on it A Press the User Tools key B Press 0 or 1 until 2...

Page 76: ...y number The number of the Quick Dial key the destination is programmed in 2 Destination The other party s name or Group name programmed in the Quick Dial GFFORM1E StellaF26_combine_F GB_FM_forPaper b...

Page 77: ...am When a program is stored on the Quick Dial key the name is printed 5 The contents of the User Function keys The contents of the User Function keys is printed 6 FAX HEADER1 and FAX HEADER2 The name...

Page 78: ...ge when it is re ceived at the other end The name will be printed at the top of the page and will be preceded by To See p 56 Label Inser tion Advanced Features Telephone Directory search let ter You c...

Page 79: ...the Speed Dial you want to program 000 to 199 Enter the Speed Dial number with the number keys or search using 0 or 1 Note If you make a mistake press the Clear Stop key and try again If a Speed Dial...

Page 80: ...e OK key If you do not program the destina tion name proceed to step L K Enter the destination name Reference p 87 Entering Characters L Press the OK key M Enter the search letter A a to Z z for Telep...

Page 81: ...r with the number keys or search using 0 or 1 H Press the OK key If you do not edit the number pro ceed to step J I Press the Clear Stop key and then reenter the fax number with the number keys Note I...

Page 82: ...another Speed Dial number proceed to step F S Press the User Tools key The standby display reappears Deleting A Press the User Tools key B Press 0 or 1 until 2 Fax Fea tures is displayed C Press the O...

Page 83: ...he number keys or search using 0 or 1 H Press the OK key The programmed data fax number and name is deleted If you want to delete another Speed Dial number proceed to step F I Press the User Tools key...

Page 84: ...l keys to program groups you will be able to program fewer Quick Dial keys Note You cannot program another function in a Quick Dial key al ready used for a group Also you cannot program groups in a Qu...

Page 85: ...f specified destination is 99 or less It is recommended that you print the Group Dial list and keep it when you program or change desti nations See p 105 Reports Lists Advanced Features If you program...

Page 86: ...ey I Specify the destination using one of the following three methods Enter the fax number with the number keys Press a Quick Dial key Press the Speed Dial key and then enter a Speed Dial number Note...

Page 87: ...P O Enter the Group name Reference p 87 Entering Characters P Press the OK key Q Press 0 or 1 to select whether to assign the Group to a Quick Dial key If you want to assign the Group to a Quick Dial...

Page 88: ...w destination Note When a programmed Group is be ing used for a standby Memory Transmission you cannot edit the group name or add destinations for the group A Press the User Tools key B Press 0 or 1 u...

Page 89: ...n See p 44 Redial Advanced Features L Press the OK key Confirm that Add is selected M To add another destination re peat steps J to L N If you finished adding a destina tion press the 0 or 1 to select...

Page 90: ...you want to edit another Group proceed to step F V Press the User Tools key The standby display reappears Deleting Note When a programmed Group is be ing used for a standby Memory Transmission you can...

Page 91: ...key Confirm that Yes is selected I Press the OK key J Press 0 or 1 to select Delete K Press the OK key L Press 0 or 1 to display the desti nation you want to delete M Press the OK key To delete anothe...

Page 92: ...ess 0 or 1 until 6 Delete Group Dial is displayed F Press the OK key G Display the number of the group you want to delete 1 to 9 Enter the group number with the number keys or search using 0 or 1 H Pr...

Page 93: ...illustration is for Type1 1 0 or 1 Use to move the cursor left or right and to select a symbol 2 OK key Press to program entered characters 3 Quick Dial keys Press these keys to enter upper and lower...

Page 94: ...displayed at the position of the cursor If there is a character at the cursor position the entered char acter is displayed before the char acter A Enter letters symbols or num bers Characters are ent...

Page 95: ...identifications You can use wild cards for the fol lowing functions Authorized Reception See p 118 Authorized Recep tion Advanced Features Memory Lock See p 121 Memory Lock Ad vanced Features Multi C...

Page 96: ...Programming 90 3 StellaF26_combine_F GB_FM_forPaper book Page 90 Tuesday January 16 2007 10 08 AM...

Page 97: ...aper or con ductive paper such as carbon pa per or silver coated paper Note You can load up to 250 sheets in the main paper tray Regarding paper types and sizes that can be used see p 201 Rec ommended...

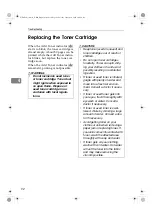
Page 98: ...ing your clothes or hands and possibly resulting in accidental ingestion If toner or used toner is inhaled gargle with plenty of water and move into a fresh air environ ment Consult a doctor if neces...

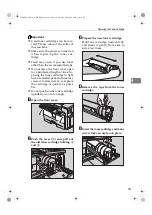
Page 99: ...nded period of time may cause it to deteriorate so replace the cartridge as quickly as possi ble Do not position the toner cartridge upside down or at an angle A Open the front cover B Push the lever...

Page 100: ...rrectly If the cover will not close re move the cartridge and set it again When Toner Runs Out Even if toner runs out and the Add Toner indicator D is lit transmis sion operations are possible Referen...

Page 101: ...not lay heavy objects on toner cartridge Do not incinerate used toner or toner cartridge Toner dust might ignite when exposed to an open flame Dispose of used toner cartridge in ac cordance with local...

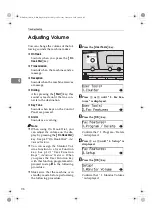
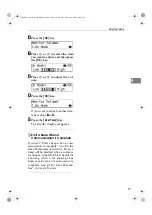
Page 102: ...pressing the On Hook Dial key See p 49 On Hook Dial Ad vanced Features You can assign the Monitor Vol ume function to a User Function key See p 101 User Function Keys Advanced Features When you press...

Page 103: ...ey The standby display reappears Emit a Beep When a Communication Is Complete If you set Emit a beep when a com munication is complete on with the User Parameters switch 01 bit 6 a beep will be emitte...

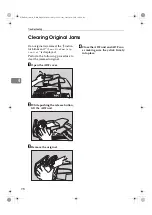
Page 104: ...ayed Perform the following procedure to clear the jammed original A Open the ADF cover B While pushing the release button lift the ADF unit C Remove the original D Close the ADF unit and ADF cov er ma...

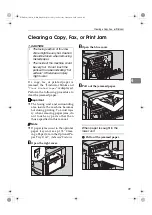
Page 105: ...anual Note If paper jams occur in the optional paper tray unit see p 173 Clear ing a Paper Jam in the Optional Pa per Tray Unit Advanced Features A Open the right cover B Open the blue cover C Pull ou...

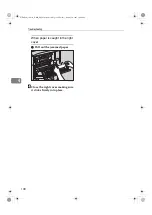
Page 106: ...0 4 When paper is caught in the right cover A Pull out the jammed paper D Close the right cover making sure it clicks firmly into place StellaF26_combine_F GB_FM_forPaper book Page 100 Tuesday January...

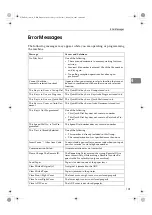
Page 107: ...uick Dial key does not contain a number This Quick Dial key does not contain a Keystroke Pro gram This Speed Dial No is Not Pro grammed This Speed Dial number does not contain a number This Dest is Al...

Page 108: ...ely blank document was scanned Check your document Time to Change PCU Replace the PCU Reset PCU Correctly The PCU is not set correctly Toner is Almost Empty The toner cartridge is nearly empty Replace...

Page 109: ...send fax messages h is lit red Paper is jammed Remove the jammed paper See p 98 Clearing Original Jams and p 99 Clearing a Copy Fax or Print Jam h is lit red Cover is open Close the cover The Receive...

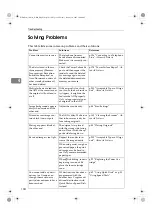
Page 110: ...nd appears dirty when received at the other end Adjust the scan density p 44 Scan Settings Printed or sent image con tains black lines or spots The ADF is dirty Make sure that ink or eraser is dry be...

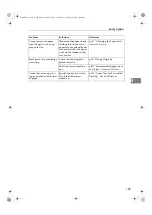
Page 111: ...es Some part of a copied image is missing Check that the original is placed correctly p 33 Placing Originals Select the correct sized pa per p 201 Recommended paper sizes and types Advanced Features C...

Page 112: ...top key After the original is has been scanned press the Job Infor mation key p 38 Canceling a Memory Trans mission You want to cancel Immedi ate Transmission Press the Clear Stop key p 43 Canceling a...

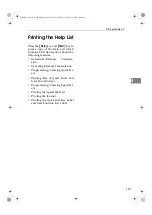
Page 113: ...es Immediate Memory Transmis sion Canceling Memory Transmission Programming Clearing Quick Di als Printing lists of Quick Dials and User Function keys Programming Clearing Speed Di als Printing the Sp...

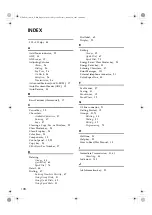
Page 114: ...8 Speed Dial 76 Detail 44 Dialing 47 Entering Numbers Directly 47 Using Group Dials 51 Using Quick Dials 49 Using Speed Dials 50 Dial label 69 Display 22 E Editing Groups 82 Quick Dial 67 Speed Dial 7...

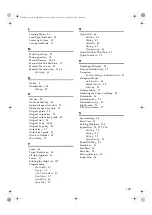
Page 115: ...elp List 107 Programming Fax Header 57 Groups 78 Own Fax Number 57 Own Name 57 Quick Dial 65 Speed Dial 73 Q Quick Dial 64 Deleting 68 Dialing 49 Dial label 69 Editing 67 Programming 65 Quick Dial Key...

Page 116: ...31 Trans Option key 22 Troubleshooting 91 Error Messages 101 TTI Fax Header 57 U User Function keys 22 User Tools key 22 V Ventilation Hole 21 Volume 96 W When Things Don t Go as Expected 106 Wild Ca...

Page 117: ...111 MEMO StellaF26_combine_F GB_FM_forPaper book Page 111 Tuesday January 16 2007 10 08 AM...

Page 118: ...112 GB GB H557 8201 MEMO StellaF26_combine_F GB_FM_forPaper book Page 112 Tuesday January 16 2007 10 08 AM...

Page 119: ...ions and interlock mechanisms have been designed to prevent any possible laser beam exposure to the operator The following marking is attached on the back of the product Two kinds of size notation are...

Page 120: ...ckness 2 4 640000 mm Operating Instructions Basic Features Operating Instructions Basic Features Operating Instructions Basic Features For safe and correct use of this machine please be sure to read t...

Reviews: