Chapter 2: Getting Started & Adjusting the Display
2-11
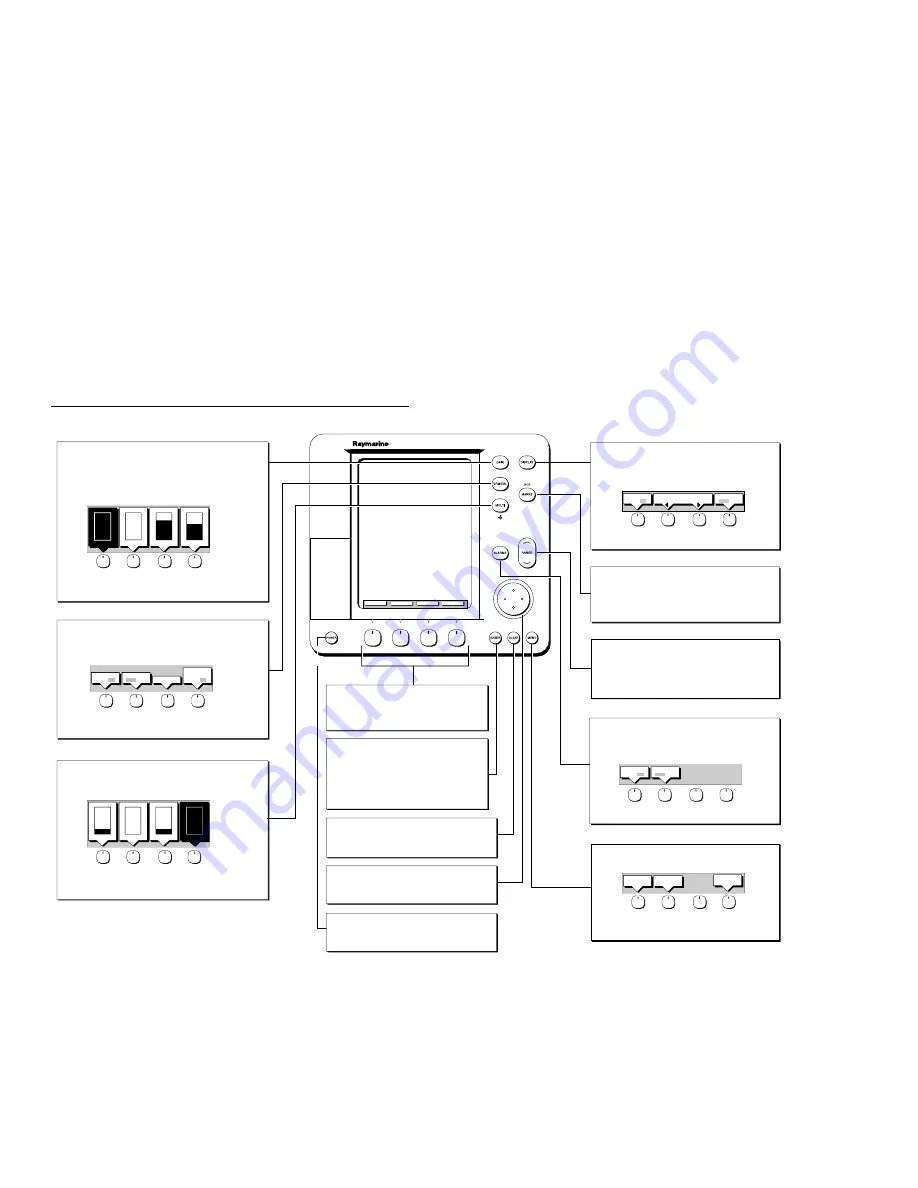
MULTI
Controls guard zone alarm sensitivity, and tuning the receiver.
Also controls display lighting and contrast.
- Press to display sliders.
Soft Key Labels:
Change when you press a key.
Default soft key labels are shown.
Trackpad
Controls cursor position on the screen, and also the sliders
and setup options.
Hold the trackpad down to move the cursor faster.
CLEAR
Cancels operation in progress and returns to the
previous display.
Deletes an object/function under cursor control.
ENTER
Confirms selection and (if appropriate) clears current
soft key labels. It performs the selected task, accepts
changes, or leads to display of more options.
When cursor text is displayed, takes cursor control
of the object.
When arrow-head cursor symbol is displayed, drops
the object under cursor control.
Soft keys
Press to select option, or highlight option or slider.
Labels change when you press soft/dedicated key.
Elipses (...) after the text indicate that pressing soft
key leads to a further display of soft key options.
POWER
Press and hold until unit beeps to turn on display.
Press to toggle between Standby and Transmit.
Press for 3 seconds to turn off display.
Press soft key to display required setup menu, then use trackpad
to select option and soft key to change setting.
Press
ENTER
to close menu, and
CLEAR
to to finish.
MENU
Provides access to setup options.
- Press to display soft keys.
DISPLAY
Controls display mode and windows.
- Press for display mode and soft keys display.
- Press again to toggle through display modes, and
ENTER
- Press and hold for 2 seconds for full page radar display.
MARKS / MOB
Controls placing marks, and Man Overboard function.
- Press to place mark at cursor or vessel position, and use
trackpad to move mark. Press
ENTER
to finish.
- Press and hold for 2 seconds to activate or cancel MOB.
VRM/EBL
Used to measure range and bearing to/between targets.
- Press to place VRM/EBL if one not already placed.
Adjust position using trackpad, and press
ENTER
to finish.
- Press to display soft keys if VRM/EBL already placed.
D5664_1
GAIN
Controls the presentation of radar targets.
GAIN controls for background noise (speckle).
SEA controls sea clutter.
RAIN controls rain clutter around the vessel.
FTC controls rain clutter at a distance.
- Press for soft keys display.
RANGE
Controls range scale. Range scale and range rings are
shown in the Status Bar.
- Press top of key to increase the range scale.
- Press bottom of key to decrease the range scale.
- Press and hold to change the scale faster.
ALARMS
Used to control guard zones.
- Press to place guard zone if one not already placed.
Adjust size/shape using trackpad, press
ENTER
to finish.
- Press to display soft keys if guard zone already placed.
Select a slider using the soft key or trackpad.
Toggle between Auto/Man or off/on by pressing soft key again.
Adjust slider using trackpad, and press
ENTER
to finish.
O
F
F
75%
O
F
F
RAIN
SEA
FTC
GAIN
MANUAL
MANUAL
Use soft key to toggle zone on or off.
Adjust size/shape using trackpad, and press
ENTER
to finish.
GUARD 1
OFF ON
GUARD 2
OFF ON
Use soft key to toggle VRM/EBL on or off.
Press FLOAT to access float options for existing VRM/EBL.
Press VRM/EBL DATABOX to toggle data box display off/on.
FLOAT!
VRM/EBL2
OFF ON
VRM/EBL1
OFF ON
VRM/EBL
DATABOX
OFF ON
Press soft key to toggle window on/off, or return to full screen.
Zoom: Move Zoom box using trackpad, press
ENTER
to finish.
SELECT
WINDOWS
WINDOWS
OFF ON
ZOOM
OFF ON
SYSTEM
SET UP¬
RADAR
SET UP¬
TUNE
O
F
F
A
U
T
O
25%
25%
ON
ALARM
LIGHT
CONTRAST
Select a slider using the soft key or trackpad.
Toggle between Auto/Man or off/on by pressing key again.
Adjust slider using trackpad, and press
ENTER
to finish.
60%
MARPA
SET UP¬
MARPA
SCREEN
HDG MODE
TARGETS
Summary of Contents for Pathfinder Radar
Page 3: ...hsb2 PLUS Series LCD Display Owner s Handbook Document number 81186_2 Date 14th December 2001 ...
Page 4: ......
Page 66: ...2 32 hsb2 PLUS Series LCD Display Displaying the Radar and Synchronizing Radar Chart ...
Page 154: ...6 12 hsb2 PLUS Series LCD Display Data Log Mode ...
Page 206: ...8 32 hsb2 PLUS Series LCD Display Transmitted Data ...
Page 212: ...9 6 hsb2 PLUS Series LCD Display Worldwide Support ...
Page 228: ...C 6 hsb2 PLUS Series LCD Display C MAP Chart Card Features ...


